本文对应项目的码云地址:https://gitee.com/wanchuanxy/AndroidHeroesTest/tree/master/3/SystemWidget
Android给我们提供了丰富的组件库来创建丰富的UI效果,同时也提供了非常方便的拓展方法。通过继承Android的系统组件,我们可以非常方便地拓展现有功能,在系统组件的基础上创建新的功能,甚至可以直接自定义一个控件,实现Android系统控件所没有的功能。自定义控件作为Android中一个非常重要的功能,一直以来都被初学者认为是代表高手的象征。其实,自定义View并没有想象中的那么难,与其说是在自定义一个View,不如说是在设计一个图形,只有站在一个设计者的角度上,才可以更好地创建自定义View。我们不能机械地记忆所有绘图的API,而是要让这些API为你所用,结合现实中绘图的方法,甚至是PhotoShop的技巧,才能设计出更好的自定义View。
适当地使用自定义View,可以丰富应用程序的体验效果,但滥用自定义View则会带来适得其反的效果。一个让用户觉得熟悉得控件,才是一个好的控件。如果一味追求炫酷的效果而创建自定义View,则会让用户觉得华而不实。而且,在系统原生控件可以实现功能的基础上,系统也提供了主题、图片资源、各种风格来创建丰富的UI。这些控件都是经过了Android一代代版本迭代后的产物。即使这样,在如今的版本中,依然存在不少Bug,更不要提我们自定义的View了。特别是现在Android ROM的多样性,导致Android的适配变得越来越复杂,很难保证自定义View在其他手机上也能达到你想要的效果。
当然,了解Android系统自定义View的过程,可以帮助我们了解系统的绘图机智。同时,在适当的情况下也可以通过自定义View来帮助我们创建更佳灵活的布局。
在自定义View时,我们通常会去重写onDraw()方法来挥着View的显示内容。如果该View还需要使用wrap_content属性,那么还必须写onMeasure()方法。另外,通过自定义attrs属性,还可以设置新的属性配置值。
在View中通常有以下一些比较重要的回调方法。
- onFinishInflate():从XML加载组件后回调。
- onSizeChanged():组件大小改变时回调。
- onMeasure():回调该方法来进行测量。
- onLayout():回调该方法来确定显示的位置。
- onTouchEvent():监听到触摸事件时回调。
当然,创建自定义View的时候,并不需要重写所有的方法,只需要重写特定条件的回调方法即可。这也是Android控件架构灵活性的体现。
通常情况下,有以下三种方法来实现自定义的控件。
- 对现有控件进行拓展
- 通过组合来实现新的控件
- 重写View来实现全新的控件
3.6.1 对现有控件进行拓展
这是一个非常重要的自定义View方法,它可以在原生控件的基础上进行拓展,增加新的功能、修改显示的UI等。一般来说,我们可以再原生控件的基础上进行拓展,增加新的功能、修改显示的UI等。一般来说,我们可以在onDraw()方法中对原生控件行为进行拓展。
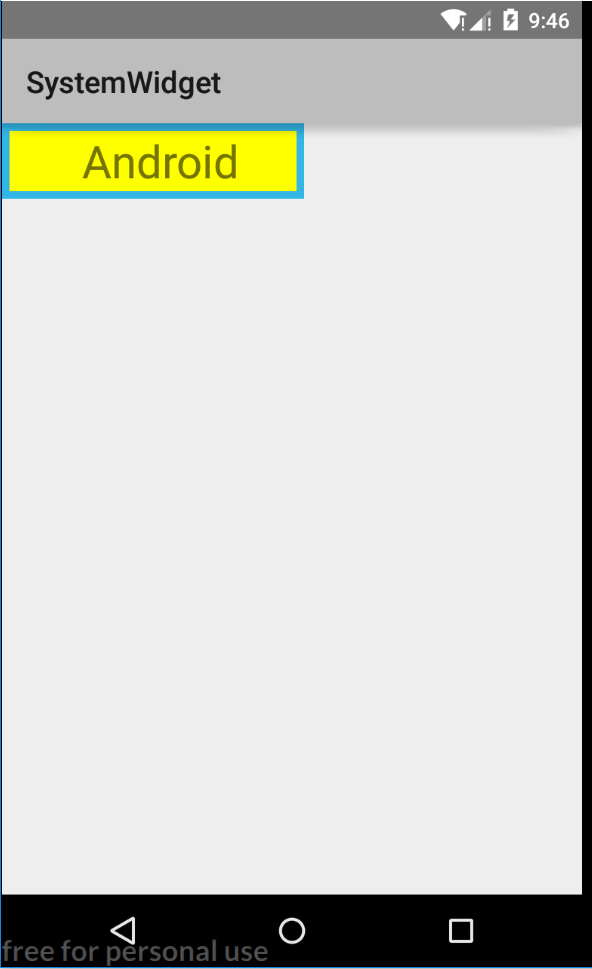
下面以一个TextView为例,来看看如何使用拓展原生控件的方法创建新的控件。比如想让一个TextView的背景更佳丰富,给其多绘制几层背景,如下图所示。
我们先来分析一下如何实现这个效果,原生的TextView使用onDraw()方法绘制要显示的文字。当继承了系统的TextView之后,如果不重写其onDraw()方法,则不会修改TextView的任何效果。可以认为在自定义的TextView中调用TextView类的onDraw()方法来绘制显示的文字,代码如下所示。
@Override
protected void onDraw(Canvas canvas) {
 super.onDraw(canvas);
}
程序调用super.onDraw(canvas)方法来实现原生控件的功能,但是在动用super.onDraw()方法之前和之后,我们都可以实现自己的逻辑,分别在系统绘制文字前后,完成自己的操作,即如下所示。
@Override
protected void onDraw(Canvas canvas) {
 //在调父类方法前,实现自己的逻辑,对TextView来说即是在绘制文本内容前
 super.onDraw(canvas);
 //在调父类方法后,实现自己的逻辑,对TextView来说即是在绘制文本内容后
}
以上就是通过改变控件的绘制行为创建自定义View的思路。有了上面的分析,我们就可以很轻松地实现上图所示的自定义TextView了。我们在构造方法中完成必要对象的初始化工作,如初始化画笔等,代码如下所示。
mPaint1 = new Paint();
mPaint1.setColor(Color.BLUE);
mPaint1.setStyle(Paint.Style.FILL);
mPaint2 = new Paint();
mPaint2.setColor(Color.YELLOW);
mPaint2.setStyle(Paint.Style.FILL);
而代码中最重要的部分则是在onDraw()方法中,为了改变原生的绘制行为,在系统调用super.onDraw(canvas)方法前,也就是在绘制文字之前,绘制两个不同大小的矩形,形成一个重叠效果,再让系统调用super.onDraw(canvas)方法,执行绘制文字的工作。这样,我们就通过改变控件绘制行为,创建了一个新的控件,代码如下所示。
//绘制外层矩形
canvas.drawRect(
 0,
 0,
 getMeasuredWidth(),
 getMeasuredHeight(),
 mPaint1);
//绘制内层矩形
canvas.drawRect(
 10,
 10,
 getMeasuredWidth() - 10,
 getMeasuredHeight() - 10,
 mPaint2);
canvas.save();
//绘制文字前平移10像素
canvas.translate(10,0);
//父类完成的方法,即绘制文本
super.onDraw(canvas);
canvas.restore();
此View全文(一些细节解析包含在注释中了):
package com.imooc.systemwidget;

import android.content.Context;
import android.graphics.Canvas;
import android.graphics.Color;
import android.graphics.Paint;
import android.util.AttributeSet;
import android.util.Log;
import android.widget.TextView;

//思路:1.准备画笔,2.绘制。完
public class MyTextView extends TextView {

    private Paint mPaint1, mPaint2;//声明画笔对象

    public MyTextView(Context context) {
        super(context);
        initView();
    }//三个重载构造函数

    public MyTextView(Context context, AttributeSet attrs) {
        super(context, attrs);
        initView();
    }

    public MyTextView(Context context, AttributeSet attrs,
                      int defStyleAttr) {
        super(context, attrs, defStyleAttr);
        initView();
    }

    private void initView() {  //准备画笔
        mPaint1 = new Paint();//准备画笔1
        mPaint1.setColor(getResources().getColor(
                android.R.color.holo_blue_light));
        mPaint1.setStyle(Paint.Style.FILL);

        mPaint2 = new Paint();//准备画笔2
        mPaint2.setColor(Color.YELLOW);
        mPaint2.setStyle(Paint.Style.FILL);
    }

    @Override
    protected void onDraw(Canvas canvas) {
        // 绘制外层矩形  drawRect乃绘制矩形的方法
        // 参数:public void drawRect(float left, float top, float right, float bottom, @NonNull Paint paint)
        // 按ctrl点击方法,自己看
        canvas.drawRect(
                0,
                0,
                getMeasuredWidth(),
                getMeasuredHeight(),
                mPaint1);
        // 绘制内层矩形
        canvas.drawRect(
                10,
                10,
                getMeasuredWidth() - 10,
                getMeasuredHeight() - 10,
                mPaint2);
        canvas.save();
        // 绘制文字前平移10像素
        // public void translate(float dx, float dy)
        //translate用于平移坐标系
        canvas.translate(10, 0);
        // 父类完成的方法,即绘制文本
        super.onDraw(canvas);
        canvas.restore();
        Log.d("MyTextView", "MyTextView_onDraw: ");
    }
}
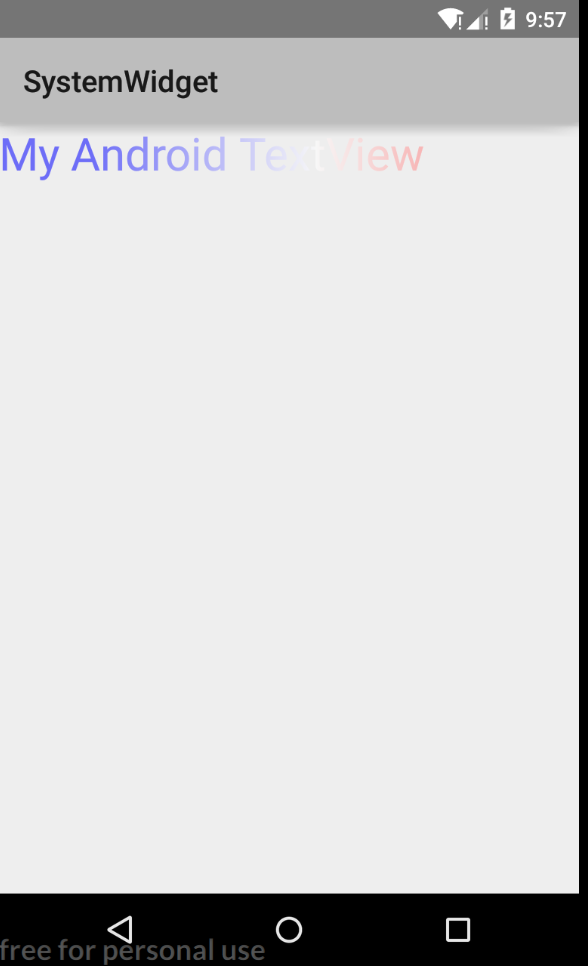
下面再来看一个稍微复杂一点的TextView。在前面一个实例中,我们直接使用了Canvas对象来进行图像的绘制,然后利用Android的绘图机制,可以绘制出更复杂丰富的图像。比如可以利用LinearGradient Shader 和Matrix来实现一个动态的文字闪动效果,程序运行效果如下图所示。
- 要想实现这个效果,可以充分利用Android中Paint对象的Shader渲染器。
- 通过设置一个不断变化的LinearGradient,并使用带有该属性的Paint对象来绘制要显示的文字。
- 首先,在onSizeChanged()方法中进行一些对象的初始化工作,并根据View的宽度设置一个LinearGradient渐变渲染器,代码如下所示。 (注意细节的注释)
 @Override
    protected void onSizeChanged(int w, int h, int oldw, int oldh) {
        Log.d(TAG, "onSizeChanged: ");
        super.onSizeChanged(w, h, oldw, oldh);
        if (mViewWidth == 0) {
            mViewWidth = getMeasuredWidth();
            if (mViewWidth > 0) {
                mPaint = getPaint();
                mLinearGradient = new LinearGradient(  //gradient.梯度|LinearGradient是一个渐变渲染器!!!
                        0,
                        0,
                        mViewWidth,
                        0,
                        new int[]{
                                Color.BLUE, 0xffffffff,
                                Color.RED},
                        null,
                        Shader.TileMode.CLAMP);

//                 Create a shader that draws a linear gradient along a line.
//                 @param x0           The x-coordinate for the start of the gradient line
//                 @param y0           The y-coordinate for the start of the gradient line
//                 @param x1           The x-coordinate for the end of the gradient line
//                 @param y1           The y-coordinate for the end of the gradient line
//                 @param  colors      The colors to be distributed along the gradient line         用于设置渐变中的色彩
//                 @param  positions   May be null. The relative positions [0..1] of
//                 each corresponding color in the colors array. If this is null,
//                 the the colors are distributed evenly along the gradient line.颜色沿着梯度线均匀分布
//                 @param  tile        The Shader tiling mode
//
//    public LinearGradient(float x0, float y0, float x1, float y1, int colors[], float positions[],
//                Shader.TileMode tile)

                mPaint.setShader(mLinearGradient);//设置渲染器
                mGradientMatrix = new Matrix();
//                Log.d(TAG, "onSizeChanged: ");
//                String i ="88888888888";
            }
        }
    }
其中最关键的就是使用getPaint()方法获取当前绘制TextView的Paint对象,并给这个Paint对象设置原生TextView没有的LinearGradient属性。最后,在onDraw()方法中,通过矩形的方式来不断平移渐变效果,从而在绘制文字时,产生动态的闪动效果,代码如下所示。 (注意细节的注释)
    @Override
    protected void onDraw(Canvas canvas) {
        super.onDraw(canvas);
        Log.d(TAG, "onDraw:000000 "+i);
        if (mGradientMatrix != null) {
            mTranslate += mViewWidth / 5;
//            Log.d(TAG, "onDraw: ");
            if (mTranslate > 2 * mViewWidth) {
                mTranslate = -mViewWidth;
            }
            mGradientMatrix.setTranslate(mTranslate, 0);//平移矩阵
            mLinearGradient.setLocalMatrix(mGradientMatrix);//通过设置平移的矩阵来平移渐变效果
            postInvalidateDelayed(100);//延时0.1s
//            Log.d(TAG, "onDraw2222: ");
        }
    }
}
onDraw()思路简析:
本View.java全文:
package com.imooc.systemwidget;

import android.content.Context;
import android.graphics.Canvas;
import android.graphics.Color;
import android.graphics.LinearGradient;
import android.graphics.Matrix;
import android.graphics.Paint;
import android.graphics.Shader;
import android.util.AttributeSet;
import android.util.Log;
import android.widget.TextView;

public class ShineTextView extends TextView {

    private LinearGradient mLinearGradient;
    private Matrix mGradientMatrix;
    private Paint mPaint;
    private int mViewWidth = 0;
    private int mTranslate = 0;
    private final String TAG = "ShineTextView";
    private String i = "0" ;

    public ShineTextView(Context context, AttributeSet attrs) {
        super(context, attrs);
    }

    @Override
    protected void onSizeChanged(int w, int h, int oldw, int oldh) {
        Log.d(TAG, "onSizeChanged: ");
        super.onSizeChanged(w, h, oldw, oldh);
        if (mViewWidth == 0) {
            mViewWidth = getMeasuredWidth();
            if (mViewWidth > 0) {
                mPaint = getPaint();
                mLinearGradient = new LinearGradient(  //gradient.梯度|LinearGradient是一个渐变渲染器!!!
                        0,
                        0,
                        mViewWidth,
                        0,
                        new int[]{
                                Color.BLUE, 0xffffffff,
                                Color.RED},
                        null,
                        Shader.TileMode.CLAMP);

//                 Create a shader that draws a linear gradient along a line.
//                 @param x0           The x-coordinate for the start of the gradient line
//                 @param y0           The y-coordinate for the start of the gradient line
//                 @param x1           The x-coordinate for the end of the gradient line
//                 @param y1           The y-coordinate for the end of the gradient line
//                 @param  colors      The colors to be distributed along the gradient line         用于设置渐变中的色彩
//                 @param  positions   May be null. The relative positions [0..1] of
//                 each corresponding color in the colors array. If this is null,
//                 the the colors are distributed evenly along the gradient line.颜色沿着梯度线均匀分布
//                 @param  tile        The Shader tiling mode
//
//    public LinearGradient(float x0, float y0, float x1, float y1, int colors[], float positions[],
//                Shader.TileMode tile)

                mPaint.setShader(mLinearGradient);//设置渲染器
                mGradientMatrix = new Matrix();
//                Log.d(TAG, "onSizeChanged: ");
//                String i ="88888888888";
            }
        }
    }

    @Override
    protected void onDraw(Canvas canvas) {
        super.onDraw(canvas);
        Log.d(TAG, "onDraw:000000 "+i);
        if (mGradientMatrix != null) {
            mTranslate += mViewWidth / 5;
//            Log.d(TAG, "onDraw: ");
            if (mTranslate > 2 * mViewWidth) {
                mTranslate = -mViewWidth;
            }
            mGradientMatrix.setTranslate(mTranslate, 0);//平移矩阵
            mLinearGradient.setLocalMatrix(mGradientMatrix);//通过设置平移的矩阵来平移渐变效果
            postInvalidateDelayed(100);//延时0.1s
//            Log.d(TAG, "onDraw2222: ");
        }
    }
}

/*
postInvalidateDelayed(100);线程刷新,0.1s一刷,每刷调用onDraw一次****反复不停地调用onDraw()
07-16 07:19:59.949 28857-28857/com.example.helloworld D/ShineTextView: onDraw:000000
07-16 07:19:59.949 28857-28857/com.example.helloworld D/ShineTextView: onDraw:
07-16 07:20:00.065 28857-28857/com.example.helloworld D/ShineTextView: onDraw:000000
07-16 07:20:00.065 28857-28857/com.example.helloworld D/ShineTextView: onDraw:
07-16 07:20:00.181 28857-28857/com.example.helloworld D/ShineTextView: onDraw:000000
07-16 07:20:00.181 28857-28857/com.example.helloworld D/ShineTextView: onDraw:
07-16 07:20:00.298 28857-28857/com.example.helloworld D/ShineTextView: onDraw:000000
07-16 07:20:00.298 28857-28857/com.example.helloworld D/ShineTextView: onDraw:
07-16 07:20:00.414 28857-28857/com.example.helloworld D/ShineTextView: onDraw:000000
07-16 07:20:00.414 28857-28857/com.example.helloworld D/ShineTextView: onDraw:
07-16 07:20:00.532 28857-28857/com.example.helloworld D/ShineTextView: onDraw:000000
07-16 07:20:00.532 28857-28857/com.example.helloworld D/ShineTextView: onDraw:
07-16 07:20:00.648 28857-28857/com.example.helloworld D/ShineTextView: onDraw:000000
07-16 07:20:00.649 28857-28857/com.example.helloworld D/ShineTextView: onDraw:
07-16 07:20:00.764 28857-28857/com.example.helloworld D/ShineTextView: onDraw:000000
07-16 07:20:00.764 28857-28857/com.example.helloworld D/ShineTextView: onDraw:
07-16 07:20:00.881 28857-28857/com.example.helloworld D/ShineTextView: onDraw:000000
07-16 07:20:00.881 28857-28857/com.example.helloworld D/ShineTextView: onDraw:
07-16 07:20:00.997 28857-28857/com.example.helloworld D/ShineTextView: onDraw:000000
07-16 07:20:00.997 28857-28857/com.example.helloworld D/ShineTextView: onDraw:
07-16 07:20:01.115 28857-28857/com.example.helloworld D/ShineTextView: onDraw:000000
07-16 07:20:01.115 28857-28857/com.example.helloworld D/ShineTextView: onDraw:
 */
内容参考自Blankj