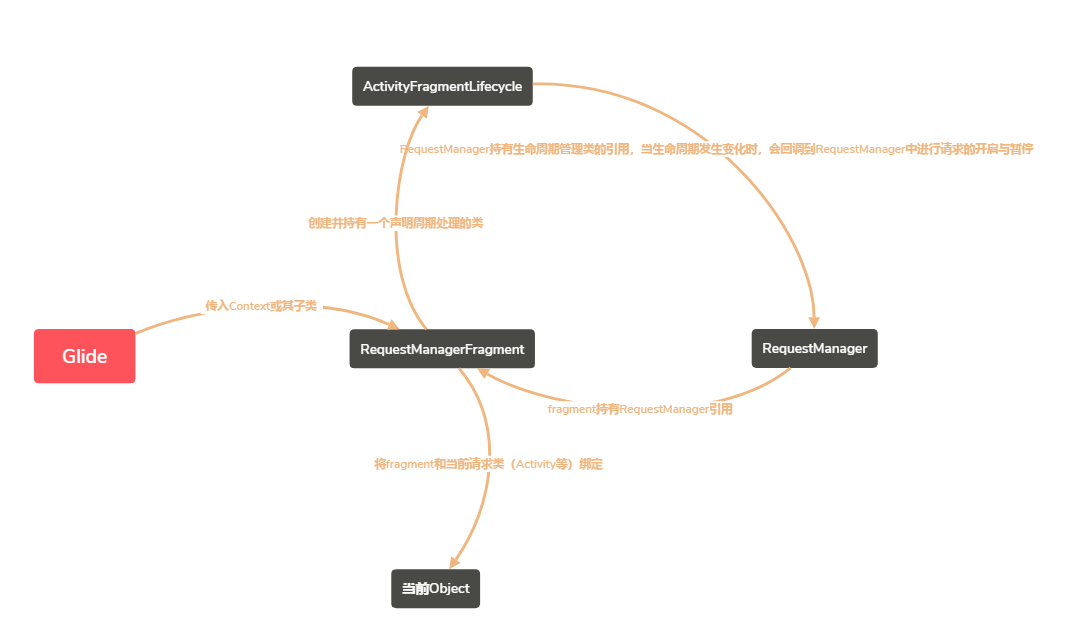
Glide.with(mContext).load("baidu.com")
                        .centerCrop().into(imageView);
with方法
Glide进行的网络请求可以和当前页面(Activity或者Fragment)生命周期绑定在一起,当在某一个页面中开始请求网络图片时,假设此时突然按了退出键,那么Glide能监听到这个页面(Activity或者Fragment)的onStop方法,它会将当前所有正在进行但是尚未完成的Request请求暂停掉;同样道理,当页面再次回到前台时,它可以监听到页面的onStart方法,然后将所有当前尚未完成的,没有被取消的并且当前不是请求状态中的Request启动起来开始请求。那么Glide是如何左到这一点的?我们从源码角度寻找答案。
可以看到Glide的with方法可以接收五种类型的Context
    public static RequestManager with(Context context) {
        RequestManagerRetriever retriever = RequestManagerRetriever.get();
        return retriever.get(context);
    }

    public static RequestManager with(Activity activity) {
        RequestManagerRetriever retriever = RequestManagerRetriever.get();
        return retriever.get(activity);
    }

    public static RequestManager with(FragmentActivity activity) {
        RequestManagerRetriever retriever = RequestManagerRetriever.get();
        return retriever.get(activity);
    }

    @TargetApi(Build.VERSION_CODES.HONEYCOMB)
    public static RequestManager with(android.app.Fragment fragment) {
        RequestManagerRetriever retriever = RequestManagerRetriever.get();
        return retriever.get(fragment);
    }

    public static RequestManager with(Fragment fragment) {
        RequestManagerRetriever retriever = RequestManagerRetriever.get();
        return retriever.get(fragment);
    }
我们以参数为Activity 的构造方法为例进行分析,因为他们原理都是相同的,进入这个方法中,我们来看看RequestManagerRetriever 是什么,它获取到了这个类以单利形式创建的对象
    public static RequestManager with(Activity activity) {
        RequestManagerRetriever retriever = RequestManagerRetriever.get();
        return retriever.get(activity);
    }
    private static final RequestManagerRetriever INSTANCE = new RequestManagerRetriever();
    public static RequestManagerRetriever get() {
        return INSTANCE;
    }
进入get方法,这里对当前线程做了判断,我们先从主线程看起,等了解到为什么Glide能和Activity生命周期绑定,你就会知道,为什么子线程中使用Glide无法实现这一效果了。可以看到主线程中请求时,拿到了当前activity的FragmentManager,然后将二者都传入fragmentGet方法
    @TargetApi(Build.VERSION_CODES.HONEYCOMB)
    public RequestManager get(Activity activity) {
        if (Util.isOnBackgroundThread() || Build.VERSION.SDK_INT < Build.VERSION_CODES.HONEYCOMB) {
            return get(activity.getApplicationContext());
        } else {
            assertNotDestroyed(activity);
            android.app.FragmentManager fm = activity.getFragmentManager();
            return fragmentGet(activity, fm);
        }
    }
fragmentGet,可以看到,with方法最终返回的是RequestManager,在方法中还创建了一个RequestManagerFragment 继承自Fragment,那么二者有什么关系,为什么要创建一个Fragment出来?
    @TargetApi(Build.VERSION_CODES.HONEYCOMB)
    RequestManager fragmentGet(Context context, android.app.FragmentManager fm) {
        //根据当前activity获取到的fragmentManager创建出一个Fragment
        RequestManagerFragment current = getRequestManagerFragment(fm);
        //从这个fragment中获取到RequestManager,可见二者是绑定在一起的
        RequestManager requestManager = current.getRequestManager();
        if (requestManager == null) {
            //将fragment中的Lifecycle传递到了RequestManger中,莫非这是和生命周期相关的
            requestManager = new RequestManager(context, current.getLifecycle(), current.getRequestManagerTreeNode());
            current.setRequestManager(requestManager);
        }
        return requestManager;
    }
先看看这个Fragment怎么创建的,getRequestManagerFragment
    @TargetApi(Build.VERSION_CODES.JELLY_BEAN_MR1)
    RequestManagerFragment getRequestManagerFragment(final android.app.FragmentManager fm) {
        //由FragmentManager通过tag获取fragment,第一次的时候由于没有设置,会返回null
        RequestManagerFragment current = (RequestManagerFragment) fm.findFragmentByTag(FRAGMENT_TAG);
        if (current == null) {
            //再从缓存集合中获取fragment的,map以fragmentManger为
            //key,以fragment为value进行存储,第一次请求也是null
            current = pendingRequestManagerFragments.get(fm);
            if (current == null) {
                //创建出来fragment,把它加入集合并且commit
                current = new RequestManagerFragment();
                pendingRequestManagerFragments.put(fm, current);
                fm.beginTransaction().add(current, FRAGMENT_TAG).commitAllowingStateLoss();
                //可以看下边handleMessage中是把这个fragment又从刚刚
                //加入的集合中移除了,不知何故,不管了不是重点
                handler.obtainMessage(ID_REMOVE_FRAGMENT_MANAGER, fm).sendToTarget();
            }
        }
        return current;
    }

    case ID_REMOVE_FRAGMENT_MANAGER:
                android.app.FragmentManager fm = (android.app.FragmentManager) message.obj;
                key = fm;
                removed = pendingRequestManagerFragments.remove(fm);
                break;
把这个fragment commit之后,当前activity的生命周期和这个fragment就绑定在了一起,那么它又是怎么回调到Glide的请求中的,我们可以看一下这个fragment创建的时候做了什么,创建fragment同时new了一个ActivityFragmentLifecycle对象,这个对象继承自Lifecycle这个接口。也就是说,当activity的onStart,onStop和onDestroy生命周期方法执行的时候,这个fragment相应的方法也会执行,然后就会调用这个ActivityFragmentLifecycle的onStart onStop onDestroy方法。那么此时可以猜想,应该就是这个LifeCycle将生命周期回调到Glide的请求中去的
    public RequestManagerFragment() {
        this(new ActivityFragmentLifecycle());
    }

    @SuppressLint("ValidFragment")
    RequestManagerFragment(ActivityFragmentLifecycle lifecycle) {
        this.lifecycle = lifecycle;
    }

    @Override
    public void onStart() {
        super.onStart();
        lifecycle.onStart();
    }

    @Override
    public void onStop() {
        super.onStop();
        lifecycle.onStop();
    }

    @Override
    public void onDestroy() {
        super.onDestroy();
        lifecycle.onDestroy();
    }
看一下lifecycle.onStart onStop onDestroy方法的具体实现,可以看到,这里面会通过LifecycleListener 这个接口将相应的方法回调了出去,那么我们只要找到设置这个接口的地方就可以找到接收这个生命周期回调的位置了,二者的关联关系也就清楚了
    void onStart() {
        isStarted = true;
        for (LifecycleListener lifecycleListener : Util.getSnapshot(lifecycleListeners)) {
            lifecycleListener.onStart();
        }
    }

    void onStop() {
        isStarted = false;
        for (LifecycleListener lifecycleListener : Util.getSnapshot(lifecycleListeners)) {
            lifecycleListener.onStop();
        }
    }

    void onDestroy() {
        isDestroyed = true;
        for (LifecycleListener lifecycleListener : Util.getSnapshot(lifecycleListeners)) {
            lifecycleListener.onDestroy();
        }
    }
再回到fragmentGet方法中,创建fragment之后又创建了RequestManager,并且通过构造函数将lifeCycle传入了RequestManager中,我们重点看这里
requestManager = new RequestManager(context,
        current.getLifecycle(), current.getRequestManagerTreeNode());
进入构造方法中
    public RequestManager(Context context, Lifecycle lifecycle, RequestManagerTreeNode treeNode) {
        this(context, lifecycle, treeNode, new RequestTracker(), new ConnectivityMonitorFactory());
    }

    RequestManager(Context context, final Lifecycle lifecycle, RequestManagerTreeNode treeNode,
            RequestTracker requestTracker, ConnectivityMonitorFactory factory) {
        this.context = context.getApplicationContext();
        this.lifecycle = lifecycle;
        this.treeNode = treeNode;
        this.requestTracker = requestTracker;
        this.glide = Glide.get(context);
        this.optionsApplier = new OptionsApplier();

        ConnectivityMonitor connectivityMonitor = factory.build(context,
                new RequestManagerConnectivityListener(requestTracker));

        // If we're the application level request manager, we may be created on a background thread. In that case we
        // cannot risk synchronously pausing or resuming requests, so we hack around the issue by delaying adding
        // ourselves as a lifecycle listener by posting to the main thread. This should be entirely safe.

        //在这里找到了给LifeCycle设置监听接口的位置,那么很明显,
        //这个RequestManager中一定重写了onStart onStop onDestroy方
        //法,当fragment生命周期回调时,会调用到这里的方法,从而进行请
        //求的开启与暂停
        if (Util.isOnBackgroundThread()) {
            new Handler(Looper.getMainLooper()).post(new Runnable() {
                @Override
                public void run() {
                    lifecycle.addListener(RequestManager.this);
                }
            });
        } else {
            lifecycle.addListener(this);
        }
        //这里做的很巧妙,在生命周期的回调中进行网络状态的检测
        //代码构造的很完美,值得借鉴
        lifecycle.addListener(connectivityMonitor);
    }
找到这三个回调方法,不出所料,生命周期的绑定就是这样进行的
    /**
     * Lifecycle callback that registers for connectivity events (if the android.permission.ACCESS_NETWORK_STATE
     * permission is present) and restarts failed or paused requests.
     */
    @Override
    public void onStart() {
        // onStart might not be called because this object may be created after the fragment/activity's onStart method.
        resumeRequests();
    }

    /**
     * Lifecycle callback that unregisters for connectivity events (if the android.permission.ACCESS_NETWORK_STATE
     * permission is present) and pauses in progress loads.
     */
    @Override
    public void onStop() {
        pauseRequests();
    }

    /**
     * Lifecycle callback that cancels all in progress requests and clears and recycles resources for all completed
     * requests.
     */
    @Override
    public void onDestroy() {
        requestTracker.clearRequests();
    }
最后回到开始时做线程检测的位置,我们看到了主线程中请求网络的逻辑,那么子线程中有何不同
    @TargetApi(Build.VERSION_CODES.HONEYCOMB)
    public RequestManager get(Activity activity) {
        //子线程请求
        if (Util.isOnBackgroundThread() || Build.VERSION.SDK_INT < Build.VERSION_CODES.HONEYCOMB) {
            return get(activity.getApplicationContext());
        } else {
            assertNotDestroyed(activity);
            android.app.FragmentManager fm = activity.getFragmentManager();
            return fragmentGet(activity, fm);
        }
    }

    public RequestManager get(Context context) {
        if (context == null) {
            throw new IllegalArgumentException("You cannot start a load on a null Context");
        } else if (Util.isOnMainThread() && !(context instanceof Application)) {
            if (context instanceof FragmentActivity) {
                return get((FragmentActivity) context);
            } else if (context instanceof Activity) {
                return get((Activity) context);
            } else if (context instanceof ContextWrapper) {
                return get(((ContextWrapper) context).getBaseContext());
            }
        }

        return getApplicationManager(context);
    }
由于子线程传递的是Context,不满足 instanceof FragmentActivity context instanceof Activity context instanceof ContextWrapper这三个条件,所以最终是进入了getApplicationManager(context)方法中
    private RequestManager getApplicationManager(Context context) {
        // Either an application context or we're on a background thread.
        if (applicationManager == null) {
            synchronized (this) {
                if (applicationManager == null) {
                    // Normally pause/resume is taken care of by the fragment we add to the fragment or activity.
                    // However, in this case since the manager attached to the application will not receive lifecycle
                    // events, we must force the manager to start resumed using ApplicationLifecycle.
                    applicationManager = new RequestManager(context.getApplicationContext(),
                            new ApplicationLifecycle(), new EmptyRequestManagerTreeNode());
                }
            }
        }

        return applicationManager;
    }
我们可以看到这里也是创建了RequestManager,但是这个RequestManager和之前的不同之处就是传递到构造方法中的lifecycle实现类不同。源码的注释上也说的很清楚,由于在子线程中只能通过getApplicationContext获取到Context,而生命周期又是通过fragment进行关联的,如此一来,就无法获取到fragmentmanger,也无法创建fragment进行生命周期管理,所以在子线程中使用Glide或者在主线程中通过getApplicationContext获取上下文的情况都无法实现和Activity生命周期的绑定
总结一下
1.Glide要和当前请求的页面Activity或者Fragment生命周期绑定,必须传入当前Activity或者Fragment的实例,不能用Application的上文
2.Glide请求之所以能和页面的生命周期绑定,是通过创建一个和这个页面绑定的fragment实现的
3.当页面的生命周期执行时,fragment相应的生命周期也会执行,然后通过一个生命周期管理类,将其回调到RequestManger中,从而进行Request请求得开启和暂停
4.补充:有一点需要注意,虽然with方法允许在子线程中运行,但是into方法不可以,with方法在子线程多用于下载图片缓存到磁盘,并不能在子线程设置给控件进行展示