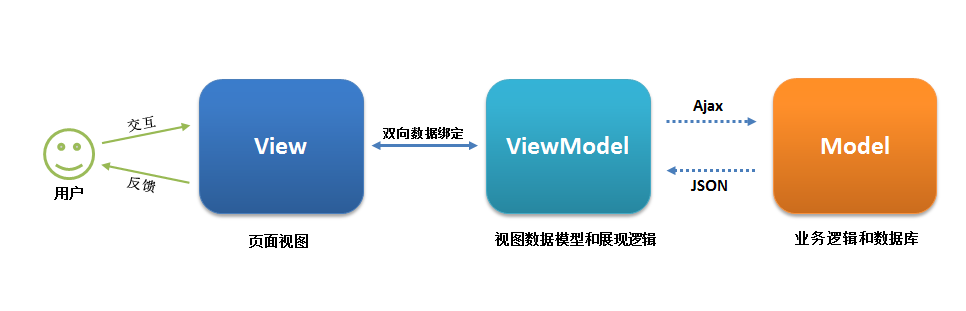
随着三大前端框架和小程序的流行,MVVM大行其道,而其中的核心是 ViewModel 层,它就像是一个中转站(value converter),负责转换 Model 中的数据对象来让数据变得更容易管理和使用,该层向上与视图层进行双向数据绑定,向下与 Model 层通过接口请求进行数据交互,起呈上启下作用,因此处理数据结构就变得非常重要了。
前端发展的历史
在上个世纪的1989年,欧洲核子研究中心的物理学家Tim Berners-Lee发明了超文本标记语言(HyperText Markup Language),简称HTML,并在1993年成为互联网草案。从此,互联网开始迅速商业化,诞生了一大批商业网站。
最早的HTML页面是完全静态的网页,它们是预先编写好的存放在Web服务器上的html文件。浏览器请求某个URL时,Web服务器把对应的html文件扔给浏览器,就可以显示html文件的内容了。如果要针对不同的用户显示不同的页面,显然不可能给成千上万的用户准备好成千上万的不同的html文件,所以,服务器就需要针对不同的用户,动态生成不同的html文件。一个最直接的想法就是利用C、C++这些编程语言,直接向浏览器输出拼接后的字符串。这种技术被称为CGI:Common Gateway Interface。
很显然,复杂的HTML是不可能通过拼字符串得到的。于是,人们又发现,其实拼字符串的时候,大多数字符串都是HTML片段,是不变的,变化的只有少数和用户相关的数据,所以,又出现了新的创建 动态HTML的方式:ASP、JSP和PHP——分别由微软、SUN和开源社区开发。
但是,一旦浏览器显示了一个HTML页面,要更新页面内容,唯一的方法就是重新向服务器获取一份新的HTML内容。如果浏览器想要自己修改HTML页面的内容,就需要等到1995年年底, JavaScript 被引入到浏览器。
有了JavaScript后,浏览器就可以运行JavaScript,然后,对页面进行一些修改。JavaScript还可以通过修改HTML的DOM结构和CSS来实现一些动画效果,而这些功能没法通过服务器完成,必须在浏览器实现。用JavaScript在浏览器中操作HTML,经历了若干发展阶段:
- 第一阶段,直接用JavaScript操作DOM节点,使用浏览器提供的原生API:
- 第二阶段,由于原生API不好用,还要考虑浏览器兼容性,jQuery横空出世,以简洁的API迅速俘获了前端开发者的芳心:
- 第三阶段,MVC模式,需要服务器端配合,JavaScript可以在前端修改服务器渲染后的数据。
现在,随着前端页面越来越复杂,用户对于交互性要求也越来越高,仅仅用jQuery是远远不够的。MVVM 模型应运而生 :)。
MVVM诞生
MVVM最早由微软提出来,它借鉴了桌面应用程序的MVC思想,在前端页面中,把Model用纯JavaScript对象表示,View负责显示,两者做到了最大限度的分离。把Model和View关联起来的就是ViewModel。ViewModel负责把Model的数据同步到View显示出来,还负责把View的修改同步回Model。
![1.png]()
前端目前的MVVM框架就是我们所熟悉的三个了,ng,react,vue。另外小程序也是借用了vue的思想,MVVM 的核心是 ViewModel 层,它就像是一个中转站(value converter),负责转换 Model 中的数据对象来让数据变得更容易管理和使用,该层向上与视图层进行双向数据绑定,向下与 Model 层通过接口请求进行数据交互,起呈上启下作用,因此处理数据结构就变得非常重要了:)。
高阶函数和ES6
ES6 有很多新特性,解构、展开运算符、箭头函数、模板字符串、模块等等,这些让我们处理数据结构非常舒服。而高阶函数中的map,reduce,filter也是我们常用的。
-
some方法对数组中每一项运行给定函数,如果该函数对任意一项返回true,则返回true
-
every方法对数组中每一项运行给定函数,如果该函数对所有项返回true,则返回true
let arr=[1,2,3,4,5,4,3,2,1];
let res=arr.some((item,index,array)=>{
    return item>3;
});
let res1=arr.every((item,index,array)=>{
    return item>3;
});
console.log(res);//true
console.log(res1);//false
    [1, 5, 10, 15].find((item, index, arr)=> {
        return item > 9;
    }) // 10
-
filter方法对数组中的每一项运行给定函数,返回该函数会返回true的项组成的数组
    let arr=[1,2,3,4,5,4,3,2,1];
    let res=arr.filter((item,index,array)=>{
        return item>3;
    });
    console.log(res);// [4, 5, 4]
-
map方法返回一个数组,这个数组是在原始数组的对应项上运行传入函数的结果
有返回值
    let arr=[1,2,3,4,5,4,3,2,1];
    let res=arr.map((item,index,array)=>{
        return item*2;
    });
    console.log(res);// [2, 4, 6, 8, 10, 8, 6, 4, 2]

无返回值,当数组里面的个体是对象的时候,可以不返回,即当作for循环使用
    let arr = [{ data: 1 }, { data: 2 }];
    arr.map((item, index, array) => {
        item.data = item.data * 2;
    });
    console.log(arr);// [{ data: 2 }, { data: 4 }]
例子2:
    let kvArray = [{ key: 1, value: 10 },{ key: 2, value: 20 },{ key: 3, value: 30 }];
    let reformattedArray = kvArray.map(function (obj) {
        let rObj = {};
        rObj[obj.key] = obj.value;
        return rObj;
    });
    console.log(reformattedArray)//[{1: 10}, {2: 20}, {3: 30}]
    //优化写法,如果箭头函数直接返回一个对象,必须在对象外面加上括号
    let reformattedArray=kvArray.map(val => ({ [val.key]: val.value }))
-
reduce()和reduceRight(),这两个方法都会迭代数组中的所有项,然后构建一个最终返回的值
- reduce()方法从数组的第一项开始,逐个遍历到最后,reduceRight()从数组的最后一项开始,向前遍历到第一项
- 这两个方法的函数都接受四个参数:前一个值、当前值、项的索引和数组对象
```js
let arr=[1,2,3,4,5];
let res=arr.reduce((prev,cur,index,array)=>{
return prev+cur;
});
let res1=arr.reduceRight((prev,cur,index,array)=>{
return prev+cur;
});
console.log("reduce:"+res);//15
console.log("reduceRight:"+res1);//15
例子2:统计出现次数
var names = ['Alice', 'Bob', 'Tiff', 'Bruce', 'Alice'];
var countedNames = names.reduce(function (allNames, name) {
if (name in allNames) {
allNames[name]++;
}
else {
allNames[name] = 1;
}
return allNames;
}, {});
console.log(countedNames)//{ 'Alice': 2, 'Bob': 1, 'Tiff': 1, 'Bruce': 1 }
例子3:对象中提取部分属性
const pick = (obj, arr) =>
arr.reduce((iter, val) => (val in obj && (iter[val] = obj[val]), iter), {});
let obj={a:1,b:2,c:3,d:4,e:5}
let obj2 = pick(obj, ['a', 'd', 'e'])//{a: 1, d: 4, e: 5}
+ 解构,展开运算符
let data = { a: 1, b: 2, c: 3 }
let { a, ...other } = data
console.log(a)//1
console.log({ d: 4, ...other })//{d: 4, b: 2, c: 3}

//react redux中常见
    beginSubmitting(state) {
        return { ...state, isSubmitting: true };
    },

//小程序中常见
let { inputValue, ...other } = that.data;
inputValue = 123;
that.setData({inputValue},()=>{
    that.something(other)
})
```
小程序案例
- 最近做小程序,发现一个很常见的需求:
- 一个滚动的tab页,展示list内容,下拉加载更多
- 一个详情页,不传id就新建,可以编辑。传了id就是展示
-
类似这种
![2.png]()
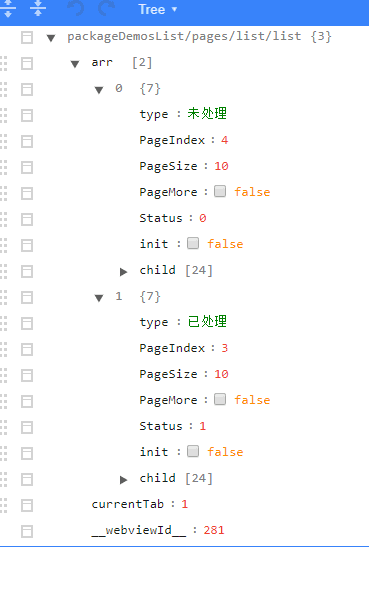
拿到需求脑袋里的数据结构大概是这样
![3.png]()
- 代码
list页面
<component-navigations backShow="{{true}}" title="DemoList"></component-navigations>

<view class="pages">
    <scroll-view scroll-x="true" class="tabHd">
      <view wx:for="{{arr}}" wx:key="{{index}}" data-current="{{index}}" class="tabHd_item {{currentTab==index?'active':''}}" bindtap="swichNav">
        {{item.type}}
      </view>
    </scroll-view>


    <swiper class="tabBd" current="{{currentTab}}" duration="300" bindchange="switchTab">
        <swiper-item wx:for="{{arr}}" wx:key="{{index1}}" wx:for-index="index1" wx:for-item="item1" class="tabBd_item">
            <scroll-view scroll-y bindscrolltolower="lower" class="tabBdItem_content">
                <view bindtap="goDetail" data-id="{{item2.Id}}" wx:for="{{item1.child}}" wx:key="{{index2}}" wx:for-index="index2" wx:for-item="item2" class="tabBdItem_card">
                    <image class="tabBdItem_card__pic" src="{{item2.UploadPictures}}"  mode='aspectFill'/>
                    <view class="tabBdItem_card__txt">
                        <text class="tabBdItem_card__title">{{item2.Title}}</text>
                        <text class="tabBdItem_card__date">{{item2.CreatedTime}}</text>
                    </view>
                </view>
                <view wx:if="{{!item1.PageMore}}" class="tabBdItem_card__nomore">没有更多了</view>
            </scroll-view>
        </swiper-item>
    </swiper>
    <view class="add" bindtap="add"><text>+</text></view>
</view>
.pages{
    padding: 65px 0 0 0;
    height:100vh;
    box-sizing:border-box;
    font-size: 28rpx;
    color: #222;
    display:flex;
    flex-direction: column;
    background: #F8F9FD;
}
/* hd */
.tabHd{
    border-bottom: 2rpx solid #eee;
    height: 83rpx;
}
.tabHd_item{
    display: inline-block;
    width: 50%;
    text-align: center;
    line-height: 80rpx;
    margin-bottom: -2rpx;
    background: #fff;
}
.tabHd_item.active{
    border-bottom: 3rpx solid #0490DB;
}
/* bd */
.tabBd{
    flex: 1;
}
.tabBd_item{
    overflow: scroll;
    padding: 20rpx;
    box-sizing: border-box;
}
.tabBdItem_content{
    height: 100%;
}
.tabBdItem_card{
    font-size: 0;
    margin-bottom: 20rpx;
}
.tabBdItem_card__pic{
    width: 100%;
    height: 350rpx;
    border-top-left-radius:20rpx;
    border-top-right-radius:20rpx;
    border:2rpx solid #eee;
    box-sizing:border-box;
    border-bottom:none;
}
.tabBdItem_card__txt{
    display: flex;
    justify-content: space-between;
    align-items:center;
    height:98rpx;
    background:#fff;
    padding:0 20rpx;
    border-bottom-left-radius:20rpx;
    border-bottom-right-radius:20rpx;
    border:2rpx solid #eee;
    border-top: none;
}
.tabBdItem_card__title{
    font-size: 30rpx;
    color: #222222;
}
.tabBdItem_card__date{
    font-size: 24rpx;
    color:#A5A5A5;
}
.tabBdItem_card__nomore{
    text-align: center;
}

.add{
    position:fixed;
    bottom:64rpx;
    right: 64rpx;
    width: 120rpx;
    height: 120rpx;
    text-align: center;
    background: #0490DB;
    border-radius: 50%;
    display: flex;
    justify-content: center;
    align-items: center;
    color: #fff;
    font-size: 60rpx;
}
let that = null;
let util = require('../../../utils/util');


Page({
  data: {
    arr: null,
    currentTab: 0,
  },
  onLoad: function (options) {
    that = this;
    that.init();
  },
  onReady: function () {

  },
  onShow: function () {

  },
  onShareAppMessage: function () {

  },
  // 滚动切换标签样式
  switchTab: function (e) {
    let { arr, currentTab } = that.data;
    that.setData({
      currentTab: e.detail.current
    }, () => {
      if (arr[currentTab]["init"]) {
        that.renderArr()
      }
    });
  },
  // 点击标题切换当前页时改变样式
  swichNav: function (e) {
    var cur = e.target.dataset.current;
    if (that.data.currentTab == cur) {
      return false
    } else {
      that.setData({
        currentTab: cur
      })
    }
  },
  init: function () {//重置
    let arr = [
      { type: '未处理', PageIndex: 1, PageSize: 10, PageMore: true, Status: 0, init: true, child: [] },
      { type: '已处理', PageIndex: 1, PageSize: 10, PageMore: true, Status: 1, init: true, child: [] }
    ];
    that.setData({ arr }, () => {
      that.renderArr();
    })
  },
  renderArr: function () {//渲染
    let { currentTab, arr } = that.data;
    let { PageMore, PageSize, PageIndex, Status, child } = arr[currentTab];

    arr[currentTab]["init"] = false;
    if (PageMore) {
      wx.showLoading({
        title: '加载中',
        mask: true
      })
      // util.commonAjax(
      //   'api/Wecha/GetReadily',
      //   1,
      //   {
      //     PageSize, PageIndex, Status
      //   }
      // )
      //   .then((res) => {
      //     let newArr = res.data;

      //     arr[currentTab]["child"] = child.concat(newArr)
      //     arr[currentTab]["PageMore"] = newArr.length == PageSize ? true : false;
      //     that.setData({ arr }, () => {
      //       wx.hideLoading()
      //     })
      //   })
      //   .catch((rej) => {
      //     console.log(rej)
      //     that.setData({ arr }, () => {
      //       wx.hideLoading()
      //     })
      //   })
      setTimeout(() => {
        let newArr = that.mockFetch({ PageSize, PageIndex, Status }).data;
        arr[currentTab]["child"] = child.concat(newArr)
        arr[currentTab]["PageMore"] = newArr.length == PageSize ? true : false;
        that.setData({ arr }, () => {
          wx.hideLoading()
        })
      }, 1000);
    }
  },
  mockFetch: function (datas) {//模拟请求
    let { PageSize, PageIndex, Status } = datas;
    let commonObj = null;
    let num = null;
    let List = [];

    if (Status) {
      commonObj = { Title: '海外业务反馈', CreatedTime: '2017-01-01', Id: 1, UploadPictures: 'https://timgsa.baidu.com/timg?image&quality=80&size=b9999_10000&sec=1533999968716&di=e188f89b8c2a6c89f8b8c376737feb99&imgtype=0&src=http%3A%2F%2Fi2.hdslb.com%2Fbfs%2Farchive%2Fbb1c3dcb07c096adf6cc4122e6fafaa6f620fa58.png' }
    } else {
      commonObj = { Title: '海外业务反馈', CreatedTime: '2017-01-01', Id: 1, UploadPictures: 'https://timgsa.baidu.com/timg?image&quality=80&size=b9999_10000&sec=1534594896&di=b0d2b207488522b5f7cc446cb60ac7e3&imgtype=jpg&er=1&src=http%3A%2F%2Fimages5.fanpop.com%2Fimage%2Fphotos%2F26000000%2FSaber-Screencap-saber-arthuria-pendragon-funclub-26095187-1920-1080.jpg' }
    }

    if (PageIndex == 3) {
      num = 4
    } else if (PageIndex > 3) {
      num = 0
    } else {
      num = 10
    }
    for (let i = 0; i < 10; i++) {
      List.push(commonObj)
    }
    List = List.slice(0, num);
    return { data: List }
  },
  lower: function () {//加载更多
    let { arr, currentTab } = that.data;
    let { PageIndex, PageMore } = arr[currentTab];

    if (PageMore) {
      arr[currentTab]["PageIndex"] = PageIndex + 1;
      that.setData({ arr }, () => {
        that.renderArr();
      })
    }
  },
  add: function () {//新增
    wx.navigateTo({
      url: '/packageDemosList/pages/new/new'
    })
  },
  goDetail: function (e) {//查看详情
    let id = e.currentTarget.dataset.id;

    wx.navigateTo({
      url: `/packageDemosList/pages/new/new?id=${id}`
    })
  },
})
new页面
<component-navigations backShow="{{true}}" title="DemoList"></component-navigations>

<view class="pages">
    <view class="upload">
        <image bindtap="getImage" class="upload_img"  mode='aspectFill' src="{{imgUrl?imgUrl:defaultImgUrl}}" />
        <block wx:if="{{!id}}">
            <view wx:if="{{!imgUrl}}" bindtap="upLoad" class="upload_btn">
                <i class="fa fa-upload"></i>
                <text>上传照片</text>
                <progress wx:if="{{progress}}" percent="{{progress}}" class="upload_progress" stroke-width="12" />
            </view>
            <view wx:else bindtap="delImg" class="upload_btn">
                <i class="fa fa-trash-o"></i>
                <text>删除照片</text>
            </view>
        </block>
    </view>
    <view class="form">
        <view wx:for="{{inputs}}" wx:key="{{index}}" class="form_item">
            <view class="formItem_l">
                <i class="label_icon fa {{item.icon}}"></i><text class="label_txt">{{item.title}}:</text>
            </view>
            <view wx:if="{{item.com==1}}" class="formItem_r">
                <input
                value="{{item.value}}"
                data-index="{{index}}"
                bindinput="inputChangeValue"
                focus="{{item.focus}}"
                disabled="{{!item.editable}}"
                type="{{item.type}}"
                class="formItemR_input"
                placeholder="请输入{{item.title}}"
                confirm-type="next"
                bindconfirm="next"/>
            </view>
            <view wx:elif="{{item.com==2}}" class="formItem_r" style="padding-top:6rpx;">
                <textarea
                value="{{item.value}}"
                data-index="{{index}}"
                bindinput="inputChangeValue"
                focus="{{item.focus}}"
                disabled="{{!item.editable}}"
                class="formItemR_textarea"
                auto-height
                maxlength="-1"
                placeholder="请输入{{item.title}}" />
            </view>
        </view>
        <view wx:if="{{!id}}" bindtap="submit" class="form_submit">提交</view>
    </view>
</view>
.pages{
    padding: 65px 0 0 0;
    height:100vh;
    box-sizing:border-box;
    font-size: 28rpx;
    color: #222;
    background: #fff;
}
.upload{
    position: relative;
    font-size: 0;
}
.upload_img{
    width: 100%;
    height:350rpx;
}
.upload_btn{
    font-size: 26rpx;
    position: absolute;
    right: 0;
    bottom: 0;
    background: rgba(0,0,0,.2);
    padding: 10rpx 20rpx;
    color: #fff;
}
.upload_btn .fa{
    margin-right: 6rpx;
}
.upload_progress{
    margin-top: 12rpx;
}
/* form */
.form{
    padding: 20rpx;
}
.form_item{
    border: 2rpx solid #ccc;
    border-radius: 10rpx;
    display: flex;
    align-self: center;
    padding: 20rpx;
    margin-bottom: 20rpx;
}
.formItem_l{
    vertical-align: middle;
    /* padding-top:2rpx; */
}
.label_icon{
    margin-right: 10rpx;
    vertical-align: middle;
}
.label_txt{
    vertical-align: middle;
}
.formItem_r{
    flex: 1;
}
.formItemR_input{
}
.formItemR_textarea{
    width:auto;
    min-height:100px;
}
.form_submit{
    background: #0490DB;
    color: #fff;
    height: 88rpx;
    line-height: 88rpx;
    text-align: center;
    border-radius: 10rpx;
    font-size: 30rpx;
}
let that = null;
let util = require('../../../utils/util');

Page({

  /**
   * 页面的初始数据
   */
  data: {
    defaultImgUrl: '../../images/upload.png',
    imgUrl: null,
    progress: null,
    inputs: [//1input,2textarea
      { com: '1', editable: true, type: 'text', title: '标题', icon: 'fa-folder-o', key: 'UserTitle', value: null, focus: false },
      { com: '1', editable: true, type: 'text', title: '机构', icon: 'fa-building-o', key: 'ORGName', value: null, focus: false },
      { com: '1', editable: true, type: 'text', title: '部门', icon: 'fa-code-fork', key: 'Department', value: null, focus: false },
      { com: '1', editable: true, type: 'text', title: '姓名', icon: 'fa-user-o', key: 'Name', value: null, focus: false },
      { com: '1', editable: true, type: 'number', title: '电话', icon: 'fa-phone', key: 'PhoneNumber', value: null, focus: false },
      { com: '2', editable: true, type: 'text', title: '描述', icon: 'fa-edit', key: 'Description', value: null, focus: false },
    ],
    id: null,//有表示预览,无表示新增
  },

  /**
   * 生命周期函数--监听页面加载
   */
  onLoad: function (options) {
    that = this;
    if (options.id) {//如果有id传入,则为详情,否则为新增
      that.setData({ id: options.id }, () => {
        wx.showLoading({
          title: '载入中',
          mask: true
        })
        util.commonAjax(
          'api/wx/Detail',
          1,
          { id: that.data.id }
        )
          .then((res) => {
            let data = res.data[0];
            let { inputs } = that.data;

            inputs = inputs.map((e, i) => {
              if (data.hasOwnProperty(e.key)) {
                e.editable = false;
                e.value = data[e.key];
              }
              return e;
            })
            that.setData({ inputs, imgUrl: data.UploadPictures }, () => {
              wx.hideLoading();
            })
          })
          .catch((rej) => {
            console.log(rej)
            wx.hideLoading()
          })
      })
    }
  },
  onReady: function () {

  },
  onShow: function () {

  },
  onShareAppMessage: function () {

  },
  upLoad: function () {//上传
    wx.chooseImage({
      count: 1, // 默认9
      sizeType: ['original', 'compressed'], // 可以指定是原图还是压缩图,默认二者都有
      sourceType: ['album', 'camera'], // 可以指定来源是相册还是相机,默认二者都有
      success: function (res) {
        let tempFilePaths = res.tempFilePaths;
        console.log(res)
        //等待中...
        wx.showToast({
          title: '正在上传...',
          icon: 'loading',
          mask: true,
          duration: 10000
        })
        //上传
        const uploadTask = wx.uploadFile({
          url: '/api/FileUpload/UploadImages',
          filePath: tempFilePaths[0],
          name: 'file',
          formData: {
            'name': tempFilePaths[0],
            'folder': 'appletCover'
          },
          success: function (res) {
            let data = JSON.parse(res.data);//后台返回图片保存服务器后的路径
            that.setData({ imgUrl: data.msg }, () => {
              wx.hideToast();
            });
          },
          fail: function (res) {
            console.log('上传图片失败' + res)
            wx.hideToast();
            wx.showModal({
              title: '错误提示',
              content: '上传图片失败',
              showCancel: false,
              success: function (res) {
                that.setData({
                  imgUrl: null,
                  progress: null,
                })
              }
            })
          }
        })
        //进度
        uploadTask.onProgressUpdate((res) => {
          // console.log('上传进度', res.progress)
          // console.log('已经上传的数据长度', res.totalBytesSent)
          // console.log('预期需要上传的数据总长度', res.totalBytesExpectedToSend)
          that.setData({ progress: res.progress })
        })
        // 取消上传任务
        // uploadTask.abort()
      }
    })
  },
  getImage: function () {//查看图片
    if (that.data.imgUrl) {
      wx.previewImage({
        urls: [that.data.imgUrl]
      })
    }
  },
  delImg: function () {//删除图片
    that.setData({
      imgUrl: null,
      progress: null,
    })
  },
  inputChangeValue: function (e) {//输入
    let value = e.detail.value;
    let index = e.currentTarget.dataset.index;
    let inputs = that.data.inputs;

    inputs = inputs.map((e, i) => {
      if (i == index) {
        e["value"] = value;
        e["focus"] = true;
      } else {
        e["focus"] = false;
      }
      return e
    })
    that.setData({ inputs })
  },
  next: function (e) {//直接聚焦下一项
    let index = e.currentTarget.dataset.index;
    let inputs = that.data.inputs;

    inputs = inputs.map((e, i) => {
      e["focus"] = false;
      return e
    })
    that.setData({ inputs }, () => {//直接一次赋值有问题。。。
      inputs = inputs.map((e, i) => {
        if (i == parseInt(index) + 1) {
          e["focus"] = true;
        }
        return e
      })
      that.setData({ inputs })//所以先全部false,再单独赋值一次true
    })
  },
  submit: function () {//提交
    let submitObj = {};
    let { imgUrl, inputs } = that.data;

    inputs.map((e, i) => {
      submitObj[e.key] = e.value
    })
    submitObj["UploadPictures"] = imgUrl;
    // console.log(submitObj)
    if (submitObj.UserTitle == "") {
      wx.showToast({
        title: '请输入标题',
        icon: 'none',
        duration: 2000
      })
    } else if (submitObj.ORGName == "") {
      wx.showToast({
        title: '请输入机构',
        icon: 'none',
        duration: 2000
      })
    } else if (submitObj.Department == "") {
      wx.showToast({
        title: '请输入部门',
        icon: 'none',
        duration: 2000
      })
    }
    else if (submitObj.Name == "") {
      wx.showToast({
        title: '请输入姓名',
        icon: 'none',
        duration: 2000
      })
    } else if (!(/0?(13|14|15|17|18|19)[0-9]{9}/.test(submitObj.PhoneNumber))) {
      debugger
      wx.showToast({
        title: '请输入正确的手机号',
        icon: 'none',
        duration: 2000
      })
    }
    else if (submitObj.Description == "") {
      wx.showToast({
        title: '请输入描述',
        icon: 'none',
        duration: 2000
      })
    }
    else if (!submitObj.UploadPictures) {
      wx.showToast({
        title: '请上传图片',
        icon: 'none',
        duration: 2000
      })
    } else {
      wx.showLoading({
        title: '提交中',
        mask: true
      })
      util.commonAjax(
        'api/WXReadilyShoot/Add',
        2,
        submitObj
      )
        .then((res) => {
          if (res.data.ResultType == 3) {
            let pages = getCurrentPages();
            let prevPage = pages[pages.length - 2];

            prevPage.init();//返回上一页并刷新
            wx.hideLoading();
            wx.navigateBack({
              delta: 1
            })
          }
        })
        .catch((rej) => {
          console.log(rej)
          wx.hideLoading()
        })
    }
  }
})
预览
已放入小程序的Demos里面
![4.jpg]()
最后
大家好,这里是「 TaoLand 」,这个博客主要用于记录一个菜鸟程序猿的Growth之路。这也是自己第一次做博客,希望和大家多多交流,一起成长!文章将会在下列地址同步更新……
个人博客:www.yangyuetao.cn
小程序:TaoLand


