我们在创建Powerpoint文档时,系统默认的幻灯片是空白背景的,很多时候我们需要自定义幻灯片背景,以达到美观的文档效果。在下面的示例中将介绍给PowerPoint幻灯片设置背景的方法,主要包含以下三个部分:
所需工具
示例代码(供参考)
步骤 1 :添加如下using指令
using Spire.Presentation;
using Spire.Presentation.Drawing;
using System.Drawing;
步骤 2 :创建文档
Presentation ppt = new Presentation();
ppt.LoadFromFile("test.pptx");
步骤 3 :添加纯色背景
//设置文档的背景填充模式为纯色填充
ppt.Slides[0].SlideBackground.Type = BackgroundType.Custom;
ppt.Slides[0].SlideBackground.Fill.FillType = FillFormatType.Solid;
ppt.Slides[0].SlideBackground.Fill.SolidColor.Color = Color.Pink;
步骤 4 :添加渐变背景色
//设置文档的背景填充模式为渐变色填充
ppt.Slides[1].SlideBackground.Type = BackgroundType.Custom;
ppt.Slides[1].SlideBackground.Fill.FillType = FillFormatType.Gradient;
ppt.Slides[1].SlideBackground.Fill.Gradient.GradientStops.Append(0f, KnownColors.Yellow);
ppt.Slides[1].SlideBackground.Fill.Gradient.GradientStops.Append(1f, KnownColors.Orange);
步骤 5 :添加图片作为背景
//设置幻灯片背景色为图片背景
ppt.Slides[2].SlideBackground.Type = Spire.Presentation.Drawing.BackgroundType.Custom;
ppt.Slides[2].SlideBackground.Fill.FillType = FillFormatType.Picture;
ppt.Slides[2].SlideBackground.Fill.PictureFill.FillType = PictureFillType.Stretch;
//加载图片作为幻灯片背景
Image img = Image.FromFile("green.png");
IImageData image = ppt.Images.Append(img);
ppt.Slides[2].SlideBackground.Fill.PictureFill.Picture.EmbedImage = image;
步骤6 :保存文件
ppt.SaveToFile("result.pptx", FileFormat.Pptx2010);
System.Diagnostics.Process.Start("result.pptx");
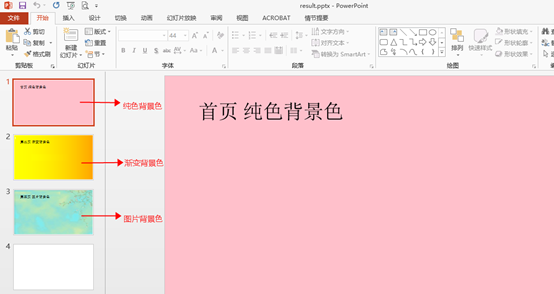
完成代码后,调试运行程序,生成文件,如下:
![]()
全部代码:
![]()
![]()
using Spire.Presentation;
using Spire.Presentation.Drawing;
using System.Drawing;

namespace AddBackground_PPT
{
    class Program
    {
        static void Main(string[] args)
        {
            //实例化Presentation类,加载PowerPoint文档
            Presentation ppt = new Presentation();
            ppt.LoadFromFile("test.pptx");

            //设置文档的背景填充模式为纯色填充
            ppt.Slides[0].SlideBackground.Type = BackgroundType.Custom;
            ppt.Slides[0].SlideBackground.Fill.FillType = FillFormatType.Solid;
            ppt.Slides[0].SlideBackground.Fill.SolidColor.Color = Color.Pink;

            //设置文档的背景填充模式为渐变色填充
            ppt.Slides[1].SlideBackground.Type = BackgroundType.Custom;
            ppt.Slides[1].SlideBackground.Fill.FillType = FillFormatType.Gradient;
            ppt.Slides[1].SlideBackground.Fill.Gradient.GradientStops.Append(0f, KnownColors.Yellow);
            ppt.Slides[1].SlideBackground.Fill.Gradient.GradientStops.Append(1f, KnownColors.Orange);

            //设置幻灯片背景色为图片背景
            ppt.Slides[2].SlideBackground.Type = Spire.Presentation.Drawing.BackgroundType.Custom;
            ppt.Slides[2].SlideBackground.Fill.FillType = FillFormatType.Picture;
            ppt.Slides[2].SlideBackground.Fill.PictureFill.FillType = PictureFillType.Stretch;
            //加载图片作为幻灯片背景
            Image img = Image.FromFile("green.png");
            IImageData image = ppt.Images.Append(img);
            ppt.Slides[2].SlideBackground.Fill.PictureFill.Picture.EmbedImage = image;

            //保存并打开文档
            ppt.SaveToFile("result.pptx", FileFormat.Pptx2010);
            System.Diagnostics.Process.Start("result.pptx");
        }
    }
}
View Code
本文完。
如需转载,请注明出处!!