#扫雷游戏窗口
class_name = "TMain"
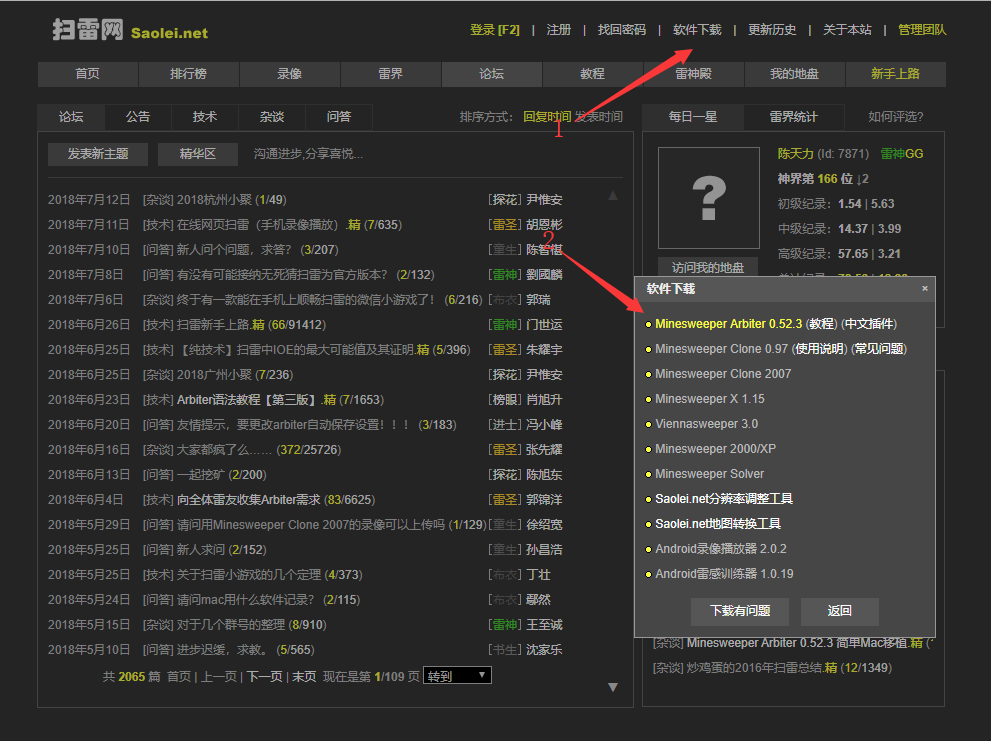
title_name = "Minesweeper Arbiter "
hwnd = win32gui.FindWindow(class_name, title_name)
#窗口坐标
left = 0
top = 0
right = 0
bottom = 0
if hwnd:
print("找到窗口")
left, top, right, bottom = win32gui.GetWindowRect(hwnd)
#win32gui.SetForegroundWindow(hwnd)
print("窗口坐标:")
print(str(left)+' '+str(right)+' '+str(top)+' '+str(bottom))
else:
print("未找到窗口")
#锁定雷区坐标
#去除周围功能按钮以及多余的界面
#具体的像素值是通过QQ的截图来判断的
left += 15
top += 101
right -= 15
bottom -= 42

#抓取雷区图像
rect = (left, top, right, bottom)
img = ImageGrab.grab().crop(rect)
#数字1-8 周围雷数
#0 未被打开
#ed 被打开 空白
#hongqi 红旗
#boom 普通雷
#boom_red 踩中的雷
rgba_ed = [(225, (192, 192, 192)), (31, (128, 128, 128))]
rgba_hongqi = [(54, (255, 255, 255)), (17, (255, 0, 0)), (109, (192, 192, 192)), (54, (128, 128, 128)), (22, (0, 0, 0))]
rgba_0 = [(54, (255, 255, 255)), (148, (192, 192, 192)), (54, (128, 128, 128))]
rgba_1 = [(185, (192, 192, 192)), (31, (128, 128, 128)), (40, (0, 0, 255))]
rgba_2 = [(160, (192, 192, 192)), (31, (128, 128, 128)), (65, (0, 128, 0))]
rgba_3 = [(62, (255, 0, 0)), (163, (192, 192, 192)), (31, (128, 128, 128))]
rgba_4 = [(169, (192, 192, 192)), (31, (128, 128, 128)), (56, (0, 0, 128))]
rgba_5 = [(70, (128, 0, 0)), (155, (192, 192, 192)), (31, (128, 128, 128))]
rgba_6 = [(153, (192, 192, 192)), (31, (128, 128, 128)), (72, (0, 128, 128))]
rgba_8 = [(149, (192, 192, 192)), (107, (128, 128, 128))]
rgba_boom = [(4, (255, 255, 255)), (144, (192, 192, 192)), (31, (128, 128, 128)), (77, (0, 0, 0))]
rgba_boom_red = [(4, (255, 255, 255)), (144, (255, 0, 0)), (31, (128, 128, 128)), (77, (0, 0, 0))]
#扫描雷区图像
def showmap():
    img = ImageGrab.grab().crop(rect)
    for y in range(blocks_y):
        for x in range(blocks_x):
            this_image = img.crop((x * block_width, y * block_height, (x + 1) * block_width, (y + 1) * block_height))
            if this_image.getcolors() == rgba_0:
                map[y][x] = 0
            elif this_image.getcolors() == rgba_1:
                map[y][x] = 1
            elif this_image.getcolors() == rgba_2:
                map[y][x] = 2
            elif this_image.getcolors() == rgba_3:
                map[y][x] = 3
            elif this_image.getcolors() == rgba_4:
                map[y][x] = 4
            elif this_image.getcolors() == rgba_5:
                map[y][x] = 5
            elif this_image.getcolors() == rgba_6:
                map[y][x] = 6
            elif this_image.getcolors() == rgba_8:
                map[y][x] = 8
            elif this_image.getcolors() == rgba_ed:
                map[y][x] = -1
            elif this_image.getcolors() == rgba_hongqi:
                map[y][x] = -4
            elif this_image.getcolors() == rgba_boom or this_image.getcolors() == rgba_boom_red:
                global gameover
                gameover = 1
                break
                #sys.exit(0)
            else:
                print("无法识别图像")
                print("坐标")
                print((y,x))
                print("颜色")
                print(this_image.getcolors())
                sys.exit(0)
    #print(map)
#插旗
def banner():
    showmap()
    for y in range(blocks_y):
        for x in range(blocks_x):
            if 1 <= map[y][x] and map[y][x] <= 5:
                boom_number = map[y][x]
                block_white = 0
                block_qi = 0
                for yy in range(y-1,y+2):
                    for xx in range(x-1,x+2):
                        if 0 <= yy and 0 <= xx and yy < blocks_y and xx < blocks_x:
                            if not (yy == y and xx == x):if map[yy][xx] == 0:
                                    block_white += 1
                                elif map[yy][xx] == -4:
                                    block_qi += 1if boom_number == block_white + block_qi:for yy in range(y - 1, y + 2):
                        for xx in range(x - 1, x + 2):
                            if 0 <= yy and 0 <= xx and yy < blocks_y and xx < blocks_x:
                                if not (yy == y and xx == x):
                                    if map[yy][xx] == 0:
                                        win32api.SetCursorPos([left+xx*block_width, top+yy*block_height])
                                        win32api.mouse_event(win32con.MOUSEEVENTF_RIGHTDOWN, 0, 0, 0, 0)
                                        win32api.mouse_event(win32con.MOUSEEVENTF_RIGHTUP, 0, 0, 0, 0)
                                        showmap()

#点击白块
def dig():
    showmap()
    iscluck = 0
    for y in range(blocks_y):
        for x in range(blocks_x):
            if 1 <= map[y][x] and map[y][x] <= 5:
                boom_number = map[y][x]
                block_white = 0
                block_qi = 0
                for yy in range(y - 1, y + 2):
                    for xx in range(x - 1, x + 2):
                        if 0 <= yy and 0 <= xx and yy < blocks_y and xx < blocks_x:
                            if not (yy == y and xx == x):
                                if map[yy][xx] == 0:
                                    block_white += 1
                                elif map[yy][xx] == -4:
                                    block_qi += 1if boom_number == block_qi and block_white > 0:for yy in range(y - 1, y + 2):
                        for xx in range(x - 1, x + 2):
                            if 0 <= yy and 0 <= xx and yy < blocks_y and xx < blocks_x:
                                if not(yy == y and xx == x):
                                    if map[yy][xx] == 0:
                                        win32api.SetCursorPos([left + xx * block_width, top + yy * block_height])
                                        win32api.mouse_event(win32con.MOUSEEVENTF_LEFTDOWN, 0, 0, 0, 0)
                                        win32api.mouse_event(win32con.MOUSEEVENTF_LEFTUP, 0, 0, 0, 0)
                                        iscluck = 1
    if iscluck == 0:
        luck()

#随机点击
def luck():
    fl = 1
    while(fl):
        random_x = random.randint(0, blocks_x - 1)
        random_y = random.randint(0, blocks_y - 1)
        if(map[random_y][random_x] == 0):
            win32api.SetCursorPos([left + random_x * block_width, top + random_y * block_height])
            win32api.mouse_event(win32con.MOUSEEVENTF_LEFTDOWN, 0, 0, 0, 0)
            win32api.mouse_event(win32con.MOUSEEVENTF_LEFTUP, 0, 0, 0, 0)
            fl = 0
def gogo():
    win32api.SetCursorPos([left, top])
    win32api.mouse_event(win32con.MOUSEEVENTF_LEFTDOWN, 0, 0, 0, 0)
    win32api.mouse_event(win32con.MOUSEEVENTF_LEFTUP, 0, 0, 0, 0)
    showmap()
    global gameover
    while(1):
        if(gameover == 0):
            banner()
            banner()
            dig()
        else:
            gameover = 0
            win32api.keybd_event(113, 0, 0, 0)
            win32api.SetCursorPos([left, top])
            win32api.mouse_event(win32con.MOUSEEVENTF_LEFTDOWN, 0, 0, 0, 0)
            win32api.mouse_event(win32con.MOUSEEVENTF_LEFTUP, 0, 0, 0, 0)
            showmap()