Windows Phone 7 可以把它看成是Android 的 ListView ,WP7 只是预先在XAML里面为它的数据模板规定了格式,而Android 可以通过后期引入数据的方式为其添加数据模板。
Android 我们可以通过以下几种方式为LISTVIEW 添加数据,用法极其简单:
- 继承ListActivity,使用SetListAdapter,参考下面的代码。
setListAdapter(
new
ArrayAdapter
<
String
>
(
this
,
android.R.layout.simple_list_item_1, mStrings));
- 可自定义数据源,继承BaseAdapter ,参考下面代码。
![]() 自定义数据源
自定义数据源
private
class
SlowAdapter extends BaseAdapter {
private
LayoutInflater mInflater;
public
SlowAdapter(Context context) {
mContext
=
context;
mInflater
=
(LayoutInflater)context.getSystemService(Context.LAYOUT_INFLATER_SERVICE);
}
/*
*
* The number of items in the list is determined by the number of speeches
* in our array.
*
* @see android.widget.ListAdapter#getCount()
*/
public
int
getCount() {
return
mStrings.length;
}
/*
*
* Since the data comes from an array, just returning the index is
* sufficent to get at the data. If we were using a more complex data
* structure, we would return whatever object represents one row in the
* list.
*
* @see android.widget.ListAdapter#getItem(int)
*/
public
Object getItem(
int
position) {
return
position;
}
/*
*
* Use the array index as a unique id.
*
* @see android.widget.ListAdapter#getItemId(int)
*/
public
long
getItemId(
int
position) {
return
position;
}
/*
*
* Make a view to hold each row.
*
* @see android.widget.ListAdapter#getView(int, android.view.View,
* android.view.ViewGroup)
*/
public
View getView(
int
position, View convertView, ViewGroup parent) {
TextView text;
if
(convertView
==
null
) {
text
=
(TextView)mInflater.inflate(android.R.layout.simple_list_item_1, parent,
false
);
}
else
{
text
=
(TextView)convertView;
}
if
(
!
mBusy) {
text.setText(mStrings[position]);
//
Null tag means the view has the correct data
text.setTag(
null
);
}
else
{
text.setText(
"
Loading...
"
);
//
Non-null tag means the view still needs to load it's data
text.setTag(
this
);
}
return
text;
}
/*
*
* Remember our context so we can use it when constructing views.
*/
private
Context mContext;
}
- 由于Android 默认提供了多种自定义数据源的格式模板给我们,所以用起来非常方便有多种可供选择:
SimpleAdapter,SimpleCursorAdapter,ArrayAdapter<?>等,具体可在具体的项目上实施使用。
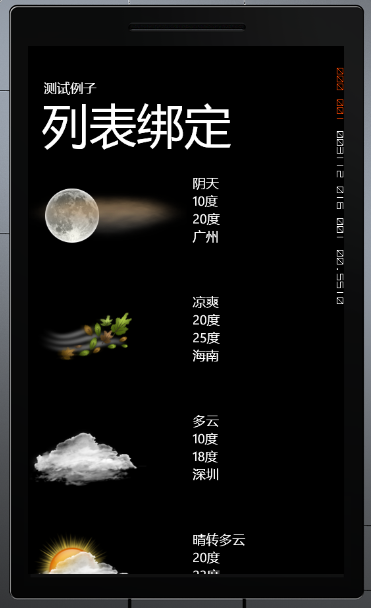
本篇将着重介绍WP7 的ListBox 一个我自认为非常简单方便的数据绑定方法。并且通过Silverlight 特有的数据绑定方法在XAML绑定数据。本篇学习笔记将以一个呈现天气列表的LISTBOX的例,效果如下:
![]()
实现这个功能我们需要编写一个Model 己记录这些实体信息,Model代码如下:
public
class
weather
{
public
string
Conditions {
get
;
set
; }
public
string
ImageUrl {
get
;
set
; }
public
string
Low {
get
;
set
; }
public
string
High {
get
;
set
; }
public
string
Location {
get
;
set
; }
public
weather(
string
conditins,
string
imageurl,
string
low,
string
high,
string
location)
{
this
.Conditions
=
conditins;
this
.ImageUrl
=
imageurl;
this
.Low
=
low;
this
.High
=
high;
this
.Location
=
location;
}
}
并且我们还需要一个类来做为ListBox 的数据源,前篇有讲过数据绑定的一篇文章提到过ObservableCollection 不知道大家还有没有印象,本篇就是使用这个数据集合来做ListBox 数据源,该类代码如下:
public
class
weathers:List
<
weather
>
{
private
const
string
imageUrl
=
"
../images/
"
;
public
weathers()
{
BuildCollection();
}
public
ObservableCollection
<
weather
>
DataCollection {
get
;
set
; }
public
ObservableCollection
<
weather
>
BuildCollection()
{
DataCollection
=
new
ObservableCollection
<
weather
>
();
DataCollection.Add(
new
weather(
"
阴天
"
, imageUrl
+
"
19n.png
"
,
"
10度
"
,
"
20度
"
,
"
广州
"
));
DataCollection.Add(
new
weather(
"
凉爽
"
, imageUrl
+
"
23d.png
"
,
"
20度
"
,
"
25度
"
,
"
海南
"
));
DataCollection.Add(
new
weather(
"
多云
"
, imageUrl
+
"
26n.png
"
,
"
10度
"
,
"
18度
"
,
"
深圳
"
));
DataCollection.Add(
new
weather(
"
晴转多云
"
, imageUrl
+
"
27d.png
"
,
"
20度
"
,
"
23度
"
,
"
三亚
"
));
DataCollection.Add(
new
weather(
"
阴转多云
"
, imageUrl
+
"
27n.png
"
,
"
22度
"
,
"
23度
"
,
"
揭阳
"
));
DataCollection.Add(
new
weather(
"
晴天
"
, imageUrl
+
"
31d.png
"
,
"
22度
"
,
"
25度
"
,
"
汕头
"
));
return
DataCollection;
}
}
实体类和数据源代码编写完成后,接下来打开mainPage.xaml,添加一个命名空间:
xmlns:data
=
"
clr-namespace:ListBoxDatBind
"
Tip:这里指定的是你的数据源所在的命名空间。
之后,添加一个页面的资源KEY
<
phone:PhoneApplicationPage.Resources
>
<
data:weathers x:Key
=
"
weatherCollection
"
/>
</
phone:PhoneApplicationPage.Resources
>
准备工作准备完成,为ListBox 绑定数据:
<
ListBox Name
=
"
listBox1
"
ItemsSource
=
"
{Binding Source={StaticResource weatherCollection},Path=DataCollection}
"
>
<
ListBox.ItemTemplate
>
<
DataTemplate
>
<
StackPanel Orientation
=
"
Horizontal
"
>
<
Image Source
=
"
{Binding Path=ImageUrl}
"
/>
<
StackPanel Orientation
=
"
Vertical
"
>
<
TextBlock Text
=
"
{Binding Conditions}
"
/>
<
TextBlock Text
=
"
{Binding Low}
"
/>
<
TextBlock Text
=
"
{Binding High}
"
/>
<
TextBlock Text
=
"
{Binding Location}
"
/>
</
StackPanel
>
</
StackPanel
>
</
DataTemplate
>
</
ListBox.ItemTemplate
>
</
ListBox
>
运行的效果如上图。
个人觉得,要论数据绑定的话,还是Android 的 ListView 来得灵活一点,不过Wp 7 的数据绑定却在微软的封装下来得方便许多。
源码下载:
数据绑定
本文转自 terry_龙 51CTO博客,原文链接:http://blog.51cto.com/terryblog/478003,如需转载请自行联系原作者