前言
今天讲解一下Android平台下ListView控件的开发,在本篇博客中,将介绍ListView的一些常用属性、方法及事件,还会讲解ListView在开发中常用的几种方式,以及使用不通用的适配器Adapter定制个性的View视图用于ListView的展示。
ListView
ListView,列表视图,直接继承了AbsListView,是一个以垂直方式在项目中显示View视图的列表。ListView的数据项,来自一个继承了ListAdapter接口的适配器。
ListView的常用属性一般就是用来设置列表的间隔、分割线、表头、表尾等属性的,常用属性有以下几个,并且Android也为其提供了对应的setter/getter方法:
- android:divider:使用一个Drawable或者color设置数据项之间的间隔样式。
- android:dividerHeight:设置数据项之间的间隔距离。
- android:entries:设置一个资源Id用于填充ListView的数据项。
- android:footerDividersEnabled:设定列表表尾是否显示分割线,如果有表尾的话。
- android:headerDividerEnabled:设定列表表头是否显示分割线,如果有表头的话。
ListView提供了一些方法,用于操作ListView。这里介绍一些常用的方法,更多的请参见API文档:
- void addFooterView(View v):添加表尾View视图。
- boolean removeFooterView(View v):移除一个表尾View视图。
- void addHeaderView(View v):添加一个表头View视图。
- boolean removeHeaderView(View v):移除一个表头View视图。
- ListAdapter getAdapter():获取当前绑定的ListAdapter适配器。
- void setAdapter(ListAdapter adapter):设置一个ListAdapter适配器到当前ListView中。
- void setSelection(int posotion):设定当前选中项。
- long[] getCheckItemIds():获取当前选中项。
作为一个列表选择控件,ListView具有一些选中选项可以触发的事件,但它本身没有定义这些事件,均继承自间接父类AdapterView。ListView支持的几个常用事件有以下几个:
- AdapterView.OnItemCLickListener:列表项被点击时触发。
- AdapterView.OnItemLongClickListener:列表项被长按时触发。
- AdapterView.OnItemSelectedListener:列表项被选择时触发。
在Android项目中使用ListView,有两种方式,一种是通过一个继承了ListActivity的Activity,在其中设定ListAdapter,对于这种方式,比较适用于整个页面就是一个ListView;第二种方式就是直接使用ListView控件,这种方式也是项目中比较常用的方式。
ListActivity
ListActivity继承了Activity,并通过绑定一个ListAdapter来显示一个数据列表。需要注意的是,如果对列表项的数据格式没有特殊要求,它完全可以不使用布局文件即可创建一个ListView,因为ListActivity类本身已经包含了一个ListView。因此在onCreate()方法中,不需要调用setContentView()方法来从一个布局文件加载用户界面。
在ListActivity的onCreate()方法中,可以直接使用this.setListAdapter()方法为这个ListView设定ListAdapter。如果想获得并操作这个ListActivity自带的ListView,可以使用this.getListView()方法获取。
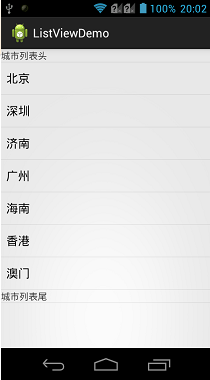
下面通过一个Demo讲解一下使用继承ListActivity的方式来实现ListView,因为这里只是使用一个ArrayAdapter填充数据,无需指定布局文件,这里只提供实现代码:
![复制代码]()
 1 package com.bgxt.datatimepickerdemo;
 2
 3 import android.app.ListActivity;
 4 import android.os.Bundle;
 5 import android.view.View;
 6 import android.widget.ArrayAdapter;
 7 import android.widget.ListView;
 8 import android.widget.TextView;
 9 import android.widget.Toast;
10
11 public class ListActivityDemo extends ListActivity {
12     private String[] presidents={"北京","深圳","济南","广州","海南","香港","澳门"};
13
14     @Override
15     protected void onCreate(Bundle savedInstanceState) {
16         // TODO Auto-generated method stub
17         super.onCreate(savedInstanceState);
18         ListView listview=getListView();
19         //添加一个TextView作为表头
20         TextView tvHeader=new TextView(ListActivityDemo.this);
21         tvHeader.setText("城市列表头");
22         listview.addHeaderView(tvHeader);
23         //添加一个TextView作为表尾
24         TextView tvFooter=new TextView(ListActivityDemo.this);
25         tvFooter.setText("城市列表尾");
26         listview.addFooterView(tvFooter);
27         listview.setAdapter(new ArrayAdapter<String>(this,android.R.layout.simple_list_item_1,presidents));
28
29     }
30     @Override
31     protected void onListItemClick(ListView parent, View view, int position, long id) {
32
33         Toast.makeText(this, "You have selected "+presidents[position], Toast.LENGTH_SHORT).show();
34     }
35 }
![复制代码]()
效果展示:
![]()
使用ListView控件构建
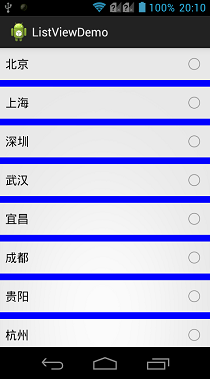
上面介绍的这种方式会将整个Activity都作为一个ListView,但是在实际项目中,一般还是把ListView作为一个数据显示控件,填充在布局中。现在通过一个简单的Demo,讲解使用ListView控件展示一个ArrayAdapter填充的数据列表。
布局代码:
 1 <?xml version="1.0" encoding="utf-8"?>
 2 <LinearLayout xmlns:android="http://schemas.android.com/apk/res/android"
 3     android:layout_width="match_parent"
 4     android:layout_height="match_parent"
 5     android:orientation="vertical" >
 6     <!-- 设定列表项的分割线为蓝色,并且数据项之间分割10个dp -->
 7     <ListView
 8         android:id="@+id/listviewsimple"
 9         android:layout_width="match_parent"
10         android:layout_height="match_parent"
11         android:divider="#00F"
12         android:dividerHeight="10dp"/>
13 </LinearLayout>
实现代码:
![复制代码]()
 1 package com.bgxt.datatimepickerdemo;
 2
 3 import java.util.ArrayList;
 4 import java.util.List;
 5
 6 import android.app.Activity;
 7 import android.os.Bundle;
 8 import android.widget.ArrayAdapter;
 9 import android.widget.ListView;
10
11 public class ListViewSimpleActivity extends Activity {
12     private ListView listview;
13     private ArrayAdapter<String> adapter;
14     private List<String> data;
15     @Override
16     protected void onCreate(Bundle savedInstanceState) {
17         // TODO Auto-generated method stub
18         super.onCreate(savedInstanceState);
19         setContentView(R.layout.activity_listviewsimple);
20         getData();//填充数据
21         listview=(ListView)findViewById(R.id.listviewsimple);
22         //设定列表项的选择模式为单选
23         adapter=new ArrayAdapter<String>(ListViewSimpleActivity.this, android.R.layout.simple_list_item_single_choice, data);
24         listview.setChoiceMode(ListView.CHOICE_MODE_SINGLE);
25         listview.setAdapter(adapter);
26     }
27
28     private void getData(){
29         data=new ArrayList<String>();
30         data.add("北京");
31         data.add("上海");
32         data.add("深圳");
33         data.add("武汉");
34         data.add("宜昌");
35         data.add("成都");
36         data.add("贵阳");
37         data.add("杭州");
38         data.add("济南");
39         data.add("天津");
40     }
41 }
![复制代码]()
效果展示:
![]()
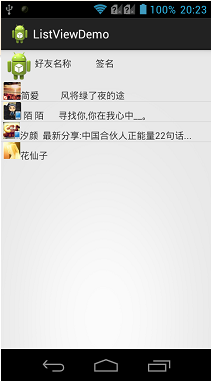
使用SimpleAdapter填充数据
ListView的使用范围很广,一般也不仅仅用来展示简单的数据,对于一些复杂样式的数据而言,可以使用SimpleAdapter这个适配器。对于SimpleAdapter适配器的用法,可以参见我的另外一篇博客:Android--UI之Spinner,这里就不再累述了。
下面直接通过一个Demo讲解,在这个Demo中,对于SimpleAdapter填充样式而言,不再单独给定模板,直接使用布局的模板。
布局代码:
![复制代码]()
 1 <?xml version="1.0" encoding="utf-8"?>
 2 <LinearLayout xmlns:android="http://schemas.android.com/apk/res/android"
 3     android:layout_width="match_parent"
 4     android:layout_height="match_parent"
 5     android:orientation="vertical" >
 6
 7     <LinearLayout
 8         android:layout_width="match_parent"
 9         android:layout_height="wrap_content"
10         android:orientation="horizontal" >
11         <!-- LinnerLayout定义的三个控件,将成为ListView控件的模板 -->
12         <ImageView
13             android:id="@+id/ivIcon"
14             android:layout_width="wrap_content"
15             android:layout_height="wrap_content"
16             android:layout_marginLeft="3dp"
17             android:maxHeight="5dp"
18             android:maxWidth="5dp"
19             android:src="@drawable/ic_launcher" />
20
21         <TextView
22             android:id="@+id/tvName"
23             android:layout_width="wrap_content"
24             android:layout_height="wrap_content"
25             android:layout_marginTop="10dp"
26             android:layout_weight="1"
27             android:text="好友名称" />
28
29         <TextView
30             android:id="@+id/tvSS"
31             android:layout_width="wrap_content"
32             android:layout_height="wrap_content"
33             android:layout_marginTop="10dp"
34             android:layout_weight="4"
35             android:text="签名" />
36     </LinearLayout>
37
38     <ListView
39         android:id="@+id/lvArray"
40         android:layout_width="match_parent"
41         android:layout_height="wrap_content" />
42
43 </LinearLayout>
![复制代码]()
实现代码:
![复制代码]()
 1 package com.bgxt.datatimepickerdemo;
 2
 3 import java.util.ArrayList;
 4 import java.util.HashMap;
 5 import java.util.List;
 6 import java.util.Map;
 7
 8 import android.app.Activity;
 9 import android.os.Bundle;
10 import android.widget.ListView;
11 import android.widget.SimpleAdapter;
12
13 public class SimpleAdapterActivity extends Activity {
14     private ListView listview;
15     private SimpleAdapter simpleAdapter;
16     private List<Map<String, Object>> data;
17
18     @Override
19     protected void onCreate(Bundle savedInstanceState) {
20         // TODO Auto-generated method stub
21         super.onCreate(savedInstanceState);
22         setContentView(R.layout.activity_listviewarrayadapter);
23         listview = (ListView) findViewById(R.id.lvArray);
24         //填充数据
25         putData();
26         //这里使用当前的布局资源作为ListView的模板。
27         //使用这种方式,SimpleAdapter会忽略ListView控件,仅以ListView之外的控件作为模板。
28         simpleAdapter = new SimpleAdapter(SimpleAdapterActivity.this, data,
29                 R.layout.activity_listviewarrayadapter, new String[] { "icon",
30                         "name", "ss" }, new int[] { R.id.ivIcon, R.id.tvName,
31                         R.id.tvSS });
32         listview.setAdapter(simpleAdapter);
33     }
34
35     private void putData()
36     {
37         data=new ArrayList<Map<String,Object>>();
38         Map<String, Object> map1=new HashMap<String, Object>();
39         map1.put("icon", R.drawable.item1);
40         map1.put("name", "简爱");
41         map1.put("ss", "风将绿了夜的途");
42         Map<String, Object> map2=new HashMap<String, Object>();
43         map2.put("icon", R.drawable.item2);
44         map2.put("name", " 陌 陌");
45         map2.put("ss", "寻找你,你在我心中__。");
46         Map<String, Object> map3=new HashMap<String, Object>();
47         map3.put("icon", R.drawable.item3);
48         map3.put("name", "汐颜");
49         map3.put("ss", "最新分享:中国合伙人正能量22句话...");
50         Map<String, Object> map4=new HashMap<String, Object>();
51         map4.put("icon", R.drawable.item4);
52         map4.put("name", "花仙子");
53         map4.put("ss", " ");
54         data.add(map1);
55         data.add(map2);
56         data.add(map3);
57         data.add(map4);
58     }
59 }
![复制代码]()
效果展示:
![]()
本文转自承香墨影博客园博客,原文链接:http://www.cnblogs.com/plokmju/p/android_ListView.html,如需转载请自行联系原作者