报文格式:
![]()
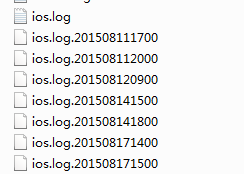
每隔一个小时 出现一个文件类型 报文 ,所以 我们的处理思路是,一个小时做一次处理。
import java.io.FileInputStream;
import java.util.Properties;
import java.util.concurrent.Executors;
import java.util.concurrent.ScheduledExecutorService;
import java.util.concurrent.TimeUnit;


import com.cmcc.aoi.util.OsUtil;

public class HbaseStarter {

	public static void main(String[] args) throws  Exception {
		Properties properties=new Properties();
		String config="";
		if(!OsUtil.isLinux())
			config= "D:/work/util/aoi-hbase/trunk/src/main/resources/config.properties";
		else
			config = "/home/aoi/aoi-hbase/conf/config.properties";
		FileInputStream fis = new FileInputStream(config);
		properties.load(fis);
		fis.close();

		String hbaseTable = properties.getProperty("com.cmcc.aoi.ua.hbaseTable");
		String hbaseFamily = properties.getProperty("com.cmcc.aoi.ua.hbaseFamily");
		String sourceFilePath=properties.getProperty("com.cmcc.aoi.ua.sourceFilePath");
		String archivelogsPath=properties.getProperty("com.cmcc.aoi.ua.archivelogsPath");
		boolean isDebug= Integer.parseInt( properties.getProperty("com.cmcc.aoi.ua.isDebug")) == 0 ? false : true;
		String sourceFileName = properties.getProperty("com.cmcc.aoi.ua.sourceFileName");

		String[] hbaseTableName=hbaseTable.split(",");  // table
		String[] hbaseFamilyName=hbaseFamily.split("&");// family
		String[] sourceFileNameArr=sourceFileName.split(",");


		ScheduledExecutorService service = Executors.newScheduledThreadPool(2);
		service.scheduleAtFixedRate(new DeviceReadThread (sourceFileNameArr[0],hbaseTableName[0],hbaseFamilyName[0].split(","),sourceFilePath,archivelogsPath,isDebug)
			               ,0, 1,TimeUnit.HOURS);
		service.scheduleAtFixedRate(new AppReadThread (sourceFileNameArr[1],hbaseTableName[1],hbaseFamilyName[1].split(","),sourceFilePath,archivelogsPath,isDebug)
                         ,0, 1,TimeUnit.HOURS);
	}
}
import java.io.BufferedReader;
import java.io.File;
import java.io.FileReader;
import java.io.IOException;
import java.util.Date;
import org.slf4j.Logger;
import org.slf4j.LoggerFactory;
import Model.Device;
import com.alibaba.fastjson.JSON;

public class DeviceReadThread extends BaseRunnabler {

	static Logger logger = LoggerFactory.getLogger(DeviceReadThread.class);

	public DeviceReadThread(String sourceFileName, String hbaseTable,
			String[] hbaseFamily, String sourceFilePath,
			String archivelogsPath, boolean isDebug) {
		super(sourceFileName, hbaseTable, hbaseFamily, sourceFilePath, archivelogsPath,
				isDebug);
	}

	public void processFile(IOperator hu) {
		FileReader logReader = null;
		BufferedReader logBufferedReader = null;
		try {
			File logFile = new File(sourceFilePath+sourceFileName);
			logReader = new FileReader(logFile);
			logBufferedReader = new BufferedReader(logReader);
			String temp = logBufferedReader.readLine();
			//logger.error(" temp is  " + temp );
			while ( temp  != null) {
				Device device = JSON.parseObject(temp, Device.class);
				//logger.error(" device is null ? " + ( device == null ) );

				String[][] s = new String[][] {
						{ device.getLid(), hbaseFamily[0], "lid" , device.getLid() } ,
						{ device.getLid(), hbaseFamily[1], "date", (new Date()).toString() },
						{ device.getLid(), hbaseFamily[2], "os", device.getOs() },
						{ device.getLid(), hbaseFamily[2], "osv", device.getOsv()} };
				hu.writeMultRow(hbaseTable, s);
				logger.info(" hbase util end "   );
				temp = logBufferedReader.readLine();
			}
		} catch (Exception e) {
			logger.error(" DeviceReadThread error "   );
			e.printStackTrace();
		} finally {
			try {
				logBufferedReader.close();
			} catch (IOException e) {
				e.printStackTrace();
			}
			try {
				logReader.close();
			} catch (IOException e) {
				e.printStackTrace();
			}
		}
	}

}
import java.io.File;
import java.util.Arrays;

import org.slf4j.Logger;
import org.slf4j.LoggerFactory;

import com.cmcc.aoi.util.FileUtil;

public abstract class BaseRunnabler implements Runnable{
	protected static Logger logger = LoggerFactory.getLogger(BaseRunnabler.class);

	String sourceFileName=""; // 读取文件路径
	String hbaseTable="";  // hbase  表名
	String [] hbaseFamily=null;    // 行列簇名
	String sourceFilePath ;
	String archivelogsPath ;
	boolean isDebug;


	public BaseRunnabler(String sourceFileName,String hbaseTable,String [] hbaseFamily  ,String sourceFilePath,String archivelogsPath,boolean isDebug ){
		this.hbaseTable=hbaseTable;
		this.hbaseFamily = hbaseFamily;
		this.sourceFileName=sourceFileName;
		this.sourceFilePath = sourceFilePath;
		this.archivelogsPath = archivelogsPath;
		this.isDebug = isDebug;
	}

	@Override
	public void run() {
		try{
		IOperator hu = new HbaseUtil( hbaseTable,hbaseFamily);
    	hu.createTable(hbaseTable,hbaseFamily );

    	File file=new File(sourceFilePath);
		 File[] tempFileList = file.listFiles();
		 Arrays.sort(tempFileList);
		 for (File tempFile: tempFileList) {
			 if (tempFile.isFile() && tempFile.getName().contains(sourceFileName +".") ) {
				try{
					try{
						processFile(hu);
					}catch (Exception e) {
						logger.error("readfile error ,must continue to protect  to read  other file ");
						continue;
					}

				removeFile(tempFile);

				}catch (Exception e2) {
					logger.error(" one file has an error ,other  file must continue to do this task ");
				}
			}
		 }


		}catch (Exception e) {
			e.printStackTrace();
		}

	}

	public abstract void processFile(IOperator hu) throws Exception;

	private void removeFile(File file) {
		if (isDebug) {
			 File path = new File(archivelogsPath);
			 if (!path.exists()) {
				 path.mkdirs();
			 }
			 FileUtil.moveFile(file, new File(archivelogsPath,file.getName()));
			 logger.info("remove file :" + file.getName());
		 }else{
			 file.delete();
			 logger.info("delete file :" + file.getName());
		 }
	}
}
捐助开发者
在兴趣的驱动下,写一个免费的东西,有欣喜,也还有汗水,希望你喜欢我的作品,同时也能支持一下。 当然,有钱捧个钱场(右上角的爱心标志,支持支付宝和PayPal捐助),没钱捧个人场,谢谢各位。
![]()
![]()
![]()
谢谢您的赞助,我会做的更好!