1.TensorRT-LLM 如何提升 LLM 模型推理效率
大型语言模型(Large language models,LLM)是基于大量数据进行预训练的超大型深度学习模型。底层转换器是一组神经网络,这些神经网络由具有 self-attention 的编码器和解码器组成。编码器和解码器从一系列文本中提取含义,并理解其中的单词和短语之间的关系。
当前 LLM 模型推理的主要瓶颈是 GPU 显存资源不足。因此,各类加速框架主要集中于降低 GPU 显存峰值和提高 GPU 使用率两大目标。
TensorRT-LLM[1]是 NVIDIA 推出的大语言模型(LLM)推理优化框架。它提供了一组 Python API 用于定义 LLMs,并且使用最新的优化技术将 LLM 模型转换为 TensorRT Engines,推理时直接使用优化后的 TensorRT Engines。
TensorRT-LLM 主要利用以下四项优化技术提升 LLM 模型推理效率。
1.1 量化
模型量化技术是通过降低原始模型的精度来减少模型推理时的 GPU 显存使用。
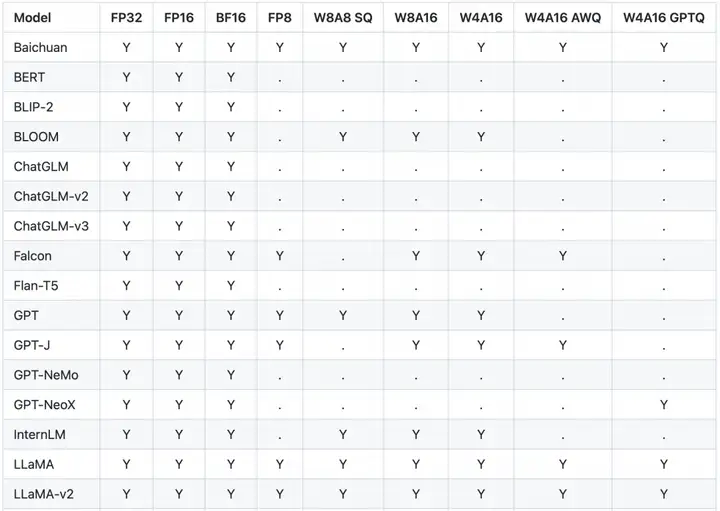
TensorRT 支持多种模型的多种精度,以下列举了部分主流模型支持的量化精度。
![]()
W8A8 SQ 使用了 SmoothQuant 技术[2],在不降低模型推理准确率的前提下,将模型权重和激活层都降低为 INT8 精度,显著减少了 GPU 显存消耗。
W4A16/W8A16 是指模型权重为 INT4 或者 INT8,激活层为 FP16 精度。
W4A16 AWQ 以及 W4A16 GPTQ 分别实现了 AWQ[3]和 GPTQ[4]两篇论文中提到的量化方法。模型权重为 INT4,激活层为 FP16 精度。
1.2 In-Flight Batching
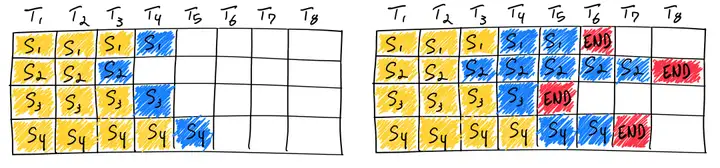
传统的 Batching 技术为 Static Batching 的,需要等 Batching 中所有序列推理完成后才能进行下一次批次。下图为一个输出最大 Token 为 8,Batch size 为 4 的推理过程,使用 Static Batching 技术。S3 序列在 T5 时刻就已经完成推理,但是需要等到 S2 序列在 T8 时刻推理完成后才会处理下一个 sequence,存在明显的资源浪费。
![]()
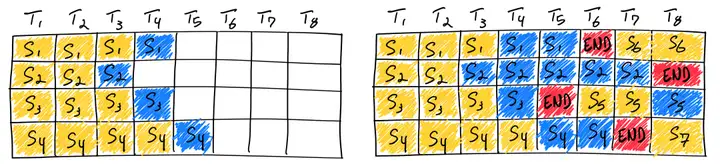
In-Flight Batching 又名 Continuous Batching 或 iteration-level batching,该技术可以提升推理吞吐率,降低推理时延。Continuous Batching 处理过程如下,当 S3 序列处理完成后插入一个新序列 S5 进行处理,提升资源利用率。详情可参考论文 Orca: A Distributed Serving System for Transformer-Based Generative Models[5]。
![]()
1.3 Attention
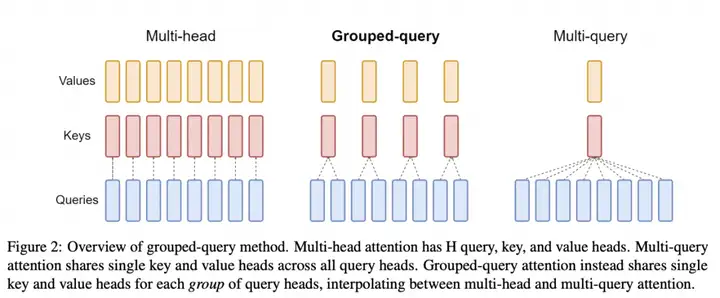
Attention 机制用于从序列中提取关键/重要信息,在情感识别、翻译、问答等任务中起着至关重要的作用。Attention 机制按照演进顺序可以分为 MHA(Multi-head Attention)、MQA(Multi-query Attention)[6]以及 GQA(Group-query Attention)[7]机制。MQA 和 GQA 都是 MHA 的变种。
![]()
MHA 是标准的多头注意力机制,每个 query 存储一份 KV,因此需要使用较多的显存。MQA 所有 query 共享一份 KV,推理时容易丢失一些细节信息。GQA 将 query 进行分组,组内共享一份 KV,可以有效避免 MHA 和 MQA 的问题。
TensorRT-LLM 支持 MHA、MQA 及 GQA 方式,可以在 tensorrt_llm.functional.gpt_attention 查看具体实现。
1.4 Graph Rewriting
TensorRT-LLM 在将 LLM 模型编译为 TensorRT Engines 时会对神经网络进行优化,提升执行效率。
2.基于阿里云容器服务 ACK 的实战体验
2.1 云原生 AI 套件
云原生 AI 套件是阿里云容器服务 ACK 提供的云原生 AI 技术和产品方案,帮助企业更快、更高效地落地云原生 AI 系统。
本文将介绍如何基于阿里云容器服务 ACK 云原生 AI 套件,利用 TensorRT-LLM 优化 LLM 模型推理。
2.2 环境配置
1. 参考文档安装云原生 AI 套件[8]。
2. 登陆容器服务管理控制台[9],在左侧导航栏选择集群 > 应用 > 云原生 AI 套件。等待开发控制台准备就绪后,单击开发控制台。
3. 在开发控制台左侧,选择 Notebook,在 Notebook 页面右上角,单击创建 Notebook 创建新的 Notebook 环境。Notebook 资源需要 CPU:12C,内存:40G,GPU 显存:24GB。(节点对应规格为 ecs.gn7i-c16g1.4xlarge[10])
![]()
2.3 准备 TensorRT-LLM 环境
1. 构建 Notebook 所需镜像。
FROM docker.io/nvidia/cuda:12.2.2-cudnn8-runtime-ubuntu22.04

ENV DEBIAN_FRONTEND=noninteractive

RUN apt-get update && apt-get upgrade -y && \
    apt-get install -y --no-install-recommends \
    libgl1 libglib2.0-0 wget git curl vim \
    python3.10 python3-pip python3-dev build-essential \
    openmpi-bin libopenmpi-dev jupyter-notebook jupyter

RUN pip3 install tensorrt_llm -U --extra-index-url https://pypi.nvidia.com
RUN pip3 install --upgrade jinja2==3.0.3 pynvml>=11.5.0

RUN rm -rf /var/cache/apt/ && apt-get clean && rm -rf /var/lib/apt/lists/* /tmp/* /var/tmp/* && \
    rm -rf /root/.cache/pip/ && rm -rf /*.whl

WORKDIR /root
RUN git clone https://github.com/NVIDIA/TensorRT-LLM.git --branch v0.7.1

ENTRYPOINT ["sh","-c","jupyter notebook --allow-root --notebook-dir=/root --port=8888 --ip=0.0.0.0 --ServerApp.token=''"]
2. 下载模型,本文以 Baichuan2-7B-Base 为例。
a.确认 tensorrt_llm 安装成功
! python3 -c "import tensorrt_llm; print(tensorrt_llm.__version__)"
# 0.7.1
b.安装 baichuan 依赖
! cd /root/TensorRT-LLM/examples/baichuan
!pip3 install -r requirements.txt
c.下载 Baichuan2-7B-Chat 模型
!yum install git-lfs
!GIT_LFS_SKIP_SMUDGE=1 git clone https://www.modelscope.cn/baichuan-inc/Baichuan2-7B-Chat.git
!cd Baichuan2-7B-Chat/
!git lfs pull
d.将模型编译为 TensorRT Engines,权重指定为 INT8。模型转换约 5 分钟。
! cd /root/TensorRT-LLM/examples/baichuan
# Build the Baichuan V2 7B model using a single GPU and apply INT8 weight-only quantization.
! python3 build.py --model_version v2_7b \
                --model_dir ./Baichuan2-7B-Chat \
                --dtype float16 \
                --use_gemm_plugin float16 \
                --use_gpt_attention_plugin float16 \
                --use_weight_only \
                --output_dir ./tmp/baichuan_v2_7b/trt_engines/int8_weight_only/1-gpu/
e.使用构建好的 tensort engines 进行推理
# With INT8 weight-only quantization inference
! python3 ../run.py --input_text "世界上第二高的山峰是哪座?" \
                 --max_output_len=50 \
                 --tokenizer_dir=./Baichuan2-7B-Chat \
                 --engine_dir=./tmp/baichuan_v2_7b/trt_engines/int8_weight_only/1-gpu/
预期输出:
Input [Text 0]: "世界上第二高的山峰是哪座?"
Output [Text 0 Beam 0]: "世界上第二高的山峰是喀喇昆仑山脉的乔戈里峰(K2),海拔高度为8611米。"
2.4 性能测试
1. 使用 TensorRT-LLM 自带的 benchmark。
向 _allowed_configs dict 中添加 baichuan2_7b_chat 配置,代码可参考链接[11]。
注:0.7.1 版本 benchmark 还未支持 baichuan2 模型,因此需要手动修改下 allowed_configs 配置。
! cd /root/TensorRT-LLM/benchmarks/python
! vim allowed_configs.py
#   "baichuan2_7b_chat":
    ModelConfig(name="baichuan2_7b_chat",
                family="baichuan_7b",
                benchmark_type="gpt",
                build_config=BuildConfig(
                    num_layers=32,
                    num_heads=32,
                    hidden_size=4096,
                    vocab_size=125696,
                    hidden_act='silu',
                    n_positions=4096,
                    inter_size=11008,
                    max_batch_size=128,
                    max_input_len=512,
                    max_output_len=200,
                    builder_opt=None,
                )),
运行 benchmark:
! python3 benchmark.py \
    -m baichuan2_7b_chat \
    --mode plugin \
    --engine_dir /root/TensorRT-LLM/examples/baichuan/tmp/baichuan_v2_7b/trt_engines/int8_weight_only/1-gpu \
    --batch_size 1 \
    --input_output_len "32,50;128,50"
# batch_size 并发度
# input_output_len 输入输出的长度,多个测试用例用分号分隔
Expected outputs:
[BENCHMARK] model_name baichuan2_7b_chat world_size 1 num_heads 32 num_kv_heads 32 num_layers 32 hidden_size 4096 vocab_size 125696 precision float16 batch_size 1 input_length 32 output_length 50 gpu_peak_mem(gb) 8.682 build_time(s) 0 tokens_per_sec 60.95 percentile95(ms) 821.977 percentile99(ms) 822.093 latency(ms) 820.348 compute_cap sm86 generation_time(ms) 798.45 total_generated_tokens 49.0 generation_tokens_per_second 61.369
[BENCHMARK] model_name baichuan2_7b_chat world_size 1 num_heads 32 num_kv_heads 32 num_layers 32 hidden_size 4096 vocab_size 125696 precision float16 batch_size 1 input_length 128 output_length 50 gpu_peak_mem(gb) 8.721 build_time(s) 0 tokens_per_sec 59.53 percentile95(ms) 841.708 percentile99(ms) 842.755 latency(ms) 839.852 compute_cap sm86 generation_time(ms) 806.571 total_generated_tokens 49.0 generation_tokens_per_second 60.751
2. 对比 INT8 量化模型与原始模型性能。
原始模型执行命令:
def normal_inference():
    from transformers import AutoModelForCausalLM, AutoTokenizer
    from transformers.generation.utils import GenerationConfig
    tokenizer = AutoTokenizer.from_pretrained(model_path, use_fast=False, trust_remote_code=True)
    model = AutoModelForCausalLM.from_pretrained(model_path, device_map="auto", torch_dtype=torch.bfloat16, trust_remote_code=True)
    model.generation_config = GenerationConfig.from_pretrained(model_path)
    messages = []
    messages.append({"role": "user", "content": prompt})
    response = model.chat(tokenizer, messages)
    print(response)
INT8 量化模型命令:
def tensorrt_llm_inference():
    from subprocess import Popen, PIPE
    script = f'''python3 /root/TensorRT-LLM/examples/run.py --input_text \"{prompt}\"  \
                 --max_output_len=50 \
                 --tokenizer_dir=/root/TensorRT-LLM/examples/baichuan/Baichuan2-7B-Chat \
                 --engine_dir=/root/TensorRT-LLM/examples/baichuan/tmp/baichuan_v2_7b/trt_engines/int8_weight_only/1-gpu/'''
    p = Popen(['sh', '-c', script], stdout=PIPE,
              stderr=PIPE)
    output, err = p.communicate()
    if p.returncode != 0:
        print(f"tensorrt_llm_inference() error:{err}")
        return
    print(output)
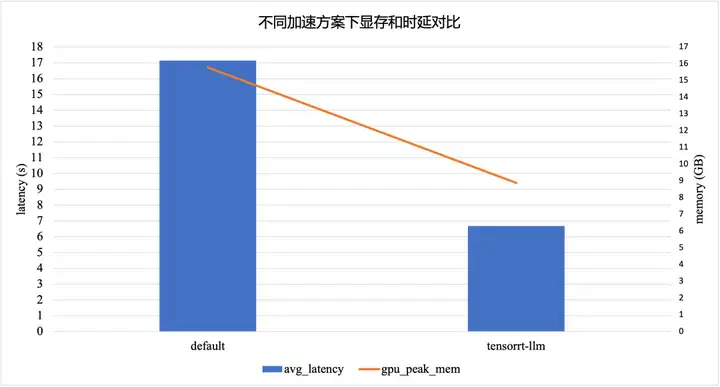
![]()
TensorRT-LLM 加速方案在采用 INT8 模型量化的情况下,相比于默认的 Baichuan2-7B-Chat 模型,显存峰值降低了 43.8%,时延降低了 61.1%。
3.相关资料
[1] 参考文献
[2] SmoothQuant技术
[3] AWQ
[4] GPTQ
[5] Orca: A Distributed Serving System for Transformer-Based Generative Models
[6] MQA(Multi-query Attention)
[7] GQA(Group-query Attention)
[8] 安装云原生AI套件
[9] 容器服务管理控制台
[10] ecs.gn7i-c16g1.4xlarge
[11]https://github.com/NVIDIA/TensorRT-LLM/blob/12e82e30b0e64b0f7ada0dc5993edd3b05385964/benchmarks/python/allowed_configs.py#L940TensorRT-LLM
[12]参考资料
原文链接
本文为阿里云原创内容,未经允许不得转载。