本文已在飞桨公众号发布,查看请戳链接:
模糊照片秒变高清大图,飞桨PPDE带你复现图像恢复模型CMFNet
![图片]()
图像恢复技术,就是使用各种图像算法对有缺陷的图像进行修复还原的技术,常见的图像恢复需求有:图像降噪、图像锐化、图像去雾、图像去雨水等等,本篇文章将介绍一种基于复合多分支特征融合的现实图像恢复模型CMFNet[1],并使用飞桨框架实现CMFNet模型,加载官方提供的预训练模型,完成去模糊、去雾霾和去雨水三种图像恢复任务。
点击获得项目链接,欢迎STAR
https://aistudio.baidu.com/aistudio/projectdetail/3732305
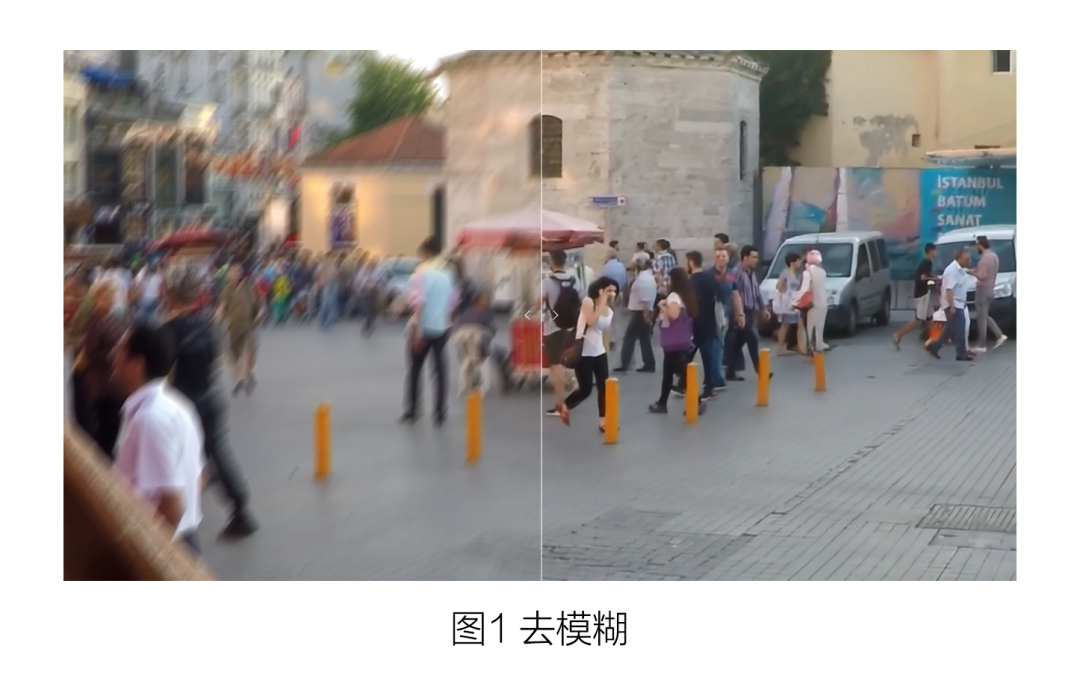
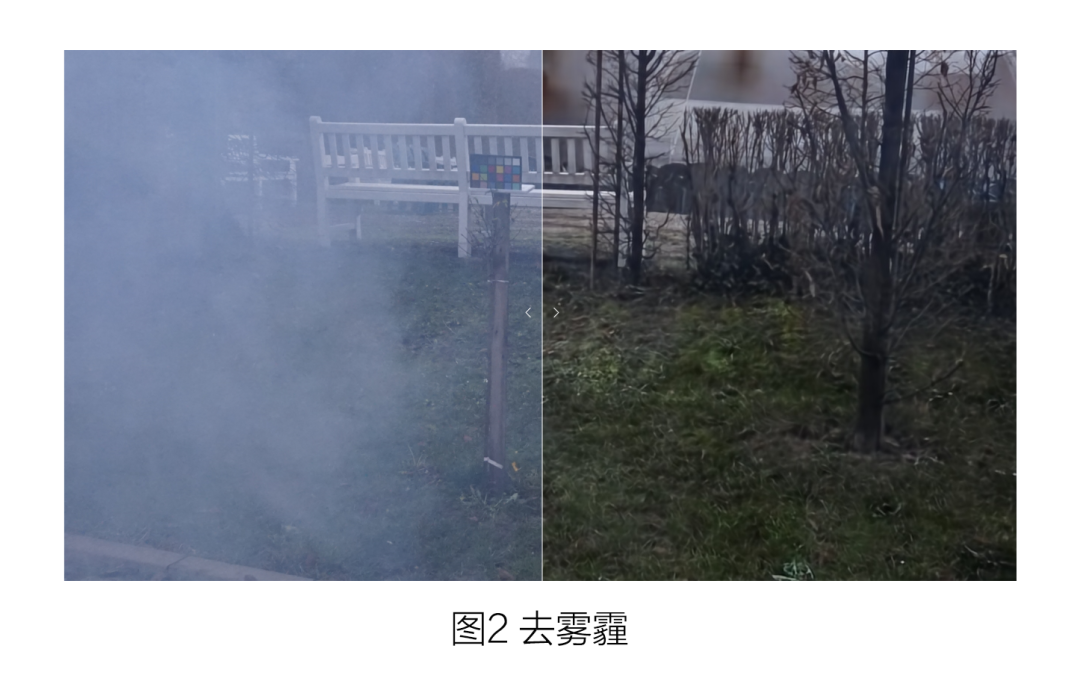
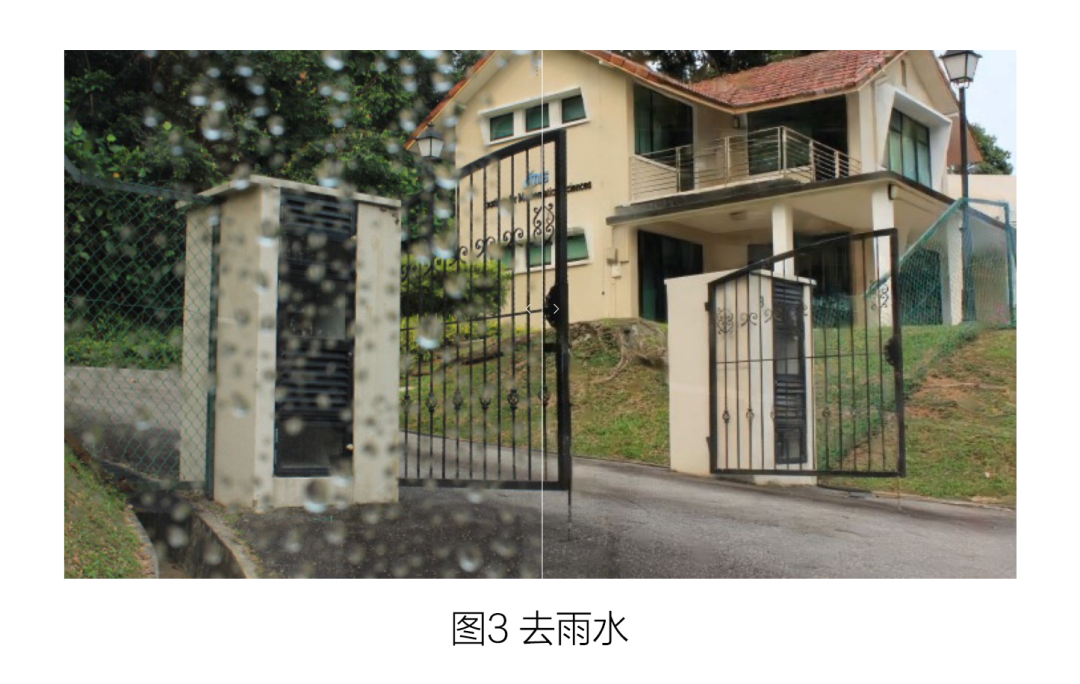
开始之前,先来看看模型的恢复效果如何?
![图片]()
![图片]()
![图片]()
图像修复的效果是不是还不错呢?接下来,我们一起了解一下技术原理吧。
CMFNet模型介绍
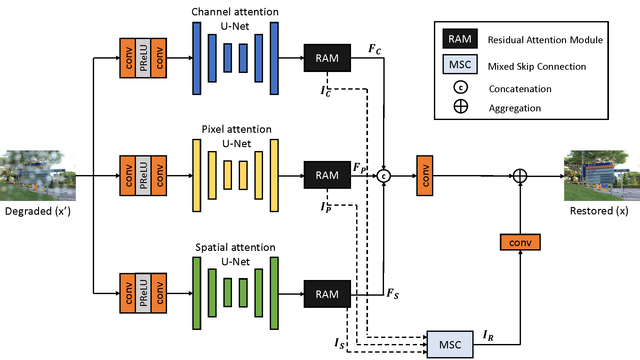
CMFNet包含三个主要的模块,其总体的模型结构如图4所示。
![图片]()
图4 CMFNet模型结构
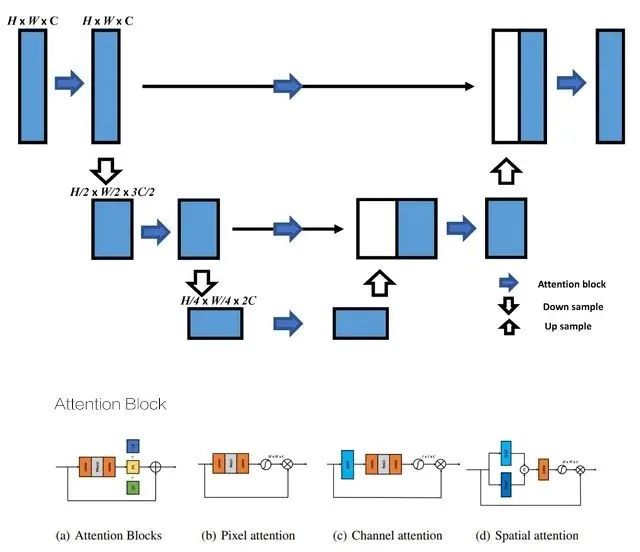
本文用简单的块结构将多个复杂块叠加到多个分支中,分离出不同的注意特征。图4中的三个U-Net结构使用不同的注意力模块,如图5所示。
![图片]()
图5 U-Net模型结构
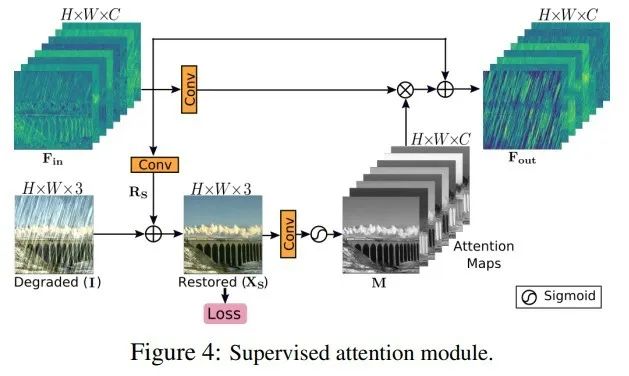
本文还基于监督注意模块 (SAM)[2] 提出RAM来提高性能,SAM模型结构如图6所示。RAM消除了SAM输出图像与真实图像之间的监督损耗,因为作者认为它会限制网络的学习。加载去模糊、去雾、去雨水模型,使用上述代码完成模型推理,分别实现去模糊、去雾、去雨水效果。
![图片]()
图6 SAM结构
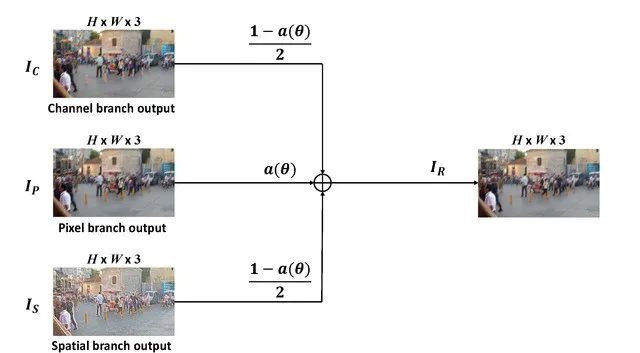
本文提出了一种混合跳跃连接 (MSC),如图7所示。将传统的残差连接替换为一个可学习的常数,使得残差学习在不同的恢复任务下更加灵活。
![图片]()
图7 MSC结构
了解过技术原理之后,是不是对模型如何搭建产生了好奇?接下来我将为大家介绍模型搭建过程。
模型搭建介绍
基础模块
构建一个基础的卷积层。
def conv(in_channels, out_channels, kernel_size, bias_attr=False, stride=1):
    layer = nn.Conv2D(in_channels, out_channels, kernel_size, padding=(kernel_size // 2), bias_attr=bias_attr, stride=stride)
    return layer
注意力模块
构建多种注意力模块。
## Spatial Attention
class SALayer(nn.Layer):
    def __init__(self, kernel_size=7):
        super(SALayer, self).__init__()
        self.conv1 = nn.Conv2D(2, 1, kernel_size, padding=kernel_size // 2, bias_attr=False)
        self.sigmoid = nn.Sigmoid()

    def forward(self, x):
        avg_out = paddle.mean(x, axis=1, keepdim=True)
        max_out = paddle.max(x, axis=1, keepdim=True)
        y = paddle.concat([avg_out, max_out], axis=1)
        y = self.conv1(y)
        y = self.sigmoid(y)
        return x * y

# Spatial Attention Block (SAB)
class SAB(nn.Layer):
    def __init__(self, n_feat, kernel_size, reduction, bias_attr, act):
        super(SAB, self).__init__()
        modules_body = [conv(n_feat, n_feat, kernel_size, bias_attr=bias_attr), act, conv(n_feat, n_feat, kernel_size, bias_attr=bias_attr)]
        self.body = nn.Sequential(*modules_body)
        self.SA = SALayer(kernel_size=7)

    def forward(self, x):
        res = self.body(x)
        res = self.SA(res)
        res += x
        return res

## Pixel Attention
class PALayer(nn.Layer):
    def __init__(self, channel, reduction=16, bias_attr=False):
        super(PALayer, self).__init__()
        self.pa = nn.Sequential(
            nn.Conv2D(channel, channel // reduction, 1, padding=0, bias_attr=bias_attr),
            nn.ReLU(),
            nn.Conv2D(channel // reduction, channel, 1, padding=0, bias_attr=bias_attr), # channel <-> 1
            nn.Sigmoid()
        )

    def forward(self, x):
        y = self.pa(x)
        return x * y

## Pixel Attention Block (PAB)
class PAB(nn.Layer):
    def __init__(self, n_feat, kernel_size, reduction, bias_attr, act):
        super(PAB, self).__init__()
        modules_body = [conv(n_feat, n_feat, kernel_size, bias_attr=bias_attr), act, conv(n_feat, n_feat, kernel_size, bias_attr=bias_attr)]
        self.PA = PALayer(n_feat, reduction, bias_attr=bias_attr)
        self.body = nn.Sequential(*modules_body)

    def forward(self, x):
        res = self.body(x)
        res = self.PA(res)
        res += x
        return res

## Channel Attention Layer
class CALayer(nn.Layer):
    def __init__(self, channel, reduction=16, bias_attr=False):
        super(CALayer, self).__init__()
        # global average pooling: feature --> point
        self.avg_pool = nn.AdaptiveAvgPool2D(1)
        # feature channel downscale and upscale --> channel weight
        self.conv_du = nn.Sequential(
            nn.Conv2D(channel, channel // reduction, 1, padding=0, bias_attr=bias_attr),
            nn.ReLU(),
            nn.Conv2D(channel // reduction, channel, 1, padding=0, bias_attr=bias_attr),
            nn.Sigmoid()
        )

    def forward(self, x):
        y = self.avg_pool(x)
        y = self.conv_du(y)
        return x * y

## Channel Attention Block (CAB)
class CAB(nn.Layer):
    def __init__(self, n_feat, kernel_size, reduction, bias_attr, act):
        super(CAB, self).__init__()
        modules_body = [conv(n_feat, n_feat, kernel_size, bias_attr=bias_attr), act, conv(n_feat, n_feat, kernel_size, bias_attr=bias_attr)]

        self.CA = CALayer(n_feat, reduction, bias_attr=bias_attr)
        self.body = nn.Sequential(*modules_body)

    def forward(self, x):
        res = self.body(x)
        res = self.CA(res)
        res += x
        return res
图像缩放模块
DownSample:下采样,用于缩小特征图尺寸,提取图像特征;
UpSample:上采样,用于放大特征图尺寸,逐级恢复至原始图像尺寸;
SkipUpSample:上采样 + 跳跃连接(Skip Connect)。
##---------- Resizing Modules ----------
class DownSample(nn.Layer):
    def __init__(self, in_channels, s_factor):
        super(DownSample, self).__init__()
        self.down = nn.Sequential(nn.Upsample(scale_factor=0.5, mode='bilinear', align_corners=False),
                                  nn.Conv2D(in_channels, in_channels + s_factor, 1, stride=1, padding=0, bias_attr=False))

    def forward(self, x):
        x = self.down(x)
        return x

class UpSample(nn.Layer):
    def __init__(self, in_channels, s_factor):
        super(UpSample, self).__init__()
        self.up = nn.Sequential(nn.Upsample(scale_factor=2, mode='bilinear', align_corners=False),
                                nn.Conv2D(in_channels + s_factor, in_channels, 1, stride=1, padding=0, bias_attr=False))

    def forward(self, x):
        x = self.up(x)
        return x

class SkipUpSample(nn.Layer):
    def __init__(self, in_channels, s_factor):
        super(SkipUpSample, self).__init__()
        self.up = nn.Sequential(nn.Upsample(scale_factor=2, mode='bilinear', align_corners=False),
                                nn.Conv2D(in_channels + s_factor, in_channels, 1, stride=1, padding=0, bias_attr=False))

    def forward(self, x, y):
        x = self.up(x)
        x = x + y
        return x
U-Net
使用对称的 Encoder 和 Decoder,对应层级之间相互连接。
SAM 模块
SAM(去除了原版图中的 Loss,并且调整了其中卷积的核大小)。
# Supervised Attention Module
class SAM(nn.Layer):
    def __init__(self, n_feat, kernel_size, bias_attr):
        super(SAM, self).__init__()
        self.conv1 = conv(n_feat, n_feat, kernel_size, bias_attr=bias_attr)
        self.conv2 = conv(n_feat, 3, kernel_size, bias_attr=bias_attr)
        self.conv3 = conv(3, n_feat, kernel_size, bias_attr=bias_attr)

    def forward(self, x, x_img):
        x1 = self.conv1(x)
        img = self.conv2(x) + x_img
        x2 = nn.functional.sigmoid(self.conv3(img))
        x1 = x1 * x2
        x1 = x1 + x
        return x1, img
MSC 模块
Mixed Residual Module实现代码如下。
# Mixed Residual Module
class Mix(nn.Layer):
    def __init__(self, m=1):
        super(Mix, self).__init__()
        self.w = self.create_parameter((1,), default_initializer=nn.initializer.Constant(m))
        self.mix_block = nn.Sigmoid()

    def forward(self, fea1, fea2, feat3):
        factor = self.mix_block(self.w)
        other = (1 - factor)/2
        output = fea1 * other + fea2 * factor + feat3 * other
        return output, factor
CMFNet 模型
上述的多个模块拼接一下即可搭建出完整的 CMFNet。
# CMFNet
class CMFNet(nn.Layer):
    def __init__(self, in_c=3, out_c=3, n_feat=96, scale_unetfeats=48, kernel_size=3, reduction=4, bias_attr=False):
        super(CMFNet, self).__init__()

        p_act = nn.PReLU()
        self.shallow_feat1 = nn.Sequential(conv(in_c, n_feat // 2, kernel_size, bias_attr=bias_attr), p_act,
                                           conv(n_feat // 2, n_feat, kernel_size, bias_attr=bias_attr))
        self.shallow_feat2 = nn.Sequential(conv(in_c, n_feat // 2, kernel_size, bias_attr=bias_attr), p_act,
                                           conv(n_feat // 2, n_feat, kernel_size, bias_attr=bias_attr))
        self.shallow_feat3 = nn.Sequential(conv(in_c, n_feat // 2, kernel_size, bias_attr=bias_attr), p_act,
                                           conv(n_feat // 2, n_feat, kernel_size, bias_attr=bias_attr))

        self.stage1_encoder = Encoder(n_feat, kernel_size, reduction, p_act, bias_attr, scale_unetfeats, 'CAB')
        self.stage1_decoder = Decoder(n_feat, kernel_size, reduction, p_act, bias_attr, scale_unetfeats, 'CAB')

        self.stage2_encoder = Encoder(n_feat, kernel_size, reduction, p_act, bias_attr, scale_unetfeats, 'PAB')
        self.stage2_decoder = Decoder(n_feat, kernel_size, reduction, p_act, bias_attr, scale_unetfeats, 'PAB')

        self.stage3_encoder = Encoder(n_feat, kernel_size, reduction, p_act, bias_attr, scale_unetfeats, 'SAB')
        self.stage3_decoder = Decoder(n_feat, kernel_size, reduction, p_act, bias_attr, scale_unetfeats, 'SAB')

        self.sam1o = SAM(n_feat, kernel_size=3, bias_attr=bias_attr)
        self.sam2o = SAM(n_feat, kernel_size=3, bias_attr=bias_attr)
        self.sam3o = SAM(n_feat, kernel_size=3, bias_attr=bias_attr)

        self.mix = Mix(1)
        self.add123 = conv(out_c, out_c, kernel_size, bias_attr=bias_attr)
        self.concat123 = conv(n_feat*3, n_feat, kernel_size, bias_attr=bias_attr)
        self.tail = conv(n_feat, out_c, kernel_size, bias_attr=bias_attr)


    def forward(self, x):
        ## Compute Shallow Features
        shallow1 = self.shallow_feat1(x)
        shallow2 = self.shallow_feat2(x)
        shallow3 = self.shallow_feat3(x)

        ## Enter the UNet-CAB
        x1 = self.stage1_encoder(shallow1)
        x1_D = self.stage1_decoder(x1)
        ## Apply SAM
        x1_out, x1_img = self.sam1o(x1_D[0], x)

        ## Enter the UNet-PAB
        x2 = self.stage2_encoder(shallow2)
        x2_D = self.stage2_decoder(x2)
        ## Apply SAM
        x2_out, x2_img = self.sam2o(x2_D[0], x)

        ## Enter the UNet-SAB
        x3 = self.stage3_encoder(shallow3)
        x3_D = self.stage3_decoder(x3)
        ## Apply SAM
        x3_out, x3_img = self.sam3o(x3_D[0], x)

        ## Aggregate SAM features of Stage 1, Stage 2 and Stage 3
        mix_r = self.mix(x1_img, x2_img, x3_img)
        mixed_img = self.add123(mix_r[0])

        ## Concat SAM features of Stage 1, Stage 2 and Stage 3
        concat_feat = self.concat123(paddle.concat([x1_out, x2_out, x3_out], 1))
        x_final = self.tail(concat_feat)

        return x_final + mixed_img
最后一步就是模型推理啦!
模型推理过程介绍
功能函数
加载模型:加载训练完成的模型参数;
图像预处理:读取图像、裁切图像、转置并归一化数据;
结果后处理:阈值处理、反归一化和转置并转换为数据类型uint8的BGR图像;
模型推理 :读取数据、预处理、前向计算最后完成后处理得到推理结果。
import cv2
from IPython.display import Image, display
def load_model(model_path):
    model = CMFNet()
    model.eval()
    params = paddle.load(model_path)
    model.set_state_dict(params)
    return model

def preprocess(img):
    clip_h, clip_w = [_ % 4  if _ % 4 else None for _ in img.shape[:2]]
    x = img[None, :clip_h, :clip_w, ::-1]
    x = x.transpose(0, 3, 1, 2)
    x = x.astype('float32')
    x /= 255.0
    x = paddle.to_tensor(x)
    return x

def postprocess(y):
    y = y.numpy()
    y = y.clip(0.0, 1.0)
    y *= 255.0
    y = y.transpose(0, 2, 3, 1)
    y = y.astype('uint8')
    y = y[0, :, :, ::-1]
    return y

@paddle.no_grad()
def run(model, img_path, save_path):
    img = cv2.imread(img_path)
    x = preprocess(img)
    y = model(x)
    deimg = postprocess(y)
    cv2.imwrite(save_path, deimg)
    return deimg

def show(img_path, save_path):
    display(Image(img_path))
    display(Image(save_path))
去模糊
加载去模糊、去雾、去雨水模型,使用上述代码完成模型推理,分别实现去模糊、去雾、去雨水效果。
总结
基于深度学习实现的图像恢复算法,相比传统的图像恢复算法而言,恢复效果大多数情况下更佳,而且基于深度学习的模型算法适应性更强,通过统一的模型框架使用不同的数据集训练即可实现不同的图像恢复效果,无需针对不同任务实现定制化的处理算法。当然,基于深度学习实现的图像恢复算法也有其缺点,如需要大量的数据支持算法的训练、模型没有很好的可解释性等等。总而言之,基于深度学习实现图像恢复的优缺点兼具,是未来图像恢复领域一个可以持续优化发展的重要技术路径。
参考资料
[1] Fan C M, Liu T J, Liu K H. Compound Multi-branch Feature Fusion for Real Image Restoration[J]. arXiv preprint arXiv:2206.02748, 2022.
[2] Zamir S W , Arora A , Khan S , et al. Multi-Stage Progressive Image Restoration[C]// 2021.
关注【飞桨PaddlePaddle】公众号
获取更多技术内容~