前提 在很早很早之前,写过一篇文章介绍过Redis中的red lock的实现,但是在生产环境中,笔者所负责的项目使用的分布式锁组件一直是Redisson。Redisson是具备多种内存数据网格特性的基于Java编写的Redis客户端框架(Redis Java Client with features of In-Memory Data Grid),基于Redis的基本数据类型扩展出很多种实现的高级数据结构,具体见其官方的简介图:
本文要分析的R(ed)Lock实现,只是其中一个很小的模块,其他高级特性可以按需选用。下面会从基本原理、源码分析和基于Jedis仿实现等内容进行展开。本文分析的Redisson源码是2020-01左右Redisson项目的main分支源码,对应版本是3.14.1。
基本原理 red lock的基本原理其实就"光明正大地"展示在Redis官网的首页文档中(具体链接是https://redis.io/topics/distlock):
摘录一下简介进行翻译:在许多环境中不同进程必须以互斥方式使用共享资源进行操作时,分布式锁是一个非常有用的原语。此试图提供一种更规范的算法来实现Redis的分布式锁。我们提出了一种称为Redlock的算法,它实现了DLM(猜测是Distributed Lock Manager的缩写,分布式锁管理器),我们认为它比普通的单实例方法更安全。
算法的三个核心特征(三大最低保证):
Safety property(安全性):互斥。确保在任何给定时刻下,只有一个客户端可以持有锁
Liveness property A(活性 A):无死锁。即使存在曾经锁定资源的客户端崩溃或者出现网络分区异常,确保锁总是能够成功获取
Liveness property B(活性 B):容错性。只要大多数 Redis节点处于正常运行状态,客户端就可以获取和释放锁
文档中还指出了目前算法对于故障转移的实现还存在明显的竞态条件问题(描述的应该是Redis主从架构下的问题):
客户端 A获取 Redis主节点中的锁(假设锁定的资源为 X)
在 Redis主节点把 KEY同步到 Redis从节点之前, Redis主节点崩溃
此时,客户端 B获取资源 X的锁成功,问题是资源 X的锁在前面已经被客户端 A获取过,这样就出现了并发问题
算法的实现很简单,单个Redis实例下加锁命令如下:
SET $resource_name $random_value NX PX $ttl这里的Nx和PX是SET命令的增强参数,自从Redis的2.6.12版本起,SET命令已经提供了可选的复合操作符:
NX: IF NOT EXIST的缩写,只有 KEY不存在的前提下才会设置 K-V,设置成功返回 1,否则返回 0
XX: IF EXIST的缩写,只有在 KEY存在的前提下才会设置 K-V,设置成功返回 1,否则返回 0
单个Redis实例下解锁命令如下:
# KEYS[1] = $resource_name # ARGV[1] = $random_value 使用Redisson中的RLock 使用RLock要先实例化Redisson,Redisson已经适配了Redis的哨兵、集群、普通主从和单机模式,因为笔者本地只安装了单机Redis,所以这里使用单机模式配置进行演示。实例化RedissonClient:
static RedissonClient REDISSON;@BeforeClass public static void beforeClass () throws Exception new Config();// 单机 10000 )"redis://127.0.0.1:6379" );// // 主从 // config.useMasterSlaveServers() // .setMasterAddress("主节点连接地址") // .setSlaveAddresses(Sets.newHashSet("从节点连接地址")); // REDISSON = Redisson.create(config); // // 哨兵 // config.useSentinelServers() // .setMasterName("Master名称") // .addSentinelAddress(new String[]{"哨兵连接地址"}); // REDISSON = Redisson.create(config); // // 集群 // config.useClusterServers() // .addNodeAddress(new String[]{"集群节点连接地址"}); // REDISSON = Redisson.create(config); 加锁和解锁:
@Test public void testLockAndUnLock () throws Exception "resource:x" ;new Thread(() -> {try {finally {"线程%s释放资源%s的锁" , Thread.currentThread().getName(), resourceName));"threadA" );new Thread(() -> {try {finally {"线程%s释放资源%s的锁" , Thread.currentThread().getName(), resourceName));"threadB" );private void process (String resourceName) "线程%s获取到资源%s的锁" , threadName, resourceName));try {1000 );catch (InterruptedException ignore) {// 某次执行的输出结果 更多的时候,我们会选用带等待时间周期和锁最大持有时间的API:
@Test public void testTryLockAndUnLock () throws Exception "resource:x" ;int waitTime = 500 ;int leaseTime = 1000 ;new Thread(() -> {"threadA" );new Thread(() -> {"threadB" );private void process (String resourceName, int waitTime, int leaseTime) try {boolean tryLock = lock.tryLock(waitTime, leaseTime, TimeUnit.MILLISECONDS);if (tryLock) {try {"线程%s获取到资源%s的锁" , threadName, resourceName));800 );finally {"线程%s释放资源%s的锁" , Thread.currentThread().getName(), resourceName));else {"线程%s获取资源%s的锁失败,等待时间:%d ms" , threadName, resourceName, waitTime));catch (InterruptedException e) {// 某次执行的输出结果 500 ms为了使用的时候更加简单,可以参考spring-tx中的编程式事务那样进行轻度封装:
@RequiredArgsConstructor private static class RedissonLockProvider private final RedissonClient redissonClient;public <T> T executeInLock (String resourceName, LockAction lockAction) {try {return lockAction.doInLock(resourceName);finally {public <T> T executeInLock (String resourceName, int waitTime, int leaseTime, LockAction lockAction) throws InterruptedException {boolean tryLock = lock.tryLock(waitTime, leaseTime, TimeUnit.MILLISECONDS);if (tryLock) {try {return lockAction.doInLock(resourceName);finally {return null ;public void executeInLockWithoutResult (String resourceName, int waitTime, int leaseTime, LockActionWithoutResult lockAction) throws InterruptedException boolean tryLock = lock.tryLock(waitTime, leaseTime, TimeUnit.MILLISECONDS);if (tryLock) {try {finally {public void executeInLockWithoutResult (String resourceName, LockActionWithoutResult lockAction) try {finally {@FunctionalInterface interface LockAction default void onAcquire (String resourceName) T doInLock (String resourceName) ;default void onExit (String resourceName) @FunctionalInterface interface LockActionWithoutResult default void onAcquire (String resourceName) void doInLock (String resourceName) default void onExit (String resourceName) 使用RedissonLockProvider(仅供参考):
@Test public void testRedissonLockProvider () throws Exception new RedissonLockProvider(REDISSON);"resource:x" ;new Thread(() -> {new LockActionWithoutResult() {@Override public void onAcquire (String resourceName) "线程%s获取到资源%s的锁" , Thread.currentThread().getName(), resourceName));@Override public void doInLock (String resourceName) try {800 );catch (InterruptedException ignore) {@Override public void onExit (String resourceName) "线程%s释放资源%s的锁" , Thread.currentThread().getName(), resourceName));"threadA" );new Thread(() -> {new LockActionWithoutResult() {@Override public void onAcquire (String resourceName) "线程%s获取到资源%s的锁" , Thread.currentThread().getName(), resourceName));@Override public void doInLock (String resourceName) try {800 );catch (InterruptedException ignore) {@Override public void onExit (String resourceName) "线程%s释放资源%s的锁" , Thread.currentThread().getName(), resourceName));"threadB" );// 某次执行结果 Redisson中RLock的实现原理 Redisson中RLock的实现是基本参照了Redis的red lock算法进行实现,不过在原始的red lock算法下进行了改良,主要包括下面的特性:
可重入,类似于 ReentrantLock,同一个线程可以重复获取同一个资源的锁(一般使用计数器实现),锁的重入特性一般情况下有利于提高资源的利用率
「续期」 ,这个是一个比较前卫解决思路,也就是如果一个客户端对资源 X永久锁定,那么并不是直接对 KEY生存周期设置为 -1,而是通过一个守护线程每隔固定周期延长 KEY的过期时间,这样就能实现 「在守护线程不被杀掉的前提下,避免客户端崩溃导致锁无法释放长期占用资源的问题」
锁状态变更订阅,依赖于 org.redisson.pubsub.LockPubSub,用于订阅和通知锁释放事件
不是完全参考 red lock算法的实现,数据类型选用了 HASH,配合 Lua脚本完成多个命令的原子性
续期或者说延长KEY的过期时间在Redisson使用watch dog实现,理解为用于续期的守护线程,底层依赖于Netty的时间轮HashedWheelTimer和任务io.netty.util.Timeout实现,「俗称看门狗」 ,下面会详细分析。
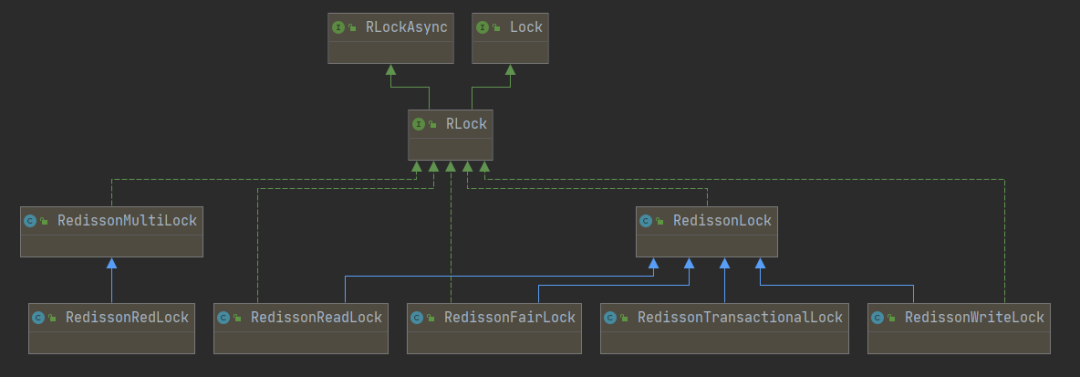
先看RLock的类图:
❝
这里有一个疑惑点,RedissonRedLock(RedissonMultiLock的子类)的注释中提到RedLock locking algorithm implementation for multiple locks. It manages all locks as one. 但从直观上看,RedissonLock才是整个锁体系的核心,里面的实现思路也是遵从red lock算法的。
❞
RedissonLock就是RLock的直接实现,也是分布式锁实现的核心类,从源码中看到Redisson#getLock()就是直接实例化RedissonLock
public class Redisson implements RedissonClient // ...... 省略其他代码 @Override public RLock getLock (String name) return new RedissonLock(connectionManager.getCommandExecutor(), name);// ...... 省略其他代码 因此只需要围绕RedissonLock的源码进行分析即可。RedissonLock的类继承图如下:
这里需要有几点认知:
RedissonLock实现了 java.util.concurrent.locks.Lock接口中除了 newCondition()方法外的所有方法,也就是可以基本无缝适配 Lock接口,对于习惯 Lock接口的 API的使用者来说是一个福音
RedissonLock基本所有同步 API都依赖于异步 API的实现,也就是 RLock的实现依赖于 RLockAsync的实现,底层依赖的是 Netty的 io.netty.util.concurrent.Promise,具体见 RedissonPromise,如果用过 JUC中的 Future的开发者应该比较熟悉 Future#get(),这里的做法类似
RObjectAsync:所有 Redisson对象的基础接口,提供一些内存测量、对象拷贝、移动等的异步方法
RObject: RObjectAsync的同步版本
RExpirableAsync:提供对象 TTL相关的异步方法
RExpirable: RExpirableAsync的同步版本
RedissonObject:直接实现类 RObject接口中的方法
RedissonExpirable:主要是实现了 RExpirable接口中的方法
接着先看RedissonLock的构造函数和核心属性:
// 存放entryName -> ExpirationEntry,用于获取当前entryName的线程重入计数器和续期任务 private static final ConcurrentMap<String, ExpirationEntry> EXPIRATION_RENEWAL_MAP = new ConcurrentHashMap<>();// 内部的锁持有的最大时间,来源于参数Config#lockWatchdogTimeout,用于控制续期的周期 protected long internalLockLeaseTime;// ID,唯一标识,是一个UUID final String id;// final String entryName;// 锁释放事件订阅发布相关 protected final LockPubSub pubSub;// 命令异步执行器实例 final CommandAsyncExecutor commandExecutor;/** public RedissonLock (CommandAsyncExecutor commandExecutor, String name) super (commandExecutor, name);this .commandExecutor = commandExecutor;// 这里的ID为外部初始化的UUID实例,调用toString() this .id = commandExecutor.getConnectionManager().getId();this .internalLockLeaseTime = commandExecutor.getConnectionManager().getCfg().getLockWatchdogTimeout();// 这里的entryName = uuid值 + : + 外部传进来的name(KEY),如559cc9df-bad8-4f6c-86a4-ffa51b7f1c36:resource:x this .entryName = id + ":" + name;// 初始化LockPubSub实例,用于订阅和发布锁释放的事件 this .pubSub = commandExecutor.getConnectionManager().getSubscribeService().getLockPubSub();// RedissonLock内部类ExpirationEntry,存放着线程重入的计数器和续期的Timeout任务 public static class ExpirationEntry // 线程ID -> 线程重入的次数 private final Map<Long, Integer> threadIds = new LinkedHashMap<>();private volatile Timeout timeout;public ExpirationEntry () super ();// 这个方法主要记录线程重入的计数 public void addThreadId (long threadId) if (counter == null ) {1 ;else {public boolean hasNoThreads () return threadIds.isEmpty();public Long getFirstThreadId () if (threadIds.isEmpty()) {return null ;return threadIds.keySet().iterator().next();public void removeThreadId (long threadId) if (counter == null ) {return ;if (counter == 0 ) {else {public void setTimeout (Timeout timeout) this .timeout = timeout;public Timeout getTimeout () return timeout;这里需要关注一下Config中的lockWatchdogTimeout参数:
翻译一下大意:lockWatchdogTimeout参数只有在没有使用leaseTimeout参数定义的成功获取到锁的场景(简单来说就是不设置时限的加锁)下生效,如果看门狗在下一个lockWatchdogTimeout周期内不进行续期,那么锁就会过期释放(「从源码上看,每三分之一lockWatchdogTimeout就会执行一次续期任务,每次通过pexpire把KEY的存活周期延长lockWatchdogTimeout」 ),lockWatchdogTimeout的默认值为30000,也就是30秒。
这里先列举一下RedissonLock中获取名称的方法,以便后面分析这些名称作为K-V结构的KEY时候使用:
id:由配置实例化时候实例化的 UUID实例生成,从源码上分析每个连接方式的 Redisson实例有唯一的 UUID, ConnectionManager初始化的时候会调用 UUID id = UUID.randomUUID(),笔者认为可以理解为 Redisson实例在某个应用程序进程中的唯一标识,毕竟一般情况下,一个应用程序应该只会应用一种 Redisson的连接方式
getEntryName():返回的是 UUID + : + $KEY,例如 559cc9df-bad8-4f6c-86a4-ffa51b7f1c36:resource:x
getName():返回的是 $KEY,例如 resource:x
getChannelName():返回的是 redisson_lock__channel:{$KEY},例如 redisson_lock__channel:{resource:x}
getLockName(long threadId):返回的是 UUID + : + $threadId,例如 559cc9df-bad8-4f6c-86a4-ffa51b7f1c36:1
接着看加锁的方法,核心实现主要是:
private void lock(long leaseTime, TimeUnit unit, boolean interruptibly) throws InterruptedException: lock方法体系
public boolean tryLock(long waitTime, long leaseTime, TimeUnit unit) throws InterruptedException: tryLock方法体系
先看只包含锁最大持有时间的lock()方法体系:
/** private void lock (long leaseTime, TimeUnit unit, boolean interruptibly) throws InterruptedException long threadId = Thread.currentThread().getId();// 尝试获取锁,返回的ttl为空代表获取锁成功,返回的ttl代表已经存在的KEY的剩余存活时间 // lock acquired if (ttl == null ) {return ;// 订阅redisson_lock__channel:{$KEY},其实本质的目的是为了客户端通过Redis的订阅发布,感知到解锁的事件 // 这个方法会在LockPubSub中注册一个entryName -> RedissonLockEntry的哈希映射,RedissonLockEntry实例中存放着RPromise<RedissonLockEntry>结果,一个信号量形式的锁和订阅方法重入计数器 // 下面的死循环中的getEntry()或者RPromise<RedissonLockEntry>#getNow()就是从这个映射中获取的 // 同步订阅执行,获取注册订阅Channel的响应,区分是否支持中断 if (interruptibly) {else {// 走到下面的for循环说明返回的ttl不为空,也就是Redis已经存在对应的KEY,有其他客户端已经获取到锁,此客户端线程的调用需要阻塞等待获取锁 try {while (true ) {// 死循环中尝试获取锁,这个是后面会分析的方法 // 返回的ttl为空,说明获取到锁,跳出死循环,这个死循环或者抛出中断异常,或者获取到锁成功break跳出,没有其他方式 if (ttl == null ) {break ;// 这个ttl来源于等待存在的锁的KEY的存活时间,直接使用许可为0的信号量进行阻塞等待,下面的几个分支判断都是大同小异,只是有的支持超时时间,有的支持中断 // 有的是永久阻塞直到锁释放事件订阅LockPubSub的onMessage()方法回调激活getLatch().release()进行解锁才会往下走 // 这里可以学到一个特殊的技巧,Semaphore(0),信号量的许可设置为0,首个调用acquire()的线程会被阻塞,直到其他线程调用此信号量的release()方法才会解除阻塞,类似于一个CountDownLatch(1)的效果 if (ttl >= 0 ) {try {catch (InterruptedException e) {if (interruptibly) {throw e;else {if (interruptibly) {else {finally {// 获取到锁或者抛出中断异常,退订redisson_lock__channel:{$KEY},不再关注解锁事件 // 这是一个异步转同步的方法,类似于FutureTask#get(),关键看调用的tryAcquireAsync()方法 private Long tryAcquire (long leaseTime, TimeUnit unit, long threadId) return get(tryAcquireAsync(leaseTime, unit, threadId));/** private <T> RFuture<Long> tryAcquireAsync (long leaseTime, TimeUnit unit, long threadId) {// 锁持有最大时间不为-1,也就是明确锁的持有时间,不是永久持有的场景 if (leaseTime != -1 ) {return tryLockInnerAsync(leaseTime, unit, threadId, RedisCommands.EVAL_LONG);// 走到这里说明是leaseTime == -1,KEY不设置过期时间的分支,需要启动看门狗机制。尝试内部异步获取锁,注意这里的lockWatchdogTimeout是从配置中获取传进去,不是内部的internalLockLeaseTime属性,这里的默认值还是30000毫秒 // 执行异常场景直接返回 if (e != null ) {return ;// 成功获取到锁的场景,需要基于线程ID启用看门狗,通过时间轮指定定时任务进行续期 if (ttlRemaining == null ) {// 定时调度进行续期操作 return ttlRemainingFuture;/** RFuture<T> tryLockInnerAsync (long leaseTime, TimeUnit unit, long threadId, RedisStrictCommand<T> command) {// 时间转换为毫秒,注意一点这里的internalLockLeaseTime是类内的属性,被重新赋值了 // 底层向Redis服务执行LUA脚本 return commandExecutor.evalWriteAsync(getName(), LongCodec.INSTANCE, command,"if (redis.call('exists', KEYS[1]) == 0) then " +"redis.call('hset', KEYS[1], ARGV[2], 1); " +"redis.call('pexpire', KEYS[1], ARGV[1]); " +"return nil; " +"end; " +"if (redis.call('hexists', KEYS[1], ARGV[2]) == 1) then " +"redis.call('hincrby', KEYS[1], ARGV[2], 1); " +"redis.call('pexpire', KEYS[1], ARGV[1]); " +"return nil; " +"end; " +"return redis.call('pttl', KEYS[1]);" ,「先留意一下属性internalLockLeaseTime,它在tryLockInnerAsync()方法内被重新赋值,在leaseTime == -1L的前提下,它被赋值为lockWatchdogTimeout,这个细节很重要,决定了后面续期方法(看门口)的调度频率。另外,leaseTime != -1L不会进行续期,也就是不会启动看门狗机制。」
接着需要仔细分析一下tryLockInnerAsync()中执行的LUA脚本,笔者把它提取出来通过注释进行描述:
-- KEYS[1] == getName() --> $KEY --> resource:x -- ARGV[1] == internalLockLeaseTime --> 30000 -- ARGV[2] == getLockName(threadId) --> 559cc9df-bad8-4f6c-86a4-ffa51b7f1c36:1 -- 第一段代码是判断锁定的资源KEY不存在的时候进行相应值的设置,代表资源没有被锁定,首次获取锁成功 if (redis.call('exists' , KEYS[1 ]) == 0 ) then -- 这里是设置调用次数,可以理解为延长KEY过期时间的调用次数 'hset' , KEYS[1 ], ARGV[2 ], 1 );-- 设置KEY的过期时间 'pexpire' , KEYS[1 ], ARGV[1 ]);return nil ;end ;-- 第二段代码是判断HASH的field是否存在,如果存在说明是同一个线程重入的情况,这个时候需要延长KEY的TTL,并且HASH的field对应的value加1,记录延长ttl的次数 if (redis.call('hexists' , KEYS[1 ], ARGV[2 ]) == 1 ) then -- 这里是增加调用次数,可以理解为增加延长KEY过期时间的调用次数 'hincrby' , KEYS[1 ], ARGV[2 ], 1 );-- 延长KEY的过期时间 'pexpire' , KEYS[1 ], ARGV[1 ]);return nil ;end ;-- 第三段代码是兜底的,走到这里说明当前线程获取锁失败,锁已经被其他(进程中的)线程占有,返回当前KEY被占用资源的ttl,用来确定需要休眠的最大时间 return redis.call('pttl' , KEYS[1 ]);这里画一个图演示一下这个Lua脚本中三段代码出现的逻辑:
剩下一个scheduleExpirationRenewal(threadId)方法还没有分析,里面的逻辑就是看门狗的定期续期逻辑:
// 基于线程ID定时调度和续期 private void scheduleExpirationRenewal (long threadId) // 如果需要的话新建一个ExpirationEntry记录线程重入计数,同时把续期的任务Timeout对象保存在属性中 new ExpirationEntry();if (oldEntry != null ) {// 当前进行的当前线程重入加锁 else {// 当前进行的当前线程首次加锁 // 首次新建ExpirationEntry需要触发续期方法,记录续期的任务句柄 // 处理续期 private void renewExpiration () // 根据entryName获取ExpirationEntry实例,如果为空,说明在cancelExpirationRenewal()方法已经被移除,一般是解锁的时候触发 if (ee == null ) {return ;// 新建一个定时任务,这个就是看门狗的实现,io.netty.util.Timeout是Netty结合时间轮使用的定时任务实例 new TimerTask() {@Override public void run (Timeout timeout) throws Exception // 这里是重复外面的那个逻辑, if (ent == null ) {return ;// 获取ExpirationEntry中首个线程ID,如果为空说明调用过cancelExpirationRenewal()方法清空持有的线程重入计数,一般是锁已经释放的场景 if (threadId == null ) {return ;// 向Redis异步发送续期的命令 // 抛出异常,续期失败,只打印日志和直接终止任务 if (e != null ) {"Can't update lock " + getName() + " expiration" , e);return ;// 返回true证明续期成功,则递归调用续期方法(重新调度自己),续期失败说明对应的锁已经不存在,直接返回,不再递归 if (res) {// reschedule itself // 这里的执行频率为leaseTime转换为ms单位下的三分之一,由于leaseTime初始值为-1的情况下才会进入续期逻辑,那么这里的执行频率为lockWatchdogTimeout的三分之一 3 , TimeUnit.MILLISECONDS); // ExpirationEntry实例持有调度任务实例 // 调用Redis,执行Lua脚本,进行异步续期 protected RFuture<Boolean> renewExpirationAsync (long threadId) return commandExecutor.evalWriteAsync(getName(), LongCodec.INSTANCE, RedisCommands.EVAL_BOOLEAN,"if (redis.call('hexists', KEYS[1], ARGV[2]) == 1) then " +"redis.call('pexpire', KEYS[1], ARGV[1]); " +"return 1; " +"end; " +"return 0;" ,// 这里根据前面的分析,internalLockLeaseTime在leaseTime的值为-1的前提下,对应值为lockWatchdogTimeout 基于源码推断出续期的机制由入参leaseTime决定:
当 leaseTime == -1的前提下(一般是 lock()和 lockInterruptibly()这类方法调用),续期任务的调度周期为 lockWatchdogTimeout / 3,锁的最大持有时间( KEY的过期时间)被刷新为 lockWatchdogTimeout
当 leaseTime != -1的前提下(一般是 lock(long leaseTime, TimeUnit unit)和 lockInterruptibly(long leaseTime, TimeUnit unit)这类方法调用指定 leaseTime不为 -1),这种情况下会直接设置锁的过期时间为输入值转换为 ms单位的时间量,不会启动续期机制
提取续期的Lua脚本如下:
-- KEYS[1] == getName() --> $KEY --> resource:x -- ARGV[1] == internalLockLeaseTime --> 30000 -- ARGV[2] == getLockName(threadId) --> 559cc9df-bad8-4f6c-86a4-ffa51b7f1c36:1 if (redis.call('hexists' , KEYS[1 ], ARGV[2 ]) == 1 ) then 'pexpire' , KEYS[1 ], ARGV[1 ]);return 1 ;end ;return 0 ;到此为止,不带waitTime参数的加锁和续期逻辑基本分析完毕,而带waitTime参数的tryLock(long waitTime, long leaseTime, TimeUnit unit)实现其实和只存在leaseTime参数的lock(long leaseTime, TimeUnit unit, boolean interruptibly)实现底层调用的方法是一致的,最大的区别是会在尝试获取锁操作之后基于前后的System.currentTimeMillis()计算出时间差和waitTime做对比,决定需要阻塞等待还是直接超时获取锁失败返回,处理阻塞等待的逻辑是客户端本身的逻辑,这里就不做详细展开,因为源码实现也不是十分优雅(太多long currentTime = System.currentTimeMillis()的代码段了)。接着花点功夫分析一下解锁的实现,包括一般情况下的解锁unlock()和强制解锁forceUnlockAsync():
// 一般情况下的解锁 @Override public void unlock () try {catch (RedisException e) {// IllegalMonitorStateException一般是A线程加锁,B线程解锁,内部判断线程状态不一致抛出的 if (e.getCause() instanceof IllegalMonitorStateException) {throw (IllegalMonitorStateException) e.getCause();else {throw e;@Override public RFuture<Void> unlockAsync () // 获取当前调用解锁操作的线程ID long threadId = Thread.currentThread().getId();return unlockAsync(threadId);@Override public RFuture<Void> unlockAsync (long threadId) // 构建一个结果RedissonPromise new RedissonPromise<Void>();// 返回的RFuture如果持有的结果为true,说明解锁成功,返回NULL说明线程ID异常,加锁和解锁的客户端线程不是同一个线程 // 这是内部的异常,说明解锁异常,需要取消看门狗的续期任务 if (e != null ) {return ;// 这种情况说明线程ID异常,加锁和解锁的客户端线程不是同一个线程,抛出IllegalMonitorStateException异常 if (opStatus == null ) {new IllegalMonitorStateException("attempt to unlock lock, not locked by current thread by node id: " " thread-id: " + threadId);return ;// 走到这里说明正常解锁,取消看门狗的续期任务 null );return result;// 真正的内部解锁的方法,执行解锁的Lua脚本 protected RFuture<Boolean> unlockInnerAsync (long threadId) return commandExecutor.evalWriteAsync(getName(), LongCodec.INSTANCE, RedisCommands.EVAL_BOOLEAN,"if (redis.call('hexists', KEYS[1], ARGV[3]) == 0) then " +"return nil;" +"end; " +"local counter = redis.call('hincrby', KEYS[1], ARGV[3], -1); " +"if (counter > 0) then " +"redis.call('pexpire', KEYS[1], ARGV[2]); " +"return 0; " +"else " +"redis.call('del', KEYS[1]); " +"redis.call('publish', KEYS[2], ARGV[1]); " +"return 1; " +"end; " +"return nil;" ,// 取消续期任务 void cancelExpirationRenewal (Long threadId) // 这里说明ExpirationEntry已经被移除,一般是基于同一个线程ID多次调用解锁方法导致的(并发解锁) if (task == null ) {return ;// 传入的线程ID不为NULL,从ExpirationEntry中移除线程ID,如果持有的线程ID对应的线程重入计数不为0,会先递减到0,等于0的前提下才会进行删除 if (threadId != null ) {// 这里threadId == null的情况是为了满足强制解锁的场景,强制解锁需要直接删除锁所在的KEY,不需要理会传入的线程ID(传入的线程ID直接为NULL) // 后者task.hasNoThreads()是为了说明当前的锁没有被任何线程持有,对于单线程也确定在移除线程ID之后重入计数器已经为0,从ExpirationEntry中移除,这个时候获取ExpirationEntry的任务实例进行取消即可 if (threadId == null || task.hasNoThreads()) {if (timeout != null ) {// EntryName -> ExpirationEntry映射中移除当前锁的相关实例ExpirationEntry // 强制解锁 @Override public boolean forceUnlock () return get(forceUnlockAsync());@Override public RFuture<Boolean> forceUnlockAsync () // 线程ID传入为NULL,取消当前的EntryName对应的续期任务 null );// 执行Lua脚本强制删除锁所在的KEY并且发布解锁消息 return commandExecutor.evalWriteAsync(getName(), LongCodec.INSTANCE, RedisCommands.EVAL_BOOLEAN,"if (redis.call('del', KEYS[1]) == 1) then " "redis.call('publish', KEYS[2], ARGV[1]); " "return 1 " "else " "return 0 " "end" ,这里列出一般情况下解锁和强制解锁的Lua脚本,分析如下:
-- unlockInnerAsync方法的lua脚本 -- KEYS[1] == getName() --> $KEY --> resource:x -- KEYS[2] == getChannelName() --> 订阅锁的Channel --> redisson_lock__channel:{resource:x} -- ARGV[1] == LockPubSub.UNLOCK_MESSAGE --> 常量数值0 -- ARGV[2] == internalLockLeaseTime --> 30000或者具体的锁最大持有时间 -- ARGV[3] == getLockName(threadId) --> 559cc9df-bad8-4f6c-86a4-ffa51b7f1c36:1 -- 第一个IF分支判断如果锁所在的哈希的field不存在,说明当前线程ID未曾获取过对应的锁,返回NULL表示解锁失败 if (redis.call('hexists' , KEYS[1 ], ARGV[3 ]) == 0 ) then return nil ;end ;-- 走到这里通过hincrby进行线程重入计数-1,返回计数值 local counter = redis.call('hincrby' , KEYS[1 ], ARGV[3 ], -1 );-- 计数值大于0,说明线程重入加锁,这个时候基于internalLockLeaseTime对锁所在KEY进行续期 if (counter > 0 ) then 'pexpire' , KEYS[1 ], ARGV[2 ]);return 0 ;else -- 计数值小于或等于0,说明可以解锁,删除锁所在的KEY,并且向redisson_lock__channel:{$KEY}发布消息,内容是0(常量数值) 'del' , KEYS[1 ]);'publish' , KEYS[2 ], ARGV[1 ]);return 1 ;end ;-- 最后的return nil;在IDEA中提示是不会到达的语句,估计这里是开发者笔误写上去的,前面的if-else都有返回语句,这里应该是不可达的 return nil ;-------------------------------------------------- 不怎么华丽的分割线 ------------------------------------------------- -- forceUnlockAsync方法的lua脚本 -- KEYS[1] == getName() --> $KEY --> resource:x -- KEYS[2] == getChannelName() --> 订阅锁的Channel --> redisson_lock__channel:{resource:x} -- ARGV[1] == LockPubSub.UNLOCK_MESSAGE --> 常量数值0 -- 强制删除锁所在的KEY,如果删除成功向redisson_lock__channel:{$KEY}发布消息,内容是0(常量数值) if (redis.call('del' , KEYS[1 ]) == 1 ) then 'publish' , KEYS[2 ], ARGV[1 ]);return 1 else return 0 end 其他辅助方法都相对简单,这里弄个简单的"流水账"记录一番:
isLocked():基于 getName()调用 Redis的 EXISTS $KEY命令判断是否加锁
isHeldByThread(long threadId)和 isHeldByCurrentThread():基于 getName()和 getLockName(threadId)调用 Redis的 HEXISTS $KEY $LOCK_NAME命令判断 HASH中对应的 field-value是否存在,存在则说明锁被对应线程 ID的线程持有
getHoldCount():基于 getName()和 getLockName(threadId)调用 Redis的 HGET $KEY $LOCK_NAME命令,用于获取线程对于某一个锁的持有量(注释叫 holds,其实就是同一个线程对某一个锁的 KEY的续期次数)
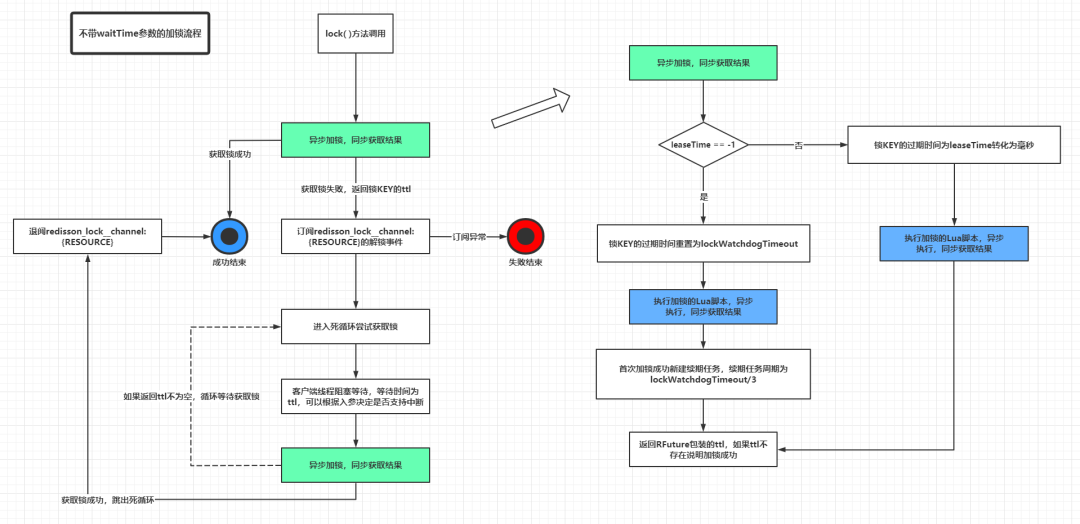
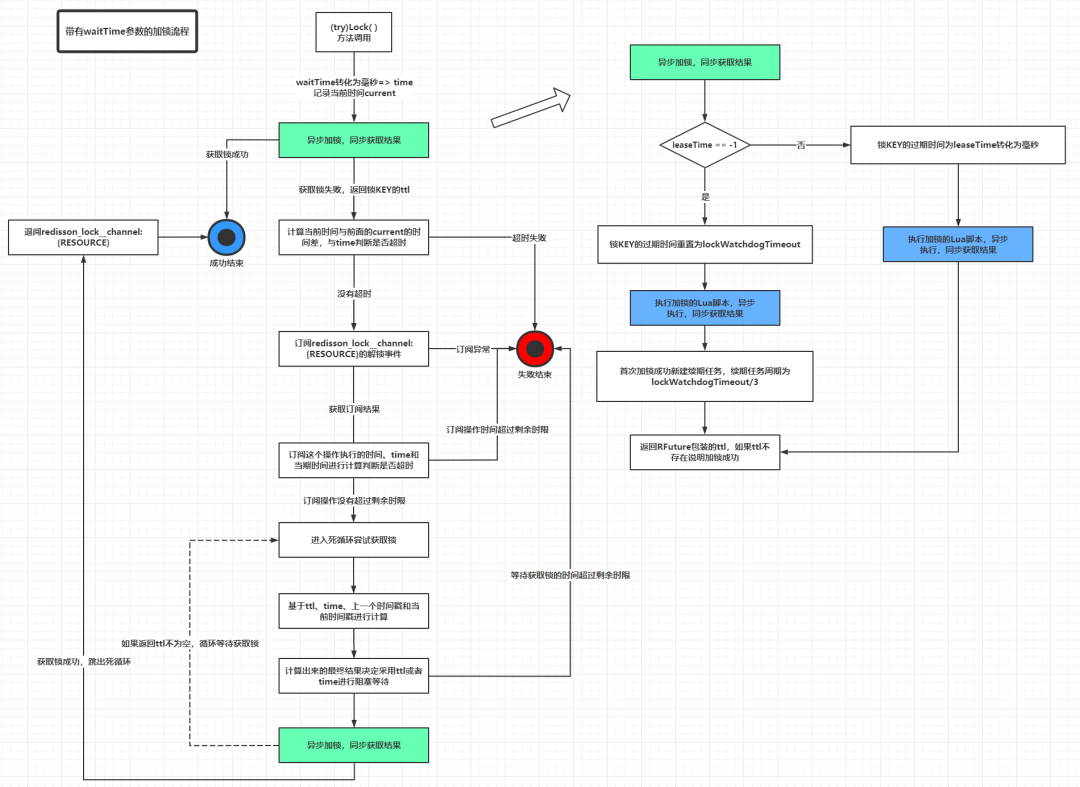
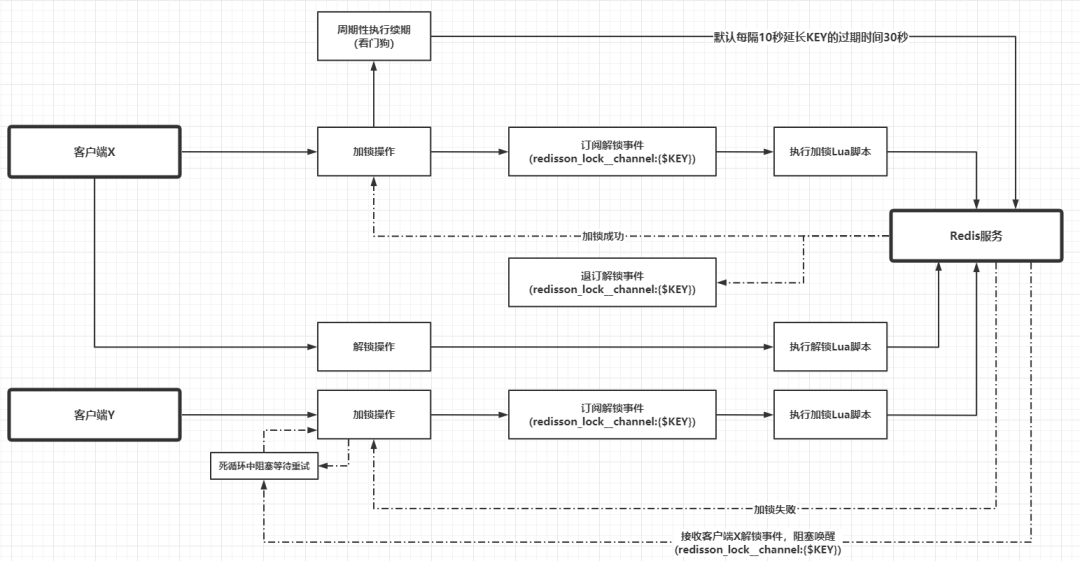
「订阅和发布」 部分设计到大量Netty组件使用相关的源码,这里不详细展开,这部分的逻辑简单附加到后面这个流程图中。最后,通过一个比较详细的图分析一下Redisson的加锁和解锁流程。
带有 waitTime参数的加锁流程(图右边的流程基本不变,主要是左边的流程每一步都要计算时间间隔):
假设不同进程的两个不同的线程X和Y去竞争资源RESOURCE的锁,那么可能的流程如下:
最后再概括一下Redisson中实现red lock算法使用的HASH数据类型:
KEY代表的就是资源或者锁, 「创建、存在性判断,延长生存周期和删除操作总是针对KEY进行的」
FIELD代表的是锁名称 lockName(),但是其实它由 Redisson连接管理器实例的初始化 UUID拼接客户端线程 ID组成,严格来说应该是获取锁的客户端线程唯一标识
VALUE代表的是客户端线程对于锁的持有量,从源码上看应该是 KEY被续期的次数
基于Jedis实现类似Redisson的分布式锁功能 前面的章节已经比较详细分析了Redisson中分布式锁的实现原理,这里使用Jedis和多线程技巧做一个类似的实现。为了简单起见,这里只实现一个无入参的lock()方法(类似于Redisson中leaseTime == -1的场景)和unlock()方法。定义接口RedLock:
public interface RedLock void lock (String resource) throws InterruptedExceptionvoid unlock (String resource) 为了简单起见,笔者把所有实现逻辑都写在实现类RedisRedLock中:
@RequiredArgsConstructor public class RedisRedLock implements RedLock private final JedisPool jedisPool;private final String uuid;private static final String WATCH_DOG_TIMEOUT_STRING = "30000" ;private static final long WATCH_DOG_TASK_DURATION = 10000L ;private static final String CHANNEL_PREFIX = "__red__lock:" ;private static final String UNLOCK_STATUS_STRING = "0" ;private static final String LOCK_LUA = "if (redis.call('exists', KEYS[1]) == 0) then\n" +" redis.call('hset', KEYS[1], ARGV[2], 1);\n" +" redis.call('pexpire', KEYS[1], ARGV[1]);\n" +" return nil;\n" +"end;\n" +"if (redis.call('hexists', KEYS[1], ARGV[2]) == 1) then\n" +" redis.call('hincrby', KEYS[1], ARGV[2], 1);\n" +" redis.call('pexpire', KEYS[1], ARGV[1]);\n" +" return nil;\n" +"end;\n" +"return redis.call('pttl', KEYS[1]);" ;private static final String UNLOCK_LUA = "if (redis.call('hexists', KEYS[1], ARGV[3]) == 0) then\n" +" return nil;\n" +"end;\n" +"local counter = redis.call('hincrby', KEYS[1], ARGV[3], -1);\n" +"if (counter > 0) then\n" +" redis.call('pexpire', KEYS[1], ARGV[2]);\n" +" return 0;\n" +"else\n" +" redis.call('del', KEYS[1]);\n" +" redis.call('publish', KEYS[2], ARGV[1]);\n" +" return 1;\n" +"end;" ;private static final String RENEW_LUA = "if (redis.call('hexists', KEYS[1], ARGV[2]) == 1) then " +"redis.call('pexpire', KEYS[1], ARGV[1]); " +"return 1; " +"end; " +"return 0;" ;private static final ExecutorService SUB_PUB_POOL = Executors.newCachedThreadPool();private static final ScheduledExecutorService WATCH_DOG_POOL = new ScheduledThreadPoolExecutor(2 private static class ThreadEntry private final ConcurrentMap<Long, Integer> threadCounter = Maps.newConcurrentMap();private volatile WatchDogTask watchDogTask;public synchronized void addThreadId (long threadId) if (counter == null ) {1 ;else {public synchronized boolean hasNoThreads () return threadCounter.isEmpty();public synchronized Long getFirstThreadId () if (threadCounter.isEmpty()) {return null ;return threadCounter.keySet().iterator().next();public synchronized void removeThreadId (long threadId) if (counter == null ) {return ;if (counter == 0 ) {else {public void setWatchDogTask (WatchDogTask watchDogTask) this .watchDogTask = watchDogTask;public WatchDogTask getWatchDogTask () return watchDogTask;@Getter private static class SubPubEntry private final String key;private final Semaphore latch;private final SubscribeListener subscribeListener;public SubPubEntry (String key) this .key = key;this .latch = new Semaphore(0 );this .subscribeListener = new SubscribeListener(key, latch);private static final ConcurrentMap<String, ThreadEntry> THREAD_ENTRY_MAP = Maps.newConcurrentMap();@Override public void lock (String resource) throws InterruptedException long threadId = Thread.currentThread().getId();":" + threadId;":" + resource;// 获取锁 // 加锁成功直接返回 if (Objects.isNull(ttl)) {return ;// 订阅 try {for (; ; ) {// 加锁成功直接返回 if (Objects.isNull(ttl)) {return ;if (ttl > 0L ) {finally {private Long acquire (String key, String lockName, long threadId, String entryName) if (Objects.nonNull(result)) {return Long.parseLong(String.valueOf(result));// 启动看门狗 new ThreadEntry();if (oldEntry != null ) {else {new WatchDogTask(new AtomicReference<>(renewAction));0 , WATCH_DOG_TASK_DURATION, TimeUnit.MILLISECONDS);return null ;private SubPubEntry subscribeAsync (String key) new SubPubEntry(key);return null ;return subPubEntry;private void unsubscribeSync (SubPubEntry subPubEntry) @Override public void unlock (String resource) long threadId = Thread.currentThread().getId();":" + resource;":" + threadId;if (Objects.nonNull(threadEntry)) {if (threadEntry.hasNoThreads() && Objects.nonNull(threadEntry.getWatchDogTask())) {if (Objects.isNull(result)) {throw new IllegalMonitorStateException();private static class SubscribeListener extends JedisPubSub @Getter private final String key;@Getter private final String channelName;@Getter private final Semaphore latch;public SubscribeListener (String key, Semaphore latch) this .key = key;this .channelName = CHANNEL_PREFIX + key;this .latch = latch;@Override public void onMessage (String channel, String message) if (Objects.equals(channelName, channel) && Objects.equals(UNLOCK_STATUS_STRING, message)) {@RequiredArgsConstructor private static class WatchDogTask implements Runnable private final AtomicBoolean running = new AtomicBoolean(true );private final AtomicReference<Runnable> actionReference;@Override public void run () if (running.get() && Objects.nonNull(actionReference.get())) {else {throw new WatchDogTaskStopException("watch dog cancel" );public void cancel () null );false );private <T> T execute0 (Function<Jedis, T> function) {try (Jedis jedis = jedisPool.getResource()) {return function.apply(jedis);interface Action void apply (Jedis jedis) private void executeWithoutResult (Action action) try (Jedis jedis = jedisPool.getResource()) {private static class WatchDogTaskStopException extends RuntimeException @Override public synchronized Throwable fillInStackTrace () return this ;public static void main (String[] args) throws Exception "resource:x" ;new RedisRedLock(new JedisPool(new GenericObjectPoolConfig()), UUID.randomUUID().toString());new Thread(() -> {try {catch (InterruptedException e) {finally {"线程%s释放资源%s的锁" , Thread.currentThread().getName(), resourceName));"threadA" );new Thread(() -> {try {catch (InterruptedException e) {finally {"线程%s释放资源%s的锁" , Thread.currentThread().getName(), resourceName));"threadB" );private static void process (String resourceName) "线程%s获取到资源%s的锁" , threadName, resourceName));try {1000 );catch (InterruptedException ignore) {上面的实现短时间内编写完,没有做详细的DEBUG,可能会有纰漏。某次执行结果如下:
线程threadB获取到资源resource:x的锁小结 Redisson中的red lock实现,应用到下面的核心技术:
Netty中的时间轮 HashedWheelTimer和对应的定时任务 (HashedWheel)Timeout
Semaphore进行带期限、永久或者可中断的阻塞以及唤醒,替代 CountDownLatch中的无等待期限阻塞
上面的核心技术相对合理地应用,才能实现一个高效而且容错能力相对比较高的分布式锁方案,但是从目前来看,Redisson仍未解决red lock算法中的故障转移缺陷,笔者认为这个有可能是Redis实现分布式锁方案的一个底层缺陷,「此方案在Redis单实例中是相对完善」 ,一旦应用在Redis集群(普通主从、哨兵或者Cluster),有几率会出现前文提到的节点角色切换导致多个不同客户端获取到同一个资源对应的锁的问题。暂时无解。
参考资料:
画图用的是ProcessOn:https://www.processon.com/view/link/5ffc540de0b34d2060d2d715
(c-2-w e-a-20210110 2021年的第一篇文章,希望这一年不要这么鸽,这个系列的下一篇是《冷饭新炒:理解JDK中UUID的底层实现》)