Vue3 正式发布已经有一段时间了,前段时间写了一篇文章(《Vue 模板编译原理》 )分析 Vue 的模板编译原理。今天的文章打算学习下 Vue3 下的模板编译与 Vue2 下的差异,以及 VDOM 下 Diff 算法的优化。
编译入口 了解过 Vue3 的同学肯定知道 Vue3 引入了新的组合 Api,在组件 mount 阶段会调用 setup 方法,之后会判断 render 方法是否存在,如果不存在会调用 compile 方法将 template 转化为 render。
// packages/runtime-core/src/renderer.ts const mountComponent = (initialVNode, container ) => {const instance = (// ...params // 调用 setup // packages/runtime-core/src/component.ts let compileexport function registerRuntimeCompiler (_compile ) export function setupComponent (instance ) const Component = instance.typeconst { setup } = Componentif (setup) {// ...调用 setup if (compile && Component.template && !Component.render) {// 如果没有 render 方法 // 调用 compile 将 template 转为 render 方法 这部分都是 runtime-core 中的代码,之前的文章有讲过 Vue 分为完整版和 runtime 版本。如果使用 vue-loader 处理 .vue 文件,一般都会将 .vue 文件中的 template 直接处理成 render 方法。
// 需要编译器 template : '<div>{{ hi }}</div>' // 不需要 return Vue.h('div' , {}, this .hi)完整版与 runtime 版的差异就是,完整版会引入 compile 方法,如果是 vue-cli 生成的项目就会抹去这部分代码,将 compile 过程都放到打包的阶段,以此优化性能。runtime-dom 中提供了 registerRuntimeCompiler 方法用于注入 compile 方法。
主流程 在完整版的 index.js 中,调用了 registerRuntimeCompiler 将 compile 进行注入,接下来我们看看注入的 compile 方法主要做了什么。
// packages/vue/src/index.ts import { compile } from '@vue/compiler-dom' // 编译缓存 const compileCache = Object .create(null )// 注入 compile 方法 function compileToFunction (// 模板// 编译配置RenderFunction if (!isString(template)) {// 如果 template 不是字符串 // 则认为是一个 DOM 节点,获取 innerHTML if (template.nodeType) {else {return NOOP// 如果缓存中存在,直接从缓存中获取 const key = templateconst cached = compileCache[key]if (cached) {return cached// 如果是 ID 选择器,这获取 DOM 元素后,取 innerHTML if (template[0 ] === '#' ) {const el = document .querySelector(template)'' // 调用 compile 获取 render code const { code } = compile(// 将 render code 转化为 function const render = new Function (code)();// 返回 render 方法的同时,将其放入缓存 return (compileCache[key] = render)// 注入 compile 在讲 Vue2 模板编译的时候已经讲过,compile 方法主要分为三步,Vue3 的逻辑类似:
// packages/compiler-dom/src/index.ts import { baseCompile, baseParse } from '@vue/compiler-core' export function compile (template, options ) return baseCompile(template, options)// packages/compiler-core/src/compile.ts import { baseParse } from './parse' import { transform } from './transform' import { transformIf } from './transforms/vIf' import { transformFor } from './transforms/vFor' import { transformText } from './transforms/transformText' import { transformElement } from './transforms/transformElement' import { transformOn } from './transforms/vOn' import { transformBind } from './transforms/vBind' import { transformModel } from './transforms/vModel' export function baseCompile (template, options ) // 解析 html,转化为 ast const ast = baseParse(template, options)// 优化 ast,标记静态节点 nodeTransforms : [// ... 省略了部分 transform directiveTransforms : {on : transformOn,bind : transformBind,model : transformModel// 将 ast 转化为可执行代码 return generate(ast, options)计算 PatchFlag 这里大致的逻辑与之前的并没有多大的差异,主要是 optimize 方法变成了 transform 方法,而且默认会对一些模板语法进行 transform。这些 transform 就是后续虚拟 DOM 优化的关键,我们先看看 transform 的代码 。
// packages/compiler-core/src/transform.ts export function transform (root, options ) const context = createTransformContext(root, options)export function traverseNode (node, context ) const { nodeTransforms } = contextconst exitFns = []for (let i = 0 ; i < nodeTransforms.length; i++) {// Transform 会返回一个退出函数,在处理完所有的子节点后再执行 const onExit = nodeTransforms[i](node, context)if (onExit) {if (isArray(onExit)) {else {// 执行所以 Transform 的退出函数 let i = exitFns.lengthwhile (i--) {我们重点看一下 transformElement 的逻辑:
// packages/compiler-core/src/transforms/transformElement.ts export const transformElement: NodeTransform = (node, context ) => {// transformElement 没有执行任何逻辑,而是直接返回了一个退出函数 // 说明 transformElement 需要等所有的子节点处理完后才执行 return function postTransformElement (const { tag, props } = nodelet vnodePropslet vnodePatchFlagconst vnodeTag = node.tagType === ElementTypes.COMPONENT`"${tag} "` let patchFlag = 0 // 检测节点属性 if (props.length > 0 ) {// 检测节点属性的动态部分 const propsBuildResult = buildProps(node, context)// 检测子节点 if (node.children.length > 0 ) {if (node.children.length === 1 ) {const child = node.children[0 ]// 检测子节点是否为动态文本 if (!getStaticType(child)) {// 格式化 patchFlag if (patchFlag !== 0 ) {String (patchFlag)buildProps 会对节点的属性进行一次遍历,由于内部源码涉及很多其他的细节,这里的代码是经过简化之后的,只保留了 patchFlag 相关的逻辑。
export function buildProps ('props' ] = node.propslet patchFlag = 0 for (let i = 0 ; i < props.length; i++) {const prop = props[i]const [key, name] = prop.name.split(':' )if (key === 'v-bind' || key === '' ) {if (name === 'class' ) {// 如果包含 :class 属性,patchFlag | CLASS else if (name === 'style' ) {// 如果包含 :style 属性,patchFlag | STYLE return {上面的代码只展示了三种 patchFlag 的类型:
节点只有一个文本子节点,且该文本包含动态的数据 ( TEXT = 1)
<p > name: {{name}}</p >
节点包含可变的 class 属性 ( CLASS = 1 << 1)
<div :class ="{ active: isActive }" > </div >
节点包含可变的 style 属性 ( STYLE = 1 << 2)
<div :style ="{ color: color }" > </div > 可以看到 PatchFlags 都是数字 1 经过 左移操作符 计算得到的。
export const enum PatchFlags {1 , // 1, 二进制 0000 0001 1 << 1 , // 2, 二进制 0000 0010 1 << 2 , // 4, 二进制 0000 0100 1 << 3 , // 8, 二进制 0000 1000 从上面的代码能看出来,patchFlag 的初始值为 0,每次对 patchFlag 都是执行 | (或)操作。如果当前节点是一个只有动态文本子节点且同时具有动态 style 属性,最后得到的 patchFlag 为 5(二进制:0000 0101)。
<p :style="{ color: color }" >name: {{name}}</p> patchFlag = 0 // 或运算:两个对应的二进制位中只要一个是1,结果对应位就是1。 // 0000 0001 // 0000 0100 // ------------ // 0000 0101 => 十进制 5
patchFlag
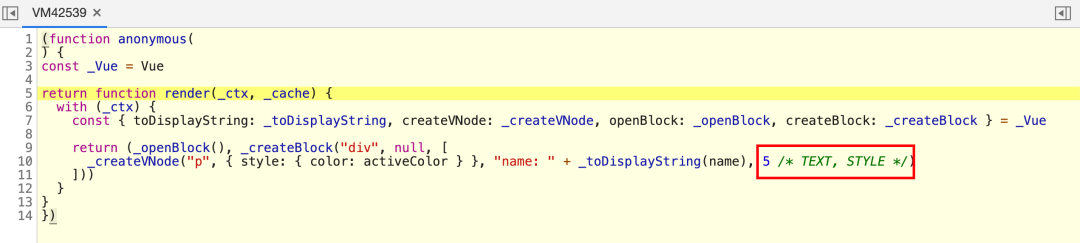
我们将上面的代码放到 Vue3 中运行:
const app = Vue.createApp({return {color : 'red' ,name : 'shenfq' template : `<div> '#app' )最后生成的 render 方法如下,和我们之前的描述基本一致。
function render() {}
render 优化 Vue3 在虚拟 DOM Diff 时,会取出 patchFlag 和需要进行的 diff 类型进行 &(与)操作,如果结果为 true 才进入对应的 diff。
patchFlag 判断
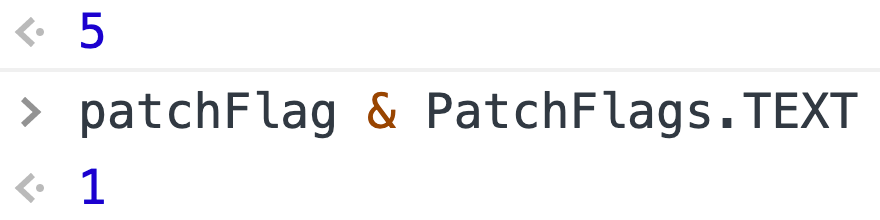
还是拿之前的模板举例:
<p :style ="{ color: color }" > name: {{name}}</p > 如果此时的 name 发生了修改,p 节点进入了 diff 阶段,此时会将判断 patchFlag & PatchFlags.TEXT ,这个时候结果为真,表明 p 节点存在文本修改的情况。
patchFlag
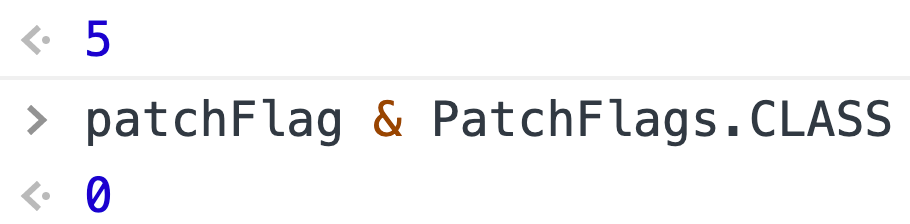
patchFlag = 5 // 或运算:只有对应的两个二进位都为1时,结果位才为1。 // 0000 0101 // 0000 0001 // ------------ // 0000 0001 => 十进制 1 if (patchFlag & PatchFlags.TEXT) {if (oldNode.children !== newNode.children) {// 修改文本 但是进行 patchFlag & PatchFlags.CLASS 判断时,由于节点并没有动态 Class,返回值为 0,所以就不会对该节点的 class 属性进行 diff,以此来优化性能。
patchFlag
patchFlag = 5 // 或运算:只有对应的两个二进位都为1时,结果位才为1。 // 0000 0101 // 0000 0010 // ------------ // 0000 0000 => 十进制 0 总结 其实 Vue3 相关的性能优化有很多,这里只单独将 patchFlag 的十分之一的内容拿出来讲了,Vue3 还没正式发布的时候就有看到说 Diff 过程会通过 patchFlag 来进行性能优化,所以打算看看他的优化逻辑,总的来说还是有所收获。