在mybatis插件机制原理剖析一文章中,我们简单的剖析了mybatis插件的实现的基本原理,但是还是不够完善,比如:如果有多个拦截器要怎么处理,能不能只要实现了MyInterceptor接口,就自动给包装成代理对象,一个拦截器能不能多个方法进行拦截等等....
现在我们就基于上篇文章继续优化改进:
-
首先,一个拦截器能多个方法进行拦截,将MySignature注解进行改造, 让它可以支持多个方法如下:
/**
 * 支持多个方法的注解,注意 @Target({})
*/
@Documented
@Retention(RetentionPolicy.RUNTIME)
@Target({})
public @interface MySignature2 {
   // class
   Class<?> type();

   String method();

   Class<?>[] args();
}
-
第二步:若想在拦截器使用,在定义一个包装MySignature2的注解,我们定义成如下:
import java.lang.annotation.Documented;
import java.lang.annotation.ElementType;
import java.lang.annotation.Retention;
import java.lang.annotation.RetentionPolicy;
import java.lang.annotation.Target;
/**
* @ClassName MyIntercepts
* @Description:
* @author: 轩逸
* @date: 2020/9/22 19:54
*/
@Documented
@Retention(RetentionPolicy.RUNTIME)
@Target(ElementType.TYPE)
public @interface MyIntercepts2 {
 /**
 * @Title: 支持多个方法签名
 * @Description:
 * @return
 * @version V1.0
 * @author 轩逸
 * @Date 2020-09-22 19:55
 */
 MySignature2[] value();
}
-
第三步,改造我们的拦截器接口,使得自动实现该接口的包装成一个代理对象,如下
import com.xfyang.plugin.MyInvcation;

/**
* @ClassName MyInterceptor2
* @Description:
* @author: 轩逸
* @date: 2020/9/22 20:05
*/
public interface MyInterceptor2 {
  /**
   * @return
   * @Title:
   * @Description:拦截
   * @version V1.0
   * @author 轩逸
   * @Date 2020-09-22 9:53
   */
  Object intercept(MyInvcation myInvcation) throws Exception;

  /**
   * @Title:
   * @Description:默认把当前的拦截器包装成给代理对象返回
   * @return
   * @version V1.0
   * @author 轩逸
   * @Date 2020-09-22 20:09
   */
  default Object plugin(Object target) {
  	return MyPlugin2.wrap(target, this);
  }
}
-
第四步,改造我们的MyPlugin,使其能够支持多个方法的拦截(也即一个拦截器可以多个方法进行拦截)
  import com.xfyang.plugin.MyInvcation;
  import org.apache.ibatis.reflection.ExceptionUtil;

  import java.lang.reflect.InvocationHandler;
  import java.lang.reflect.Method;
  import java.lang.reflect.Proxy;
  import java.util.HashMap;
  import java.util.HashSet;
  import java.util.Map;
  import java.util.Set;

  /**
   * @ClassName MyPlugin2
   * @Description:
   * @author: 轩逸
   * @date: 2020/9/22 10:21
   */
  public class MyPlugin2 implements InvocationHandler {
  	private final Object target;
  	private final MyInterceptor2 myInterceptor;
  	private final Map<Class<?>, Set<Method>> signatureMap;

  	public MyPlugin2(Object target, MyInterceptor2 myInterceptor, Map<Class<?>, Set<Method>>signatureMap) {
  		this.target = target;
  		this.myInterceptor = myInterceptor;
  		this.signatureMap = signatureMap;
  	}

  	/**
  	 * @Title:
  	 * @Description: 包装拦截器符合当前调用方法的代理对象
  	 * @return
  	 * @version V1.0
  	 * @author 轩逸
  	 * @Date 2020-09-22 20:13
  	 */
  	public static Object wrap(Object target, MyInterceptor2 myInterceptor) {
  		Map<Class<?>, Set<Method>> signatureMap = getSignatureMap(myInterceptor);
  		Class<?> type = target.getClass();
  		Class<?>[] interfaces = getAllInterfaces(type, signatureMap);
  		if (interfaces.length > 0) {
  			return Proxy.newProxyInstance(
  					type.getClassLoader(),
  					interfaces,
  					new MyPlugin2(target, myInterceptor, signatureMap));
  		}
  		return target;
  	}

  	/**
  	 * @Title:
  	 * @Description:执行代理的拦截器方法,并执行目标的真实方法
  	 * @return
  	 * @version V1.0
  	 * @author 轩逸
  	 * @Date 2020-09-22 20:14
  	 */
  	@Override
  	public Object invoke(Object proxy, Method method, Object[] args) throws Throwable {
  		try {
  			Set<Method> methods = signatureMap.get(method.getDeclaringClass());
  			if (methods != null && methods.contains(method)) {
  				return myInterceptor.intercept(new MyInvcation(target, method, args));
  			}
  			return method.invoke(target, args);
  		} catch (Exception e) {
  			throw ExceptionUtil.unwrapThrowable(e);
  		}
  	}

  	/**
  	 * @Title:
  	 * @Description:获取当前拦截器的方法签名
  	 * @return
  	 * @version V1.0
  	 * @author 轩逸
  	 * @Date 2020-09-22 20:15
  	 */
  	private static Map<Class<?>, Set<Method>> getSignatureMap(MyInterceptor2 interceptor) {
  		MyIntercepts2 myIntercepts2Annotation = interceptor.getClass().getAnnotation(MyIntercepts2.class);
  		if (myIntercepts2Annotation == null) {
  			throw new RuntimeException("No @Intercepts annotation was found in interceptor " + interceptor.getClass().getName());
  		}
  		MySignature2[] sigs = myIntercepts2Annotation.value();
  		Map<Class<?>, Set<Method>> signatureMap = new HashMap<>();
  		for (MySignature2 sig : sigs) {
  			Set<Method> methods = signatureMap.computeIfAbsent(sig.type(), k -> new HashSet<>());
  			try {
  				Method method = sig.type().getMethod(sig.method(), sig.args());
  				methods.add(method);
  			} catch (NoSuchMethodException e) {
  				throw new RuntimeException("Could not find method on " + sig.type() + " named " + sig.method() + ". Cause: " + e, e);
  			}
  		}
  		return signatureMap;
  	}

  	/**
  	 * @Title:
  	 * @Description:获取符合当前执行方法的的接口
  	 * @return
  	 * @version V1.0
  	 * @author 轩逸
  	 * @Date 2020-09-22 20:15
  	 */
  	private static Class<?>[] getAllInterfaces(Class<?> type, Map<Class<?>, Set<Method>> signatureMap) {
  		Set<Class<?>> interfaces = new HashSet<>();
  		while (type != null) {
  			for (Class<?> c : type.getInterfaces()) {
  				if (signatureMap.containsKey(c)) {
  					interfaces.add(c);
  				}
  			}
  			type = type.getSuperclass();
  		}
  		return interfaces.toArray(new Class<?>[interfaces.size()]);
  	}
  }
-
第五步,定义一个拦截器连MyInterceptorChain2,吧对的拦截器依次加入进行
  import java.util.ArrayList;
  import java.util.Collections;
  import java.util.List;

  /**
   * @ClassName MyInterceptorChain
   * @Description:
   * @author: 轩逸
   * @date: 2020/9/22 20:30
   */
  public class MyInterceptorChain2 {
  	// 拦截器集合
  	private final List<MyInterceptor2> interceptors = new ArrayList<>();

  	 // 依次加入到链条中
  	public Object pluginAll(Object target) {
  	    for (MyInterceptor2 interceptor : interceptors) {
  	     target = interceptor.plugin(target);
            }
  	   return target;
  	}

   // 加入拦截器
  public void addInterceptor(MyInterceptor2 interceptor) {
  	interceptors.add(interceptor);
  }

   // 提供给外面一个无法修改的拦截器集合
   public List<MyInterceptor2> getInterceptors() {
  	return Collections.unmodifiableList(interceptors);
   }
}
-
第六步,定义一个拦截器SQLTimeConsumeInterceptor2.
 import com.xfyang.plugin.MyInvcation;
 import com.xfyang.plugin.QueryService;

  /**
   * @ClassName SQLTimeConsumeInterceptor2
   * @Description:
   * @author: 轩逸
   * @date: 2020/9/22 20:25
   */
  @MyIntercepts2({
  		@MySignature2(type = QueryService.class, method = "queryByName", args = {String.class}),
  		@MySignature2(type = QueryService.class, method = "updateByName", args = {String.class}),
  })
  public class SQLTimeConsumeInterceptor2 implements MyInterceptor2 {
  	/**
  	 * @param myInvcation
  	 * @return
  	 * @Title:
  	 * @Description:拦截
  	 * @version V1.0
  	 * @author 轩逸
  	 * @Date 2020-09-22 9:53
  	 */
  	@Override
  	public Object intercept(MyInvcation myInvcation) throws Exception {
  		long beginTime = System.currentTimeMillis();
  		Object object = myInvcation.process();
  		System.out.println("SQLTimeConsumeInterceptor2-->当前方法名:" + myInvcation.getMethod().getName() + ",SQL耗时:" + (System.currentTimeMillis() - beginTime));
  		return object;
  	}
  }
-
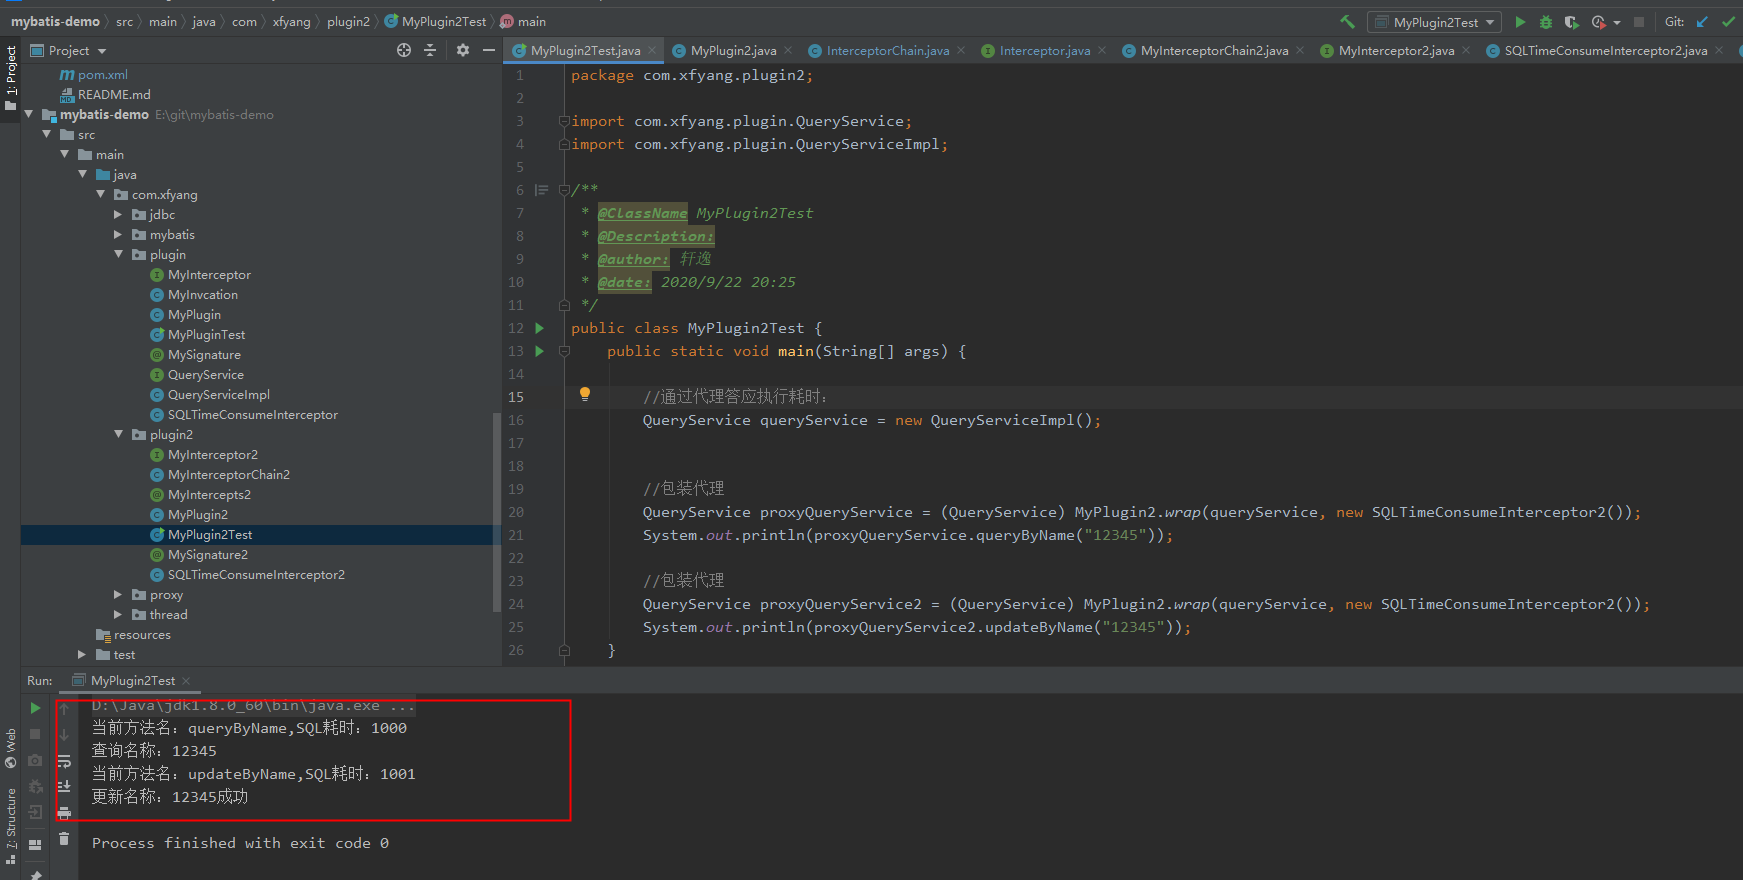
最后一步,执行测试,首先验证一个拦截器针对一个接口中的2个方法是否OK?
  import com.xfyang.plugin.QueryService;
  import com.xfyang.plugin.QueryServiceImpl;

  /**
   * @ClassName MyPlugin2Test
   * @Description:
   * @author: 轩逸
   * @date: 2020/9/22 20:25
   */
  public class MyPlugin2Test {
  	public static void main(String[] args) {

  		//通过代理答应执行耗时:
  		QueryService queryService = new QueryServiceImpl();


  		//包装代理
  		QueryService proxyQueryService = (QueryService) MyPlugin2.wrap(queryService, new SQLTimeConsumeInterceptor2());
  		System.out.println(proxyQueryService.queryByName("12345"));

  		//包装代理
  		QueryService proxyQueryService2 = (QueryService) MyPlugin2.wrap(queryService, new SQLTimeConsumeInterceptor2());
  		System.out.println(proxyQueryService2.updateByName("12345"));
  	}
  }
控制台打印接口如下,符合预期,一个拦截器针对一个接口类中的2个方法都生效了。 ![]()
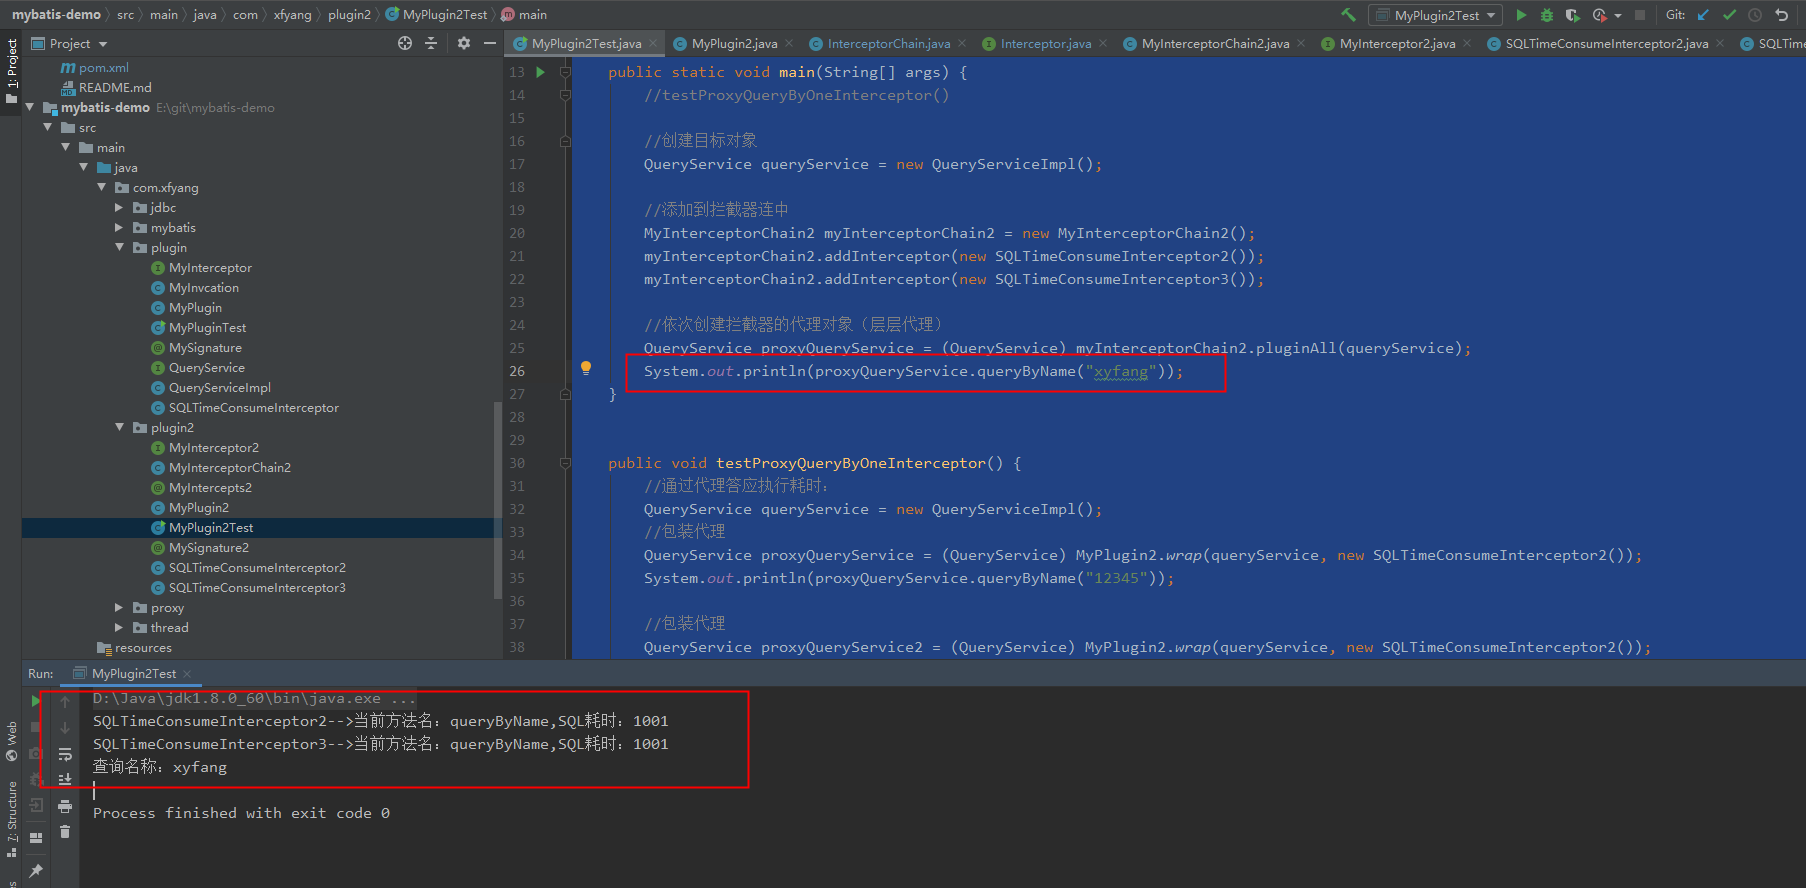
其次,验证多个拦截器针对同一个接口中的方法进行层层代理拦截。
package com.xfyang.plugin2;

import com.xfyang.plugin.QueryService;
import com.xfyang.plugin.QueryServiceImpl;

/**
 * @ClassName MyPlugin2Test
 * @Description:
 * @author: 轩逸
 * @date: 2020/9/22 20:25
 */
public class MyPlugin2Test {
	public static void main(String[] args) {
		//testProxyQueryByOneInterceptor()

		//创建目标对象
		QueryService queryService = new QueryServiceImpl();

		//添加到拦截器连中
		MyInterceptorChain2 myInterceptorChain2 = new MyInterceptorChain2();
		myInterceptorChain2.addInterceptor(new SQLTimeConsumeInterceptor2());
		myInterceptorChain2.addInterceptor(new SQLTimeConsumeInterceptor3());

		//依次创建拦截器的代理对象(层层代理)
		QueryService proxyQueryService = (QueryService) myInterceptorChain2.pluginAll(queryService);
		System.out.println(proxyQueryService.queryByName("xyfang"));
	}


	public void testProxyQueryByOneInterceptor() {
		//通过代理答应执行耗时:
		QueryService queryService = new QueryServiceImpl();
		//包装代理
		QueryService proxyQueryService = (QueryService) MyPlugin2.wrap(queryService, new SQLTimeConsumeInterceptor2());
		System.out.println(proxyQueryService.queryByName("12345"));

		//包装代理
		QueryService proxyQueryService2 = (QueryService) MyPlugin2.wrap(queryService, new SQLTimeConsumeInterceptor2());
		System.out.println(proxyQueryService2.updateByName("12345"));
	}
}
验证结果,符合预期:
![]()
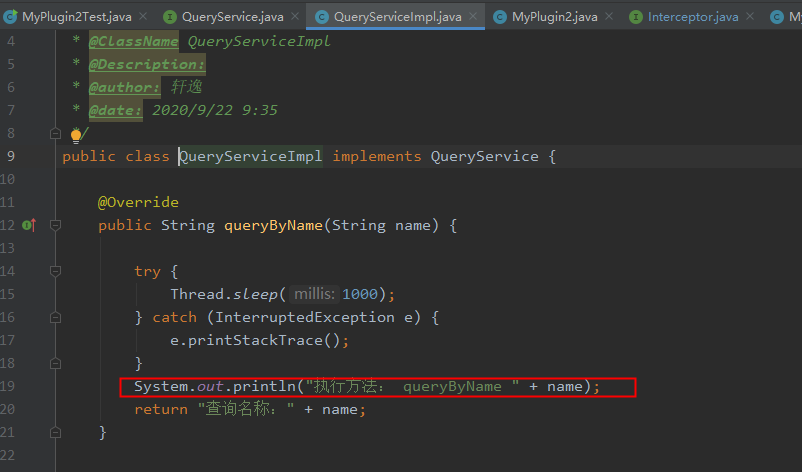
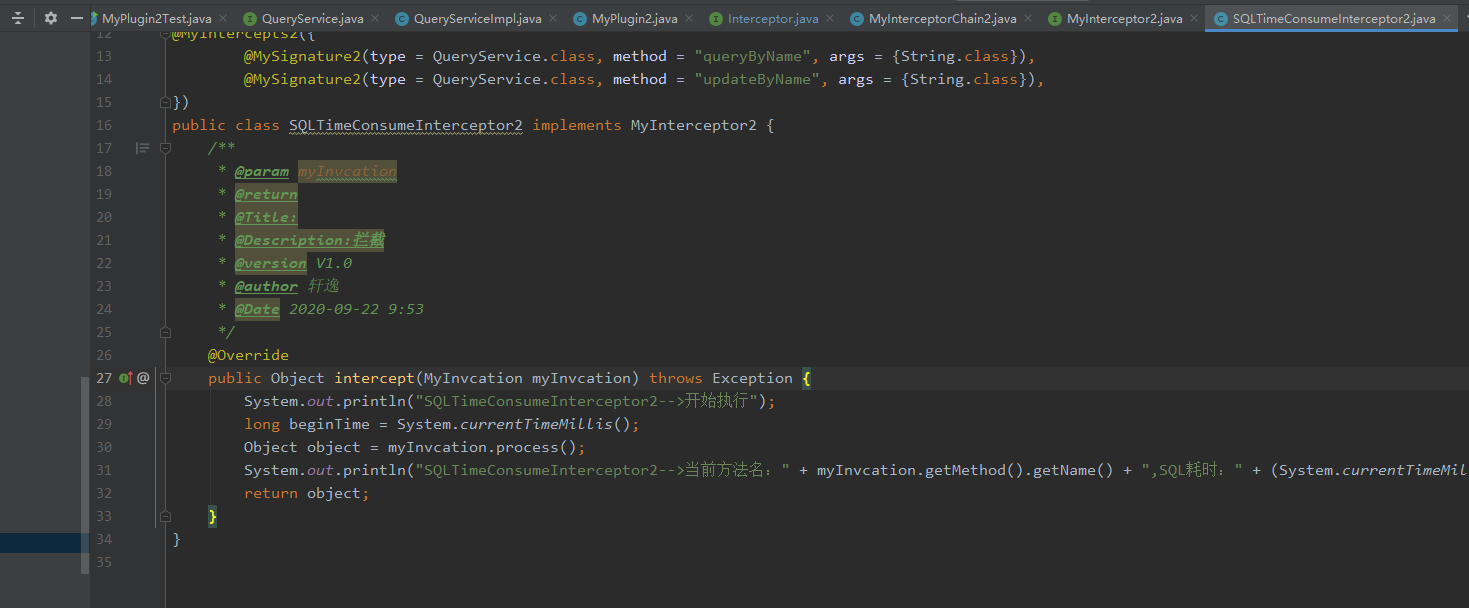
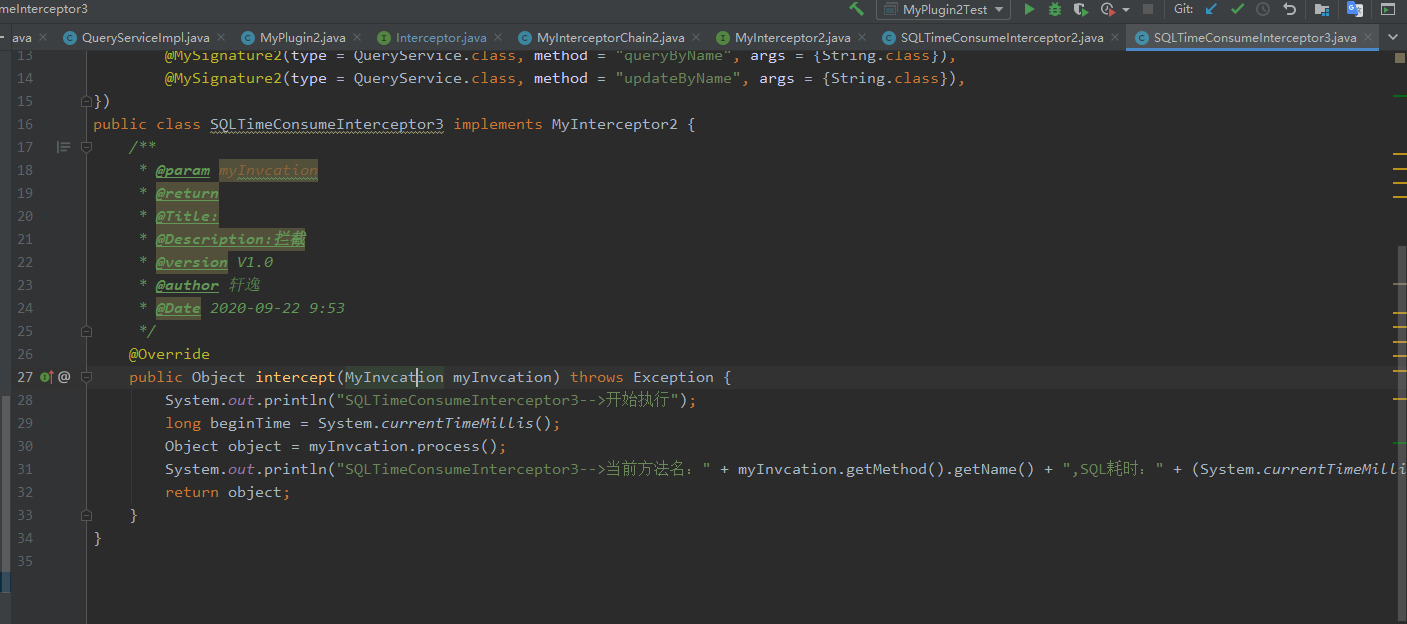
在目前实现类中加入:
![]()
![]()
![]()
执行如下:
![]()
可能有人对结果,不是很理解:
    SQLTimeConsumeInterceptor3-->开始执行
    SQLTimeConsumeInterceptor2-->开始执行
    执行方法: queryByName xyfang
    SQLTimeConsumeInterceptor2-->当前方法名:queryByName,SQL耗时:1000
    SQLTimeConsumeInterceptor3-->当前方法名:queryByName,SQL耗时:1000
    查询名称:xyfang
那是因为:SQLTimeConsumeInterceptor3 是对SQLTimeConsumeInterceptor2的代理,SQLTimeConsumeInterceptor2在对QueryService进行代理,从而执行目标类QueryServiceImpl中的queryByName方法, 所以 SQLTimeConsumeInterceptor3-->开始执行是最开始执行的,返回的时候就SQLTimeConsumeInterceptor3-->当前方法名:queryByName,SQL耗时:1000最后返回打印了。
下一篇,我将画个时序图加深下印象,加深了解,就能理解为啥打印是这样的,请看下一篇。
有需要转载的同学,请注明来源、作者等,谢谢!