前言
笔者上一篇文章 TS核心知识点总结及项目实战案例分析 主要写了typescript的用法和核心知识点总结, 这篇文章将通过一个实际的前端案例来教大家如何在项目中使用typescript.
你将收获
-
如何使用umi快速搭建一个基于React + antd + typescript的前端项目
-
-
-
-
正文
在开始文章之前, 我们先看一下企业黑白墙项目的演示:
(注: 本文仅针对项目剖析和学习使用, 不做任何商业用途)
该项目是一个响应式网站, 针对PC端和H5均做了一定的适配, 接下来我们将正对该网站做一次typescript剖析.
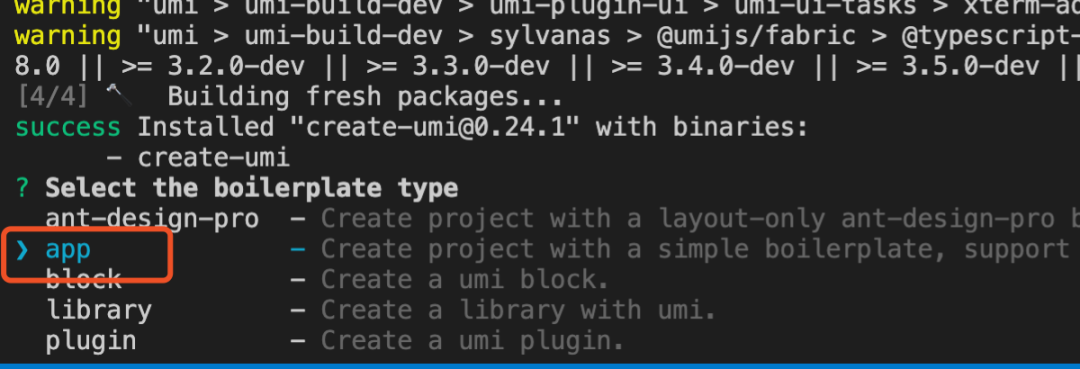
1. 使用umi快速搭建一个基于React + antd + typescript的前端项目
umi是一个功能强大且开箱即用的企业级项目脚手架, 这里笔者直接采用umi来创建一个ts项目, 具体方式如下:
// 1.创建项目空目录
$ mkdir ts-react && cd ts-react
// 2.创建项目
yarn create @umijs/umi-app
// 3.安装项目依赖
yarn
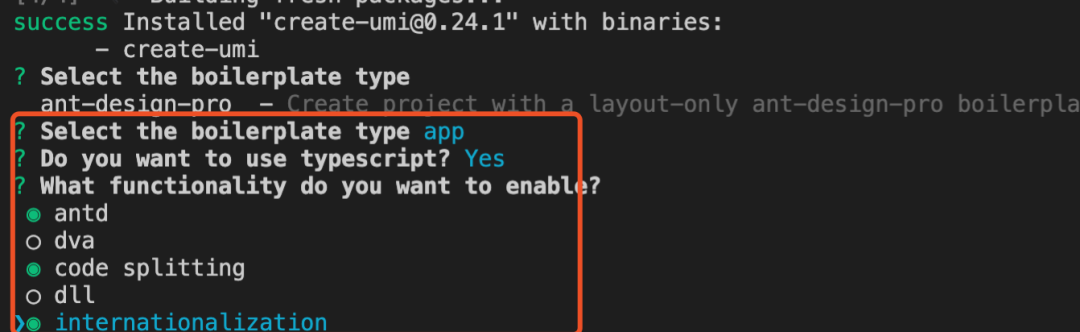
用umi开发只需要简单的3个命令即可, 值得注意的是, 在执行步骤2时会在命令行出现如下交互选项:
主要是让我们选择创建的项目类型的, 这里我们选typescript和antd即可, 有关如何创建可交互的命令行工具, 在笔者的 基于react/vue生态的前端集成解决方案探索与总结 中有介绍, 感兴趣的可以学习交流.
经过以上的步骤我们就初步搭建了一个支持react + typescript + antd技术栈的项目骨架.
2. 中后台前端项目的目录和ts文件划分
ts-react
├─ src
│ ├─ assets
│ │ └─ yay.jpg
│ ├─ components
│ │ └─ PublicModal
│ │ ├─ index.css
│ │ ├─ index.tsx
│ │ └─ type.ts
│ ├─ layouts
│ │ ├─ __tests__
│ │ │ └─ index.test.tsx
│ │ ├─ index.css
│ │ └─ index.tsx
│ ├─ locales
│ │ └─ en-US.ts
│ ├─ models
│ ├─ pages
│ │ ├─ __tests__
│ │ │ ├─ __mocks__
│ │ │ │ └─ umi-plugin-locale.ts
│ │ │ └─ index.test.tsx
│ │ ├─ about
│ │ │ ├─ components
│ │ │ ├─ index.d.ts
│ │ │ ├─ index.less
│ │ │ └─ index.tsx
│ │ ├─ index.css
│ │ ├─ index.tsx
│ │ ├─ innerRec.tsx
│ │ └─ list.tsx
│ ├─ utils
│ │ ├─ tool.ts
│ │ └─ type.ts
│ ├─ app.ts
│ └─ global.css
├─ global.d.ts
├─ package.json
├─ readme.md
├─ tsconfig.json
└─ typings.d.ts
我们从外往里看, 在项目根目录下有typings.d.ts和global.d.ts这两个文件, 前者我们可以放置一些全局的导出模块,比如css,less, 图片的导出声明, 这样我们就不用一个个的在页面代码里再重新声明了, 如下:
// typings.d.ts
declare module '*.css';
declare module '*.less';
declare module "*.png";
declare module "*.jpeg";
这样做我们就能避免在页面中导入css或者图片文件时ts报错的问题了. 对于global.d.ts, 笔者建议放一些全局声明的变量, 接口等, 比如说Jquery这种第三方库的声明, window下全局变量的声明等.
其次是src目录,我们具体介绍一下目录的意义:
-
assets 存放静态资源如图片/视频/音频等, 参与webpack的打包过程
-
-
-
-
models dva的models文件夹, 处理redux流
-
pages 存放页面的目录, 内部可以有页面组件components, 结构类似于全局的components
-
utils 存放js工具库, 请求库等公共js文件
在了解了上面的目录和目录的含义之后, 我们再来看看如何规划其中的ts文件.
对于组件库来说, 其下面的一个子目录对应一个组件, 里面包含必须的样式文件, 组件tsx文件和组件自有类型文件, 这里命名为type.ts, 专门存放该组件所需要的类型和接口声明.
同理对于页面文件夹来说, 也应具有类似的结构, 就好比上面的about页面, 包含如下结构:
还需要说明一点的是, 如果某个页面有私有的类型或者接口声明,我们可以直接在文件内部去声明, 没必要全部都拿到外面去定义和声明.
目录规划这块基本完成, 实际情况还是需要根据自身项目结构来做更合理的划分, 接下来我们看看具体的typescript在业务代码中的应用.
3. 在React组件中使用typescript
这里笔者将会拿该项目的自定义上传组件以及白名单页面作为例子, 文件上传组件笔者将采用SFC(即函数组件), 白名单页面将采用类组件, 这样可以方便大家对这两中组件开发模式下的typescript开发有个全面的认知.
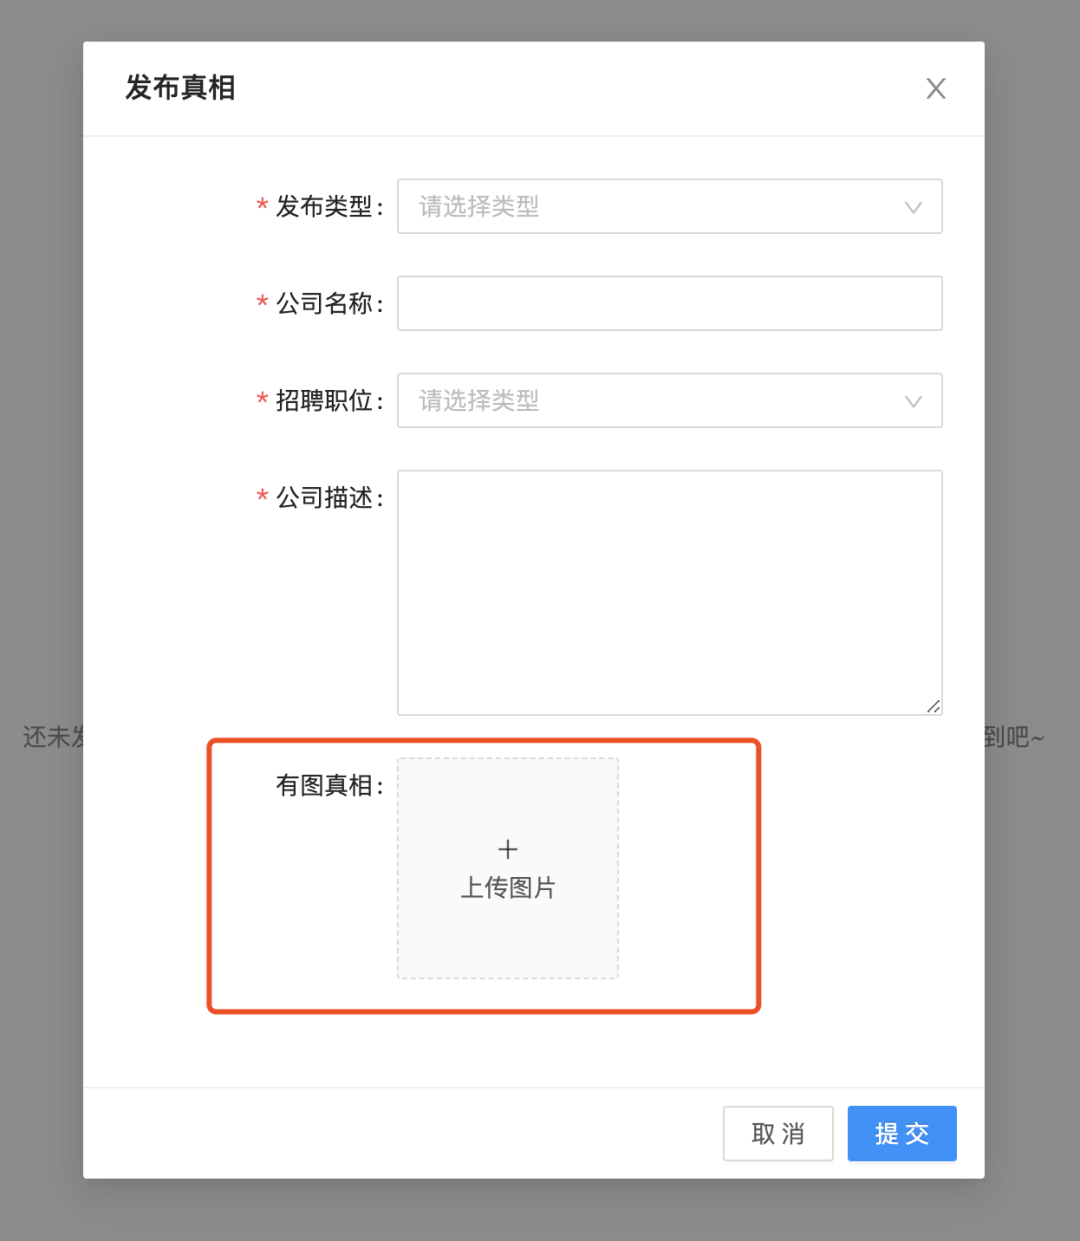
3.1 自定义上传组件开发
自定义上传组件我们主要应用在发布模块, 基于antd进行二次封装以便能兼容支持antd的Form模型, 如下图:
![]()
import React, { useState, useEffect, SFC, ReactNode } from 'react';
import { Upload, message } from 'antd';
import { LoadingOutlined, PlusOutlined } from '@ant-design/icons';
import styles from './index.less';
export interface BeforeUploadFunc {
(file:File, fileList:FileList): boolean | Promise<File>;
}
export interface SuccessBack {
(url: string): string;
}
export interface ChangeFunc {
(value: string | Array<string>): void;
}
export interface IProps {
action: string;
listType?: string;
showUploadList?: boolean;
headers?: object;
beforeUpload?: BeforeUploadFunc;
onSuccess?: SuccessBack;
withCredentials?: boolean;
text?: string | ReactNode;
imgUrl?: string;
onChange?: ChangeFunc;
value?: string;
}
const UploadCp:SFC<IProps> = (props:IProps) => {
const {
listType = 'picture-card',
showUploadList = false,
action = 'http://io.cc.com/api/files/free',
headers,
beforeUpload = handleBeforeUpload,
onSuccess,
withCredentials = true,
text = '上传封面',
imgUrl,
onChange,
value
} = props
const [loading, setLoading] = useState(false)
const [imageUrl, setImageUrl] = useState(imgUrl)
const handleChange = (info:FileList):void => {
// 一些操作
}
function handleBeforeUpload(file:File):boolean {
const isJpgOrPng = file.type === 'image/jpeg' || file.type === 'image/png';
if (!isJpgOrPng) {
message.error('You can only upload JPG/PNG file!');
}
const isLt2M = file.size / 1024 / 1024 < 2;
if (!isLt2M) {
message.error('Image must smaller than 2MB!');
}
return isJpgOrPng && isLt2M;
}
useEffect(() => {
!value && setImageUrl(imgUrl)
}, [imgUrl, value])
return <Upload
name="file"
listType={listType}
className={styles.avatarUploader}
showUploadList={showUploadList}
action={action}
withCredentials={withCredentials}
headers={headers}
beforeUpload={beforeUpload}
onChange={handleChange}
>
{(value || imageUrl) ? <img src={value || imageUrl} alt="avatar" style={{ width: '100%' }} alt={text} /> : text}
</Upload>
}
export default UploadCp
以上代码我们使用了React的函数组件, React提供了函数组件的类型SFC, 内置了children所以我们不用显示的再声明一次. 其他的比如函数声明, 泛型接口, 可选类型的设置等笔者在上一篇文章TS核心知识点总结及项目实战案例分析有详细介绍.不懂的可以在评论区与我交流.
3.2 白名单页面开发
在了解完函数式组件如何与typescript搭配使用之后, 我们再来看看类组件. 我们那拿搜索列表页作为例子来讲解:
import React from 'react';
import { List, Avatar, Button, Skeleton, Tag, Modal } from 'antd';
import styles from './index.less';
import req from '@/utils/req';
export interface IProps extends Location {
}
interface List {
name: string;
img: string;
desc: string;
isLoading?: boolean;
}
interface LoadingState {
initLoading: boolean;
loading: boolean;
}
export interface IState extends LoadingState {
data: Array<List>;
list: Array<List>;
}
class LoadMoreList extends React.Component<IProps, IState> {
state:IState = {
initLoading: true,
loading: false,
data: [],
list: [],
};
componentDidMount() {
this.getData();
}
getData = () => {
req.get(`/blackwhite/get?type=${this.props.location.query.type}`).then((res:List) => {
this.setState({
initLoading: false,
data: res,
list: res.slice(0, pageNum)
});
})
};
render() {
const { initLoading, loading, list, data } = this.state;
return // 页面实现代码
}
}
export default LoadMoreList
以上代码实现了class组件的typescript应用, 对于interface类型声明用到了继承, 当然也可以不用继承直接写类型声明, 这里主要为了学习方便. 大家也可以把公用的页面类型放到单独的type.ts目录下复用.
4. 在工具库中使用typescript
在掌握了类组件和函数组件的typescript写法之后, 我们来说说工具类的typescript编写方式, 这块比较简单, 笔者简单举几个常用工具函数, 将其改造成typescript的模式. 代码如下:
// utils/tool.ts
/*
* @Author: Mr Jiang.Xu
* @Date: 2019-06-06 11:23:05
* @Last Modified by: Mr Jiang.Xu
* @Last Modified time: 2019-06-29 22:33:52
*/
/**
* 识别ie--浅识别
*/
export const isIe = ():boolean => {
let explorer = window.navigator.userAgent;
//判断是否为IE浏览器
if (explorer.indexOf("MSIE") >= 0) {
return true;
}else {
return false
}
}
/**
* 颜色转换16进制转rgba
* @param {String} hex
* @param {Number} opacity
*/
export function hex2Rgba(hex:string, opacity:number):string {
if(!hex) hex = "#2c4dae";
return "rgba(" + parseInt("0x" + hex.slice(1, 3)) + "," + parseInt("0x" + hex.slice(3, 5)) + "," + parseInt("0x" + hex.slice(5, 7)) + "," + (opacity || "1") + ")";
}
// 去除html标签
export const htmlSafeStr = (str:string):string => {
return str.replace(/<[^>]+>/g, "")
}
interface params {
[propertyName: string]: string | number
}
/* 解析url参数 */
export const toParams = (params:params):string => {
if(params){
let query = [];
for(let key in params){
query.push(`${key}=${params[key]}`)
}
return `${query.join('&')}`
}else{
return ''
}
}
以上是几个比较简单的案例, 方便大家入门和理解, 实际工作中场景会更复杂, 但是掌握了基本声明和定义模式, 基本可以解决大部分ts声明问题. 作为一名前端工程师, typescript的意义很大,虽然它增加了编程的复杂度和学习成本, 但是长远来说, 对于团队的编码规范, 问题定位, 项目维护和代码管理的角度确实有不少积极作用, 所以学习typescript刻不容缓.
最后
如果想学习更多H5游戏, webpack,node,gulp,css3,javascript,nodeJS,canvas数据可视化等前端知识和实战,欢迎在公号《趣谈前端》加入我们的技术群一起学习讨论,共同探索前端的边界。