vue-toy
200行左右代码模拟vue实现,视图渲染部分使用React来代替Snabbdom,欢迎Star。 项目地址:https://github.com/bplok20010/vue-toy
codesandbox示例
已实现的参数:
interface Options {
    el: HTMLElement | string;
	propsData?: Record<string, any>;
	props?: string[];
	name?: string;
	data?: () => Record<string, any>;
	methods?: Record<string, (e: Event) => void>;
	computed?: Record<string, () => any>;
	watch?: Record<string, (newValue: any, oldValue: any) => any>;
	render: (h: typeof React.createElement) => React.ReactNode;
	renderError?: (h: typeof React.createElement, error: Error) => React.ReactNode;
	mounted?: () => void;
	updated?: () => void;
	destroyed?: () => void;
	errorCaptured?: (e: Error, vm: React.ReactInstance) => void;
}
示例:
import Vue from "vue-toy";

const Hello = Vue.component({
	render(h){
		return h('span', null, 'vue-toy') ;
	}
})

new Vue({
  el: document.getElementById("root"),
  data() {
    return {
      msg: "hello vue toy"
    };
  },
  render(h) {
    return h("h1", null, this.msg, h(Hello));
  }
});
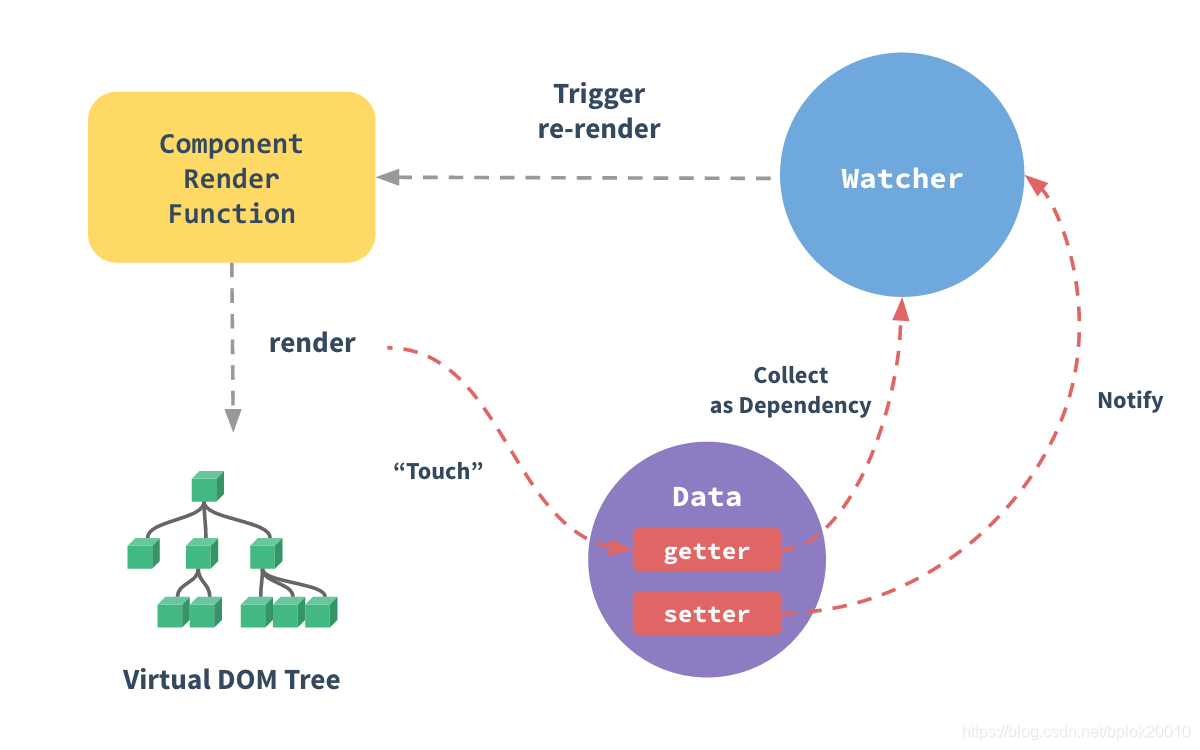
基本原理
官方原理图: ![在这里插入图片描述]() 实现基本步骤:
实现基本步骤:
- 使用Observable创建观察对象
- 定义好视图既render函数
- 收集视图依赖,并监听依赖属性
- 渲染视图
- 重复3-4
// 创建观察对象
// 观察对象主要使用的是Object.defineProperty或Proxy来实现,
const data = observable({
    name: 'vue-toy',
});

// 渲染模版
const render = function(){
    return <h1>{data.name}</h1>
}

// 计算render的依赖属性,
// 依赖属性改变时,会重新计算computedFn,并执行监控函数watchFn,
// 属性依赖计算使用栈及可以了。
// watch(computedFn, watchFn);
watch(render, function(newVNode, oldVNode){
    update(newVNode, mountNode);
});

//初始渲染
mount(render(), mountNode);

// 改变观察对象属性,如果render依赖了该属性,则会重新渲染
data.name = 'hello vue toy';
视图渲染部分(既render)使用的是vdom技术,vue使用Snabbdom库,vue-toy使用的是react来进行渲染,所以在render函数里你可以直接使用React的JSX语法,不过别忘记import React from 'react',当然也可以使用preact inferno 等 vdom库。
由于vue的template的最终也是解析并生成render函数,模版的解析可用htmleParser库来生成AST,剩下就是解析指令并生产代码,由于工作量大,这里就不具体实现,直接使用jsx。
响应式实现
一个响应式示例代码:
const data = Observable({
	name: "none",
});

const watcher =new Watch(
	data,
	function computed() {
		return "hello " + this.name;
	},
	function listener(newValue, oldValue) {
		console.log("changed:", newValue, oldValue);
	}
);
// changed vue-toy none
data.name = "vue-toy";
Observable实现
源码 观察对象创建这里使用Proxy实现,示例:
function Observable(data) {
	return new Proxy(data, {
		get(target, key) {
			return target[key];
		},
		set(target, key, value) {
			target[key] = value;
			return true;
		},
	});
}
这就完成了一个对象的观察,但以上示例代码虽然能观察对象,但无法实现对象属性改动后通知观察者,这时还缺少Watch对象来计算观察函数的属性依赖及Notify来实现属性变更时的通知。
Watch实现
源码
定义如下:
Watch(data, computedFn, watchFn);
- data 为 computedFn 的 上下文 既
this 非必须
- computedFn 为观察函数并返回观察的数据,Watch会计算出里面的依赖属性。
- watchFn 当computedFn 返回内容发生改变时,watchFn会被调用,同时接收到新、旧值
大概实现如下:
// Watch.js
// 当前正在收集依赖的Watch
const CurrentWatchDep = {
    current: null,
};
class Watch {
    constructor(data, exp, fn) {
        this.deps = [];
        this.watchFn = fn;
        this.exp =  () => {
                    return exp.call(data);
                };
        // 保存上一个依赖收集对象
        const lastWatchDep = CurrentWatchDep.current;
        // 设置当前依赖收集对象
        CurrentWatchDep.current = this;
        // 开始收集依赖,并获取观察函数返回的值
        this.last = this.exp();
        // 还原
        CurrentWatchDep.current = lastWatchDep;
    }
    clearDeps() {
        this.deps.forEach((cb) => cb());
        this.deps = [];
    }
    // 监听依赖属性的改动,并保存取消回调
    addDep(notify) {
        // 当依赖属性改变时,重新触发依赖计算
        this.deps.push(notify.sub(() => {
            this.check();
        }));
    }
    // 重新执行依赖计算
    check() {
        // 清空所有依赖,重新计算
        this.clearDeps();
        // 作用同构造函数
        const lastWatchDep = CurrentWatchDep.current;
        CurrentWatchDep.current = this;
        const newValue = this.exp();
        CurrentWatchDep.current = lastWatchDep;
        const oldValue = this.last;
        // 对比新旧值是否改变
        if (!shallowequal(oldValue, newValue)) {
            this.last = newValue;
            // 调用监听函数
            this.watchFn(newValue, oldValue);
        }
    }
}
Notify实现
观察对象发生改变后需要通知监听者,所以还需要实现通知者Notify:
class Notify {
    constructor() {
        this.listeners = [];
    }
    sub(fn) {
        this.listeners.push(fn);
        return () => {
            const idx = this.listeners.indexOf(fn);
            if (idx === -1)
                return;
            this.listeners.splice(idx, 1);
        };
    }
    pub() {
        this.listeners.forEach((fn) => fn());
    }
}
调整Observable
前面的Observable太简单了,无法完成属性计算的需求,结合上面Watch Notify的来调整下Observable。
function Observable(data) {
	const protoListeners = Object.create(null);
	// 给观察数据的所有属性创建一个Notify
	each(data, (_, key) => {
		protoListeners[key] = new Notify();
	});
	return new Proxy(data, {
		get(target, key) {
			// 属性依赖计算
			if (CurrentWatchDep.current) {
				const watcher = CurrentWatchDep.current;
				watcher.addDep(protoListener[key]);
			}
			return target[key];
		},
		set(target, key, value) {
			target[key] = value;
			if (protoListeners[key]) {
				// 通知所有监听者
				protoListeners[key].pub();
			}
			return true;
		},
	});
}
好了,观察者的创建和订阅都完成了,开始模拟Vue。
模拟Vue
vue-toy 使用React来实现视图的渲染,所以render函数里如果使用JSX则需要引入React
准备
既然已经实现了Observable和Watch,那我们就来实现基本原理的示例:
codesandbox示例
import Observable from "vue-toy/cjs/Observable";
import Watch from "vue-toy/cjs/Watch";

function mount(vnode) {
  console.log(vnode);
}

function update(vnode) {
  console.log(vnode);
}

const data = Observable({
  msg: "hello vue toy!",
  counter: 1
});

function render() {
  return `render: ${this.counter} | ${this.msg}`;
}

new Watch(data, render, update);

mount(render.call(data));

setInterval(() => data.counter++, 1000);
// 在控制台可看到每秒的输出信息
这时将mount update的实现换成vdom就可以完成一个基本的渲染。
但这还不够,我们需要抽象并封装成组件来用。
Component
源码
这里的Component像是React的高阶函数HOC,使用示例:
const Hello = Component({
	props: ["msg"],
	data() {
		return {
			counter: 1,
		};
	},
	render(h) {
		return h("h1", null, this.msg, this.counter);
	},
});
大概实现如下,options 参考文章开头
function Component(options) {
	return class extends React.Component {
	    // 省略若干...
		constructor(props) {
			super(props);
			// 省略若干...
			// 创建观察对象
			this.$data = Observable({ ...propsData, ...methods, ...data }, computed);
			// 省略若干...
			// 计算render依赖并监听
			this.$watcher = new Watch(
				this.$data,
				() => {
					return options.render.call(this, React.createElement);
				},
				debounce((children) => {
					this.$children = children;
					this.forceUpdate();
				})
			);
			this.$children = options.render.call(this, React.createElement);
		}
		shouldComponentUpdate(nextProps) {
			if (
				!shallowequal(
					pick(this.props, options.props || []),
					pick(nextProps, options.props || [])
				)
			) {
				this.updateProps(nextProps);
				this.$children = options.render.call(this, React.createElement);
				return true;
			}
			return false;
		}
        // 生命周期关联
		componentDidMount() {
			options.mounted?.call(this);
		}

		componentWillUnmount() {
			this.$watcher.clearDeps();
			options.destroyed?.call(this);
		}

		componentDidUpdate() {
			options.updated?.call(this);
		}

		render() {
			return this.$children;
		}
	};
}
创建主函数 Vue
最后创建入口函数Vue,实现代码如下:
export default function Vue(options) {
	const RootComponent = Component(options);
	let el;
	if (typeof el === "string") {
		el = document.querySelector(el);
	}

	const props = {
		...options.propsData,
		$el: el,
	};

	return ReactDOM.render(React.createElement(RootComponent, props), el);
}
Vue.component = Component;
好了,Vue的基本实现完成了。
感谢阅读。
最后,欢迎Star:https://github.com/bplok20010/vue-toy
 实现基本步骤: