seata 简介
Seata 是 阿里巴巴2019年开源的分布式事务解决方案,致力于在微服务架构下提供高性能和简单易用的分布式事务服务。在 Seata 开源之前,Seata 对应的内部版本在阿里内部一直扮演着分布式一致性中间件的角色,帮助阿里度过历年的双11,对各业务进行了有力的支撑。经过多年沉淀与积累,2019.1 Seata 正式宣布对外开源 。目前 Seata 1.0 已经 GA。
微服务中的分布式事务问题
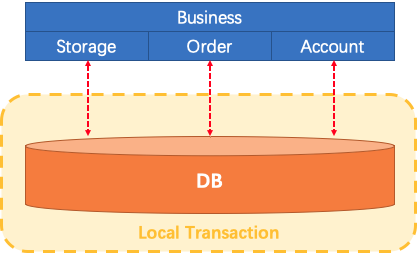
让我们想象一下传统的单片应用程序,它的业务由3个模块组成,他们使用单个本地数据源。自然,本地事务将保证数据的一致性。
![]()
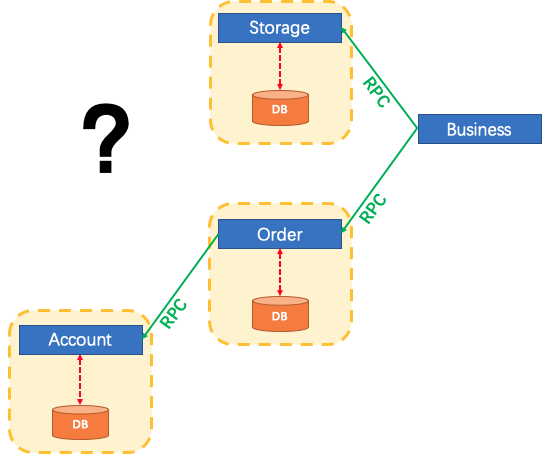
微服务架构已发生了变化。上面提到的3个模块被设计为3种服务。本地事务自然可以保证每个服务中的数据一致性。但是整个业务逻辑范围如何?
![]()
Seata怎么办?
![]()
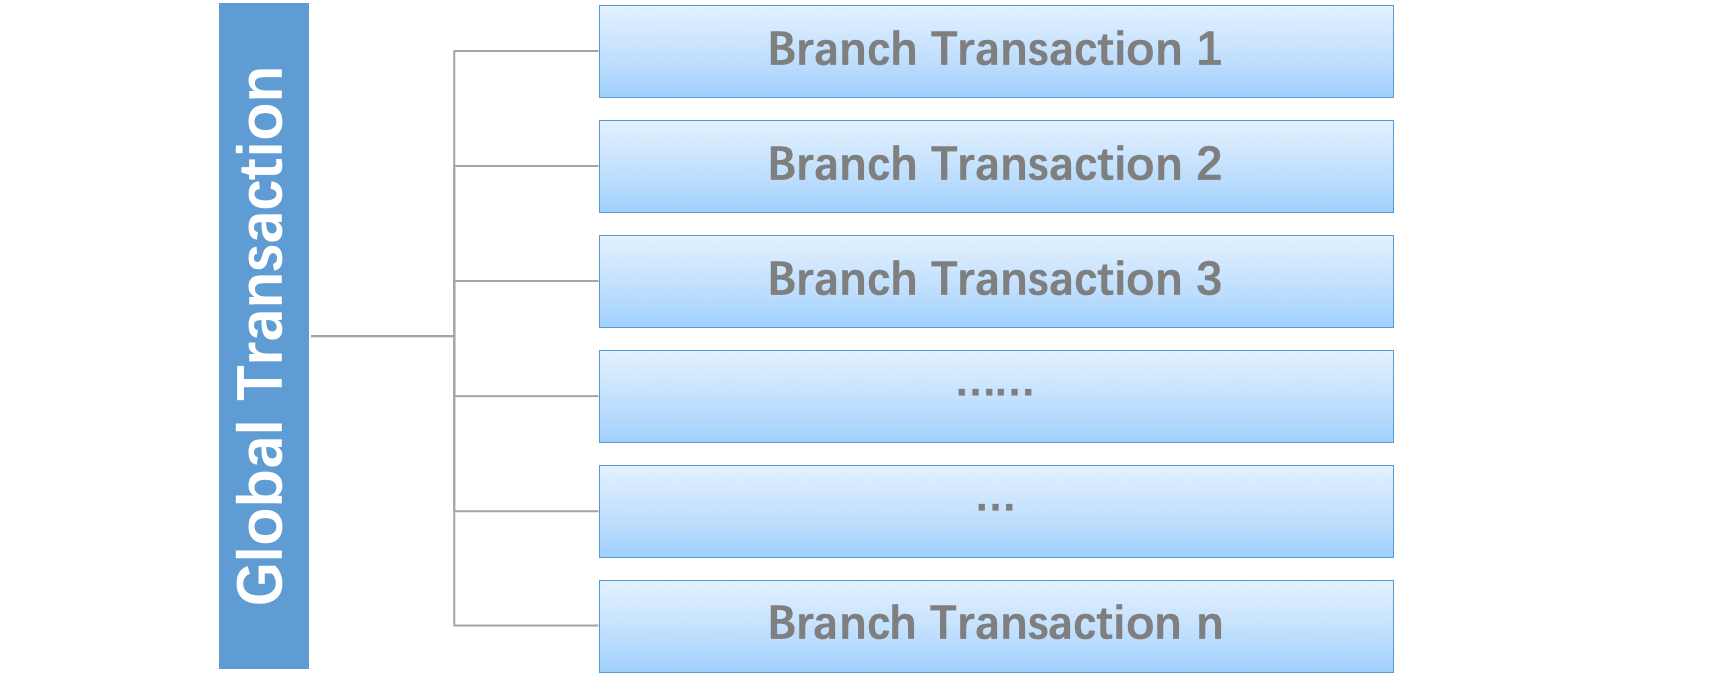
我们说,分布式事务是由一批分支事务组成的全局事务,通常分支事务只是本地事务。
![]()
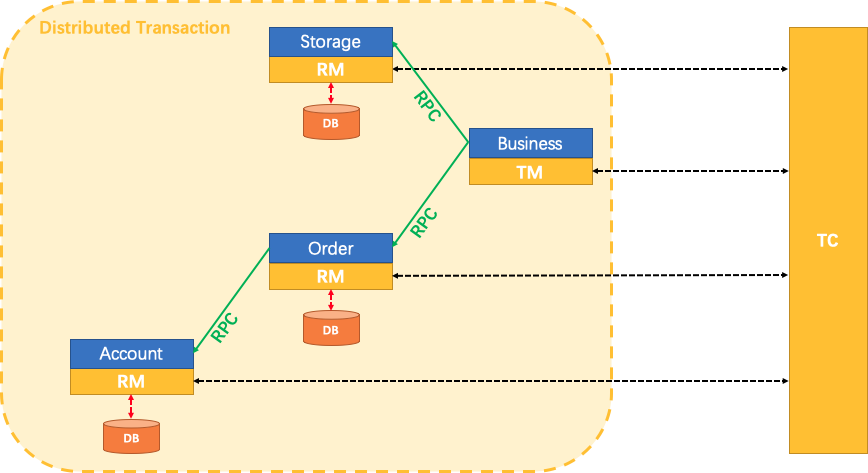
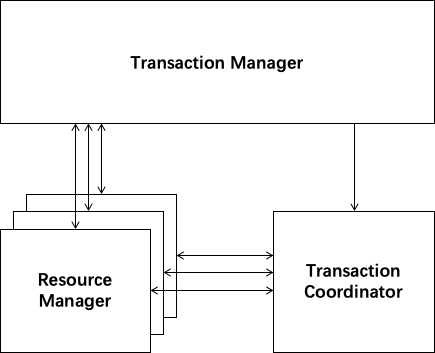
Seata有3个基本组成部分:
- 事务协调器(TC):维护全局事务和分支事务的状态,驱动全局提交或回滚。
- 事务管理器TM:定义全局事务的范围:开始全局事务,提交或回滚全局事务。
- 资源管理器(RM):管理正在处理的分支事务的资源,与TC对话以注册分支事务并报告分支事务的状态,并驱动分支事务的提交或回滚。
![]()
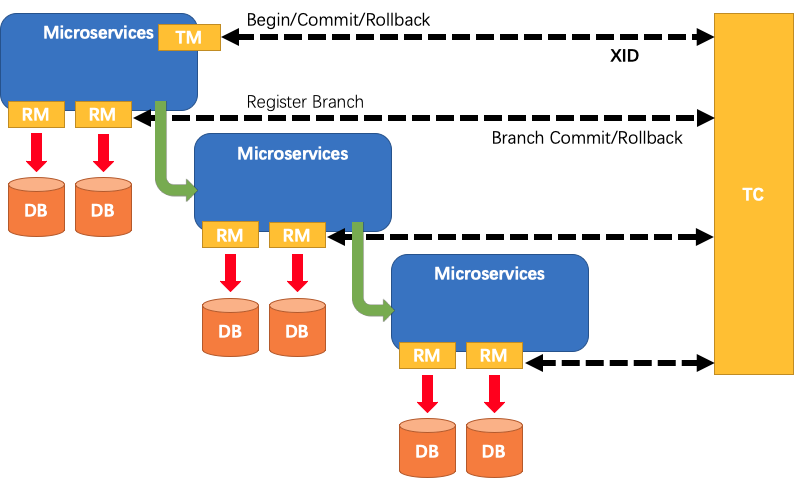
Seata管理的分布式事务的典型生命周期:
- TM要求TC开始一项新的全局事务。TC生成代表全局事务的XID。
- XID通过微服务的调用链传播。
- RM将本地事务注册为XID到TC的相应全局事务的分支。
- TM要求TC提交或回退相应的XID全局事务。
- TC驱动XID的相应全局事务下的所有分支事务以完成分支提交或回滚。
![]()
快速开始
用例
用户购买商品的业务逻辑。整个业务逻辑由3个微服务提供支持:
- 仓储服务:对给定的商品扣除仓储数量。
- 订单服务:根据采购需求创建订单。
- 帐户服务:从用户帐户中扣除余额。
环境准备
步骤 1:建立数据库
# db_seata
DROP SCHEMA IF EXISTS db_seata;
CREATE SCHEMA db_seata;
USE db_seata;

# Account
CREATE TABLE `account_tbl` (
  `id` INT(11) NOT NULL AUTO_INCREMENT,
  `user_id` VARCHAR(255) DEFAULT NULL,
  `money` INT(11) DEFAULT 0,
  PRIMARY KEY (`id`)
) ENGINE = InnoDB DEFAULT CHARSET = utf8;

INSERT INTO account_tbl (id, user_id, money)
VALUES (1, '1001', 10000);
INSERT INTO account_tbl (id, user_id, money)
VALUES (2, '1002', 10000);

# Order
CREATE TABLE `order_tbl`
(
  `id` INT(11) NOT NULL AUTO_INCREMENT,
  `user_id` VARCHAR(255) DEFAULT NULL,
  `commodity_code` VARCHAR(255) DEFAULT NULL,
  `count` INT(11) DEFAULT '0',
  `money` INT(11) DEFAULT '0',
  PRIMARY KEY (`id`)
) ENGINE = InnoDB DEFAULT CHARSET = utf8;

# Storage
CREATE TABLE `storage_tbl` (
  `id` INT(11) NOT NULL AUTO_INCREMENT,
  `commodity_code` VARCHAR(255) DEFAULT NULL,
  `count` INT(11) DEFAULT '0',
  PRIMARY KEY (`id`),
  UNIQUE KEY `commodity_code` (`commodity_code`)
) ENGINE = InnoDB DEFAULT CHARSET = utf8;


INSERT INTO storage_tbl (id, commodity_code, count)
VALUES (1, '2001', 1000);

CREATE TABLE `undo_log` (
  `id` bigint(20) NOT NULL AUTO_INCREMENT,
  `branch_id` bigint(20) NOT NULL,
  `xid` varchar(100) NOT NULL,
  `context` varchar(128) NOT NULL,
  `rollback_info` longblob NOT NULL,
  `log_status` int(11) NOT NULL,
  `log_created` datetime NOT NULL,
  `log_modified` datetime NOT NULL,
  PRIMARY KEY (`id`),
  UNIQUE KEY `ux_undo_log` (`xid`,`branch_id`)
) ENGINE=InnoDB AUTO_INCREMENT=1 DEFAULT CHARSET=utf8;
seata AT 模式需要 undo_log 表,另外三张是业务表。
步骤 2: 启动 Seata Server
Server端存储模式(store.mode)现有file、db两种(后续将引入raft),file模式无需改动,直接启动即可。db模式需要导入用于存储全局事务回话信息的三张表。
*注:file模式为单机模式,全局事务会话信息内存中读写并持久化本地文件root.data,性能较高;
db模式为高可用模式,全局事务会话信息通过db共享,相应性能差些*
可以直接通过bash 脚本启动 Seata Server,也可以通过 Docker 镜像启动,但是 Docker 方式目前只支持使用 file 模式,不支持将 Seata-Server 注册到 Eureka 或 Nacos 等注册中心。
通过脚本启动
在 https://github.com/seata/seata/releases 下载相应版本的 Seata Server,解压后执行以下命令启动,这里使用 file 配置
通过 Docker 启动
docker run --name seata-server -p 8091:8091 seataio/seata-server:latest
项目介绍
| 项目名 |
地址 |
说明 |
| sbm-account-service |
127.0.0.1:8081 |
账户服务 |
| sbm-order-service |
127.0.0.1:8082 |
订单服务 |
| sbm-storage-service |
127.0.0.1:8083 |
仓储服务 |
| sbm-business-service |
127.0.0.1:8084 |
主业务 |
| seata-server |
172.16.2.101:8091 |
seata-server |
核心代码
为了不让篇幅太长,这里只给出部分代码,详细代码文末会给出源码地址
maven 引入 seata 的依赖 eata-spring-boot-starter
<dependency>
    <groupId>io.seata</groupId>
    <artifactId>seata-spring-boot-starter</artifactId>
    <version>1.0.0</version>
</dependency>
仓储服务
application.properties
spring.application.name=account-service
server.port=8081
spring.datasource.url=jdbc:mysql://172.16.2.101:3306/db_seata?useSSL=false&serverTimezone=UTC
spring.datasource.username=root
spring.datasource.password=123456
seata.tx-service-group=my_test_tx_group
mybatis.mapper-locations=classpath*:mapper/*Mapper.xml
seata.service.grouplist=172.16.2.101:8091
logging.level.io.seata=info
logging.level.io.seata.samples.account.persistence.AccountMapper=debug
StorageService
public interface StorageService {

    /**
     * 扣除存储数量
     */
    void deduct(String commodityCode, int count);
}
订单服务
public interface OrderService {

    /**
     * 创建订单
     */
    Order create(String userId, String commodityCode, int orderCount);
}
帐户服务
public interface AccountService {

    /**
     * 从用户账户中借出
     */
    void debit(String userId, int money);
}
主要业务逻辑
只需要使用一个 @GlobalTransactional 注解在业务方法上。
@GlobalTransactional
public void purchase(String userId, String commodityCode, int orderCount) {
    LOGGER.info("purchase begin ... xid: " + RootContext.getXID());
    storageClient.deduct(commodityCode, orderCount);
    orderClient.create(userId, commodityCode, orderCount);
}
XID 的传递
全局事务ID的跨服务传递,需要我们自己实现,这里通过拦截器的方式。每个服务都需要添加下面两个类。
SeataFilter
@Component
public class SeataFilter implements Filter {
    @Override
    public void init(FilterConfig filterConfig) throws ServletException {
    }

    @Override
    public void doFilter(ServletRequest servletRequest, ServletResponse servletResponse, FilterChain filterChain) throws IOException, ServletException {
        HttpServletRequest req = (HttpServletRequest) servletRequest;
        String xid = req.getHeader(RootContext.KEY_XID.toLowerCase());
        boolean isBind = false;
        if (StringUtils.isNotBlank(xid)) {
            RootContext.bind(xid);
            isBind = true;
        }
        try {
            filterChain.doFilter(servletRequest, servletResponse);
        } finally {
            if (isBind) {
                RootContext.unbind();
            }
        }
    }

    @Override
    public void destroy() {
    }
}
SeataRestTemplateAutoConfiguration
@Configuration
public class SeataRestTemplateAutoConfiguration {
    @Autowired(
            required = false
    )
    private Collection<RestTemplate> restTemplates;
    @Autowired
    private SeataRestTemplateInterceptor seataRestTemplateInterceptor;

    public SeataRestTemplateAutoConfiguration() {
    }

    @Bean
    public SeataRestTemplateInterceptor seataRestTemplateInterceptor() {
        return new SeataRestTemplateInterceptor();
    }

    @PostConstruct
    public void init() {
        if (this.restTemplates != null) {
            Iterator var1 = this.restTemplates.iterator();

            while (var1.hasNext()) {
                RestTemplate restTemplate = (RestTemplate) var1.next();
                List<ClientHttpRequestInterceptor> interceptors = new ArrayList(restTemplate.getInterceptors());
                interceptors.add(this.seataRestTemplateInterceptor);
                restTemplate.setInterceptors(interceptors);
            }
        }

    }
}
测试
测试成功场景:
curl -X POST http://127.0.0.1:8084/api/business/purchase/commit
此时返回结果为:true
测试失败场景:
UserId 为1002 的用户下单,sbm-account-service会抛出异常,事务会回滚
http://127.0.0.1:8084/api/business/purchase/rollback
此时返回结果为:false
查看 undo_log 的日志或者主键,可以看到在执行过程中有保存数据。
如查看主键自增的值,在执行前后的值会发生变化,在执行前是 1,执行后是 7 。
源码地址
https://github.com/gf-huanchupk/SpringBootLearning/tree/master/springboot-seata
参考
http://seata.io/zh-cn/docs/overview/what-is-seata.html