导入开源的文件云存储平台-Seafile
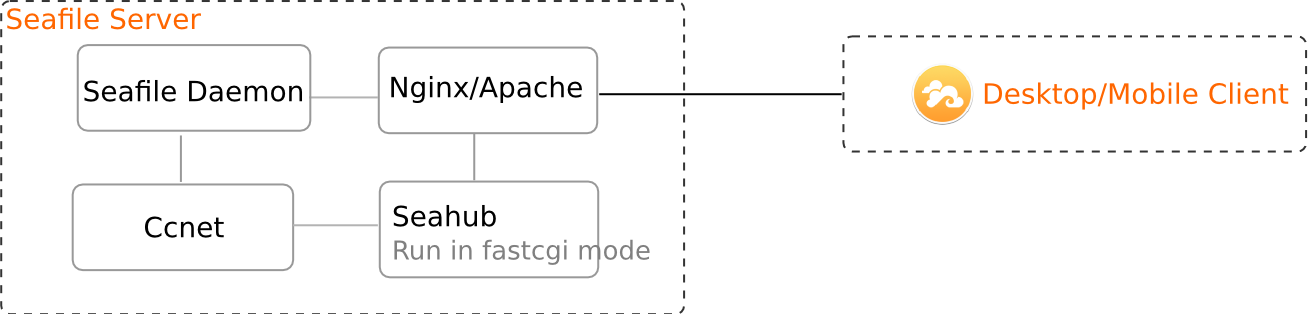
1 理论基础 1.1 简介 Seafile 是一个开源的文件云存储平台,更注重于隐私保护和对团队文件协作的支持。 Seafile 通过“资料库”来分类管理文件,每个资料库可单独同步,用户可加密资料库, 且密码不会保存在服务器端,所以即使是服务器管理员也无权访问你的文件。 Seafile 允许用户创建“群组”,在群组内同步文件、创建维基、发起讨论等,方便团队内协同工作 1.2 软件许可协议 Seafile 及其桌面、移动客户端遵循 GPLv3。 Seahub(Seafile 服务器的 web 端)遵循 Apache License。 1.3 部署的要求 要求安装以下组件: python 2.7 (从 Seafile 5.1 开始,python 版本最低要求为2.7) python-setuptools python-imaging python-mysqldb python-ldap python-urllib3 python-memcache (或者 python-memcached) 1.4 Seafile的系统架构 如上图所示,Seafile 包含以下系统组件: Seahub - 网站界面,供用户管理自己在服务器上的数据和账户信息。Seafile服务器通过"gunicorn"(一个轻量级的Python HTTP服务器)来提供网站支持。Seahub作为gunicorn的一个应用程序来运行。 Seafile server (seaf-server) - 数据服务进程, 处理原始文件的上传/下载/同步。 Ccnet server (ccnet-server) - 内部 RPC 服务进程,连接多个组件。 Controller - 监控 ccnet 和 seafile 进程,必要时会重启进程。 注: 所有 Seafile 服务都可以配置在 Nginx/Apache 后面,由 Nginx/Apache 提供标准的 http(s) 访问。 当用户通过 seahub 访问数据时,seahub 通过 ccnet 提供的内部 RPC 来从 seafile server 获取数据。 2 实践部分 2.1 环境信息 2.1.1 主机信息 hostname=seafile.cmdschool.org ip address=10.168.0.53 os type=CentOS Linux release 7.2 2.1.2 域名解析 配置dns解析或配置host解析,host解析配置如下(客户端和服务端): 1 vim /etc/hosts 加入如下内容: 1 10.168.0.53seafile.cmdschool.org 2.1.3 关闭selinux 1 2 setenforce0 sed -i 's/SELINUX=enforcing/SELINUX=disabled/g' /etc/selinux/config 2.2 yum源和安装包 2.2.1 更新系统 1 yumupdate 2.2.2 数据库的安装 1 yum install -ymariadb-servermariadb-develmariadb 2.2.3 安装脚本运行环境 1 yum install -ypython-setuptoolspython-imagingpython-ldapMySQL-pythonpython-memcachedpython-urllib3 2.2.4 安装nginx 1 2 yum install -yhttp: //nginx .org /packages/centos/7/noarch/RPMS/nginx-release-centos-7-0 .el7.ngx.noarch.rpm yum install -ynginx 2.2.5 其他配置工具 1 yum install -ynet-toolsvimwgettree 2.4.6 下载安装包 1 2 cd ~ wgethttps: //bintray .com /artifact/download/seafile-org/seafile/seafile-server_5 .1.3_x86-64. tar .gz 2.3 配置数据库 2.3.1 启动数据库并配置数据库开机默认启动 1 2 systemctlstartmariadb systemctl enable mariadb 2.3.2 初始化数据库 1 mysql_secure_installation 向导如下: 1 2 3 4 5 6 7 8 9 10 11 12 13 14 15 16 17 18 19 20 21 22 23 [...] Setrootpassword?[Y /n ]y Newpassword: Re-enternewpassword: Passwordupdatedsuccessfully! Reloadingprivilegetables.. ...Success! [...] Removeanonymous users ?[Y /n ]y ...Success! [...] Disallowrootloginremotely?[Y /n ]n ...skipping. [...] Remove test databaseandaccesstoit?[Y /n ]y -Dropping test database... ...Success! -Removingprivilegeson test database... ...Success! [...] Reloadprivilegetablesnow?[Y /n ]y ...Success! [...] 2.4 安装主程序 2.4.1建立目录结构 1 2 mkdir /home/cmdschool .org cp seafile-server_5.1.3_x86-64. tar .gz /home/cmdschool .org 2.4.2 解压并备份安装包 1 2 3 4 cd /home/cmdschool .org tar -xfseafile-server_5.1.3_x86-64. tar .gz mkdir installed mv seafile-server_5.1.3_x86-64. tar .gzinstalled/ 检查目录 1 2 cd /home/cmdschool .org tree-L2 显示如下: 1 2 3 4 5 6 7 8 9 10 11 12 13 14 15 16 17 18 19 20 . ├──installed │└──seafile-server_5.1.3_x86-64. tar .gz └──seafile-server-5.1.3 ├──check_init_admin.py ├──reset-admin.sh ├──runtime ├──seaf- fsck .sh ├──seaf-fuse.sh ├──seaf-gc.sh ├──seafile ├──seafile.sh ├──seahub ├──seahub.sh ├──setup-seafile-mysql.py ├──setup-seafile-mysql.sh ├──setup-seafile.sh └──upgrade 6directories,11files 2.4.3 运行安装向导 1 2 cd seafile-server-5.1.3 . /setup-seafile-mysql .sh 显示如下: 1 2 3 4 5 6 7 8 9 10 11 12 13 14 15 16 17 18 19 20 21 22 23 24 25 26 27 28 29 30 31 32 33 34 35 36 37 38 39 40 41 42 43 44 45 46 47 48 49 50 51 52 53 54 55 56 57 58 59 60 61 62 63 64 65 66 67 68 69 70 71 72 73 74 75 76 77 78 79 80 81 82 83 84 85 86 87 88 89 90 91 92 93 94 95 96 97 98 99 100 101 102 103 104 105 106 107 108 109 110 111 112 113 114 115 116 117 118 119 120 121 122 123 124 125 126 127 128 Checkingpythononthismachine... Checkingpythonmodule:setuptools...Done. Checkingpythonmodule:python-imaging...Done. Checkingpythonmodule:python-mysqldb...Done. ----------------------------------------------------------------- ThisscriptwillguideyoutosetupyourseafileserverusingMySQL. Makesureyouhave read seafileservermanualat https: //github .com /haiwen/seafile/wiki PressENTERto continue ----------------------------------------------------------------- Whatisthenameoftheserver?Itwillbedisplayedontheclient. 3-15lettersordigits [servername]seafile Whatistheipordomainoftheserver? Forexample:www.mycompany.com,192.168.1.101 [Thisserver'sipordomain]seafile.cmdschool.org Where do youwanttoputyourseafiledata? Pleaseuseavolumewithenough free space [default "/home/cmdschool.org/seafile-data" ] Whichport do youwanttouse for theseafilefileserver? [default "8082" ] ------------------------------------------------------- Pleasechooseawaytoinitializeseafiledatabases: ------------------------------------------------------- [1]Createnewccnet /seafile/seahub databases [2]Useexistingccnet /seafile/seahub databases [1or2]1 Whatisthehostofmysqlserver? [default "localhost" ] Whatistheportofmysqlserver? [default "3306" ] Whatisthepasswordofthemysqlrootuser? [rootpassword] verifyingpasswordofuserroot... done Enterthename for mysqluserofseafile.Itwouldbecreated if notexists. [default "root" ]seafile Enterthepassword for mysqluser "seafile" : [password for seafile] verifyingpasswordofuserseafile... done Enterthedatabasename for ccnet-server: [default "ccnet-db" ] Enterthedatabasename for seafile-server: [default "seafile-db" ] Enterthedatabasename for seahub: [default "seahub-db" ] --------------------------------- Thisisyourconfiguration --------------------------------- servername:seafile serverip /domain :seafile.cmdschool.org seafiledata dir : /home/cmdschool .org /seafile-data fileserverport:8082 database:createnew ccnetdatabase:ccnet-db seafiledatabase:seafile-db seahubdatabase:seahub-db databaseuser:seafile --------------------------------- PressENTERto continue ,orCtrl-Ctoabort --------------------------------- Generatingccnetconfiguration... done Successlycreateconfiguration dir /home/cmdschool .org /ccnet . Generatingseafileconfiguration... Done. done Generatingseahubconfiguration... ---------------------------------------- Nowcreatingseahubdatabasetables... ---------------------------------------- creatingseafile-server-latestsymboliclink... done ----------------------------------------------------------------- Yourseafileserverconfigurationhasbeenfinishedsuccessfully. ----------------------------------------------------------------- runseafileserver:. /seafile .sh{start|stop|restart} runseahubserver:. /seahub .sh{start<port>|stop|restart<port>} ----------------------------------------------------------------- Ifyouarebehindafirewall,remembertoallowinput /output ofthesetcpports: ----------------------------------------------------------------- portofseafilefileserver:8082 portofseahub:8000 Whenproblemsoccur,Referto https: //github .com /haiwen/seafile/wiki for information. 2.4.4 确认安装 1 2 cd /home/cmdschool .org tree-L2 显示如下: 1 2 3 4 5 6 7 8 9 10 11 12 13 14 15 16 17 18 19 20 21 22 23 24 25 26 27 28 29 30 31 32 33 . ├──ccnet │├──mykey.peer │└──seafile.ini ├──conf │├──ccnet.conf │├──seafdav.conf │├──seafile.conf │└──seahub_settings.py ├──installed │└──seafile-server_5.1.3_x86-64. tar .gz ├──seafile-data │└──library-template ├──seafile-server-5.1.3 │├──check_init_admin.py │├──reset-admin.sh │├──runtime │├──seaf- fsck .sh │├──seaf-fuse.sh │├──seaf-gc.sh │├──seafile │├──seafile.sh │├──seahub │├──seahub.sh │├──setup-seafile-mysql.py │├──setup-seafile-mysql.sh │├──setup-seafile.sh │└──upgrade ├──seafile-server-latest->seafile-server-5.1.3 └──seahub-data └──avatars 13directories,17files 2.4.5 启动Seafile 1 /home/cmdschool .org /seafile-server-5 .1.3 /seafile .shstart 显示如下: 1 2 3 4 5 [06 /19/16 13:23:55].. /common/session .c(132):usingconfig file /home/cmdschool .org /conf/ccnet .conf Startingseafileserver,pleasewait... Seafileserverstarted Done. 2.4.6 启动Seahub 1 /home/cmdschool .org /seafile-server-5 .1.3 /seahub .shstart 向导如下: 1 2 3 4 5 6 7 8 9 10 11 12 13 14 15 16 17 18 19 20 21 22 23 24 25 26 27 28 LC_ALLisnot set in ENV, set toen_US.UTF-8 Startingseahubatport8000... ---------------------------------------- It 'sthefirsttimeyoustarttheseafileserver.Nowlet' screatetheadminaccount ---------------------------------------- Whatistheemail for theadminaccount? [adminemail]will@cmdschool.org Whatisthepassword for theadminaccount? [adminpassword] Enterthepasswordagain: [adminpasswordagain] ---------------------------------------- Successfullycreatedseafileadmin ---------------------------------------- Seahubisstarted Done. 2.4.7 配置防护墙 1 2 3 4 firewall-cmd--permanent--add-port=8000 /tcp firewall-cmd--permanent--add-port=8082 /tcp firewall-cmd--reload firewall-cmd--list-all 2.4.8 浏览器测试 1 http: //seafile .cmdschool.org:8000 2.5 配置nginx的http代理 注:以下配置基于2.4章节 2.5.1 配置虚拟服务 1 vim /etc/nginx/conf .d /seafile .com 输入如下内容: 1 2 3 4 5 6 7 8 9 10 11 12 13 14 15 16 17 18 19 20 21 22 23 24 25 26 27 28 29 30 31 32 33 34 35 36 37 erver{ listen80; server_nameseafile.cmdschool.org; proxy_set_headerX-Forwarded-For$remote_addr; location/{ fastcgi_pass127.0.0.1:8000; fastcgi_paramSCRIPT_FILENAME$document_root$fastcgi_script_name; fastcgi_paramPATH_INFO$fastcgi_script_name; fastcgi_paramSERVER_PROTOCOL$server_protocol; fastcgi_paramQUERY_STRING$query_string; fastcgi_paramREQUEST_METHOD$request_method; fastcgi_paramCONTENT_TYPE$content_type; fastcgi_paramCONTENT_LENGTH$content_length; fastcgi_paramSERVER_ADDR$server_addr; fastcgi_paramSERVER_PORT$server_port; fastcgi_paramSERVER_NAME$server_name; fastcgi_paramREMOTE_ADDR$remote_addr; access_log /var/log/nginx/seahub .access.log; error_log /var/log/nginx/seahub .error.log; } location /seafhttp { rewrite^ /seafhttp (.*)$$1 break ; proxy_passhttp: //127 .0.0.1:8082; client_max_body_size0; proxy_connect_timeout36000s; proxy_read_timeout36000s; } location /media { root /home/cmdschool .org /seafile-server-latest/seahub ; } } 2.5.2 修改SERVICE_URL和FILE_SERVER_ROOT 界面中单击“系统管理”->“设置”修改如下参数为: 1 2 SERVICE_URL:http: //seafile .cmdschool.org FILE_SERVER_ROOT:http: //seafile .cmdschool.org /seafhttp 2.5.3 配置启动脚本 1 vim /home/cmdschool .org /seafile-server-5 .1.3 /seafiled .sh 修改启动参数如下: 1 2 3 4 5 6 7 8 9 10 11 12 13 14 15 16 17 18 19 20 21 22 23 24 25 26 27 28 29 30 31 32 33 34 35 36 37 38 39 40 41 42 43 44 #!/bin/sh #请将user改为你的Linux用户名 user=seafile #请将script_dir改为你的Seafile文件安装路径 seafile_dir= /home/cmdschool .org script_path=${seafile_dir} /seafile-server-latest seafile_init_log=${seafile_dir} /logs/seafile .init.log seahub_init_log=${seafile_dir} /logs/seahub .init.log #若使用Nginx/Apache,请将其设置为true,否者为false fastcgi= true #fastcgi端口,默认为8000. fastcgi_port=8000 case "$1" in start) sudo -u${user}${script_path} /seafile .shstart>>${seafile_init_log} if [$fastcgi= true ]; then sudo -u${user}${script_path} /seahub .shstart-fastcgi${fastcgi_port}>>${seahub_init_log} else sudo -u${user}${script_path} /seahub .shstart>>${seahub_init_log} fi ;; restart) sudo -u${user}${script_path} /seafile .shrestart>>${seafile_init_log} if [$fastcgi= true ]; then sudo -u${user}${script_path} /seahub .shrestart-fastcgi${fastcgi_port}>>${seahub_init_log} else sudo -u${user}${script_path} /seahub .shrestart>>${seahub_init_log} fi ;; stop) sudo -u${user}${script_path} /seafile .sh$1>>${seafile_init_log} sudo -u${user}${script_path} /seahub .sh$1>>${seahub_init_log} ;; *) echo "Usage:/etc/init.d/seafile-server{start|stop|restart}" exit 1 ;; esac 2.5.4 添加执行用户和配置目录权限 1 2 3 useradd seafile-s /sbin/nologin -d /home/cmdschool .org/ chown -Rseafile:seafile /home/cmdschool .org/ chown -Rseafile:seafile /tmp/seahub_cache/ 2.5.5 配置启动服务 1 vim /lib/systemd/system/seafile .service 输入如下内容: 1 2 3 4 5 6 7 8 9 10 11 12 13 [Unit] Description=seafile After=mariadb.service [Service] Type=forking ExecStart= /home/cmdschool .org /seafile-server-5 .1.3 /seafiled .shstart ExecReload= /home/cmdschool .org /seafile-server-5 .1.3 /seafiled .shrestart ExecStop= /home/cmdschool .org /seafile-server-5 .1.3 /seafiled .shstop PrivateTmp= true [Install] WantedBy=multi-user.target 2.5.6 修改sudo 1 visudo 注释掉如下行: 1 Defaultsrequiretty 注:不修改可能使用systemctl命令启动服务时会出错 2.5.7 停止管理员身份运行的主程序 1 2 /home/cmdschool .org /seafile-server-5 .1.3 /seafile .shstop /home/cmdschool .org /seafile-server-5 .1.3 /seahub .shstop 2.5.8 测试服务并配置开机启动 1 2 3 4 5 systemctlstartseafile.service systemctlrestartseafile.service systemctlstopseafile.service systemctlstartseafile.service systemctl enable seafile.service 2.5.9 启动服务并配置开机启动 1 2 systemctlrestartnginx systemctl enable nginx 2.5.10 配置防火墙 1 2 3 4 5 firewall-cmd--permanent--remove-port=8000 /tcp firewall-cmd--permanent--remove-port=8082 /tcp firewall-cmd--permanent--add-servicehttp firewall-cmd--reload firewall-cmd--list-all 2.5.11 浏览器测试 1 http: //seafile .cmdschool.org 2.6 配置nginx的https代理 注:以下配置基于2.5章节 2.6.1 生成私钥 1 opensslgenrsa-outprivkey.pem2048 生成如下私钥: 1 privkey.pem 2.6.2 生成公钥 1 opensslreq-new-x509-keyprivkey.pem-outcacert.pem-days1095 向导如下: 1 2 3 4 5 6 7 8 9 10 11 12 13 14 Youareabouttobeaskedtoenterinformationthatwillbeincorporated intoyourcertificaterequest. WhatyouareabouttoenteriswhatiscalledaDistinguishedNameoraDN. Therearequiteafewfieldsbutyoucanleavesomeblank Forsomefieldstherewillbeadefaultvalue, Ifyouenter '.' ,thefieldwillbeleftblank. ----- CountryName(2lettercode)[XX]:CN StateorProvinceName(fullname)[]:GD LocalityName(eg,city)[DefaultCity]:DG OrganizationName(eg,company)[DefaultCompanyLtd]:cmdschool.org OrganizationalUnitName(eg,section)[]:it CommonName(eg,yournameoryourserver's hostname )[]:seafile.cmdschool.org EmailAddress[]:will@cmdschool.org 2.6.3 复制公钥和私钥到指定路径 1 cp cacert.pemprivkey.pem /etc/ssl/ 2.6.4 修改配置文件 1 vim /etc/nginx/conf .d /seafile .conf 修改配置文件如下: 1 2 3 4 5 6 7 8 9 10 11 12 13 14 15 16 17 18 19 20 21 22 23 24 25 26 27 28 29 30 31 32 33 34 35 36 37 38 39 40 41 42 server{ listen80; server_nameseafile.cmdschool.org; rewrite^https: // $http_host$request_uri?permanent; #强制将http重定向到https } server{ listen443; sslon; ssl_certificate /etc/ssl/cacert .pem; #cacert.pem文件路径 ssl_certificate_key /etc/ssl/privkey .pem; #privkey.pem文件路径 server_nameseafile.cmdschool.org; proxy_set_headerX-Forwarded-For$remote_addr; location/{ fastcgi_pass127.0.0.1:8000; fastcgi_paramSCRIPT_FILENAME$document_root$fastcgi_script_name; fastcgi_paramPATH_INFO$fastcgi_script_name; fastcgi_paramSERVER_PROTOCOL$server_protocol; fastcgi_paramQUERY_STRING$query_string; fastcgi_paramREQUEST_METHOD$request_method; fastcgi_paramCONTENT_TYPE$content_type; fastcgi_paramCONTENT_LENGTH$content_length; fastcgi_paramSERVER_ADDR$server_addr; fastcgi_paramSERVER_PORT$server_port; fastcgi_paramSERVER_NAME$server_name; fastcgi_paramHTTPSon; fastcgi_paramHTTP_SCHEMEhttps; access_log /var/log/nginx/seahub .access.log; error_log /var/log/nginx/seahub .error.log; } location /seafhttp { rewrite^ /seafhttp (.*)$$1 break ; proxy_passhttp: //127 .0.0.1:8082; client_max_body_size0; proxy_connect_timeout36000s; proxy_read_timeout36000s; } location /media { root /home/cmdschool .org /seafile-server-latest/seahub ; } } 2.6.5 修改SERVICE_URL和FILE_SERVER_ROOT 界面中单击“系统管理”->“设置”修改如下参数为: 1 2 SERVICE_URL:https: //seafile .cmdschool.org FILE_SERVER_ROOT:https: //seafile .cmdschool.org /seafhttp 2.6.7 重新启动服务 1 systemctlrestartseafile.service 2.6.8 配置防火墙 1 2 3 4 firewall-cmd--permanent--remove-servicehttp firewall-cmd--permanent--add-servicehttps firewall-cmd--reload firewall-cmd--list-all 2.6.9 浏览器测试 https://seafile.cmdschool.org 注:登录帐号和密码(详见2.4.6章节的配置向导生成) 本文转自 tanzhenchao 51CTO博客,原文链接:http://blog.51cto.com/cmdschool/1790806,如需转载请自行联系原作者