首页 文章 精选 留言 我的

精选列表

搜索[部署],共10000篇文章
优秀的个人博客,低调大师

基于springcloud + vue的分布式服务paascloud项目部署文档

这里特别感谢 QQ 金宝宝 1771717896 提供的服务器 准备环境 安装虚拟机 安装项目运行环境 配置host文件 windows 目录 C:\Windows\System32\drivers\etc\hosts mac/linux 地址 /etc/hosts 下面的ip注意修改为自己虚拟机对应的ip地址 127.0.0.1 dev-login.paascloud.net 127.0.0.1 dev-admin.paascloud.net 127.0.0.1 dev-api.paascloud.net 127.0.0.1 dev-mall.paascloud.net 127.0.0.1 paascloud-discovery 127.0.0.1 paascloud-eureka 127.0.0.1 paascloud-gateway 127.0.0.1 paascloud-monitor 127.0.0.1 paascloud-zipkin 127.0.0.1 paascloud-provider-uac 127.0.0.1 paascloud-provider-mdc 127.0.0.1 paascloud-provider-omc 127.0.0.1 paascloud-provider-opc 192.168.241.21 paascloud-db-mysql 192.168.241.21 paascloud-db-redis 192.168.241.21 paascloud-mq-rabbit 192.168.241.21 paascloud-mq-rocket 192.168.241.21 paascloud-provider-zk 192.168.241.101 paascloud-zk-01 192.168.241.102 paascloud-zk-02 192.168.241.103 paascloud-zk-03 配置私服 http://blog.paascloud.net/2018/03/29/springcloud/nexus/maven-nexus-use/ 编译elastic-job-lite-starter-master https://github.com/paascloud/elastic-job-lite-starter-master 配置 spring cloud 配置中心 http://blog.paascloud.net/2018/03/26/springcloud/config/springcloud-config-encrypt/ fork 项目 paascloud-config-repo 修改配置中心git地址, 如果使用私有地址请配置用户名密码 修改第一步fork来的项目的application-dev.yml 配置文件配置文件 paascloud: mail: username: 'your email address' password: 'your email password' aliyun: key: accessKeyId: 'your aliyun accessKeyId' accessKeySecret: 'your aliyun accessKeySecret' sms: product: 'your sms product' qiniu: key: accessKey: 'your qiniu accessKey' secretKey: 'your qiniu secretKey' oss: privateHost: 'your qiniu oss private host' publicHost: 'your qiniu oss public host' 微服务启动顺序 1. paascloud-eureka 2. paascloud-discovery 3. paascloud-provider-uac 4. paascloud-gateway 5. 剩下微服务无启动数序要求 我的开源项目 github: https://github.com/paascloud/paascloud-master 码云:https://gitee.com/paascloud/paascloud-master 如果觉得本文对您有帮助, 空闲的时候点帮忙加个星星, 您的支持将鼓励我继续创作的动力!

优秀的个人博客,低调大师

zeromq的安装,部署(号称最快的消息队列,消息中间件)

1:Storm作为一个实时处理的框架,产生的消息需要快速的进行处理,比如存在消息队列ZeroMQ里面。 由于消息队列ZeroMQ是C++写的,而我们的程序是运行在JVM虚拟机里面的。所以需要jzmq这个桥梁来黏合C++程序接口和Java程序接口。 ZeroMQ的官方网址:http://zeromq.org/ 1:MetaQ(全称Metamorphosis)是一个高性能、高可用、可扩展的分布式消息中间件,思路起源于LinkedIn的Kafka,但并不是Kafka的一个Copy。MetaQ具有消息存储顺序写、吞吐量大和支持本地和XA事务等特性,适用于大吞吐量、顺序消息、广播和日志数据传输等场景,目前在淘宝和支付宝有着广泛的应用。2:MetaQ概念 Producer (消息生产者) Consumer (消息消费者) Topic (消息的主题) Partition (分区) Message (消息) Broker (就是meta的服务端) Group (消费者分组) Offset (消息偏移量) 3:下载地址 http://fnil.net GitHub地址 https://github.com/killme2008/Metamorphosis 2:ZeroMQ的安装过程如下所示(首先将zeromq-2.1.7.tar.gz上传到自己的虚拟机里面,过程省略): 然后进行解压缩操作,如下所示: [root@slaver1 package]# tar -zxvf zeromq-2.1.7.tar.gz -C /home/hadoop/soft/ 解压缩以后,由于解压缩以后是源码,所以需要编译,编译以后再进行安装操作: 然后使用此命令对编译环境进行检测: [root@slaver1 zeromq-2.1.7]# ./configure 然后出现如下错误,没有找到C++编译器,所以现在安装C++编译器: 1 checking for a BSD-compatible install... /usr/bin/install -c 2 checking whether build environment is sane... yes 3 checking for a thread-safe mkdir -p... /bin/mkdir -p 4 checking for gawk... gawk 5 checking whether make sets $(MAKE)... yes 6 checking how to create a ustar tar archive... gnutar 7 checking for gcc... gcc 8 checking whether the C compiler works... yes 9 checking for C compiler default output file name... a.out10 checking for suffix of executables... 11 checking whether we are cross compiling... no12 checking for suffix of object files... o13 checking whether we are using the GNU C compiler... yes14 checking whether gcc accepts -g... yes15 checking for gcc option to accept ISO C89... none needed16 checking for style of include used by make... GNU17 checking dependency style of gcc... gcc318 checking for gcc option to accept ISO C99... -std=gnu9919 checking for g++... no20 checking for c++... no21 checking for gpp... no22 checking for aCC... no23 checking for CC... no24 checking for cxx... no25 checking for cc++... no26 checking for cl.exe... no27 checking for FCC... no28 checking for KCC... no29 checking for RCC... no30 checking for xlC_r... no31 checking for xlC... no32 checking whether we are using the GNU C++ compiler... no33 checking whether g++ accepts -g... no34 checking dependency style of g++... none35 checking whether gcc -std=gnu99 and cc understand -c and -o together... yes36 checking for a sed that does not truncate output... /bin/sed37 checking for gawk... (cached) gawk38 checking for xmlto... no39 checking for asciidoc... no40 checking build system type... i686-pc-linux-gnu41 checking host system type... i686-pc-linux-gnu42 checking for a sed that does not truncate output... (cached) /bin/sed43 checking for grep that handles long lines and -e... /bin/grep44 checking for egrep... /bin/grep -E45 checking for fgrep... /bin/grep -F46 checking for ld used by gcc -std=gnu99... /usr/bin/ld47 checking if the linker (/usr/bin/ld) is GNU ld... yes48 checking for BSD- or MS-compatible name lister (nm)... /usr/bin/nm -B49 checking the name lister (/usr/bin/nm -B) interface... BSD nm50 checking whether ln -s works... yes51 checking the maximum length of command line arguments... 196608052 checking whether the shell understands some XSI constructs... yes53 checking whether the shell understands "+="... yes54 checking for /usr/bin/ld option to reload object files... -r55 checking for objdump... objdump56 checking how to recognize dependent libraries... pass_all57 checking for ar... ar58 checking for strip... strip59 checking for ranlib... ranlib60 checking command to parse /usr/bin/nm -B output from gcc -std=gnu99 object... ok61 checking how to run the C preprocessor... gcc -std=gnu99 -E62 checking for ANSI C header files... yes63 checking for sys/types.h... yes64 checking for sys/stat.h... yes65 checking for stdlib.h... yes66 checking for string.h... yes67 checking for memory.h... yes68 checking for strings.h... yes69 checking for inttypes.h... yes70 checking for stdint.h... yes71 checking for unistd.h... yes72 checking for dlfcn.h... yes73 checking whether we are using the GNU C++ compiler... (cached) no74 checking whether g++ accepts -g... (cached) no75 checking dependency style of g++... (cached) none76 checking for objdir... .libs77 checking if gcc -std=gnu99 supports -fno-rtti -fno-exceptions... no78 checking for gcc -std=gnu99 option to produce PIC... -fPIC -DPIC79 checking if gcc -std=gnu99 PIC flag -fPIC -DPIC works... yes80 checking if gcc -std=gnu99 static flag -static works... no81 checking if gcc -std=gnu99 supports -c -o file.o... yes82 checking if gcc -std=gnu99 supports -c -o file.o... (cached) yes83 checking whether the gcc -std=gnu99 linker (/usr/bin/ld) supports shared libraries... yes84 checking whether -lc should be explicitly linked in... no85 checking dynamic linker characteristics... GNU/Linux ld.so86 checking how to hardcode library paths into programs... immediate87 checking whether stripping libraries is possible... yes88 checking if libtool supports shared libraries... yes89 checking whether to build shared libraries... yes90 checking whether to build static libraries... yes91 checking whether the C compiler works... yes92 checking whether we are using Intel C compiler... no93 checking whether we are using Sun Studio C compiler... no94 checking whether we are using clang C compiler... no95 checking whether we are using gcc >= 4 C compiler... yes96 checking whether the C++ compiler works... no97 configure: error: Unable to find a working C++ compiler 安装C++编译器,如果有网络的话,可以使用yum进行安装,如果没有网络需要提前下载好,由于前段时间重装系统了,所有都是从头开始,你懂的,然后我的网络又坏了,日了狗了,我的问题是,本机可以ping通虚拟机,但是虚拟机ping不通本地,很显然就是DNS出现问题了,那么说一下我是如何解决的: 然后呢,配置一下自己的虚拟机的网络编辑器,本机NET模式的DNS和虚拟机的NET模式的DNS要一致: 可以上网的情况下: [root@slaver1 hadoop]# yum install gcc-c++ 离线安装如下所示: rpm -i libstdc++-devel-4.4.7-3.el6.x86_64.rpmrpm -i gcc-c++-4.4.7-3.el6.x86_64.rpmrpm -i libuuid-devel-2.17.2-12.9.el6.x86_64.rpm 然后呢,再去zeroMQ目录下面对编译环境进行检测: [root@slaver1 zeromq-2.1.7]# ./configure 然后呢,出现如下所示的问题,最后一行如下所示的问题,这是需要一些依赖,所以接下来解决这个问题: configure: error: cannot link with -luuid, install uuid-dev. 手动安装这个依赖,解决问题,解决完问题再去ZeroMQ目录下面检测环境正常即可: 1 [root@slaver1 rpms-32]# rpm -ivh libuuid-devel-2.17.2-12.9.el6.i686.rpm 2 Preparing... ########################################### [100%]3 1:libuuid-devel ########################################### [100%] 如果正常,最后一行如下所示: config.status: executing libtool commands 然后开始进行编译操作,如下所示,在ZeroMQ目录下面输入make命令,进行编译操作: [root@slaver1 zeromq-2.1.7]# make 编译以后进行安装,如下所示,在ZeroMQ目录下面输入make install命令,进行安装操作: [root@slaver1 zeromq-2.1.7]# make install 至此ZeroMQ安装结束,接下来安装 jzmq(Java调用C++的桥梁),如下所示: [root@slaver1 package]# unzip jzmq-master.zip -d /home/hadoop/soft/ 然后生成configure命令。操作如下所示,会提示你缺少libtool这个包,然后现在安装一下这个包: [root@slaver1 jzmq-master]# ./autogen.sh autogen.sh: error: could not find libtool. libtool is required to run autogen.sh. 然后呢,安装libtool出现的问题以及解决方法如下所示: 1 [root@slaver1 rpms-32]# rpm -ivh libtool-2.2.6-15.5.el6.i686.rpm 2 error: Failed dependencies: 3 autoconf >= 2.58 is needed by libtool-2.2.6-15.5.el6.i686 4 automake >= 1.4 is needed by libtool-2.2.6-15.5.el6.i686 5 [root@slaver1 rpms-32]# rpm -ivh autoconf-2.63-5.1.el6.noarch.rpm 6 Preparing... ########################################### [100%] 7 1:autoconf ########################################### [100%] 8 [root@slaver1 rpms-32]# rpm -ivh automake-1.11.1-4.el6.noarch.rpm 9 Preparing... ########################################### [100%]10 1:automake ########################################### [100%]11 [root@slaver1 rpms-32]# rpm -ivh libtool-2.2.6-15.5.el6.i686.rpm 12 Preparing... ########################################### [100%]13 1:libtool ########################################### [100%]14 [root@slaver1 rpms-32]# 然后呢,再去jzmq目录下面运行如下脚本生成configure命令: [root@slaver1 jzmq-master]# ./autogen.sh 然后使用configure命令对编译环境进行检测: [root@slaver1 jzmq-master]# ./configure 然后进行编译操作,如下所示: [root@slaver1 jzmq-master]# make 然后进行安装操作,如下所示: [root@slaver1 jzmq-master]# make install 3:由于Storm的脚本是Python写的,所以需要安装一下Python这个运行环境,又因为Centos6.4版本已经安装了python,所以就不需要进行安装了哦: [root@slaver1 jzmq-master]# which python/usr/bin/python 查看python的版本,如下所示: [root@slaver1 jzmq-master]# python -VPython 2.6.6 4:然后呢,开始安装Storm,由于之前写过了,这里就不再叙述了; 待续......

优秀的个人博客,低调大师

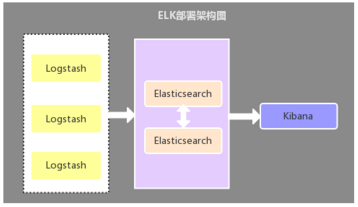
ELK实时日志分析平台(elk+kafka+metricbeat)-elasticsearch部署(五)

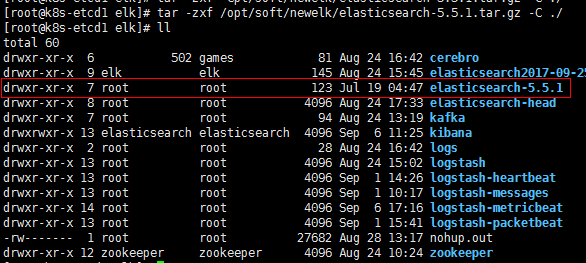
192.168.30.121,192.168.30.122,192.168.30.123上配置elasticsearch集群: 在所有主机上添加elk用户 在所有主机上解压elasticsearch,并更改属主,组: 修改192.168.30.121配置文件: #cat>elasticsearch/config/elasticsearch.yml<<EOF cluster.name: my-es node.name: node-1 path.data: /usr/local/elk/elasticsearch/data path.logs: /usr/local/elk/elasticsearch/logs bootstrap.memory_lock: false network.host: 192.168.30.121 http.port: 9200 discovery.zen.ping.unicast.hosts: ["192.168.30.121", "192.168.30.122","192.168.30.123"] discovery.zen.minimum_master_nodes: 2 node.master: true node.data: true EOF 修改192.168.30.122配置: #cat>elasticsearch/config/elasticsearch.yml<<EOF cluster.name: my-es node.name: node-2 path.data: /usr/local/elk/elasticsearch/data path.logs: /usr/local/elk/elasticsearch/logs bootstrap.memory_lock: false network.host: 192.168.30.122 http.port: 9200 discovery.zen.ping.unicast.hosts: ["192.168.30.121", "192.168.30.122","192.168.30.123"] discovery.zen.minimum_master_nodes: 2 node.master: true node.data: true EOF 修改192.168.30.123配置: #cat>elasticsearch/config/elasticsearch.yml<<EOF cluster.name: my-es node.name: node-3 path.data: /usr/local/elk/elasticsearch/data path.logs: /usr/local/elk/elasticsearch/logs bootstrap.memory_lock: false network.host: 192.168.30.123 http.port: 9200 discovery.zen.ping.unicast.hosts: ["192.168.30.121", "192.168.30.122","192.168.30.123"] discovery.zen.minimum_master_nodes: 2 node.master: true node.data: true EOF 启动: cd /usr/local/elk/elasticsearch/logs && nohup sudo -u elk /usr/local/elk/elasticsearch/bin/elasticsearch & 检查: 安装head: 检查依赖包: 安装: #git clone https://github.com/mobz/elasticsearch-head.git cd elasticsearch-head/ npm config set registry https://registry.npm.taobao.org npm install #安装较慢,失败可多次执行 修改vim Gruntfile.js connect: { server: { options: { hostname: "192.168.30.121", port: 9100, base: '.', keepalive: true } } } }); 修改app.js: [root@k8s-etcd1elasticsearch-head]# vim _site/app.js this.base_uri =this.config.base_uri || this.prefs.get("app-base_uri") ||"http://192.168.30.121:9200"; 在所有elasticsearch的配置文件追添以下两行,然后重启elasticsearch: http.cors.enabled: true http.cors.allow-origin: "*" 启动head: [root@k8s-etcd1 elk]# cdelasticsearch-head/ && nohup grunt server -d & 检测: 本文转自 zhuxtqw 51CTO博客,原文链接:http://blog.51cto.com/1054054/1968684,如需转载请自行联系原作者

优秀的个人博客,低调大师

ELK实时日志分析平台(elk+kafka+metricbeat)-kibana部署(六)

解压(192.168.30.121上执行): tar -zxf /opt/soft/newelk/kibana-5.5.1-linux-x86_64.tar.gz -C ./ mv kibana-5.5.1-linux-x86_64 kibana 修改配置文件: #cat>kibana/config/kibana.yml<<EOF server.port: 5601 server.host: "192.168.30.121" server.basePath: "" server.maxPayloadBytes: 1048576 elasticsearch.url: "http://192.168.30.121:9200" elasticsearch.preserveHost: true kibana.index: ".kibana" kibana.defaultAppId: "discover" elasticsearch.username: "elastic" elasticsearch.password: "changeme" elasticsearch.pingTimeout: 1500 elasticsearch.requestTimeout: 30000 elasticsearch.shardTimeout: 0 elasticsearch.startupTimeout: 5000 pid.file: /var/run/kibana.pid logging.dest: stdout logging.silent: false logging.quiet: false logging.verbose: false ops.interval: 5000 i18n.defaultLocale: "en" EOF 启动: 以metricbeat为例导入模板: tar -zxf/opt/soft/newelk/metricbeat-5.5.1-linux-x86_64.tar.gz -C /opt/soft/newelk cd/opt/soft/newelk/metricbeat-5.5.1-linux-x86_64 创建test索引: curl -XPUT'192.168.30.121:9200/test?pretty' 导入模板到指定索引: ./scripts/import_dashboards -es http://192.168.30.121:9200 -k test 在kibana中关联索引: 本文转自 zhuxtqw 51CTO博客,原文链接:http://blog.51cto.com/1054054/1968690,如需转载请自行联系原作者

资源下载

更多资源
优质分享App

优质分享App

近一个月的开发和优化,本站点的第一个app全新上线。该app采用极致压缩,本体才4.36MB。系统里面做了大量数据访问、缓存优化。方便用户在手机上查看文章。后续会推出HarmonyOS的适配版本。

Mario

Mario

马里奥是站在游戏界顶峰的超人气多面角色。马里奥靠吃蘑菇成长,特征是大鼻子、头戴帽子、身穿背带裤,还留着胡子。与他的双胞胎兄弟路易基一起,长年担任任天堂的招牌角色。

腾讯云软件源

腾讯云软件源

为解决软件依赖安装时官方源访问速度慢的问题,腾讯云为一些软件搭建了缓存服务。您可以通过使用腾讯云软件源站来提升依赖包的安装速度。为了方便用户自由搭建服务架构,目前腾讯云软件源站支持公网访问和内网访问。

Spring

Spring

Spring框架(Spring Framework)是由Rod Johnson于2002年提出的开源Java企业级应用框架,旨在通过使用JavaBean替代传统EJB实现方式降低企业级编程开发的复杂性。该框架基于简单性、可测试性和松耦合性设计理念,提供核心容器、应用上下文、数据访问集成等模块,支持整合Hibernate、Struts等第三方框架,其适用范围不仅限于服务器端开发,绝大多数Java应用均可从中受益。

用户登录
用户注册