首页 文章 精选 留言 我的

精选列表

搜索[android],共10000篇文章
优秀的个人博客,低调大师

Android实现仿IOS带清空功能的文本输入框

/** *@类名:ClearableEditText *@功能描述: *@作者:WilliamXu *@创建日期:2013-4-13 *@修改人: *@修改日期: *@修改备注: *@版本号:1.0 */ publicclassClearableEditTextextendsEditTextimplements OnFocusChangeListener,TextWatcher{ privateDrawablexD; publicClearableEditText(Contextcontext){ super(context); init(); } publicClearableEditText(Contextcontext,AttributeSetattrs){ super(context,attrs); init(); } publicClearableEditText(Contextcontext,AttributeSetattrs,intdefStyle){ super(context,attrs,defStyle); init(); } privatevoidinit(){ xD=getCompoundDrawables()[2]; if(xD==null){ xD=getResources() .getDrawable(R.drawable.search_clear); } xD.setBounds(0,0,xD.getIntrinsicWidth(),xD.getIntrinsicHeight()); setClearIconVisible(false); super.setOnFocusChangeListener(this); addTextChangedListener(this); } @Override publicvoidsetOnFocusChangeListener(OnFocusChangeListenerf){ this.f=f; } privateOnFocusChangeListenerf; @Override publicbooleanonTouchEvent(MotionEventevent){ if(getCompoundDrawables()[2]!=null){ if(event.getAction()==MotionEvent.ACTION_UP){ booleantappedX=event.getX()>(getWidth() -getPaddingRight()-xD.getIntrinsicWidth()); if(tappedX){ setText(""); event.setAction(MotionEvent.ACTION_CANCEL); } } } returnsuper.onTouchEvent(event); } @Override publicvoidonFocusChange(Viewv,booleanhasFocus){ if(hasFocus){ setClearIconVisible(getText().length()>0); }else{ setClearIconVisible(false); } if(f!=null){ f.onFocusChange(v,hasFocus); } } protectedvoidsetClearIconVisible(booleanvisible){ Drawablex=visible?xD:null; setCompoundDrawables(getCompoundDrawables()[0], getCompoundDrawables()[1],x,getCompoundDrawables()[3]); } @Override publicvoidonTextChanged(CharSequences,intstart,intcount, intafter){ setClearIconVisible(s.length()>0); } @Override publicvoidbeforeTextChanged(CharSequences,intstart,intcount, intafter){ //TODOAuto-generatedmethodstub } @Override publicvoidafterTextChanged(Editables){ //TODOAuto-generatedmethodstub } } 本文转自william_xu 51CTO博客,原文链接:http://blog.51cto.com/williamx/1195051,如需转载请自行联系原作者

优秀的个人博客,低调大师

Android Ap 开发 设计模式第九篇:桥接模式

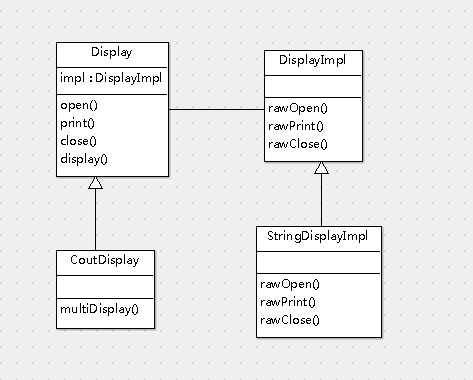
Bridge Pattern 模式解读 bridge 是“桥梁”的意思。就像现实社会里的桥梁担负着连接两岸的重大责任一样,Bridge Pattern也是负责连接2个不同位置的参与者。 桥接模式沟通着“功能的类层次”和“实现的类层次”。将“功能的类层次”和“实现的类层次”分成2个独立的类层次可能会弄得支离破碎,所以必须在2个类层次之间建一座沟通的桥梁。 程序示例 按照上面的分法,本例可以分为4个类按照“功能的类层次”和“实现的类层次”分开,分别为: 功能的类层次 Display 该类为打印内容的类 CountDisplay 该类不仅可以打印内容还可以参数指定打印次数 实现的类层次 DisplayImpl 该类为抽象类,抽象出打印内容所需要的功能 StringDisplayImpl 该类实现了DisplayImpl 所抽象出来的功能 按照如上划分,制作出了UML图,如下: 功能的类层次:Display 类,代码: public class Display{ private DisplayImplimpl; public Display(DisplayImplimpl){ this .impl = impl; } public Stringopen(){ return impl.rawOpen(); } public Stringprint(){ return impl.rawPrint(); } public Stringclose(){ return impl.rawClose(); } public finalStringdisplay(){ open(); Stringtext = print(); close(); return text; } } 该类通过参数将DisplayImpl传进来,直接让Display 有DisplayImpl的功能。该功能也是Builder Pattern 的模式。位于“功能的类层次”最上层的类,利用接口参与者的方法只记载基本功能的类。这个对象实例是保持住接口参与者。该类为扮演这个参与者的类。 功能的类层次:CountDisplay类 ,代码: public class CountDisplayextendsDisplay{ public CountDisplay(DisplayImplimpl){ super(impl); // TODOAuto-generatedconstructorstub } public StringmultiDisplay( int times){ StringBuffersb = new StringBuffer(); sb.append(open() + " \n " ); for ( int i = 0 ;i < times;i ++ ){ sb.append(print() + " \n " ); } return sb.append(close()).toString(); } } 该类系Display 的子类,并且再添加一个可按照次数循环打印的方法。对抽象参与者新增功能的参与者(改良后的抽象化),该类扮演在这个DEMO中扮演着这个角色。 实现的类层次:DisplayImpl 类,代码: public abstract class DisplayImpl{ public abstract StringrawOpen(); public abstract StringrawPrint(); public abstract StringrawClose(); } 该类位于实现的类层次的最上层,分别抽象了rawOpen、rawPrint、rawClose三个方法,这三个方法分别对应到Display 类的open、print、close方法,执行前处理、打印和后处理。规定要实现的抽象参与者的接口 。 实现的类层次:StringDisplayImpl 类,代码: public class StringDisplayImplextendsDisplayImpl{ private String string ; public StringDisplayImpl(Stringstr){ this . string = str; } @Override public StringrawClose(){ // TODOAuto-generatedmethodstub return printLine(); } @Override public StringrawOpen(){ // TODOAuto-generatedmethodstub return printLine(); } @Override public StringrawPrint(){ // TODOAuto-generatedmethodstub return " | " + string + " | " ; } private StringprintLine(){ StringBuffersb = new StringBuffer(); sb.append( " + " ); for ( int i = 0 ;i < string .length();i ++ ){ sb.append( " - " ); } return sb.append( " + " ).toString(); } } 该类实现了DisplayImpl的三个抽象方法,本例中唯一一处实现功能的也是由本类完成。具体实现接口 参与者的接口 。 界面入口:BridgePatternActivity 类,代码: public class BridgePatternActivityextendsActivity{ /* *Calledwhentheactivityisfirstcreated. */ @Override public void onCreate(BundlesavedInstanceState){ super.onCreate(savedInstanceState); setContentView(R.layout.main); ((Button)findViewById(R.id.Button01)).setOnClickListener( new OnClickListener(){ @Override public void onClick(Viewv){ // TODOAuto-generatedmethodstub Displaydisplay = new Display( new StringDisplayImpl( " terry_龙 " )); CountDisplaymCountDisplay = new CountDisplay( new StringDisplayImpl( " terry " )); ((EditText)findViewById(R.id.EditText01)).setText(display.print()); ((EditText)findViewById(R.id.EditText02)).setText(mCountDisplay.multiDisplay( 5 )); } }); } } 运行结果: 代码下载: 桥接模式 本文转自 terry_龙 51CTO博客,原文链接:http://blog.51cto.com/terryblog/624082,如需转载请自行联系原作者

优秀的个人博客,低调大师

Android笔记:Eclipse中SVN插件的两种安装方式

大部分时候我们都可以通过在线的方式安装SVN插件: 在Eclipse 中,Help -> Software Updates -> Find and Install...菜单下。 在弹出对话框中的输入框中输入http://subclipse.tigris.org/update作为URL添加New Remote Site。 就可以让Eclipse自动下载为你安装SVN插件了,安装成功后重新启动Eclipse就OK! 还有一种方式就是下载压缩包离线安装,这个也是一种安装SVN插件的方式。 Eclipse4.3之前我们可以直接将压缩包加压后覆盖到Eclipse根目录下,但是4.3之后这种方式就无法安装了,你能够看到在eclipse的根目录中有一个Dropins目录,就是它直接将解压后的全部插件文件复制到这个目录下,tb重新启动Eclipse就安装成功了!!! 插件使用教程: eclipse下SVN subclipse插件 http://www.blogjava.net/gdufo/archive/2012/04/28/376993.html 本文转自 glblong 51CTO博客,原文链接:http://blog.51cto.com/glblong/1311730,如需转载请自行联系原作者

优秀的个人博客,低调大师

[转]Android笔记:ScrollView嵌套ViewPager的滚动冲突解决方法

1 2 3 4 5 6 7 8 9 10 11 12 13 14 15 16 17 18 19 20 21 22 23 24 25 26 27 28 29 30 31 32 33 34 /** * 能够兼容ViewPager的ScrollView * @Description: 解决了ViewPager在ScrollView中的滑动反弹问题 */ public class ScrollViewExtend extends ScrollView { // 滑动距离及坐标 private float xDistance, yDistance, xLast, yLast; public ScrollViewExtend(Context context, AttributeSet attrs) { super (context, attrs); } @Override public boolean onInterceptTouchEvent(MotionEvent ev) { switch (ev.getAction()) { case MotionEvent.ACTION_DOWN: xDistance = yDistance = 0f; xLast = ev.getX(); yLast = ev.getY(); break ; case MotionEvent.ACTION_MOVE: final float curX = ev.getX(); final float curY = ev.getY(); xDistance += Math.abs(curX - xLast); yDistance += Math.abs(curY - yLast); xLast = curX; yLast = curY; if (xDistance > yDistance){ return false ; } } return super .onInterceptTouchEvent(ev); } } 本文转自 glblong 51CTO博客,原文链接:http://blog.51cto.com/glblong/1307717,如需转载请自行联系原作者

优秀的个人博客,低调大师

Android之adt 23找不到NDK路径设置解决方案

这里下载最新的adt更新一下就行。 一下是Google的原文 If you are having trouble downloading the ADT plugin after following the steps above and you are behind a firewall (such as a corporate firewall), make sure that you have properly configured your proxy settings in Eclipse. In Eclipse, you can configure proxy information from the main Eclipse menu inWindow(on Mac OS X,Eclipse) >Preferences>General>Network Connections. If you are still unable to use Eclipse to download the ADT plugin as a remote update site, you can download the ADT zip file to your local machine and manually install it: Download the ADT Plugin zip file (do not unpack it): Package Size MD5 Checksum ADT-23.0.4.zip 103336810 bytes 91a43dcf686ab73dec2c08b77243492b Start Eclipse, then selectHelp>Install New Software. ClickAdd, in the top-right corner. In the Add Repository dialog, clickArchive. Select the downloaded ADT-23.0.4.zip file and clickOK. Enter "ADT Plugin" for the name and clickOK. In the Available Software dialog, select the checkbox next to Developer Tools and clickNext. In the next window, you'll see a list of the tools to be downloaded. ClickNext. Read and accept the license agreements, then clickFinish. If you get a security warning saying that the authenticity or validity of the software can't be established, clickOK. When the installation completes, restart Eclipse. To update your plugin once you've installed using the zip file, you will have to follow these steps again instead of the default update instructions. 本文转自xuzw13 51CTO博客,原文链接:http://blog.51cto.com/xuzhiwei/1568686,如需转载请自行联系原作者

资源下载

更多资源
优质分享App

优质分享App

近一个月的开发和优化,本站点的第一个app全新上线。该app采用极致压缩,本体才4.36MB。系统里面做了大量数据访问、缓存优化。方便用户在手机上查看文章。后续会推出HarmonyOS的适配版本。

Mario

Mario

马里奥是站在游戏界顶峰的超人气多面角色。马里奥靠吃蘑菇成长,特征是大鼻子、头戴帽子、身穿背带裤,还留着胡子。与他的双胞胎兄弟路易基一起,长年担任任天堂的招牌角色。

Spring

Spring

Spring框架(Spring Framework)是由Rod Johnson于2002年提出的开源Java企业级应用框架,旨在通过使用JavaBean替代传统EJB实现方式降低企业级编程开发的复杂性。该框架基于简单性、可测试性和松耦合性设计理念,提供核心容器、应用上下文、数据访问集成等模块,支持整合Hibernate、Struts等第三方框架,其适用范围不仅限于服务器端开发,绝大多数Java应用均可从中受益。

Sublime Text

Sublime Text

Sublime Text具有漂亮的用户界面和强大的功能,例如代码缩略图,Python的插件,代码段等。还可自定义键绑定,菜单和工具栏。Sublime Text 的主要功能包括:拼写检查,书签,完整的 Python API , Goto 功能,即时项目切换,多选择,多窗口等等。Sublime Text 是一个跨平台的编辑器,同时支持Windows、Linux、Mac OS X等操作系统。

用户登录
用户注册