【Vue.js】873- Vue 3.0 进阶之指令探秘
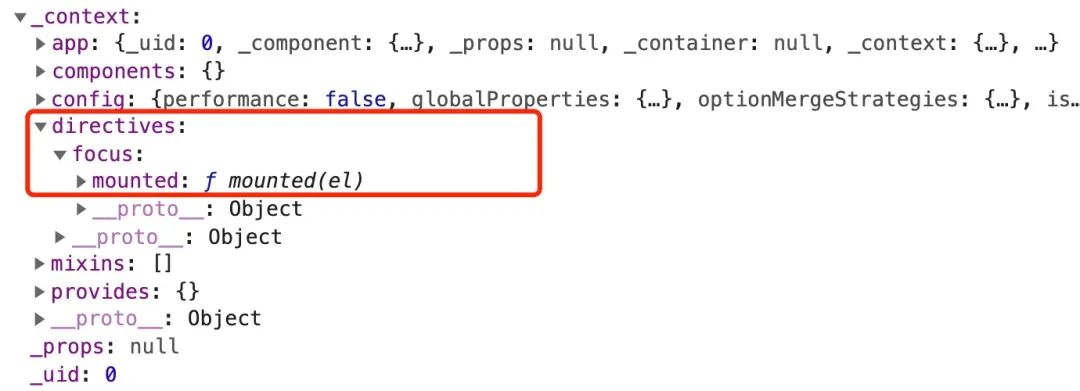
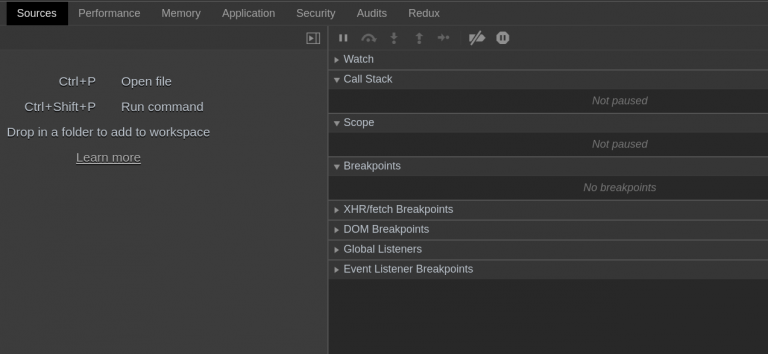
在 Vue 的项目中,我们经常会遇到 v-if、v-show、v-for 或 v-model 这些内置指令,它们为我们提供了不同的功能。除了使用这些内置指令之外,Vue 也允许注册自定义指令。 接下来,阿宝哥将使用 Vue 3 官方文档 自定义指令 章节中使用的示例,来一步步揭开自定义指令背后的秘密。 提示:在阅读本文前,建议您先阅读 Vue 3 官方文档 自定义指令 章节的内容。 一、自定义指令 1、注册全局自定义指令 constapp=Vue.createApp({})//注册一个全局自定义指令v-focusapp.directive('focus',{//当被绑定的元素挂载到DOM中时被调用mounted(el){//聚焦元素el.focus()}}) 2、使用全局自定义指令 <divid="app"><inputv-focus/></div> 3、完整的使用示例 <divid="app"><inputv-focus/></div><script>const{createApp}=Vueconstapp=Vue.createApp({})//①app.directive('focus',{//②//当被绑定的元素挂载到DOM中时被调用mounted(el){el.focus()//聚焦元素}})app.mount('#app')//③</script> 当页面加载完成后,页面中的输入框元素将自动获得焦点。该示例的代码比较简单,主要包含 3 个步骤:创建 App 对象、注册全局自定义指令和应用挂载。其中创建 App 对象的细节,阿宝哥会在后续的文章中单独介绍,下面我们将重点分析其他 2 个步骤。首先我们先来分析注册全局自定义指令的过程。 二、注册全局自定义指令的过程 在以上示例中,我们使用 app 对象的 directive 方法来注册全局自定义指令: app.directive('focus',{//当被绑定的元素挂载到DOM中时被调用mounted(el){el.focus()//聚焦元素}}) 当然,除了注册全局自定义指令外,我们也可以注册局部指令,因为组件中也接受一个 directives 的选项: directives:{focus:{mounted(el){el.focus()}}} 对于以上示例来说,我们使用的 app.directive 方法被定义在 runtime-core/src/apiCreateApp.ts 文件中: //packages/runtime-core/src/apiCreateApp.tsexportfunctioncreateAppAPI<HostElement>(render:RootRenderFunction,hydrate?:RootHydrateFunction):CreateAppFunction<HostElement>{returnfunctioncreateApp(rootComponent,rootProps=null){constcontext=createAppContext()letisMounted=falseconstapp:App=(context.app={//省略部分代码_context:context,//用于注册或检索全局指令。directive(name:string,directive?:Directive){if(__DEV__){validateDirectiveName(name)}if(!directive){returncontext.directives[name]asany}if(__DEV__&&context.directives[name]){warn(`Directive"${name}"hasalreadybeenregisteredintargetapp.`)}context.directives[name]=directivereturnapp},returnapp}} 通过观察以上代码,我们可以知道 directive 方法支持以下两个参数: name:表示指令的名称; directive(可选):表示指令的定义。 name 参数比较简单,所以我们重点分析 directive 参数,该参数的类型是 Directive 类型: //packages/runtime-core/src/directives.tsexporttypeDirective<T=any,V=any>=|ObjectDirective<T,V>|FunctionDirective<T,V> 由上可知 Directive 类型属于联合类型,所以我们需要继续分析 ObjectDirective 和 FunctionDirective 类型。这里我们先来看一下 ObjectDirective 类型的定义: //packages/runtime-core/src/directives.tsexportinterfaceObjectDirective<T=any,V=any>{created?:DirectiveHook<T,null,V>beforeMount?:DirectiveHook<T,null,V>mounted?:DirectiveHook<T,null,V>beforeUpdate?:DirectiveHook<T,VNode<any,T>,V>updated?:DirectiveHook<T,VNode<any,T>,V>beforeUnmount?:DirectiveHook<T,null,V>unmounted?:DirectiveHook<T,null,V>getSSRProps?:SSRDirectiveHook} 该类型定义了对象类型的指令,对象上的每个属性表示指令生命周期上的钩子。而 FunctionDirective 类型则表示函数类型的指令: //packages/runtime-core/src/directives.tsexporttypeFunctionDirective<T=any,V=any>=DirectiveHook<T,any,V>exporttypeDirectiveHook<T=any,Prev=VNode<any,T>|null,V=any>=(el:T,binding:DirectiveBinding<V>,vnode:VNode<any,T>,prevVNode:Prev)=>void 介绍完 Directive 类型,我们再回顾一下前面的示例,相信你就会清晰很多: app.directive('focus',{//当被绑定的元素挂载到DOM中时触发mounted(el){el.focus()//聚焦元素}}) 对于以上示例,当我们调用 app.directive 方法注册自定义 focus 指令时,就会执行以下逻辑: directive(name:string,directive?:Directive){if(__DEV__){//避免自定义指令名称,与已有的内置指令名称冲突validateDirectiveName(name)}if(!directive){//获取name对应的指令对象returncontext.directives[name]asany}if(__DEV__&&context.directives[name]){warn(`Directive"${name}"hasalreadybeenregisteredintargetapp.`)}context.directives[name]=directive//注册全局指令returnapp} 当 focus 指令注册成功之后,该指令会被保存在 context 对象的 directives 属性中,具体如下图所示: 顾名思义 context 是表示应用的上下文对象,那么该对象是如何创建的呢?其实,该对象是通过 createAppContext 函数来创建的: constcontext=createAppContext() 而 createAppContext 函数被定义在 runtime-core/src/apiCreateApp.ts 文件中: //packages/runtime-core/src/apiCreateApp.tsexportfunctioncreateAppContext():AppContext{return{app:nullasany,config:{isNativeTag:NO,performance:false,globalProperties:{},optionMergeStrategies:{},isCustomElement:NO,errorHandler:undefined,warnHandler:undefined},mixins:[],components:{},directives:{},provides:Object.create(null)}} 看到这里,是不是觉得注册全局自定义指令的内部处理逻辑其实挺简单的。那么对于已注册的 focus 指令,何时会被调用呢?要回答这个问题,我们就需要分析另一个步骤 —— 应用挂载。 三、应用挂载的过程 为了更加直观地了解应用挂载的过程,阿宝哥利用 Chrome 开发者工具,记录了应用挂载的主要过程: 通过上图,我们就可以知道应用挂载期间所经历的主要过程。此外,从图中我们也发现了一个与指令相关的函数 resolveDirective。很明显,该函数用于解析指令,且该函数在 render 方法中会被调用。在源码中,我们找到了该函数的定义: //packages/runtime-core/src/helpers/resolveAssets.tsexportfunctionresolveDirective(name:string):Directive|undefined{returnresolveAsset(DIRECTIVES,name)} 在 resolveDirective 函数内部,会继续调用 resolveAsset 函数来执行具体的解析操作。在分析 resolveAsset 函数的具体实现之前,我们在 resolveDirective 函数内部加个断点,来一睹 render 方法的 “芳容”: 在上图中,我们看到了与 focus 指令相关的 _resolveDirective("focus") 函数调用。前面我们已经知道在 resolveDirective 函数内部会继续调用 resolveAsset 函数,该函数的具体实现如下: //packages/runtime-core/src/helpers/resolveAssets.tsfunctionresolveAsset(type:typeofCOMPONENTS|typeofDIRECTIVES,name:string,warnMissing=true){constinstance=currentRenderingInstance||currentInstanceif(instance){constComponent=instance.type//省略解析组件的处理逻辑constres=//局部注册resolve(instance[type]||(ComponentasComponentOptions)[type],name)||//全局注册resolve(instance.appContext[type],name)returnres}elseif(__DEV__){warn(`resolve${capitalize(type.slice(0,-1))}`+`canonlybeusedinrender()orsetup().`)}} 因为注册 focus 指令时,使用的是全局注册的方式,所以解析的过程会执行 resolve(instance.appContext[type], name) 该语句,其中 resolve 方法的定义如下: functionresolve(registry:Record<string,any>|undefined,name:string){return(registry&&(registry[name]||registry[camelize(name)]||registry[capitalize(camelize(name))]))} 分析完以上的处理流程,我们可以知道在解析全局注册的指令时,会通过 resolve 函数从应用的上下文对象中获取已注册的指令对象。在获取到 _directive_focus 指令对象后,render 方法内部会继续调用 _withDirectives 函数,用于把指令添加到 VNode 对象上,该函数被定义在 runtime-core/src/directives.ts 文件中: //packages/runtime-core/src/directives.tsexportfunctionwithDirectives<TextendsVNode>(vnode:T,directives:DirectiveArguments):T{constinternalInstance=currentRenderingInstance//获取当前渲染的实例constinstance=internalInstance.proxyconstbindings:DirectiveBinding[]=vnode.dirs||(vnode.dirs=[])for(leti=0;i<directives.length;i++){let[dir,value,arg,modifiers=EMPTY_OBJ]=directives[i]//在mounted和updated时,触发相同行为,而不关系其他的钩子函数if(isFunction(dir)){//处理函数类型指令dir={mounted:dir,updated:dir}asObjectDirective}bindings.push({dir,instance,value,oldValue:void0,arg,modifiers})}returnvnode} 因为一个节点上可能会应用多个指令,所以 withDirectives 函数在 VNode 对象上定义了一个 dirs 属性且该属性值为数组。对于前面的示例来说,在调用 withDirectives 函数之后,VNode 对象上就会新增一个 dirs 属性,具体如下图所示: 通过上面的分析,我们已经知道在组件的 render 方法中,我们会通过 withDirectives 函数把指令注册对应的 VNode 对象上。那么 focus 指令上定义的钩子什么时候会被调用呢?在继续分析之前,我们先来介绍一下指令对象所支持的钩子函数。 一个指令定义对象可以提供如下几个钩子函数 (均为可选): created:在绑定元素的属性或事件监听器被应用之前调用。 beforeMount:当指令第一次绑定到元素并且在挂载父组件之前调用。 mounted:在绑定元素的父组件被挂载后调用。 beforeUpdate:在更新包含组件的 VNode 之前调用。 updated:在包含组件的 VNode 及其子组件的 VNode 更新后调用。 beforeUnmount:在卸载绑定元素的父组件之前调用。 unmounted:当指令与元素解除绑定且父组件已卸载时,只调用一次。 介绍完这些钩子函数之后,我们再来回顾一下前面介绍的 ObjectDirective 类型: //packages/runtime-core/src/directives.tsexportinterfaceObjectDirective<T=any,V=any>{created?:DirectiveHook<T,null,V>beforeMount?:DirectiveHook<T,null,V>mounted?:DirectiveHook<T,null,V>beforeUpdate?:DirectiveHook<T,VNode<any,T>,V>updated?:DirectiveHook<T,VNode<any,T>,V>beforeUnmount?:DirectiveHook<T,null,V>unmounted?:DirectiveHook<T,null,V>getSSRProps?:SSRDirectiveHook} 好的,接下来我们来分析一下 focus 指令上定义的钩子什么时候被调用。同样,阿宝哥在 focus 指令的 mounted 方法中加个断点: 在图中右侧的调用栈中,我们看到了 invokeDirectiveHook 函数,很明显该函数的作用就是调用指令上已注册的钩子。出于篇幅考虑,具体的细节阿宝哥就不继续介绍了,感兴趣的小伙伴可以自行断点调试一下。 四、阿宝哥有话说 4.1 Vue 3 有哪些内置指令? 在介绍注册全局自定义指令的过程中,我们看到了一个 validateDirectiveName 函数,该函数用于验证自定义指令的名称,从而避免自定义指令名称,与已有的内置指令名称冲突。 //packages/runtime-core/src/directives.tsexportfunctionvalidateDirectiveName(name:string){if(isBuiltInDirective(name)){warn('Donotusebuilt-indirectiveidsascustomdirectiveid:'+name)}} 在 validateDirectiveName 函数内部,会通过 isBuiltInDirective(name) 语句来判断是否为内置指令: constisBuiltInDirective=/*#__PURE__*/makeMap('bind,cloak,else-if,else,for,html,if,model,on,once,pre,show,slot,text') 以上代码中的 makeMap 函数,用于生成一个 map 对象(Object.create(null))并返回一个函数,用于检测某个 key 是否存在 map 对象中。另外,通过以上代码,我们就可以很清楚地了解 Vue 3 中为我们提供了哪些内置指令。 4.2 指令有几种类型? 在 Vue 3 中指令分为 ObjectDirective 和 FunctionDirective 两种类型: //packages/runtime-core/src/directives.tsexporttypeDirective<T=any,V=any>=|ObjectDirective<T,V>|FunctionDirective<T,V> ObjectDirective exportinterfaceObjectDirective<T=any,V=any>{created?:DirectiveHook<T,null,V>beforeMount?:DirectiveHook<T,null,V>mounted?:DirectiveHook<T,null,V>beforeUpdate?:DirectiveHook<T,VNode<any,T>,V>updated?:DirectiveHook<T,VNode<any,T>,V>beforeUnmount?:DirectiveHook<T,null,V>unmounted?:DirectiveHook<T,null,V>getSSRProps?:SSRDirectiveHook} FunctionDirective exporttypeFunctionDirective<T=any,V=any>=DirectiveHook<T,any,V>exporttypeDirectiveHook<T=any,Prev=VNode<any,T>|null,V=any>=(el:T,binding:DirectiveBinding<V>,vnode:VNode<any,T>,prevVNode:Prev)=>void 如果你想在 mounted 和 updated 时触发相同行为,而不关心其他的钩子函数。那么你可以通过将回调函数传递给指令来实现: app.directive('pin',(el,binding)=>{el.style.position='fixed'consts=binding.arg||'top'el.style[s]=binding.value+'px'}) 4.3 注册全局指令与局部指令有什么区别? 注册全局指令 app.directive('focus',{//当被绑定的元素挂载到DOM中时被调用mounted(el){el.focus()//聚焦元素}}); 注册局部指令 constComponent=defineComponent({directives:{focus:{mounted(el){el.focus()}}},render(){const{directives}=this.$options;return[withDirectives(h('input'),[[directives.focus,]])]}}); 解析全局注册和局部注册的指令 //packages/runtime-core/src/helpers/resolveAssets.tsfunctionresolveAsset(type:typeofCOMPONENTS|typeofDIRECTIVES,name:string,warnMissing=true){constinstance=currentRenderingInstance||currentInstanceif(instance){constComponent=instance.type//省略解析组件的处理逻辑constres=//局部注册resolve(instance[type]||(ComponentasComponentOptions)[type],name)||//全局注册resolve(instance.appContext[type],name)returnres}} 4.4 内置指令和自定义指令生成的渲染函数有什么区别? 要了解内置指令和自定义指令生成的渲染函数的区别,阿宝哥以 v-if 、v-show 内置指令和 v-focus 自定义指令为例,然后使用 Vue 3 Template Explorer 这个在线工具来编译生成渲染函数: v-if 内置指令 <inputv-if="isShow"/>const_Vue=Vuereturnfunctionrender(_ctx,_cache,$props,$setup,$data,$options){with(_ctx){const{createVNode:_createVNode,openBlock:_openBlock,createBlock:_createBlock,createCommentVNode:_createCommentVNode}=_VuereturnisShow?(_openBlock(),_createBlock("input",{key:0})):_createCommentVNode("v-if",true)}} 对于 v-if 指令来说,在编译后会通过 ?: 三目运算符来实现动态创建节点的功能。 v-show 内置指令 <inputv-show="isShow"/>const_Vue=Vuereturnfunctionrender(_ctx,_cache,$props,$setup,$data,$options){with(_ctx){const{vShow:_vShow,createVNode:_createVNode,withDirectives:_withDirectives,openBlock:_openBlock,createBlock:_createBlock}=_Vuereturn_withDirectives((_openBlock(),_createBlock("input",null,null,512/*NEED_PATCH*/)),[[_vShow,isShow]])}} 以上示例中的 vShow 指令被定义在 packages/runtime-dom/src/directives/vShow.ts 文件中,该指令属于 ObjectDirective 类型的指令,该指令内部定义了 beforeMount、mounted、updated 和 beforeUnmount 四个钩子。 v-focus 自定义指令 <inputv-focus/>const_Vue=Vuereturnfunctionrender(_ctx,_cache,$props,$setup,$data,$options){with(_ctx){const{resolveDirective:_resolveDirective,createVNode:_createVNode,withDirectives:_withDirectives,openBlock:_openBlock,createBlock:_createBlock}=_Vueconst_directive_focus=_resolveDirective("focus")return_withDirectives((_openBlock(),_createBlock("input",null,null,512/*NEED_PATCH*/)),[[_directive_focus]])}} 通过对比 v-focus 与 v-show 指令生成的渲染函数,我们可知 v-focus 自定义指令与 v-show 内置指令都会通过 withDirectives 函数,把指令注册到 VNode 对象上。而自定义指令相比内置指令来说,会多一个指令解析的过程。 此外,如果在 input 元素上,同时应用了 v-show 和 v-focus 指令,则在调用 _withDirectives 函数时,将使用二维数组: <inputv-show="isShow"v-focus/>const_Vue=Vuereturnfunctionrender(_ctx,_cache,$props,$setup,$data,$options){with(_ctx){const{vShow:_vShow,resolveDirective:_resolveDirective,createVNode:_createVNode,withDirectives:_withDirectives,openBlock:_openBlock,createBlock:_createBlock}=_Vueconst_directive_focus=_resolveDirective("focus")return_withDirectives((_openBlock(),_createBlock("input",null,null,512/*NEED_PATCH*/)),[[_vShow,isShow],[_directive_focus]])}} 4.5 如何在渲染函数中应用指令? 除了在模板中应用指令之外,利用前面介绍的 withDirectives 函数,我们可以很方便地在渲染函数中应用指定的指令: <divid="app"></div><script>const{createApp,h,vShow,defineComponent,withDirectives}=VueconstComponent=defineComponent({data(){return{value:true}},render(){return[withDirectives(h('div','我是阿宝哥'),[[vShow,this.value]])]}});constapp=Vue.createApp(Component)app.mount('#app')</script> 本文阿宝哥主要介绍了在 Vue 3 中如何自定义指令、如何注册全局和局部指令。为了让大家能够更深入地掌握自定义指令的相关知识,阿宝哥从源码的角度分析了指令的注册和应用过程。 在后续的文章中,阿宝哥将会介绍一些特殊的指令,当然也会重点分析一下双向绑定的原理,感兴趣的小伙伴不要错过哟。 五、参考资源 Vue 3 官网 - 自定义指令 Vue 3 官网 - 应用 API 聚焦全栈,专注分享 TypeScript、Web API、前端架构等技术干货。 本文分享自微信公众号 - 前端自习课(FE-study)。如有侵权,请联系 support@oschina.cn 删除。本文参与“OSC源创计划”,欢迎正在阅读的你也加入,一起分享。