首页 文章 精选 留言 我的

精选列表

搜索[c ],共10000篇文章
优秀的个人博客,低调大师

C# 如何更改Word语言设置

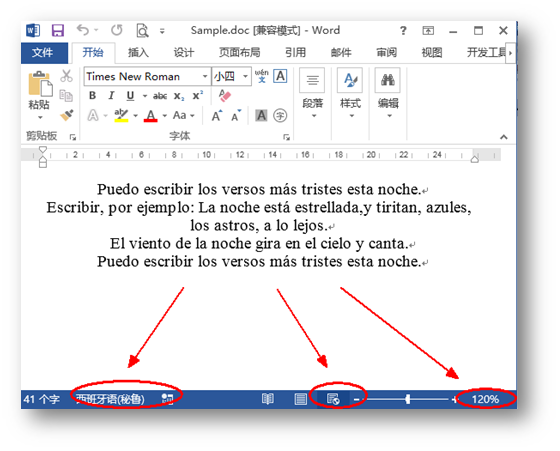
一般在创建或者打开一个Word文档时,如果没有进行过特殊设置的话,系统默认的输入语言的是英语输入,但是为适应不同的办公环境,我们其实是需要对文字嵌入的语言进行切换的,因此,本文将介绍如何使用免费版组件Free Spire.Doc for .NET来实现Word语言输入。另外,针对这款组件的多种Word操作功能,如,设置文档属性、文档视图模式等,本文中也将作进一步演示演示。 代码操作前准备 安装Spire.Doc for .NET之后,添加引用Spire.Doc.dll文件到项目程序集,同时添加相应的using指令到命名空间。 注意:以下代码中,以选取西班牙语(秘鲁)为例,其他语言设置,可参见 Microsoft Locale ID Values 具体步骤如下: 步骤一:添加如下命名空间 using System; using Spire.Doc; using Spire.Doc.Documents; using Spire.Doc.Fields; 步骤二:更改文本输入语言 //创建一个Document类实例,并添加Section和Paragraph到Document Document doc = new Document(); Section sec = doc.AddSection(); Paragraph para = sec.AddParagraph(); //向段落添加西班牙(秘鲁)语文字并设置文本对齐方式 TextRange txtRange = para.AppendText("Puedo escribir los versos más tristes esta noche.\n Escribir, por ejemplo: La noche está estrellada,y tiritan, azules, los astros, a lo lejos.\n El viento de la noche gira en el cielo y canta.\n Puedo escribir los versos más tristes esta noche."); txtRange.CharacterFormat.LocaleIdASCII= 10250; para.Format.HorizontalAlignment = HorizontalAlignment.Center; 步骤三:设置试图模式为Web视图,调整视图缩放比例 doc.ViewSetup.DocumentViewType = DocumentViewType.WebLayout; doc.ViewSetup.ZoomPercent = 120; doc.ViewSetup.ZoomType = ZoomType.None; 步骤四:添加文档属性(可根据需要自行设置文档内置属性或者自定义属性) //添加文档属性(内置属性) doc.BuiltinDocumentProperties.Title = "测试文件"; doc.BuiltinDocumentProperties.Category = "非机密文档"; doc.BuiltinDocumentProperties.Author = "James"; doc.BuiltinDocumentProperties.LastAuthor = "Mia"; doc.BuiltinDocumentProperties.Keywords = "Word文档, 属性, 样本"; doc.BuiltinDocumentProperties.Comments = "此文档仅供测试使用"; doc.BuiltinDocumentProperties.Subject = "Demo"; //添加文档属性(自定义属性) CustomDocumentProperties custom = doc.CustomDocumentProperties; custom.Add("Authorized Date", DateTime.Today); 步骤五:保存并打开文档 doc.SaveToFile("Sample.doc", FileFormat.Doc); System.Diagnostics.Process.Start("Sample.doc"); 完成以上步骤后,运行该项目生成文件(可在该项目文件夹下bin>Debug下查看),如下图所示: 对文档属性的设置如下图所示: 以上全部内容为本次对Word文档进行语言设置方法的讲述,文中对文档的属性设置在文档的保存与日后文档管理上其实也很有帮助。希望本文能提供一定帮助,欢迎转载(转载请注明出处)。感谢浏览!

优秀的个人博客,低调大师

C#中结构struct的使用

using System;using System.Collections.Generic;using System.Linq;using System.Text;using System.Threading.Tasks; namespace Demo{ enum orientation:byte { 北 = 1, 南 = 2, 东 = 3, 西 = 4 } struct route { public orientation direction; public double distance; } class Program { static void Main(string[] args) { route myRoute; int myDirection = -1; double myDistance; Console.WriteLine("1)北\n 2)南\n 3)东\n 4)西\n"); do { Console.WriteLine("选择一个方向:"); myDirection = Convert.ToInt16(Console.ReadLine()); } while (myDirection < 1 || myDirection > 4); Console.WriteLine("输入一个距离:"); myDistance = Convert.ToDouble(Console.ReadLine()); myRoute.direction = (orientation)myDirection; myRoute.distance = myDistance; Console.WriteLine("方向是{0},距离是{1}!",myRoute.direction,myRoute.distance); Console.ReadKey(); } } }结构比枚举更复杂,可以保存多种类型的数据! 本文转自TBHacker博客园博客,原文链接:http://www.cnblogs.com/jiqing9006/p/6728565.html,如需转载请自行联系原作者

优秀的个人博客,低调大师

C#运算符小例子

using System;using System.Collections.Generic;using System.Linq;using System.Text;using System.Threading.Tasks; namespace Demo{ class Program { static void Main(string[] args) { Console.WriteLine("输入一个数字:"); int myInt = Convert.ToInt32(Console.ReadLine()); bool isLessThan10 = myInt < 10; bool isBetween0And5 = (0 <= myInt) && (myInt <= 5); Console.WriteLine("数字小于10? {0}",isLessThan10); Console.WriteLine("数字在0和5之间? {0}", isBetween0And5); Console.ReadKey(); } } } 本文转自TBHacker博客园博客,原文链接:http://www.cnblogs.com/jiqing9006/p/6707627.html,如需转载请自行联系原作者

优秀的个人博客,低调大师

C#中访问私有成员

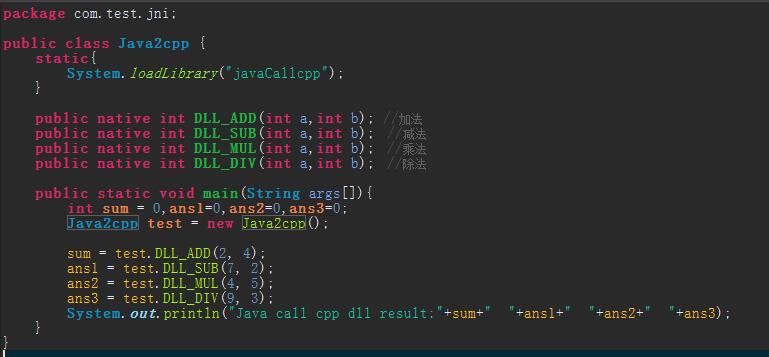
首先我必须承认访问一个类的私有成员不是什么好做法。大家也都知道私有成员在外部是不能被访问的。而一个类中会存在很多私有成员:如私有字段、私有属性、私有方法。对于私有成员访问,可以套用下面这种非常好的方式去解决。 private string name; public string Name { get { return name; } set { name = value; } } 但是有时候,源代码是别人的,你就不能修改源代码,只提供给你dll。或者你去维护别人的代码,源代码却有丢失。这样的情况如果你想知道私有成员的值,甚至去想直接调用类里面的私有方法。那怎么办呢?其实在.net中访问私有成员不是很难,这篇文章提供几个简单的方法让你如愿以偿。 为了让代码用起来优雅,使用扩展方法去实现。 1、得到私有字段的值: public static T GetPrivateField<T>(this object instance, string fieldname) { BindingFlags flag = BindingFlags.Instance | BindingFlags.NonPublic; Type type = instance.GetType(); FieldInfo field = type.GetField(fieldname, flag); return (T)field.GetValue(instance); } 2、得到私有属性的值: public static T GetPrivateProperty<T>(this object instance, string propertyname) { BindingFlags flag = BindingFlags.Instance | BindingFlags.NonPublic; Type type = instance.GetType(); PropertyInfo field = type.GetProperty(propertyname, flag); return (T)field.GetValue(instance, null); } 3、设置私有成员的值: public static voidSetPrivateField(this objectinstance,stringfieldname,objectvalue) { BindingFlagsflag =BindingFlags.Instance |BindingFlags.NonPublic; Typetype = instance.GetType(); FieldInfofield = type.GetField(fieldname, flag); field.SetValue(instance, value); }4、设置私有属性的值:public static voidSetPrivateProperty(this objectinstance,stringpropertyname,objectvalue) { BindingFlagsflag =BindingFlags.Instance |BindingFlags.NonPublic; Typetype = instance.GetType(); PropertyInfofield = type.GetProperty(propertyname, flag); field.SetValue(instance, value,null); }5、调用私有方法: public staticT CallPrivateMethod<T>(this objectinstance,stringname,params object[] param) { BindingFlagsflag =BindingFlags.Instance |BindingFlags.NonPublic; Typetype = instance.GetType(); MethodInfomethod = type.GetMethod(name, flag); return(T)method.Invoke(instance, param); } 测试: 下面我们使用一个测试类,进行测试。新建一个类库项目,测试的类代码如下: public class TestClass { public TestClass() { privatefield1 = 1; privatefield2 = 99; PrivateFieldA = "Lo"; PrivateFieldB = "ve"; } private int privatefield1; private int privatefield2; private string PrivateFieldA { get; set; } private string PrivateFieldB { get; set; } private int Add() { return privatefield1 + privatefield2; } private string Join() { return PrivateFieldA + PrivateFieldB; } } 将上面类库的dll引入控制台项目中。使用下面代码去使用这个类的私有成员: TestClass obj = new TestClass(); System.Console.WriteLine("私有字段"); System.Console.WriteLine(obj.GetPrivateField<int>("privatefield1")); System.Console.WriteLine(obj.GetPrivateField<int>("privatefield2")); System.Console.WriteLine("私有属性"); System.Console.WriteLine(obj.GetPrivateProperty<string>("PrivateFieldA")); System.Console.WriteLine(obj.GetPrivateProperty<string>("PrivateFieldB")); System.Console.WriteLine("私有方法"); System.Console.WriteLine(obj.CallPrivateMethod<int>("Add",null)); System.Console.WriteLine(obj.CallPrivateMethod<string>("Join", null)); System.Console.WriteLine("修改私有属性"); obj.SetPrivateProperty("PrivateFieldA", "hello"); obj.SetPrivateProperty("PrivateFieldB", "world"); System.Console.WriteLine(obj.CallPrivateMethod<string>("Join", null)); System.Console.Read(); 结果如下: 总结:实现对类私有成员的访问。 本文转自麒麟博客园博客,原文链接:http://www.cnblogs.com/zhuqil/archive/2010/07/25/Access-Private-Member.html,如需转载请自行联系原作者
优秀的个人博客,低调大师

C++学习第三天

一些基础就可以略过了,看书不能太呆板。 如果把一本书看完了,剩下的就是在实际项目中进行整合,训练,然后整理成笔记。 每天敲点程序,记点笔记。 变量作用域 代码: #include <iostream> #include <string> #include <conio.h> std::string s1 = "hello"; //全局 int main(){ std::string s2 = "world"; //局部 std::cout<<s1<<" "<<s2<<std::endl; int s1 = 42; //局部+隐式全局 std::cout<<s1<<" "<<s2<<std::endl; getch(); return 0; } 结果:hello world42 world判断代码输出结果 代码: #include <iostream> #include <string> #include <conio.h> int i = 42; int main(){ int i = 100,sum = 0; for(int i = 0;i!=10;++i) sum += i; std::cout<<i<<" "<<sum<<std::endl; getch(); return 0; } 结果:100 45 用class和struct关键字定义类的唯一差别在于默认访问级别:默认情况下,struct的成员为public,而class的成员为private。一旦使用了using声明,我们就可以直接引用名字,而不需要再引用改名字的命名空间了。 代码: #include <iostream> #include <string> #include <conio.h> using std::cin; using std::string; using std::cout; int main(){ string s; cin>>s; cout<<s; getch(); return 0; } #include <iostream> #include <string> #include <conio.h> using std::cin; using std::string; using std::cout; using std::endl; int main(){ string st("The expense of spirit\n"); cout<<"The size of "<<st<<"is"<<st.size() <<" characters,including the newline"<<endl; getch(); return 0; } 结果:The size of The expense of spiritis22 characters,including the newline 本文转自TBHacker博客园博客,原文链接:http://www.cnblogs.com/jiqing9006/archive/2013/04/11/3014962.html,如需转载请自行联系原作者

资源下载

更多资源
腾讯云软件源

腾讯云软件源

为解决软件依赖安装时官方源访问速度慢的问题,腾讯云为一些软件搭建了缓存服务。您可以通过使用腾讯云软件源站来提升依赖包的安装速度。为了方便用户自由搭建服务架构,目前腾讯云软件源站支持公网访问和内网访问。

Rocky Linux

Rocky Linux

Rocky Linux(中文名:洛基)是由Gregory Kurtzer于2020年12月发起的企业级Linux发行版,作为CentOS稳定版停止维护后与RHEL(Red Hat Enterprise Linux)完全兼容的开源替代方案,由社区拥有并管理,支持x86_64、aarch64等架构。其通过重新编译RHEL源代码提供长期稳定性,采用模块化包装和SELinux安全架构,默认包含GNOME桌面环境及XFS文件系统,支持十年生命周期更新。

优质分享App

优质分享App

近一个月的开发和优化,本站点的第一个app全新上线。该app采用极致压缩,本体才4.36MB。系统里面做了大量数据访问、缓存优化。方便用户在手机上查看文章。后续会推出HarmonyOS的适配版本。

Sublime Text

Sublime Text

Sublime Text具有漂亮的用户界面和强大的功能,例如代码缩略图,Python的插件,代码段等。还可自定义键绑定,菜单和工具栏。Sublime Text 的主要功能包括:拼写检查,书签,完整的 Python API , Goto 功能,即时项目切换,多选择,多窗口等等。Sublime Text 是一个跨平台的编辑器,同时支持Windows、Linux、Mac OS X等操作系统。

用户登录
用户注册