鸿蒙js开发7 鸿蒙分组列表和弹出menu菜单
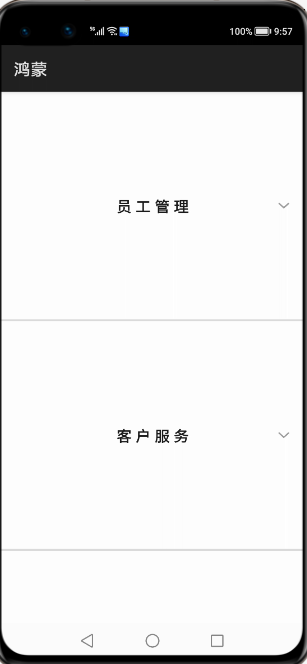
鸿蒙入门指南,小白速来!从萌新到高手,怎样快速掌握鸿蒙开发?【课程入口】 目录: 1.鸿蒙视图效果 2.js业务数据和事件 3.页面视图代码 4.跳转页面后的视图层 5.js业务逻辑部分 6.《鸿蒙js开发》系列文章合集 任正非:现在华为必须全面靠自己打造产品,要敢于将鸿蒙推入竞争,星光不问赶路人,时光不负有心人 1.鸿蒙视图效果 点击menu菜单一项,跳转页面,底部菜单栏和轮播布局和轮播图 2.js业务数据和事件 import prompt from '@system.prompt'; import router from '@system.router'; export default { data: { title: 'World', fundatas:[{"fathermenu":"员工管理","childmenu":[{"icon":"/common/emp.png","text":"查询员工"},{"icon":"/common/emp.png","text":"添加员工"},{"icon":"/common/emp.png","text":"删除员工"},{"icon":"/common/emp.png","text":"更新员工"}]}, {"fathermenu":"客户服务","childmenu":[{"icon":"/common/customer.png","text":"一卡通兑"},{"icon":"/common/customer.png","text":"银联服务"},{"icon":"/common/customer.png","text":"票据业务"}]}, {"fathermenu":"内部管理","childmenu":[{"icon":"","text":""},{"icon":"","text":""},{"icon":"","text":""}]}, {"fathermenu":"合同管理","childmenu":[{"icon":"","text":""},{"icon":"","text":""},{"icon":"","text":""}]}, {"fathermenu":"资产管理","childmenu":[{"icon":"","text":""},{"icon":"","text":""},{"icon":"","text":""}]}, {"fathermenu":"绩效管理","childmenu":[{"icon":"","text":""},{"icon":"","text":""},{"icon":"","text":""}]}, ] }, clickitem(itemvalue) { if(itemvalue=="查询员工") { this.$element("menu").show({ x: 360, y: 120 }); //this.$element("menu").show(); } prompt.showToast({ message:"点击了菜单"+itemvalue }) }, menuSelected(e) { prompt.showToast({ message:"你选择查询的值是:"+e.value }) router.push({ uri:"pages/index/index" }) } } 3.页面视图代码 <div class="container"> <list class="listview"> <block for="{{fundatas}}"> <list-item-group class="groupview"> <list-item class="listitem"> <text class="tv1">{{$item.fathermenu}}</text> </list-item> <block for="{{ (index,value) in $item.childmenu}}"> <list-item class="listitemone" onclick="clickitem({{value.text}})"> <image class="cimg" src="{{value.icon}}"></image> <text class="tv2">{{value.text}}</text> </list-item> </block> </list-item-group> </block> </list> <menu id="menu" title="员工性别" onselected="menuSelected"> <option value="男性员工"> 男性员工 </option> <option value="女性员工"> 女性员工 </option> </menu> </div> 3.样式代码 .container { width: 100%; height: 1200px; } .listview{ width: 100%; height: 100%; } .groupview{ width: 100%; height: 46%; border-bottom: 5px solid #DCDCDC; } .listitem{ width: 100%; height: 20%; display: flex; justify-content: space-around; } .listitemone { width: 50%; height: 6%; border-bottom: 1px solid #DCDCDC; display: flex; justify-content: space-around; } .cimg{ width: 40px; height: 40px; } .tv1{ font-size: 35px; font-weight: bold; font-family: sans-serif; letter-spacing: 10px; } .tv2{ font-size: 34px; font-weight: bold; font-family: sans-serif; } 4.跳转页面后的视图层 <div class="pageview"> <swiper class="swiperview" id="swiper" index="0" > <div class ="sw1"> <swiper class="swiper1" id="swiper1" autoplay="true" index="0" indicator="true" loop="true" digital="false"> <div class = "swiperContent1" > <text class = "text" value="轮播图1"></text> </div> <div class = "swiperContent1"> <text class = "text" value="轮播图2"></text> </div> <div class = "swiperContent1"> <text class = "text" value="轮播图3"></text> </div> </swiper> <swiper class="swiper2" loop="true" vertical="true" indicator="false" autoplay="true"> <div class="lineview"> <text>1.鸿蒙</text> </div> <div class="lineview"> <text>2.苹果</text> </div> <div class="lineview"> <text>3.安卓</text> </div> </swiper> </div> <div class ="sw2"> <list class="todo-wraper"> <list-item for="{{todolist}}" class="todo-item"> <text class="todo-title">{{$item.title}}</text> <text class="todo-title">{{$item.date}}</text> </list-item> </list> </div> <div class ="sw3"> <tabs class = "tabs" index="0" vertical="false" onchange="change"> <tab-bar class="tab-bar" mode="fixed"> <text class="tab-text">推荐</text> <text class="tab-text">视频</text> <text class="tab-text">本地</text> <text class="tab-text">内容</text> </tab-bar> <tab-content class="tabcontent" scrollable="true"> <div class="item-content" > <div class="currentview"> <div class="leftview"><text class="infot1">{{weatherInfo.city}}</text></div> <div class="rightview1"> <div class="cell"><text>{{winfo.info}}</text></div> <div class="cell"><text>{{winfo.direct}}</text></div> <div class="cell"><text>{{winfo.power}}</text></div> </div> </div> <div class="nextview"> </div> </div> <div class="item-content" > <text class="item-title">第二个</text> </div> <div class="item-content" > <text class="item-title">第三个</text> </div> <div class="item-content" > <text class="item-title">第四个</text> </div> </tab-content> </tabs> </div> <div class ="sw4"> <text>第四幅</text> </div> </swiper> <div class="bottommenu"> <div for="{{menus}}" class="menubox" onclick="changemenu({{$idx}})"> <image src="{{currentdata==$idx?$item.path:$item.path1}}" class="cimg"></image> <text class="menutitle">{{$item.menu}}</text> </div> </div> </div> 5.js业务逻辑部分 import fetch from '@system.fetch'; export default { data: { weatherInfo:{}, winfo:{}, nextInfo:[], currentdata:0, title: "", menus:[{menu:"首页","path":"./common/ones.png","path1":"./common/oneu.png"}, {menu:"分类","path":"./common/cs.png","path1":"./common/cu.png"}, {menu:"内容","path":"./common/cons.png","path1":"./common/conu.png"}, {menu:"我的","path":"./common/mys.png","path1":"./common/myu.png"}], todolist: [{ title: '刷leetcode', date: '2020-06-25 10:00:00', }, { title: '看电影', date: '2020-06-27 20:00:00', }, { title: '刷leetcode', date: '2020-06-25 10:00:00', }, { title: '看电影', date: '2020-06-27 20:00:00', },{ title: '刷leetcode', date: '2020-06-25 10:00:00', }, { title: '看电影', date: '2020-06-27 20:00:00', },{ title: '刷leetcode', date: '2020-06-25 10:00:00', }, { title: '看电影', date: '2020-06-27 20:00:00', }, { title: '刷leetcode', date: '2020-06-25 10:00:00', }, { title: '看电影', date: '2020-06-27 20:00:00', }, { title: '刷leetcode', date: '2020-06-25 10:00:00', }, { title: '看电影', date: '2020-06-27 20:00:00', },{ title: '刷leetcode', date: '2020-06-25 10:00:00', }, { title: '看电影', date: '2020-06-27 20:00:00', },{ title: '刷leetcode', date: '2020-06-25 10:00:00', }, { title: '看电影', date: '2020-06-27 20:00:00', },{ title: '刷leetcode', date: '2020-06-25 10:00:00', }, { title: '看电影', date: '2020-06-27 20:00:00', }, { title: '刷leetcode', date: '2020-06-25 10:00:00', }, { title: '看电影', date: '2020-06-27 20:00:00', },{ title: '刷leetcode', date: '2020-06-25 10:00:00', }, { title: '看电影', date: '2020-06-27 20:00:00', },{ title: '刷leetcode', date: '2020-06-25 10:00:00', }, { title: '看电影', date: '2020-06-27 20:00:00', } ] }, onInit() { // this.title = this.$t('strings.world'); let that =this; fetch.fetch({ url:"http://apis.juhe.cn/simpleWeather/query?city=南京&key=3dc98f3428c44424088015738a070554", responseType:"json", success:function(resp) { let currentValue=JSON.parse(resp.data); that.weatherInfo=currentValue.result; that.winfo=currentValue.result.realtime; // that.nextInfo=currentValue.future; } }) }, changemenu(index) { this.currentdata=index; this.$element('swiper').swipeTo({index: index}); } } 5.样式代码 .pageview{ width: 100%; height: 1600px; background-color: azure; } .bottommenu{ width: 100%; height: 140px; background-color: snow; border-top: 10px solid black; z-index:999; position: fixed; left: 0px; bottom: 0px; display: flex; justify-content: center; align-items: center; } .menubox{ width: 22%; height: 90%; /**border:9px solid #ccff6a;**/ margin-left: 20px; display: flex; flex-direction: column; justify-content: center; align-items: center; } .menutitle{ color: black; font-weight: bold; letter-spacing: 4px; } .cimg{ width: 40px; height: 40px; } .swiperview{ width: 100%; height: 100%; } .sw1{ width: 100%; height: 100%; display: flex; flex-direction: column; } .sw2{ width: 100%; height: 100%; background-color: cornflowerblue; } .sw3{ width: 100%; height: 100%; background-color: #ccff6a; } .sw4{ width: 100%; height: 100%; background-color: #009865; } .swiper1 { width: 100%; height: 330px; border: 1px solid #000000; indicator-color: #cf2411; indicator-size: 14px; indicator-bottom: 20px; indicator-right: 30px; margin-top: 100px; } .swiperContent1 { width: 800px; height: 100%; justify-content: center; } .button { width: 70%; margin: 10px; } .text { font-size: 40px; } .swiper2{ width: 100%; height: 100px; background-color: powderblue; } .lineview{ width: 100%; height: 100%; } .todo-wraper { width: 100%; height: 100%; } .todo-item { width: 100%; height: 80px; flex-direction: row; display: flex; } .todo-title { width: 454px; height: 40px; text-align: center; } .tabs { width: 100%; } .tab-bar { margin: 10px; height: 60px; border-color: #007dff; border-width: 1px; } .tab-text { width: 300px; text-align: center; } .tabcontent { width: 100%; height: 80%; justify-content: center; } .item-content { height: 100%; justify-content: center; display: flex; flex-direction: column; } .item-title { font-size: 60px; } .currentview{ width: 100%; height: 30%; border-bottom: 4px solid peru; display: flex; } .nextview{ width: 100%; height: 70%; } .leftview{ width: 30%; height: 100%; border-right: 2px solid paleturquoise; border-bottom: 2px solid paleturquoise; display: flex; justify-content: center; align-items: center; } .rightview1{ width: 70%; height: 100%; display: flex; flex-direction: column; } .infot1{ font-family: 楷体; font-size: 80px; color: snow; font-weight: bold; letter-spacing: 5px; } .cell{ width: 100%; height: 30%; border:1px solid red; } 作者:六合李欣 想了解更多内容,请访问: 51CTO和华为官方战略合作共建的鸿蒙技术社区https://harmonyos.51cto.com