首页 文章 精选 留言 我的

精选列表

搜索[3d游戏],共10000篇文章
优秀的个人博客,低调大师

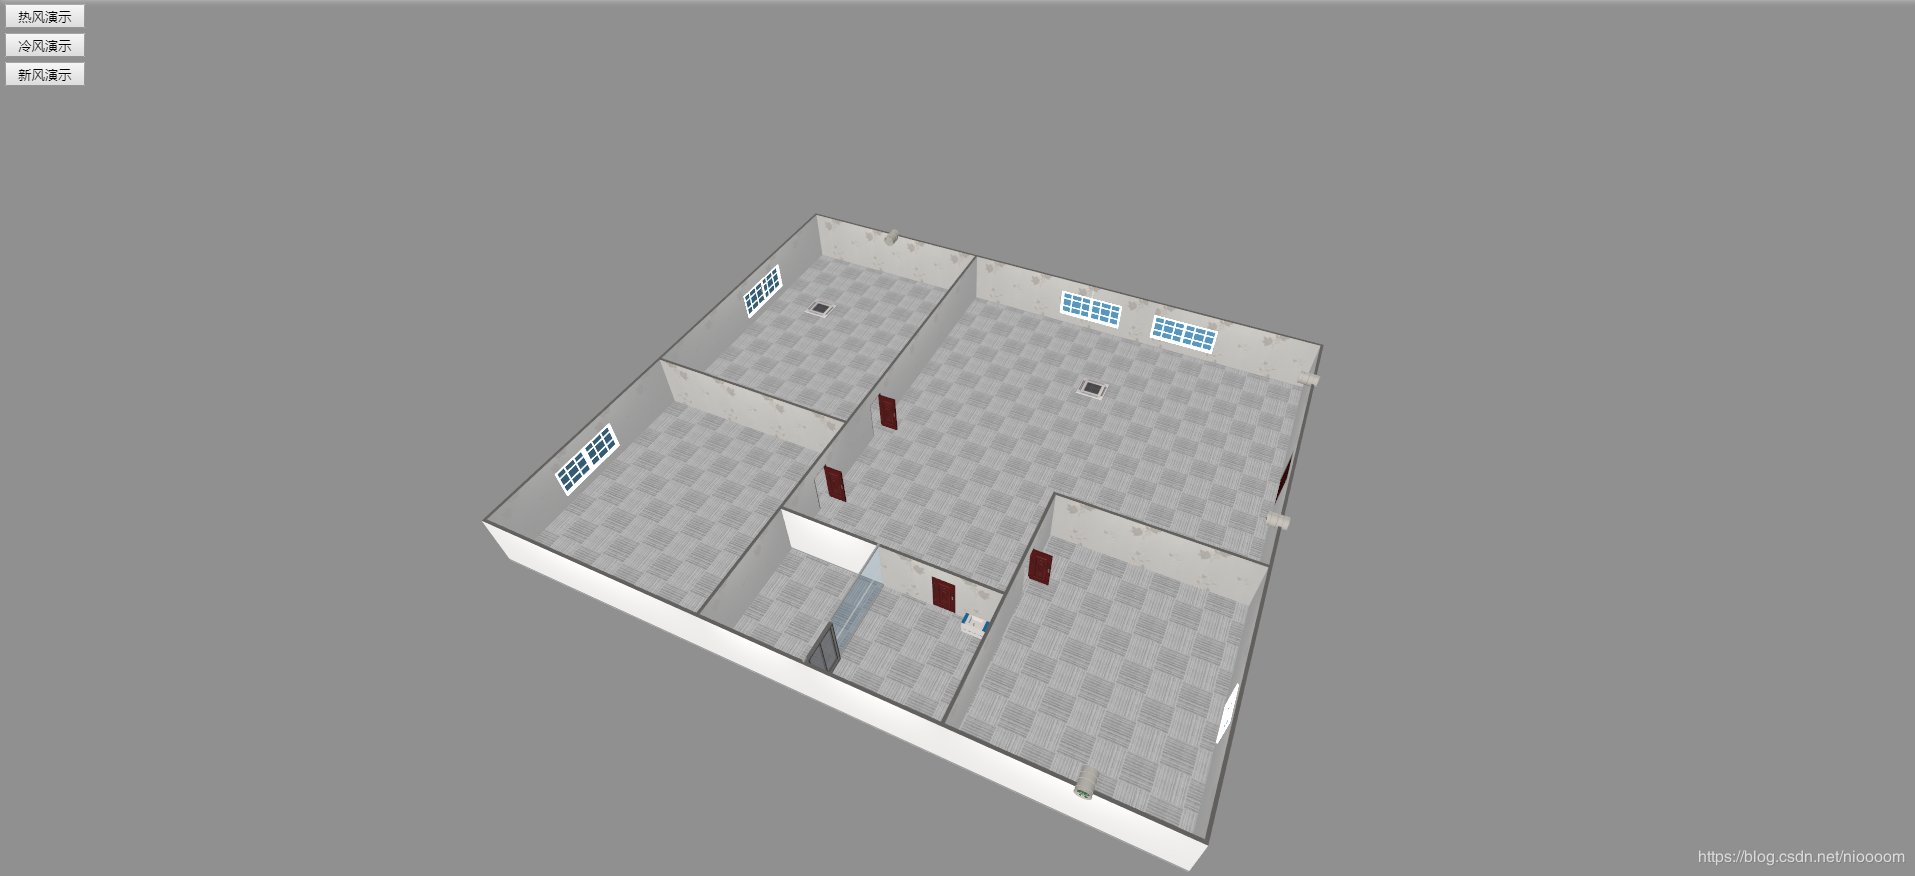
基于WebGL架构的3D可视化平台—新风系统演示

新风系统是根据在密闭的室内一侧用专用设备向室内送新风,再从另一侧由专用设备向室外排出,在室内会形成“新风流动场”,从而满足室内新风换气的需要。实施方案是:采用高风压、大流量风机、依靠机械强力由一侧向室内送风,由另一侧用专门设计的排风风机向室外排出的方式强迫在系统内形成新风流动场。在送风的同时对进入室内的空气进过滤、消毒、杀菌、增氧、预热(冬天)。 接下来就用ThingJs平台来搭建一个新风系统第一步,利用CampusBuilder搭建模拟场景。CampusBuilder的模型库有各种各样的模型,使我们搭建出的场景更逼真。 1 //加载场景代码 2 var app = new THING.App({ 3 // 场景地址 4 "url": "http://www.thingjs.com/./uploads/wechat/oLX7p05lsWJZUIxnIWsNXAzJ40X8/scene/新风演示2", 5 6 }); 第二步,创建三个数组来保存每个风的模型。 1 var hotWindGroup = []; 2 var coolWindGroup = []; 3 var newWindGroup = []; 4 var wind = null; 第三步,构造一个创建风的函数,为了方便创建风及其位置,我们选取排风设备为风的父物体,将创建出来的风的visiable属性设置为false(这里这个坐标问题可以看一下官网的教程中控制物体中的坐标转换)。 1 function createWind(parent, x, y, angle, localPosition, color, group) { 2 rs = app.query(parent)[0]; 3 wind = app.create({ 4 type: 'Thing', 5 name: 'hotWind', 6 url: 'http://model.3dmomoda.cn/models/4da706d8a37047298c0318a5b9546abd/0/gltf/', 7 localPosition: localPosition, 8 scale: [1, 2, 1], 9 angle: angle, 10 parent: rs, 11 }); 12 wind.style.color = color; 13 wind.visible = false; 14 wind.rotateX(x); 15 wind.rotateY(y); 16 group.push(wind); 17 } 第四步,开始创建风模型,并调整一下摄像机的角度及位置。 1 app.on('load', function () { 2 //摄像机角度 3 app.camera.position = [-22.91452445633646, 30.46296743148116, -23.83548169673341]; 4 app.camera.target = [-13.532807014407252, 5.6565539015865856, -3.3431546399681276]; 5 //hotWind 6 createWind('空调1', 0, 0, 0, [0, -2, 0], '#FF0000', hotWindGroup); 7 createWind('空调1', 0, 0, 0, [0, -2, 0.5], '#FF0000', hotWindGroup); 8 createWind('空调1', 0, 0, 0, [0, -2, 1], '#FF0000', hotWindGroup); 9 createWind('空调2', 0, 0, 0, [0, -2, 0], '#FF0000', hotWindGroup); 10 createWind('空调2', 0, 0, 0, [0, -2, 0.5], '#FF0000', hotWindGroup); 11 createWind('空调2', 0, 0, 0, [0, -2, 1], '#FF0000', hotWindGroup); 12 //coolWind 13 createWind('空调1', 0, 0, 0, [0, -2, 0], '#0000FF', coolWindGroup); 14 createWind('空调1', 0, 0, 0, [0, -2, 0.5], '#0000FF', coolWindGroup); 15 createWind('空调1', 0, 0, 0, [0, -2, 1], '#0000FF', coolWindGroup); 16 createWind('空调2', 0, 0, 0, [0, -2, 0], '#0000FF', coolWindGroup); 17 createWind('空调2', 0, 0, 0, [0, -2, 0.5], '#0000FF', coolWindGroup); 18 createWind('空调2', 0, 0, 0, [0, -2, 1], '#0000FF', coolWindGroup); 19 //newWind 20 createWind('排风1', -50, 0, 0, [0, -0.5, 2], '#00FF00', newWindGroup); 21 createWind('排风1', -50, 0, 0, [0, -0.5, 4], '#00FF00', newWindGroup); 22 createWind('排风1', -50, 0, 0, [0, -0.5, 6], '#00FF00', newWindGroup); 23 createWind('排风1', -50, 50, 50, [2, -0.5, 7], '#00FF00', newWindGroup); 24 createWind('排风1', -50, 50, 50, [4, -0.5, 8], '#00FF00', newWindGroup); 25 createWind('排风1', -50, 50, 50, [6, -0.5, 9], '#00FF00', newWindGroup); 26 createWind('排风1', -50, 50, 50, [8, -0.5, 12], '#00FF00', newWindGroup); 27 createWind('排风1', -50, 50, 50, [10, -0.5, 15], '#00FF00', newWindGroup); 28 createWind('排风1', -50, 50, 50, [12, -0.5, 18], '#00FF00', newWindGroup); 29 createWind('排风1', -50, 50, 50, [10, -0.5, 9], '#00FF00', newWindGroup); 30 createWind('排风1', -50, 50, 50, [14, -0.5, 9], '#00FF00', newWindGroup); 31 createWind('排风1', -50, 50, 50, [18, -0.5, 9], '#00FF00', newWindGroup); 32 createWind('排风1', -50, 50, 50, [22, -0.5, 9], '#00FF00', newWindGroup); 33 createWind('排风1', -50, 50, 50, [26, -0.5, 9], '#00FF00', newWindGroup); 34 createWind('排风2', -50, 0, 0, [0, -0.5, 2], '#00FF00', newWindGroup); 35 createWind('排风3', -50, 0, 0, [0, -0.5, 2], '#00FF00', newWindGroup); 36 createWind('排风4', -50, 0, 0, [0, -0.5, 2], '#00FF00', newWindGroup); 37 createWind('排风4', -50, 0, 0, [0, -0.5, 4], '#00FF00', newWindGroup); 38 createWind('排风4', -50, 0, 0, [0, -0.5, 6], '#00FF00', newWindGroup); 39 createWind('排风4', -50, 0, 0, [0, -0.5, 8], '#00FF00', newWindGroup); 40 createWind('排风4', -50, 0, 0, [0, -0.5, 10], '#00FF00', newWindGroup); 41 createWind('排风4', -50, 0, 0, [0, -0.5, 12], '#00FF00', newWindGroup); 42 createWind('排风4', -90, 50, 50, [2, -0.6, 12], '#00FF00', newWindGroup); 43 createWind('排风4', -90, 50, 50, [4, -0.7, 12], '#00FF00', newWindGroup); 44 createWind('排风4', -90, 50, 50, [6, -0.8, 13], '#00FF00', newWindGroup); 45 createWind('排风4', -90, 50, 90, [8, -0.8, 11], '#00FF00', newWindGroup); 46 createWind('排风4', -90, 50, 90, [12, -0.8, 9], '#00FF00', newWindGroup); 47 createWind('排风4', -90, 50, 90, [16, -0.8, 7], '#00FF00', newWindGroup); 48 createWind('排风4', -90, 50, 90, [20, -0.8, 5], '#00FF00', newWindGroup); 49 createWind('排风4', -90, 50, 90, [24, -0.8, 3], '#00FF00', newWindGroup); 50 createWind('排风4', -90, 0, 90, [8, -0.8, 13], '#00FF00', newWindGroup); 51 createWind('排风4', -90, 0, 90, [12, -0.8, 13], '#00FF00', newWindGroup); 52 createWind('排风4', -90, 0, 90, [16, -0.7, 13], '#00FF00', newWindGroup); 53 createWind('排风4', -90, 0, 90, [20, -0.6, 13], '#00FF00', newWindGroup); 54 //createWind('排风4', -90, 0, 90, [24, -0.5, 13], '#00FF00', newWindGroup); 55 56 //热风演示 57 new THING.widget.Button('热风演示', function () { 58 for (let i of coolWindGroup) { 59 i.visible = false; 60 }; 61 for (let i of hotWindGroup) { 62 i.visible = true; 63 }; 64 65 }); 66 67 //冷风演示 68 new THING.widget.Button('冷风演示', function () { 69 for (let i of coolWindGroup) { 70 i.visible = true; 71 }; 72 for (let i of hotWindGroup) { 73 i.visible = false; 74 }; 75 }); 76 77 //新风演示 78 new THING.widget.Button('新风演示', function () { 79 playNewWind(); 80 }); 81 82 function playNewWind() { 83 for (var i = 0; i < newWindGroup.length; i++) { 84 if(i==newWindGroup.length-1) 85 return; 86 newWindGroup[i].visible = true; 87 newWindGroup[i].moveTo({ 88 "time": 4000, 89 "position": newWindGroup[i+1].position, 90 }); 91 } 92 }); 第五步,运行项目。演示地址 思考与总结:首先就是空间坐标系下转父物体坐标真是弄晕了,看了官网的教程多少理解了一点。刚开始的时候我一直认为我的子物体以父物体坐标下放置的时候,子物体坐标轴的问题指向的问题。看了教程发现自己的担心多余了,就好像是人戴鸭舌帽帽子不管戴在谁的头上都一样。其次就是让风动起来,最初是想让一个模型在空间中运动,发现效果不好用。最后就创建了多个模型他们对应着有各自的点,让每一个模型向他下一个模型的位置移动实现运动。 完整代码 //加载场景代码 var app = new THING.App({ // 场景地址 "url": "http://www.thingjs.com/./uploads/wechat/oLX7p05lsWJZUIxnIWsNXAzJ40X8/scene/新风演示2", }); var hotWindGroup = []; var coolWindGroup = []; var newWindGroup = []; var wind = null; function createWind(parent, x, y, angle, localPosition, color, group) { rs = app.query(parent)[0]; wind = app.create({ type: 'Thing', name: 'hotWind', url: 'http://model.3dmomoda.cn/models/4da706d8a37047298c0318a5b9546abd/0/gltf/', localPosition: localPosition, scale: [1, 2, 1], angle: angle, parent: rs, }); wind.style.color = color; wind.visible = false; wind.rotateX(x); wind.rotateY(y); group.push(wind); } app.on('load', function () { //摄像机角度 app.camera.position = [-22.91452445633646, 30.46296743148116, -23.83548169673341]; app.camera.target = [-13.532807014407252, 5.6565539015865856, -3.3431546399681276]; //hotWind createWind('空调1', 0, 0, 0, [0, -2, 0], '#FF0000', hotWindGroup); createWind('空调1', 0, 0, 0, [0, -2, 0.5], '#FF0000', hotWindGroup); createWind('空调1', 0, 0, 0, [0, -2, 1], '#FF0000', hotWindGroup); createWind('空调2', 0, 0, 0, [0, -2, 0], '#FF0000', hotWindGroup); createWind('空调2', 0, 0, 0, [0, -2, 0.5], '#FF0000', hotWindGroup); createWind('空调2', 0, 0, 0, [0, -2, 1], '#FF0000', hotWindGroup); //coolWind createWind('空调1', 0, 0, 0, [0, -2, 0], '#0000FF', coolWindGroup); createWind('空调1', 0, 0, 0, [0, -2, 0.5], '#0000FF', coolWindGroup); createWind('空调1', 0, 0, 0, [0, -2, 1], '#0000FF', coolWindGroup); createWind('空调2', 0, 0, 0, [0, -2, 0], '#0000FF', coolWindGroup); createWind('空调2', 0, 0, 0, [0, -2, 0.5], '#0000FF', coolWindGroup); createWind('空调2', 0, 0, 0, [0, -2, 1], '#0000FF', coolWindGroup); //newWind createWind('排风1', -50, 0, 0, [0, -0.5, 2], '#00FF00', newWindGroup); createWind('排风1', -50, 0, 0, [0, -0.5, 4], '#00FF00', newWindGroup); createWind('排风1', -50, 0, 0, [0, -0.5, 6], '#00FF00', newWindGroup); createWind('排风1', -50, 50, 50, [2, -0.5, 7], '#00FF00', newWindGroup); createWind('排风1', -50, 50, 50, [4, -0.5, 8], '#00FF00', newWindGroup); createWind('排风1', -50, 50, 50, [6, -0.5, 9], '#00FF00', newWindGroup); createWind('排风1', -50, 50, 50, [8, -0.5, 12], '#00FF00', newWindGroup); createWind('排风1', -50, 50, 50, [10, -0.5, 15], '#00FF00', newWindGroup); createWind('排风1', -50, 50, 50, [12, -0.5, 18], '#00FF00', newWindGroup); createWind('排风1', -50, 50, 50, [10, -0.5, 9], '#00FF00', newWindGroup); createWind('排风1', -50, 50, 50, [14, -0.5, 9], '#00FF00', newWindGroup); createWind('排风1', -50, 50, 50, [18, -0.5, 9], '#00FF00', newWindGroup); createWind('排风1', -50, 50, 50, [22, -0.5, 9], '#00FF00', newWindGroup); createWind('排风1', -50, 50, 50, [26, -0.5, 9], '#00FF00', newWindGroup); createWind('排风2', -50, 0, 0, [0, -0.5, 2], '#00FF00', newWindGroup); createWind('排风3', -50, 0, 0, [0, -0.5, 2], '#00FF00', newWindGroup); createWind('排风4', -50, 0, 0, [0, -0.5, 2], '#00FF00', newWindGroup); createWind('排风4', -50, 0, 0, [0, -0.5, 4], '#00FF00', newWindGroup); createWind('排风4', -50, 0, 0, [0, -0.5, 6], '#00FF00', newWindGroup); createWind('排风4', -50, 0, 0, [0, -0.5, 8], '#00FF00', newWindGroup); createWind('排风4', -50, 0, 0, [0, -0.5, 10], '#00FF00', newWindGroup); createWind('排风4', -50, 0, 0, [0, -0.5, 12], '#00FF00', newWindGroup); createWind('排风4', -90, 50, 50, [2, -0.6, 12], '#00FF00', newWindGroup); createWind('排风4', -90, 50, 50, [4, -0.7, 12], '#00FF00', newWindGroup); createWind('排风4', -90, 50, 50, [6, -0.8, 13], '#00FF00', newWindGroup); createWind('排风4', -90, 50, 90, [8, -0.8, 11], '#00FF00', newWindGroup); createWind('排风4', -90, 50, 90, [12, -0.8, 9], '#00FF00', newWindGroup); createWind('排风4', -90, 50, 90, [16, -0.8, 7], '#00FF00', newWindGroup); createWind('排风4', -90, 50, 90, [20, -0.8, 5], '#00FF00', newWindGroup); createWind('排风4', -90, 50, 90, [24, -0.8, 3], '#00FF00', newWindGroup); createWind('排风4', -90, 0, 90, [8, -0.8, 13], '#00FF00', newWindGroup); createWind('排风4', -90, 0, 90, [12, -0.8, 13], '#00FF00', newWindGroup); createWind('排风4', -90, 0, 90, [16, -0.7, 13], '#00FF00', newWindGroup); createWind('排风4', -90, 0, 90, [20, -0.6, 13], '#00FF00', newWindGroup); //createWind('排风4', -90, 0, 90, [24, -0.5, 13], '#00FF00', newWindGroup); //热风演示 new THING.widget.Button('热风演示', function () { for (let i of coolWindGroup) { i.visible = false; }; for (let i of hotWindGroup) { i.visible = true; //playWind(i,[0,-0.6499999999999999,0],[0,-0.7234152255572697,0.46352549156242107],[0,-1.2683221215612903,1.2135254915624212],[0,-2.15,1.5]) }; }); //冷风演示 new THING.widget.Button('冷风演示', function () { for (let i of coolWindGroup) { i.visible = true; }; for (let i of hotWindGroup) { i.visible = false; }; }); //新风演示 new THING.widget.Button('新风演示', function () { playNewWind(); }); function playNewWind() { for (var i = 0; i < newWindGroup.length; i++) { if(i==newWindGroup.length-1) return; newWindGroup[i].visible = true; newWindGroup[i].moveTo({ "time": 4000, "position": newWindGroup[i+1].position, }); } } });


优秀的个人博客,低调大师

Unity 3D与Android Studio安卓交互之-导出jar包

u3d与安卓 jar 包交互 本文提供全流程,中文翻译。 Chinar 坚持将简单的生活方式,带给世人!(拥有更好的阅读体验 —— 高分辨率用户请根据需求调整网页缩放比例) Chinar —— 心分享、心创新!助力快速理两者 jar 包方式的交互为新手节省宝贵的时间,避免采坑! Chinar 教程效果: 1 Create Android Module —— 创建安卓库模块 2 Write Code in MainActivtity —— 在 Activity 中写代码 3 Create C# Script —— 在 Unity中创建一个C#脚本 4 Create Unity UI —— 在 Unity中创建简单的UI 5 Make Module —— 构造库模块 6 Export jar Package —— 导出 jar 包到Unity中 1. —— 切换到Project工程视图,找到我们需要的文件 2. —— 修改 classes.jar 文件导入Unity 3. —— 修改AndroidManifest.xml,并导入Unity 7 PlayerSettings —— Unity打包App之前的设置 8 Build And Run —— Unity打包App测试 9 Summarize ——总结 支持 May Be —— 搞开发,总有一天要做的事! 全文高清图片,点击即可放大观看 (很多人竟然不知道) 1 Create Android Module —— 创建安卓库模块 该过程,于新手来讲较为繁琐 另外导出 jar、arr 包创建 Module 的流程都一样 在此,为了便于新手理解 Chinar 直接提供另一个教程,专门做创建 请跳转 —— 安卓与Unity交互之-Android Studio创建Module库模块教程 2 Write Code in MainActivtity —— 在 Activity 中写代码 至此,所有的准备工作都已经做完! 我们在 Android Studio 安卓开发端,写2个 Android 端方法 然后,我们在 Unity 端写一个方法,测试通过安卓这边调用 安卓端代码如下: package kim.unity.mylibrary; import android.support.v7.app.AppCompatActivity; import android.os.Bundle; import com.unity3d.player.UnityPlayer; import com.unity3d.player.UnityPlayerActivity; public class MainActivity extends UnityPlayerActivity { @Override protected void onCreate(Bundle savedInstanceState) { super.onCreate(savedInstanceState); //setContentView(R.layout.activity_main);//注销掉这句,显示界面用的 } //测试Android Studio的A方法,等待Unity调用 //这里用中文名称当方法名,是为了便于理解。自己写,请不要用中文! public String 安卓方法A(String a,String b){return a+b;} //测试Android Studio的B方法,等待Unity调用 public int 安卓方法B(int a,int b) { 安卓端调用UnityMethodA();//调用下方方法 return a+b; } //这是安卓调用Unity端的方法 public void 安卓端调用UnityMethodA() { //UnityPlayer类中的静态方法 //UnitySendMessage向Unity发送消息, //(Unity挂载脚本的物体,具体哪个方法,传入参数“安卓端调用”) UnityPlayer.UnitySendMessage("Main Camera","UnityMethodA","安卓端调用"); } } 3 Create C# Script —— 在 Unity中创建一个C#脚本 我们在 Unity 端写一个方法,通过安卓来调用 脚本挂在、主相机 Main Camera 上 Unity端代码如下:(脚本挂在主相机上) using UnityEngine; using UnityEngine.UI; /// <summary> /// 测试类,挂载相机上 /// </summary> public class Chinar : MonoBehaviour { public Text TextUp; //上方文本框 public Text TextDown; //下方文本框 private AndroidJavaObject jo; //私有jo对象 void Start() { AndroidJavaClass jc = new AndroidJavaClass("com.unity3d.player.UnityPlayer"); //固定写法 //固定写法、获取当前对象;返回一个 AndroidJavaObject对象 //jo代表安卓当中的 当前MainActivity对象 jo = jc.GetStatic<AndroidJavaObject>("currentActivity"); string strCallA = jo.Call<string>("安卓方法A", "第一形参", "第二形参"); //用Call方法,去调用安卓端方法A TextUp.text = strCallA; //输出到文本框 int strCallB = jo.Call<int>("安卓方法B", 333, 333); //调用安卓端方法B TextUp.text += "\n" + strCallB.ToString(); //换行,输出到文本框 } /// <summary> /// 这是Unity项目中的方法A /// </summary> /// <param name="a"></param> public void UnityMethodA(string a) { TextDown.text = a; } } 4 Create Unity UI —— 在 Unity中创建简单的UI 注意: 由于通过 Android Studio 写的代码,在 Unity 中测试、调用,是会报错的 只有打包 APK ,并安装到手机上才可以测试! 我们简单的做一个 UI,创建一个 UI文本框,来测试输出 5 Make Module —— 构造库模块 回到 Android Studio ,选中我们创建的库 mylibrary 菜单栏点击 Build →→然后 Make Module 完成库模块的制作 另外,准备好我们下一步需要做的修改。 6 Export jar Package —— 导出 jar 包到Unity中 至此,准备工作全部做好! 下面,就要进入主题,开始完成 jar 包的导出到 Unity 从而与达到 Unity 交互 1. —— 切换到Project工程视图,找到我们需要的文件 注意: 切换到 Project 工程目录视图 找到我们需要的文件,然后右键 Show in Explorer 从外部打开 然后我们在外部对文件稍作修改后才能导入到 Unity 中 2. —— 修改 classes.jar 文件导入Unity 通过外部修改 Show in Explorer 切换到 Project 工程目录视图 找到我们需要的文件,然后右键 Show in Explorer 从外部打开 然后我们在外部对文件稍作修改后才能导入到 Unity 中 3. —— 修改AndroidManifest.xml,并导入Unity 工程目录视图,找打黄色的 mainifests / full / debug 同样通过 Show in Explorer 外部打开 记事本/ 或 Sublime Text 打开,修改包名 不会/想要安装 Sublime Text 的朋友请↓↓ Sublime Text 3(中文)在Windows下的配置、安装、运行 7 PlayerSettings —— Unity打包App之前的设置 注意: 更改下 PlayerSettings 中的 Package Name 需要与 AndroidManifest.xml 中的包名保持一致 8 Build And Run —— Unity打包App测试 注意: 不能 Build And Run 是由于没有安装对应的安卓 StudioUSB 驱动 步骤对于新手来讲,较为麻烦。以后我会专门写博客来讲解流程 这里修改后包名后,直接打包成 APK 包即可! 将打包的 App 包拷贝到手机中,并且安装测试 至此:安卓与 Unity 导出 jar 交互操作完美结束! 9 Summarize ——总结 提示: 其实安卓导出 jar 包与 Unity 交互的操作很简单 这里我写的比较细致,只是怕新接触的朋友,采坑出错 一步步跟着我的做,即可完美完成! 多练习 3-5次,写好方法后,导包其实十几秒都能走一遍流程! 支持 May Be —— 搞开发,总有一天要做的事! 拥有自己的服务器,无需再找攻略! Chinar 提供一站式教程,闭眼式创建!为新手节省宝贵时间,避免采坑! 先点击领取 —— 阿里全产品优惠券 (享受最低优惠) 1 —— 云服务器超全购买流程 (新手必备!) 2 —— 阿里ECS云服务器自定义配置 - 购买教程(新手必备!) 3—— Windows 服务器配置、运行、建站一条龙 ! 4 —— Linux 服务器配置、运行、建站一条龙 ! Chinar END 本博客为非营利性个人原创,除部分有明确署名的作品外,所刊登的所有作品的著作权均为本人所拥有,本人保留所有法定权利。违者必究 对于需要复制、转载、链接和传播博客文章或内容的,请及时和本博主进行联系,留言,Email: ichinar@icloud.com 对于经本博主明确授权和许可使用文章及内容的,使用时请注明文章或内容出处并注明网址

优秀的个人博客,低调大师

基于OpenGL ES 的图片翻转例子,包含双面贴图3D变换

代码不太规范,凑合着看看吧,sdk版本15,可以自己降低版本编译,反正没用什么新特性。OpenGL现在的例子很少啊,有兴趣的可以下载看看,花了我一天呐。 纹理已经处理过,一律缩放到512x512,android限制纹理高宽必须是2的N次幂,但是比例无所谓。 PS:好吧……那就把图补上 源码下载:http://www.apkbus.com/android-20283-1-1.html 代码不太规范,凑合着看看吧,sdk版本15,可以自己降低版本编译,反正没用什么新特性。OpenGL现在的例子很少啊,有兴趣的可以下载看看,花了我一天呐。 纹理已经处理过,一律缩放到512x512,android限制纹理高宽必须是2的N次幂,但是比例无所谓。 PS:好吧……那就把图补上 源码下载:http://www.apkbus.com/android-20283-1-1.html 本文转自qianqianlianmeng博客园博客,原文链接:http://www.cnblogs.com/aimeng/archive/2012/01/29/2331516.html ,如需转载请自行联系原作者

优秀的个人博客,低调大师

【读书笔记《Android游戏编程之从零开始》】5.Android 游戏开发常用的系统控件(ProgressBar、Seekbar)

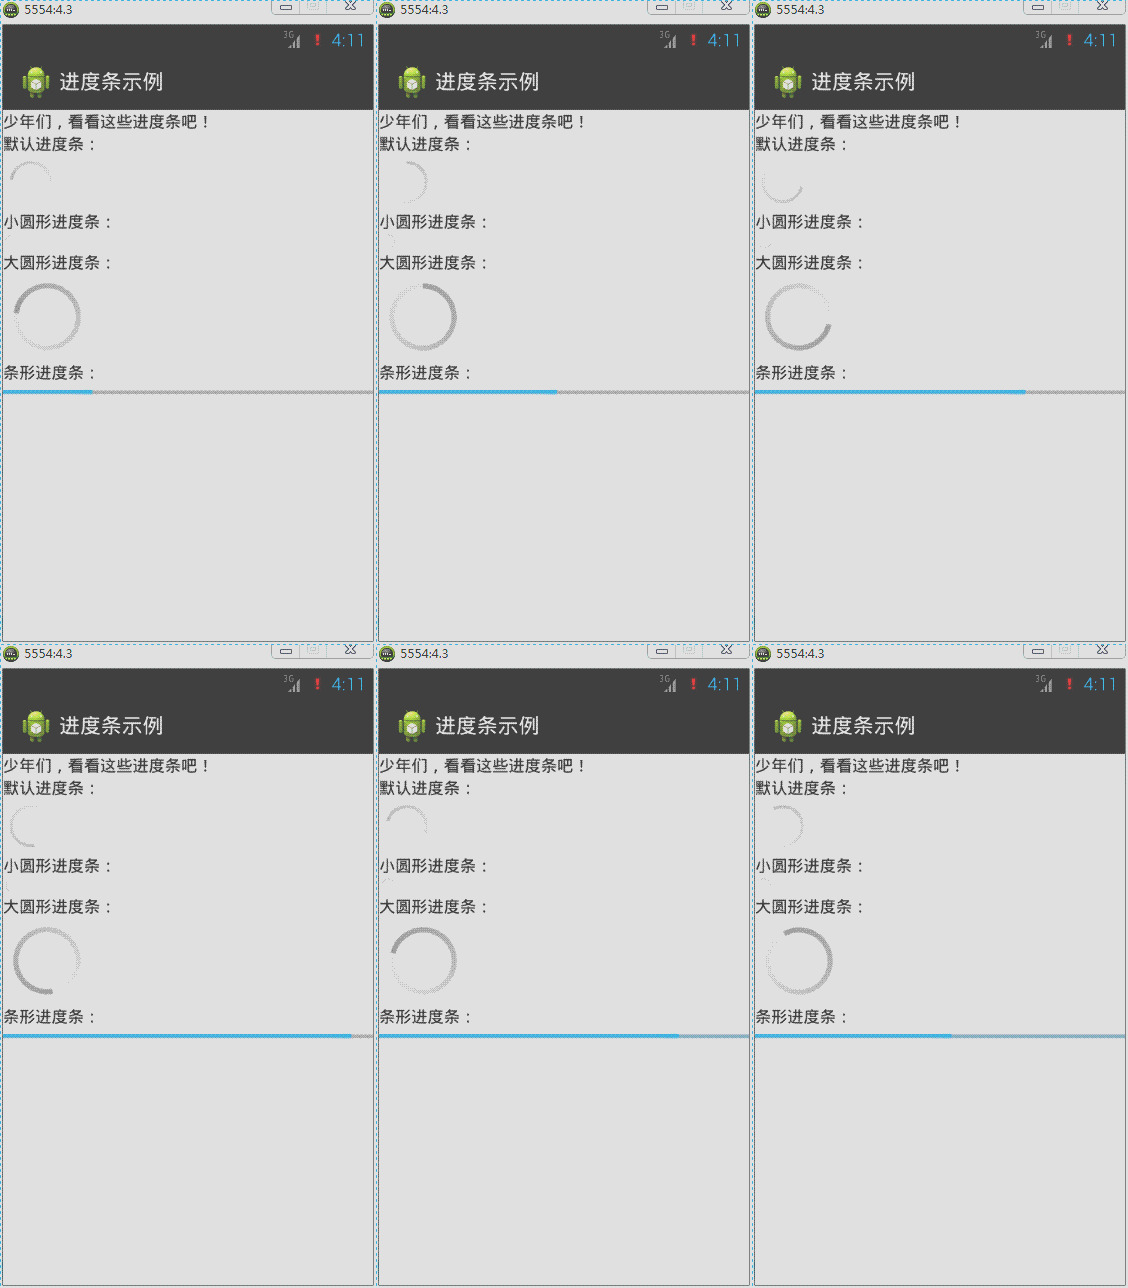
3.7 ProgressBar ProgressBar类官方文档地址:http://developer.android.com/reference/android/widget/ProgressBar.html 在Android应用开发中,ProgressBar(运行进度条)是比较常用到的组件,例如下载进度、安装程序进度、加载资源进度显示等。在Android中提供了两种样式来分别表示在不同状态下显示的进度条,下面来实现这两种样式。 默认进度条是圆形,通过style属性来指定系统进度条的大小: style="?android:attr/progressBarStyleSmall",小圆形进度条 style="?android:attr/progressBarStyleLarge",大圆形进度条 如果需要将进度条显示为长条形,那么style必须设定为这种类型: style="?android:attr/progressBarStyleHorizontal",长条形进度条 针对长条形进度条,还有几个常用属性: android:max,设置进度条最大进度值 android:progress,设置进度条出事进度值。 android:secondaryProgress,设置底层(浅色)进度值 圆形显示进度条默认是动态,但是长条进度条却是静态的,那么修改源代码MainActivity实现长条进度条为动态显示: ProgressBar类中常用函数如下所示: getProgress();获取当前进度值; setProgress();设置进度值; getSecondaryProgress();获取底层进度值 setSecondaryProgress();设置底层进度值 getMax();获取当前最大进度值 在线程循环中对进度条的最大进度值与当前进度值进行判断处理,然后不断设置进度值进而达到动态进度值越来越大,或越来越小的动态效果。 <?xml version="1.0" encoding="utf-8"?> <LinearLayout xmlns:android="http://schemas.android.com/apk/res/android" android:layout_width="match_parent" android:layout_height="match_parent" android:orientation="vertical" > <TextView android:layout_width="match_parent" android:layout_height="wrap_content" android:text="@string/txt_ProgressBar" /> <TextView android:layout_width="wrap_content" android:layout_height="wrap_content" android:text="默认进度条:" /> <ProgressBar android:id="@+id/pb1" android:layout_width="wrap_content" android:layout_height="wrap_content" /> <TextView android:layout_width="wrap_content" android:layout_height="wrap_content" android:text="小圆形进度条:" /> <ProgressBar android:id="@+id/pb2" style="?android:attr/progressBarStyleSmall" android:layout_width="wrap_content" android:layout_height="wrap_content" /> <TextView android:layout_width="wrap_content" android:layout_height="wrap_content" android:text="大圆形进度条:" /> <ProgressBar android:id="@+id/pb3" style="?android:attr/progressBarStyleLarge" android:layout_width="wrap_content" android:layout_height="wrap_content" /> <TextView android:layout_width="wrap_content" android:layout_height="wrap_content" android:text="条形进度条:" /> <ProgressBar android:id="@+id/pb4" style="?android:attr/progressBarStyleHorizontal" android:layout_width="match_parent" android:layout_height="wrap_content" android:max="100" android:progress="50" android:secondaryProgress="70" /> </LinearLayout> import android.app.Activity; import android.os.Bundle; import android.widget.ProgressBar; public class MainActivity extends Activity implements Runnable { private Thread th; // 声明一个线程 private ProgressBar pb;// 声明一个进度条对象 private Boolean stateChage = false;// 标识进度值的最大最小的状态 @Override protected void onCreate(Bundle savedInstanceState) { super.onCreate(savedInstanceState); setContentView(R.layout.activity_main); // 实例化进度条对象 pb = (ProgressBar) findViewById(R.id.pb4); th = new Thread(this);// 实例化线程对象 th.start();// 启动线程 } @Override public void run() {// 实现Runnable接口抽象函数 while (true) { int current = pb.getProgress();// 得到当前的进度值 int currentMax = pb.getMax();// 得到进度条的最大进度值 // int secCurrent = pb.getSecondaryProgress();// 得到底层当前进度值 // 一下代码实现进度值越大,越来越小的一个动态效果 if (stateChage == false) { if (current >= currentMax) { stateChage = true; } else { // 设置进度值 pb.setProgress(current + 1); // 设置底层进度值 pb.setSecondaryProgress(current + 1); } } else { if (current <= 0) { stateChage = false; } else { pb.setProgress(current - 1); } } try { Thread.sleep(50); } catch (InterruptedException e) { e.printStackTrace(); } } } } 自定义圆形进度条样式的方法:方法1:通过一张图片填充android:indeterminateDrawable 准备图片: progress_load.png 在drawable下新建image_progress_01.xml文件 <?xml version="1.0" encoding="utf-8"?> <rotate xmlns:android="http://schemas.android.com/apk/res/android" android:drawable="@drawable/progress_load" android:fromDegrees="0" android:pivotX="50%" android:pivotY="50%" android:toDegrees="360" /> 在 \value\style.xml中定义myProgressBarStyle <style name="myProgressBarStyle" > <item name="android:indeterminateDrawable">@drawable/image_progress_01</item> <item name="android:minWidth">100dip</item> <item name="android:maxWidth">100dip</item> <item name="android:minHeight">100dip</item> <item name="android:maxHeight">100dip</item> </style> 最后在ProgressBar中使用我们自己定义的style,android:indeterminateDuration="700"指定图片旋转的速度,这样我们就可以根据自己的需要来定义ProgressBar的样式。 <ProgressBar android:id="@+id/pb1" style="@style/myProgressBarStyle" android:layout_width="wrap_content" android:layout_height="wrap_content" android:indeterminateDuration="700" /> 方法2:定义一个动画来实现 准备图片:photo1.jpg、photo2.jpg、photo3.jpg、photo4.jpg、photo5.jpg 定义res/anim/image_progress.xml如下: <?xml version="1.0" encoding="utf-8"?> <animation-list xmlns:android="http://schemas.android.com/apk/res/android" android:oneshot="false"> <item android:duration="1000" android:drawable="@drawable/photo1" /> <item android:duration="1000" android:drawable="@drawable/photo2" /> <item android:duration="1000" android:drawable="@drawable/photo3" /> <item android:duration="1000" android:drawable="@drawable/photo4" /> <item android:duration="1000" android:drawable="@drawable/photo5" /> </animation-list> 在我们定义的style中引入<item name="android:indeterminateDrawable">@anim/image_progress.xml</item> <style name="myProgressBarStyle2" > <item name="android:indeterminateDrawable">@anim/image_progress</item> <item name="android:minWidth">200dip</item> <item name="android:maxWidth">200dip</item> <item name="android:minHeight">200dip</item> <item name="android:maxHeight">200dip</item> </style> 最后在ProgressBar中使用我们自己定义的style style="@style/myProgressBarStyle2" 方法3:自定义颜色来实现 定义res/drawable/image_progress_02.xml如下: <?xml version="1.0" encoding="utf-8"?> <rotate xmlns:android="http://schemas.android.com/apk/res/android" android:fromDegrees="0" android:pivotX="50%" android:pivotY="50%" android:toDegrees="360" > <shape android:innerRadiusRatio="3" android:shape="ring" android:thicknessRatio="8" android:useLevel="false" > <gradient android:centerColor="#FFFFFF" android:centerY="0.50" android:endColor="#1E90FF" android:startColor="#000000" android:type="sweep" android:useLevel="false" /> </shape> </rotate> 在我们定义的style中引入<item name="android:indeterminateDrawable">@drawable/image_progress_02</item> <style name="myProgressBarStyle3" > <item name="android:indeterminateDrawable">@drawable/image_progress_02</item> <item name="android:minWidth">100dip</item> <item name="android:maxWidth">100dip</item> <item name="android:minHeight">100dip</item> <item name="android:maxHeight">100dip</item> </style> 最后在ProgressBar中使用我们自己定义的style style="@style/myProgressBarStyle3" 自定义长条形进度条样式: 原理:在XML文件中分别定义进度条背景、第一进度颜色、第二进度颜色,然后在ProgressBar的android:progressDrawable属性应用即可。 先在drawable下建立progressbar_style.xml文件,内容如下: <?xml version="1.0" encoding="utf-8"?> <layer-list xmlns:android="http://schemas.android.com/apk/res/android" > <item android:id="@android:id/background"> <shape> <corners android:radius="5.0dip" /> <gradient android:startColor="#656666" android:endColor="#dbdedf" android:angle="270.0" android:centerY="0.75" android:centerColor="#bbbbbc" /> </shape> </item> <item android:id="@android:id/secondaryProgress"> <clip> <shape> <corners android:radius="8.0dip" /> <gradient android:startColor="#e71a5e" android:endColor="#6c213a" android:angle="90.0" android:centerY="0.75" android:centerColor="#ac6079" /> </shape> </clip> </item> <item android:id="@android:id/progress"> <clip> <shape> <corners android:radius="8.0dip" /> <gradient android:startColor="#464647" android:endColor="#2d9ae7" android:angle="270.0" /> </shape> </clip> </item> </layer-list> 分别定义背景,第一进度颜色,第二进度颜色gradient定义的是渐变,corners定义的是圆角布局中: <ProgressBar android:id="@+id/pb1" style="?android:attr/progressBarStyleHorizontal" android:layout_width="match_parent" android:layout_height="wrap_content" android:max="100" android:progress="50" android:progressDrawable="@drawable/image_progress_03" android:secondaryProgress="70" /> MainActivity.java文件: import android.app.Activity; import android.os.Bundle; import android.widget.ProgressBar; public class MainActivity extends Activity implements Runnable { private Thread th; // 声明一个线程 private ProgressBar pb;// 声明一个进度条对象 private Boolean stateChage = false;// 标识进度值的最大最小的状态 @Override protected void onCreate(Bundle savedInstanceState) { super.onCreate(savedInstanceState); setContentView(R.layout.activity_main); // 实例化进度条对象 pb = (ProgressBar) findViewById(R.id.pb1); th = new Thread(this);// 实例化线程对象 th.start();// 启动线程 } @Override public void run() {// 实现Runnable接口抽象函数 while (true) { int current = pb.getProgress();// 得到当前的进度值 int currentMax = pb.getMax();// 得到进度条的最大进度值 // int secCurrent = pb.getSecondaryProgress();// 得到底层当前进度值 // 一下代码实现进度值越大,越来越小的一个动态效果 if (stateChage == false) { if (current >= currentMax) { stateChage = true; } else { // 设置进度值 pb.setProgress(current + 1); // 设置底层进度值 pb.setSecondaryProgress(current + 1); } } else { current =0; pb.setProgress(current); stateChage = false; } try { Thread.sleep(50); } catch (InterruptedException e) { e.printStackTrace(); } } } } 3.8 Seekbar SeekBar类官方文档地址:http://developer.android.com/reference/android/widget/SeekBar.html SeekBar(拖动条)的外观类似长条进度条。Android手机上最常见到拖动条的地方就是在播放音乐的时候,当用户在拖动条上任意拖动可以调整音乐播放的时间段;调整铃声音量大小界面也是利用拖动条与用户进行交互。下面来学习如何定义和监听拖动条事件。 对拖动条进行监听的是setOnSeekBarChangeListener这个接口,这里使用的内部类实现绑定监听,然后重写接口的三个函数: onStopTrackingTouch:当用户对拖动条的拖动动作完成时触发; onStartTrackingTouch:当用户对拖动条进行拖动时触发; onProgressChanged:当拖动条的值发生改变时触发。 其实拖动条类似长条提示进度条,也拥有setMax()、setProgress()、setSecondaryProgress()这些函数。 简单示例如下: . <?xml version="1.0" encoding="utf-8"?> <LinearLayout xmlns:android="http://schemas.android.com/apk/res/android" android:layout_width="match_parent" android:layout_height="match_parent" android:orientation="vertical" > <TextView android:id="@+id/tv" android:layout_width="match_parent" android:layout_height="wrap_content" android:text="@string/txt_SeekBar" /> <SeekBar android:id="@+id/skb" android:layout_width="match_parent" android:layout_height="wrap_content" /> </LinearLayout> import android.app.Activity; import android.os.Bundle; import android.widget.SeekBar; import android.widget.SeekBar.OnSeekBarChangeListener; import android.widget.TextView; public class MainActivity extends Activity { private SeekBar skb; private TextView tv; @Override protected void onCreate(Bundle savedInstanceState) { super.onCreate(savedInstanceState); setContentView(R.layout.activity_main); skb = (SeekBar) findViewById(R.id.skb); tv = (TextView) findViewById(R.id.tv); skb.setOnSeekBarChangeListener(new OnSeekBarChangeListener() { @Override public void onStopTrackingTouch(SeekBar seekBar) { tv.setText("“拖动条”完成拖动。"); } @Override public void onStartTrackingTouch(SeekBar seekBar) { tv.setText("“拖动条”拖动中。。。"); } @Override public void onProgressChanged(SeekBar seekBar, int progress, boolean fromUser) { tv.setText("当前“拖动条”的值为" + progress); } }); } } 自定义拖动条样式: SeekBar的系统有提供一种样式如下: style="@android:style/Widget.SeekBar" 在android的源码目录\platforms\android-18\data\res\values\styles.xml下,我找到了Widget.SeekBar的代码 <style name="Widget.SeekBar"> <item name="android:indeterminateOnly">false</item> <item name="android:progressDrawable">@android:drawable/progress_horizontal</item> <item name="android:indeterminateDrawable">@android:drawable/progress_horizontal</item> <item name="android:minHeight">20dip</item> <item name="android:maxHeight">20dip</item> <item name="android:thumb">@android:drawable/seek_thumb</item> <item name="android:thumbOffset">8dip</item> <item name="android:focusable">true</item> <item name="android:mirrorForRtl">true</item> </style> 这里最重要的几个属性: <!-- 背景,进度条,次进度条的设置。 --> <item name="android:progressDrawable">@android:drawable/progress_horizontal</item> <!-- 背景,进度条,次进度条的设置【进度不确定】。 --> <item name="android:indeterminateDrawable">@android:drawable/progress_horizontal</item> <!-- 拖拽的图标。 --> <item name="android:thumb">@android:drawable/seek_thumb</item> 上面有indeterminate这个概念,是指进度不确定。这种情形下,进度会来回快闪。Seekbar默认样式是进度确定的,拖拽到具体位置就停止。图片资源progress_horizontal相当关键,它不是单一的图片。在\platforms\android-18\data\res\drawable下,有progress_horizontal.xml: <?xml version="1.0" encoding="utf-8"?> <layer-list xmlns:android="http://schemas.android.com/apk/res/android" > <item android:id="@android:id/background"> <shape> <corners android:radius="5dip" /> <gradient android:angle="270" android:centerColor="#ff5a5d5a" android:centerY="0.75" android:endColor="#ff747674" android:startColor="#ff9d9e9d" /> </shape> </item> <item android:id="@android:id/secondaryProgress"> <clip> <shape> <corners android:radius="5dip" /> <gradient android:angle="270" android:centerColor="#80ffb600" android:centerY="0.75" android:endColor="#a0ffcb00" android:startColor="#80ffd300" /> </shape> </clip> </item> <item android:id="@android:id/progress"> <clip> <shape> <corners android:radius="5dip" /> <gradient android:angle="270" android:centerColor="#ffffb600" android:centerY="0.75" android:endColor="#ffffcb00" android:startColor="#ffffd300" /> </shape> </clip> </item> </layer-list> 上面其实就是三张自定义色彩渐变的图片。我们可以依葫芦画瓢定义自己的三张图片(背景图有点淡,gif截图看不清楚,不过大家知道是那样就行了): my_seekbar.xml <?xml version="1.0" encoding="utf-8"?> <layer-list xmlns:android="http://schemas.android.com/apk/res/android" > <!-- 背景样式 --> <item android:id="@android:id/background" android:drawable="@drawable/my_seekbar_no"> </item> <!-- 次拖动条样式 --> <item android:id="@android:id/secondaryProgress"> <scale android:drawable="@drawable/my_seekbar_back" android:scaleWidth="100%" /> </item> <!-- 拖动后的样式 --> <item android:id="@android:id/progress"> <scale android:drawable="@drawable/my_seekbar_sh" android:scaleWidth="100%" /> </item> </layer-list> <style name="mySeekBar"> <item name="android:minHeight">20dip</item> <item name="android:maxHeight">20dip</item> <item name="android:progressDrawable">@drawable/my_seekbar</item> <item name="android:indeterminateDrawable">@drawable/my_seekbar</item> <item name="android:thumb">@drawable/ic_launcher</item> <item name="android:thumbOffset">8dip</item> </style> <SeekBar android:id="@+id/skb" style="@style/mySeekBar" android:layout_width="match_parent" android:layout_height="wrap_content" android:secondaryProgress="50" android:max="100" android:progress="10" /> 拖拽的小图标是由thumb属性决定的。只要搞清楚以上的东东,SeekBar做成什么样就看自己了。 本文转自叶超Luka博客园博客,原文链接:http://www.cnblogs.com/yc-755909659/p/3737975.html,如需转载请自行联系原作者

资源下载

更多资源
Mario

Mario

马里奥是站在游戏界顶峰的超人气多面角色。马里奥靠吃蘑菇成长,特征是大鼻子、头戴帽子、身穿背带裤,还留着胡子。与他的双胞胎兄弟路易基一起,长年担任任天堂的招牌角色。

腾讯云软件源

腾讯云软件源

为解决软件依赖安装时官方源访问速度慢的问题,腾讯云为一些软件搭建了缓存服务。您可以通过使用腾讯云软件源站来提升依赖包的安装速度。为了方便用户自由搭建服务架构,目前腾讯云软件源站支持公网访问和内网访问。

Sublime Text

Sublime Text

Sublime Text具有漂亮的用户界面和强大的功能,例如代码缩略图,Python的插件,代码段等。还可自定义键绑定,菜单和工具栏。Sublime Text 的主要功能包括:拼写检查,书签,完整的 Python API , Goto 功能,即时项目切换,多选择,多窗口等等。Sublime Text 是一个跨平台的编辑器,同时支持Windows、Linux、Mac OS X等操作系统。

WebStorm

WebStorm

WebStorm 是jetbrains公司旗下一款JavaScript 开发工具。目前已经被广大中国JS开发者誉为“Web前端开发神器”、“最强大的HTML5编辑器”、“最智能的JavaScript IDE”等。与IntelliJ IDEA同源,继承了IntelliJ IDEA强大的JS部分的功能。

用户登录
用户注册