前端 Vuer,为自己的项目搭建一个 Playwright 测试环境吧,给自己多一点安全感!
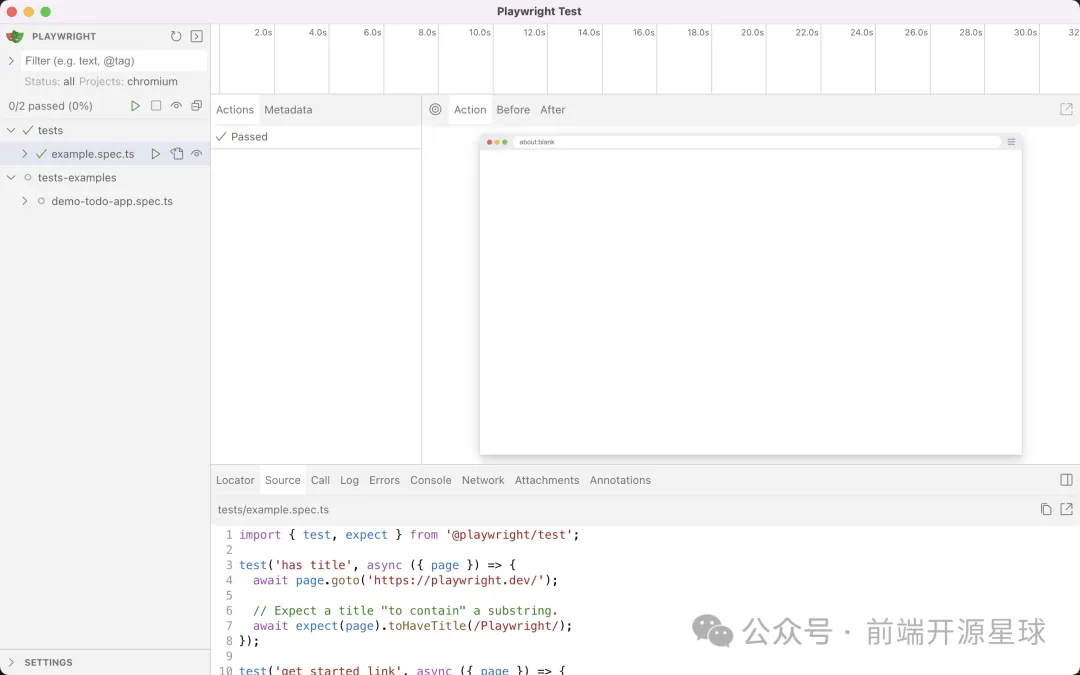
本文由体验技术团队Kagol 原创 亲爱的朋友: 你是否担心修改完一个 bug,引发了多个 bug? 是否因为担心重构代码之后,影响到现有功能,从而一直不敢对现有代码进行优化,只能不断用 if/else 叠加功能? 你是否担心增加的新特性影响到其他模块的功能,从而花大量时间反复进行手工测试,确保万无一失,却依然在上线前,胆战心惊、如履薄冰? 如果你有以上困扰,推荐大家使用一款 E2E 测试神器:Playwright,新手友好,即使是初学者也能轻松学会! Playwright 是由微软开发的一款强大的自动化测试工具,旨在为现代Web应用程序提供全面的端到端(E2E)测试解决方案。它支持主流浏览器,包括 Google Chrome、Microsoft Edge、Mozilla Firefox 和 Apple Safari,并且能够在 Windows、macOS 和 Linux 平台上运行。 除了执行测试用例,Playwright 还支持录制测试用例并生成对应的代码,能大大降低编写测试用例的成本,这也是我选择 Playwright 的重要原因之一。 接下来我就带大家一起上手 Playwright,从搭建 Playwright 测试环境,到编写测试用例,再到通过命令和 VSCode 插件执行测试,为你在自己的项目集成 Playwright 测试提供指导。 1 搭建 Playwright 测试环境 假如你已经有了一个 Vite + Vue 的项目。 在根目录执行命令:npm init playwright@latest,即可搭建 Playwright 测试环境。 而且创建了两个测试用的测试用例:tests/example.spec.ts / tests-examples/demo-todo-app.spec.ts。 $ npm init playwright@latest Getting started with writing end-to-end tests with Playwright: Initializing project in '.' ✔ Where to put your end-to-end tests? · tests ✔ Add a GitHub Actions workflow? (y/N) · true ✔ Install Playwright browsers (can be done manually via 'npx playwright install')? (Y/n) · true Installing Playwright Test (npm install --save-dev @playwright/test)... added 4 packages in 4s Installing Types (npm install --save-dev @types/node)... added 2 packages in 2s Writing playwright.config.ts. Writing .github/workflows/playwright.yml. Writing tests/example.spec.ts. Writing tests-examples/demo-todo-app.spec.ts. Writing package.json. Downloading browsers (npx playwright install)... ✔ Success! Created a Playwright Test project at /playwright-demo Inside that directory, you can run several commands: npx playwright test Runs the end-to-end tests. npx playwright test --ui Starts the interactive UI mode. npx playwright test --project=chromium Runs the tests only on Desktop Chrome. npx playwright test example Runs the tests in a specific file. npx playwright test --debug Runs the tests in debug mode. npx playwright codegen Auto generate tests with Codegen. We suggest that you begin by typing: npx playwright test And check out the following files: - ./tests/example.spec.ts - Example end-to-end test - ./tests-examples/demo-todo-app.spec.ts - Demo Todo App end-to-end tests - ./playwright.config.ts - Playwright Test configuration Visit https://playwright.dev/docs/intro for more information. ✨ Happy hacking! 🎭 初始化好 Playwright 环境,还提示我们执行命令:npx playwright test,跑一下测试用的测试用例。 并列出了一些常用命令: npx playwright test:执行全量测试用例 npx playwright test --ui:以可视化界面方式手动运行测试用例 npx playwright test --project=chromium:只在 Chrome 浏览器执行 npx playwright test example:执行部分测试用例 npx playwright test --debug:启动调试模式 npx playwright codegen:自动生成测试代码 2 命令方式执行测试用例 2.1 执行全量测试用例:npx playwright test 执行命令:npx playwright test,即可执行所有测试用例。 $ npx playwright test Running 2 tests using 2 workers 2 passed (4.0s) To open last HTML report run: npx playwright show-report 可以看到2个测试用例都已通过。 2.2 执行部分测试用例:npx playwright test tests-examples 这是执行全量测试用例,还可以执行部分用例:npx playwright test tests-examples,只执行 tests-examples 目录下的测试用例。 - tests - example.spec.ts - tests-examples - demo-todo-app.spec.ts 2.3 只在部分浏览器执行:npx playwright test --project=chromium 在 playwright.config.js 配置文件中,有一个 projects 配置项,用来配置执行的浏览器,默认会在配置的所有浏览器执行,这样速度会比较慢,可以只在部分浏览器执行,比如只在 Chrome 执行:npx playwright test --project=chromium projects: [ { name: 'chromium', use: { ...devices['Desktop Chrome'] }, }, { name: 'firefox', use: { ...devices['Desktop Firefox'] }, }, ... } 2.4 可视化方式执行:npx playwright test --ui 还可以通过可视化界面方式手动执行测试用例,执行命令:npx playwright test --ui。 执行完会弹出以下界面 左边会列出所有的测试用例,可以点击播放按钮进行执行。 2.5 查看测试报告:npx playwright show-report 也可以执行命令:npx playwright show-report,查看测试报告。 3 录制测试用例,并自动生成代码 这个功能可太有用了!必须好好安利下! 执行命令:npx playwright codegen,可启动用例录制和代码生成界面。 可以看到启动了两个界面,左边那个是用来录制用例的浏览器和界面,右边是实时生成的代码。 生成的代码是可以直接使用的,这大大降低了手动编写测试用例的成本。 只是 codegen 生成的测试用例代码是不带断言的,需要自己手动加一些断言。 import { test, expect } from '@playwright/test'; test('@mention', async ({ page }) => { await page.goto('http://localhost:5174/'); const editor = page.locator('.ql-editor') await page.locator('#editor div').click(); await page.locator('#editor div').fill('Hello @'); // 输入"@"符号之后,应该断言人名列表存在,并且有三个人名 const list = page.locator('.ql-mention-list') await expect(list).toBeVisible() await expect(await list.locator('li.ql-mention-item').count()).toBe(3) await page.locator('li').filter({ hasText: '卡哥 156粉丝' }).click(); // 选择"卡哥"之后,需要断言@的人名是正确的 const mentionId = editor.locator('[data-mention-id=kagol]') await expect(mentionId).toBeVisible() await expect((await mentionId.innerText()).trim()).toEqual('@卡哥') await page.locator('#editor div').fill('Hello @卡哥 It's time to code'); await page.getByRole('button', { name: '发布' }).click(); }); 测试代码生成的功能,对于初学者是非常友好的,几乎没有学习成本,一旦你熟悉了 Playwright 测试用例的编写语法,慢慢地你就可以摆脱这个工具,自己手写测试用例。 4 使用 VSCode 插件 在 VSCode 扩展中搜索关键字:Playwright,找到 Playwright Test for VSCode 插件,并安装。 安装完之后,VSCode 左侧会多出来一个测试的面板,可以看到当前项目所有的测试用例,点击播放按钮就可以执行测试用例,这个和 --ui 那个可视化界面有点类似。 当 VSCode 插件的功能更强一些,可以直接跳转到测试用例所在的文件。 测试用例文件左边会多出来一个播放按钮,可以直接执行当前用例。 下面还有一些配置项的设置,比如设置浏览器,还可以录制新用例。 推荐使用 Playwright 的 VSCode 插件,很实用。 更多使用方式请参考 Playwright 官网:https://playwright.dev/ 5贡献者招募:欢迎来 Fluent Editor 开源富文本练练手 Fluent Editor 是一个基于 Quill 2.0 的富文本编辑器,在 Quill 基础上扩展了丰富的模块和格式,功能强大、开箱即用。 我们正在招募志同道合的共建者🤝 目前 Fluent Editor 已经实现了基本的格式化功能,以及图片和文件上传、代码块高亮、表格、@提醒、插入表情等增强功能,并且集成了 Playwright 测试环境,还需要完善现有功能的 E2E 测试用例,这是一个很好的检验我们 Playwright 学习成果的机会,欢迎一起参与共建! 如果你想为 Fluent Editor 增加新特性,可以从以下规划的任务中进行领取: https://github.com/opentiny/fluent-editor/discussions/20 源码:https://github.com/opentiny/fluent-editor(欢迎 Star ⭐ 支持) 往期文章推荐: Fluent Editor:一个基于 Quill 2.0 的富文本编辑器,功能强大、开箱即用! 喜报!Fluent Editor 开源富文本迎来了第一位贡献者! 重回铁王座!时隔5年!Quill 2.0 终于发布啦 Monorepo:让你的项目脱胎换骨,既能代码复用,又能独立部署! 深入浅出 Quill 富文本编辑器系列专栏 6关于OpenTiny OpenTiny官网:https://opentiny.design TinyVue 源码:https://github.com/opentiny/tiny-vue (欢迎 Star ⭐) TinyEngine 源码:https://github.com/opentiny/tiny-engine (欢迎 Star ⭐) B站:https://space.bilibili.com/15284299 欢迎加入 OpenTiny 开源社区。添加微信小助手 opentiny-official 一起参与交流前端技术~ (温馨提示:OpenTiny CCF开源创新大赛也在持续报名中,欢迎大家一起报名参赛,赢取10W奖金:https://www.gitlink.org.cn/competitions/track1_openTiny )