首页 文章 精选 留言 我的

精选列表

搜索[MaaS平台],共10000篇文章
优秀的个人博客,低调大师

Windows下Hadoop eclipse开发平台搭建

Hadoop 在Windows环境下的搭建教程 搞了一个下午,在Linux和Windows下都成功了,步骤相差不大。一些小问题,google一下就能解决。但还是推荐在linux下搭建,很容易切稳定。 1.必要条件 Cygwin :我的版本是目前最新的2.774 java JDK hadoop 0.20.2 迅雷连接(有可能已经失效):thunder://QUFodHRwOi8vZGwuY3IxNzMuY29tLy9zb2Z0My9oYWRvb3AuemlwWlo= eclipse 2. java安装 具体参考百度。。。。。 3.Cygwin的安装 可以按照默认的提示安装到自己需要存放的位置,但是在安装时需要注意下面几点: Net 下的:openssh,openssl Base 下的:sed (若需要Eclipse,必须sed) Devel 下的:subversion(建议安装) 不同的版本可能有所不同,但是基本操作没有变化。。。。 CygWin的bin目录以及usr/sbin 追加到系统环境变量PATH中。 4.启动SSH服务 以管理员权限运行Cygwin,并输入 SSH-HOST-CONFIG 接下来,系统会提示以下信息 should privilege separation be used ? 回答:no if sshd should be installed as service? 回答:yes the value of CYGWIN environment variable 输入: ntsec 成功的话,会有下面的提示 Host configuration finished. Have fun! 不要高兴太早,我们还需要在Windows服务中,开启Cygwin服务。 还有活要干。。。 在Cygwin下操作: 输入ssh-keygen,回车直到完成输出 进入~/.ssh,cd ~/.ssh 复制,cp id_rsd.pub anthorized_keys 退出,exit 如果没有任何问题的话,应该是完成了。 输入ssh localhost开启SSH服务。(PS:这里我一直都是错误的,不知道为啥我重启下了电脑,好了) 5.hadoop安装 下载hadoop,解压缩到Cygwin下,修改名称为hadoop,方便使用。这里只部署在一个机器上。 需要我们首先修改一些Hadoop的配置信息(这里的端口9000和9001确保没有被占用,也可改变为其他): hadoop-env.sh core-site.xml hdfs-site.xml mapred-site.xml //打开hadoop/conf/hadoop-env.sh文件 export JAVA_HOME=/usr/lib/jvm/java //打开conf/core-site.xml文件 <?xml version="1.0"?> <?xml-stylesheet type="text/xsl" href="configuration.xsl"?> <!-- Put site-specific property overrides in this file. --> <configuration> <property> <name>fs.default.name</name> <value>hdfs://localhost:9000</value> </property> </configuration> //打开conf/mapred-site.xml文件 <?xml version="1.0"?> <?xml-stylesheet type="text/xsl" href="configuration.xsl"?> <!-- Put site-specific property overrides in this file. --> <configuration> <property> <name>mapred.job.tracker</name> <value>localhost:9001</value> </property> </configuration> //打开conf/hdfs-site.xml文件 <?xml version="1.0"?> <?xml-stylesheet type="text/xsl" href="configuration.xsl"?> <configuration> <property> <name>dfs.name.dir</name> <value>/usr/local/hadoop/datalog1,/usr/local/hadoop/datalog2</value> </property> <property> <name>dfs.data.dir</name> <value>/usr/local/hadoop/data1,/usr/local/hadoop/data2</value> </property> <property> <name>dfs.replication</name> <value>1</value> </property> </configuration> 可以启动hadoop了,激动~~ 1.创建Logs日志目录 mkdir logs 2.格式化namenode,创建HDFS(这要进入hadoop文件夹内操作) bin/hadoop namenode -format 3.启动hadoop bin/start-all.sh 4.执行JPS 完成启动~~~~~~~~~~~~~~~~~~~~~~~~~~~~~~~~~~~~~~~~~~~~~~~~ 输入网址:http://localhost:50030 6.配置eclipse Hadoop自带eclipse插件,在hadoop\contrib\eclipse-plugin中。 具体配置步骤如下: hadoop-0.20.2-eclipse-plugin.jar放入eclipse的插件文件夹中,开启eclipse。 window->Preference->Hadoop Map/Reduce,输入hadoop文件夹位置。 window->Show View,选择Map/Reduce Locations。 点击屏幕右下方新建一个Location. 编辑Location.(注意MAP/REDUCE和DFS的Port分别对应mapred-site.xml和core-site.xml),高级的我设置了Hadoop.tmp.dir 这时,打开Project Explore,刷新。 接下来,你可以new一个MapReduce程序了,找到hadoop的例子试试去吧。 对了,编译这里要配置一下。 选择Run Configurations->Java Application->Arguments,这里要填入为两个文件,分别为输入文件和输出文件。 主要参考:http://blog.csdn.net/johnnywww/article/details/7378284 http://blog.csdn.net/ruby97/article/details/7423088 本文由cococo点点创作,采用知识共享 署名-非商业性使用-相同方式共享 3.0 中国大陆 许可协议进行许可。欢迎转载,请注明出处: 转载自:cococo点点http://www.cnblogs.com/coder2012

优秀的个人博客,低调大师

高可用Hadoop平台-应用JAR部署

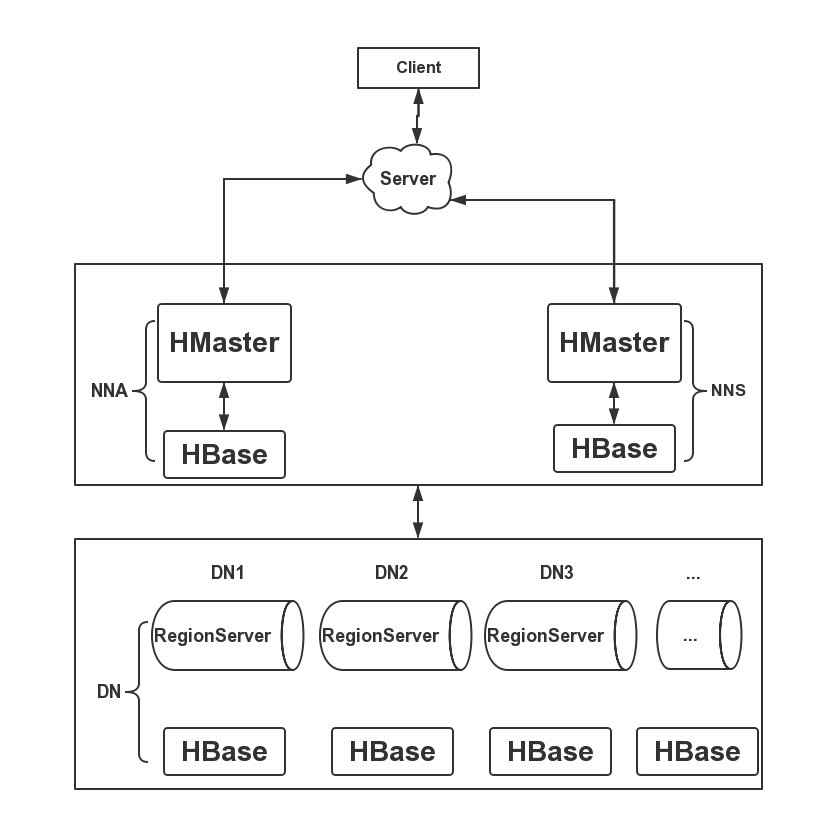
1.概述 今天在观察集群时,发现NN节点的负载过高,虽然对NN节点的资源进行了调整,同时对NN节点上的应用程序进行重新打包调整,负载问题暂时得到缓解。但是,我想了想,这样也不是长久之计。通过这个问题,我重新分析了一下以前应用部署架构图,发现了一些问题的所在,之前的部署架构是,将打包的应用直接部署在Hadoop集群上,虽然这没什么不好,但是我们分析得知,若是将应用部署在DN节点,那么时间长了应用程序会不会抢占DN节点的资源,那么如果我们部署在NN节点上,又对NN节点计算任务时造成影响,于是,经过讨论后,我们觉得应用程序不应该对Hadoop集群造成干扰,他们应该是属于一种松耦合的关系,所有的应用应该部署在一个AppServer集群上。下面,我就为大家介绍今天的内容。 2.应用部署剖析 由于之前的应用程序直接部署在Hadoop集群上,这堆集群或多或少造成了一些影响。我们知道在本地开发Hadoop应用的时候,都可以直接运行相关Hadoop代码,这里我们只用到了Hadoop的HDFS的地址,那我们为什么不能直接将应用单独部署呢?其实本地开发就可以看作是AppServer集群的一个节点,借助这个思路,我们将应用单独打包后,部署在一个独立的AppServer集群,只需要用到Hadoop集群的HDFS地址即可,这里需要注意的是,保证AppServer集群与Hadoop集群在同一个网段。下面我给出解耦后应用部署架构图,如下图所示: 从图中我们可以看出,AppServer集群想Hadoop集群提交作业,两者之间的数据交互,只需用到Hadoop的HDFS地址和Java API。在AppServer上的应用不会影响到Hadoop集群的正常运行。 3.示例 下面为大家演示相关示例,以WordCountV2为例子,代码如下所示: package cn.hadoop.hdfs.main; import java.io.IOException; import java.util.Random; import java.util.StringTokenizer; import org.apache.hadoop.conf.Configuration; import org.apache.hadoop.fs.Path; import org.apache.hadoop.io.IntWritable; import org.apache.hadoop.io.Text; import org.apache.hadoop.mapreduce.Job; import org.apache.hadoop.mapreduce.Mapper; import org.apache.hadoop.mapreduce.Reducer; import org.apache.hadoop.mapreduce.lib.input.FileInputFormat; import org.apache.hadoop.mapreduce.lib.output.FileOutputFormat; import org.slf4j.Logger; import org.slf4j.LoggerFactory; import cn.hadoop.hdfs.util.SystemConfig; /** * @Date Apr 23, 2015 * * @Author dengjie * * @Note Wordcount的例子是一个比较经典的mapreduce例子,可以叫做Hadoop版的hello world。 * 它将文件中的单词分割取出,然后shuffle,sort(map过程),接着进入到汇总统计 * (reduce过程),最后写道hdfs中。基本流程就是这样。 */ public class WordCountV2 { private static Logger logger = LoggerFactory.getLogger(WordCountV2.class); private static Configuration conf; /** * 设置高可用集群连接信息 */ static { String tag = SystemConfig.getProperty("dev.tag"); String[] hosts = SystemConfig.getPropertyArray(tag + ".hdfs.host", ","); conf = new Configuration(); conf.set("fs.defaultFS", "hdfs://cluster1"); conf.set("dfs.nameservices", "cluster1"); conf.set("dfs.ha.namenodes.cluster1", "nna,nns"); conf.set("dfs.namenode.rpc-address.cluster1.nna", hosts[0]); conf.set("dfs.namenode.rpc-address.cluster1.nns", hosts[1]); conf.set("dfs.client.failover.proxy.provider.cluster1", "org.apache.hadoop.hdfs.server.namenode.ha.ConfiguredFailoverProxyProvider"); } public static class TokenizerMapper extends Mapper<Object, Text, Text, IntWritable> { private final static IntWritable one = new IntWritable(1); private Text word = new Text(); /** * 源文件:a b b * * map之后: * * a 1 * * b 1 * * b 1 */ public void map(Object key, Text value, Context context) throws IOException, InterruptedException { StringTokenizer itr = new StringTokenizer(value.toString());// 整行读取 while (itr.hasMoreTokens()) { word.set(itr.nextToken());// 按空格分割单词 context.write(word, one);// 每次统计出来的单词+1 } } } /** * reduce之前: * * a 1 * * b 1 * * b 1 * * reduce之后: * * a 1 * * b 2 */ public static class IntSumReducer extends Reducer<Text, IntWritable, Text, IntWritable> { private IntWritable result = new IntWritable(); public void reduce(Text key, Iterable<IntWritable> values, Context context) throws IOException, InterruptedException { int sum = 0; for (IntWritable val : values) { sum += val.get();// 分组累加 } result.set(sum); context.write(key, result);// 按相同的key输出 } } public static void main(String[] args) { try { if (args.length < 1) { logger.info("args length is 0"); run("hello.txt"); } else { logger.info("args length is not 0"); run(args[0]); } } catch (Exception ex) { ex.printStackTrace(); logger.error(ex.getMessage()); } } private static void run(String name) throws Exception { long randName = new Random().nextLong();// 重定向输出目录 logger.info("output name is [" + randName + "]"); Job job = Job.getInstance(conf); job.setJarByClass(WordCountV2.class); job.setMapperClass(TokenizerMapper.class);// 指定Map计算的类 job.setCombinerClass(IntSumReducer.class);// 合并的类 job.setReducerClass(IntSumReducer.class);// Reduce的类 job.setOutputKeyClass(Text.class);// 输出Key类型 job.setOutputValueClass(IntWritable.class);// 输出值类型 String sysInPath = SystemConfig.getProperty("hdfs.input.path.v2"); String realInPath = String.format(sysInPath, name); String syOutPath = SystemConfig.getProperty("hdfs.output.path.v2"); String realOutPath = String.format(syOutPath, randName); FileInputFormat.addInputPath(job, new Path(realInPath));// 指定输入路径 FileOutputFormat.setOutputPath(job, new Path(realOutPath));// 指定输出路径 System.exit(job.waitForCompletion(true) ? 0 : 1);// 执行完MR任务后退出应用 } } 在本地IDE中运行正常,截图如下所示: 4.应用打包部署 然后,我们将WordCountV2应用打包后部署到AppServer1节点,这里由于工程是基于Maven结构的,我们使用Maven命令直接打包,打包命令如下所示: mvn assembly:assembly 然后,我们使用scp命令将打包后的JAR文件上传到AppServer1节点,上传命令如下所示: scp hadoop-ubas-1.0.0-jar-with-dependencies.jar hadoop@apps:~/ 接着,我们在AppServer1节点上运行我们打包好的应用,运行命令如下所示: java -jar hadoop-ubas-1.0.0-jar-with-dependencies.jar 但是,这里却很无奈的报错了,错误信息如下所示: java.io.IOException: No FileSystem for scheme: hdfs at org.apache.hadoop.fs.FileSystem.getFileSystemClass(FileSystem.java:2584) at org.apache.hadoop.fs.FileSystem.createFileSystem(FileSystem.java:2591) at org.apache.hadoop.fs.FileSystem.access$200(FileSystem.java:91) at org.apache.hadoop.fs.FileSystem$Cache.getInternal(FileSystem.java:2630) at org.apache.hadoop.fs.FileSystem$Cache.get(FileSystem.java:2612) at org.apache.hadoop.fs.FileSystem.get(FileSystem.java:370) at org.apache.hadoop.fs.FileSystem.get(FileSystem.java:169) at org.apache.hadoop.fs.FileSystem.get(FileSystem.java:354) at org.apache.hadoop.fs.Path.getFileSystem(Path.java:296) at org.apache.hadoop.mapreduce.lib.input.FileInputFormat.addInputPath(FileInputFormat.java:518) at cn.hadoop.hdfs.main.WordCountV2.run(WordCountV2.java:134) at cn.hadoop.hdfs.main.WordCountV2.main(WordCountV2.java:108) 2015-05-10 23:31:21 ERROR [WordCountV2.main] - No FileSystem for scheme: hdfs 5.错误分析 首先,我们来定位下问题原因,我将打包后的JAR在Hadoop集群上运行,是可以完成良好的运行,并计算出结果信息的,为什么在非Hadoop集群却报错呢?难道是这种架构方式不对?经过仔细的分析错误信息,和我们的Maven依赖环境,问题原因定位出来了,这里我们使用了Maven的assembly插件来打包应用。只是因为当我们使用Maven组件时,它将所有的JARS合并到一个文件中,所有的META-INFO/services/org.apache.hadoop.fs.FileSystem被互相覆盖,仅保留最后一个加入的,在这种情况下FileSystem的列表从Hadoop-Commons重写到Hadoop-HDFS的列表,而DistributedFileSystem就会找不到相应的声明信息。因而,就会出现上述错误信息。在原因找到后,我们剩下的就是去找到解决方法,这里通过分析,我找到的解决办法如下,在Loading相关Hadoop的Configuration时,我们设置相关FileSystem即可,配置代码如下所示: conf.set("fs.hdfs.impl", org.apache.hadoop.hdfs.DistributedFileSystem.class.getName()); conf.set("fs.file.impl", org.apache.hadoop.fs.LocalFileSystem.class.getName()); 接下来,我们重新打包应用,然后在AppServer1节点运行该应用,运行正常,并正常统计结果,运行日志如下所示: [hadoop@apps example]$ java -jar hadoop-ubas-1.0.0-jar-with-dependencies.jar 2015-05-11 00:08:15 INFO [SystemConfig.main] - Successfully loaded default properties. 2015-05-11 00:08:15 INFO [WordCountV2.main] - args length is 0 2015-05-11 00:08:15 INFO [WordCountV2.main] - output name is [6876390710620561863] 2015-05-11 00:08:16 WARN [NativeCodeLoader.main] - Unable to load native-hadoop library for your platform... using builtin-java classes where applicable 2015-05-11 00:08:17 INFO [deprecation.main] - session.id is deprecated. Instead, use dfs.metrics.session-id 2015-05-11 00:08:17 INFO [JvmMetrics.main] - Initializing JVM Metrics with processName=JobTracker, sessionId= 2015-05-11 00:08:17 WARN [JobSubmitter.main] - Hadoop command-line option parsing not performed. Implement the Tool interface and execute your application with ToolRunner to remedy this. 2015-05-11 00:08:17 INFO [FileInputFormat.main] - Total input paths to process : 1 2015-05-11 00:08:18 INFO [JobSubmitter.main] - number of splits:1 2015-05-11 00:08:18 INFO [JobSubmitter.main] - Submitting tokens for job: job_local519626586_0001 2015-05-11 00:08:18 INFO [Job.main] - The url to track the job: http://localhost:8080/ 2015-05-11 00:08:18 INFO [Job.main] - Running job: job_local519626586_0001 2015-05-11 00:08:18 INFO [LocalJobRunner.Thread-14] - OutputCommitter set in config null 2015-05-11 00:08:18 INFO [LocalJobRunner.Thread-14] - OutputCommitter is org.apache.hadoop.mapreduce.lib.output.FileOutputCommitter 2015-05-11 00:08:18 INFO [LocalJobRunner.Thread-14] - Waiting for map tasks 2015-05-11 00:08:18 INFO [LocalJobRunner.LocalJobRunner Map Task Executor #0] - Starting task: attempt_local519626586_0001_m_000000_0 2015-05-11 00:08:18 INFO [Task.LocalJobRunner Map Task Executor #0] - Using ResourceCalculatorProcessTree : [ ] 2015-05-11 00:08:18 INFO [MapTask.LocalJobRunner Map Task Executor #0] - Processing split: hdfs://cluster1/home/hdfs/test/in/hello.txt:0+24 2015-05-11 00:08:19 INFO [MapTask.LocalJobRunner Map Task Executor #0] - (EQUATOR) 0 kvi 26214396(104857584) 2015-05-11 00:08:19 INFO [MapTask.LocalJobRunner Map Task Executor #0] - mapreduce.task.io.sort.mb: 100 2015-05-11 00:08:19 INFO [MapTask.LocalJobRunner Map Task Executor #0] - soft limit at 83886080 2015-05-11 00:08:19 INFO [MapTask.LocalJobRunner Map Task Executor #0] - bufstart = 0; bufvoid = 104857600 2015-05-11 00:08:19 INFO [MapTask.LocalJobRunner Map Task Executor #0] - kvstart = 26214396; length = 6553600 2015-05-11 00:08:19 INFO [MapTask.LocalJobRunner Map Task Executor #0] - Map output collector class = org.apache.hadoop.mapred.MapTask$MapOutputBuffer 2015-05-11 00:08:19 INFO [LocalJobRunner.LocalJobRunner Map Task Executor #0] - 2015-05-11 00:08:19 INFO [MapTask.LocalJobRunner Map Task Executor #0] - Starting flush of map output 2015-05-11 00:08:19 INFO [MapTask.LocalJobRunner Map Task Executor #0] - Spilling map output 2015-05-11 00:08:19 INFO [MapTask.LocalJobRunner Map Task Executor #0] - bufstart = 0; bufend = 72; bufvoid = 104857600 2015-05-11 00:08:19 INFO [MapTask.LocalJobRunner Map Task Executor #0] - kvstart = 26214396(104857584); kvend = 26214352(104857408); length = 45/6553600 2015-05-11 00:08:19 INFO [MapTask.LocalJobRunner Map Task Executor #0] - Finished spill 0 2015-05-11 00:08:19 INFO [Task.LocalJobRunner Map Task Executor #0] - Task:attempt_local519626586_0001_m_000000_0 is done. And is in the process of committing 2015-05-11 00:08:19 INFO [LocalJobRunner.LocalJobRunner Map Task Executor #0] - map 2015-05-11 00:08:19 INFO [Task.LocalJobRunner Map Task Executor #0] - Task 'attempt_local519626586_0001_m_000000_0' done. 2015-05-11 00:08:19 INFO [LocalJobRunner.LocalJobRunner Map Task Executor #0] - Finishing task: attempt_local519626586_0001_m_000000_0 2015-05-11 00:08:19 INFO [LocalJobRunner.Thread-14] - map task executor complete. 2015-05-11 00:08:19 INFO [LocalJobRunner.Thread-14] - Waiting for reduce tasks 2015-05-11 00:08:19 INFO [LocalJobRunner.pool-6-thread-1] - Starting task: attempt_local519626586_0001_r_000000_0 2015-05-11 00:08:19 INFO [Task.pool-6-thread-1] - Using ResourceCalculatorProcessTree : [ ] 2015-05-11 00:08:19 INFO [ReduceTask.pool-6-thread-1] - Using ShuffleConsumerPlugin: org.apache.hadoop.mapreduce.task.reduce.Shuffle@16769723 2015-05-11 00:08:19 INFO [MergeManagerImpl.pool-6-thread-1] - MergerManager: memoryLimit=177399392, maxSingleShuffleLimit=44349848, mergeThreshold=117083600, ioSortFactor=10, memToMemMergeOutputsThreshold=10 2015-05-11 00:08:19 INFO [EventFetcher.EventFetcher for fetching Map Completion Events] - attempt_local519626586_0001_r_000000_0 Thread started: EventFetcher for fetching Map Completion Events 2015-05-11 00:08:19 INFO [LocalFetcher.localfetcher#1] - localfetcher#1 about to shuffle output of map attempt_local519626586_0001_m_000000_0 decomp: 50 len: 54 to MEMORY 2015-05-11 00:08:19 INFO [InMemoryMapOutput.localfetcher#1] - Read 50 bytes from map-output for attempt_local519626586_0001_m_000000_0 2015-05-11 00:08:19 INFO [MergeManagerImpl.localfetcher#1] - closeInMemoryFile -> map-output of size: 50, inMemoryMapOutputs.size() -> 1, commitMemory -> 0, usedMemory ->50 2015-05-11 00:08:19 INFO [EventFetcher.EventFetcher for fetching Map Completion Events] - EventFetcher is interrupted.. Returning 2015-05-11 00:08:19 INFO [LocalJobRunner.pool-6-thread-1] - 1 / 1 copied. 2015-05-11 00:08:19 INFO [MergeManagerImpl.pool-6-thread-1] - finalMerge called with 1 in-memory map-outputs and 0 on-disk map-outputs 2015-05-11 00:08:19 INFO [Merger.pool-6-thread-1] - Merging 1 sorted segments 2015-05-11 00:08:19 INFO [Merger.pool-6-thread-1] - Down to the last merge-pass, with 1 segments left of total size: 46 bytes 2015-05-11 00:08:19 INFO [MergeManagerImpl.pool-6-thread-1] - Merged 1 segments, 50 bytes to disk to satisfy reduce memory limit 2015-05-11 00:08:19 INFO [MergeManagerImpl.pool-6-thread-1] - Merging 1 files, 54 bytes from disk 2015-05-11 00:08:19 INFO [MergeManagerImpl.pool-6-thread-1] - Merging 0 segments, 0 bytes from memory into reduce 2015-05-11 00:08:19 INFO [Merger.pool-6-thread-1] - Merging 1 sorted segments 2015-05-11 00:08:19 INFO [Merger.pool-6-thread-1] - Down to the last merge-pass, with 1 segments left of total size: 46 bytes 2015-05-11 00:08:19 INFO [LocalJobRunner.pool-6-thread-1] - 1 / 1 copied. 2015-05-11 00:08:19 INFO [deprecation.pool-6-thread-1] - mapred.skip.on is deprecated. Instead, use mapreduce.job.skiprecords 2015-05-11 00:08:19 INFO [Job.main] - Job job_local519626586_0001 running in uber mode : false 2015-05-11 00:08:19 INFO [Job.main] - map 100% reduce 0% 2015-05-11 00:08:19 INFO [Task.pool-6-thread-1] - Task:attempt_local519626586_0001_r_000000_0 is done. And is in the process of committing 2015-05-11 00:08:19 INFO [LocalJobRunner.pool-6-thread-1] - 1 / 1 copied. 2015-05-11 00:08:19 INFO [Task.pool-6-thread-1] - Task attempt_local519626586_0001_r_000000_0 is allowed to commit now 2015-05-11 00:08:19 INFO [FileOutputCommitter.pool-6-thread-1] - Saved output of task 'attempt_local519626586_0001_r_000000_0' to hdfs://cluster1/home/hdfs/test/out/6876390710620561863/_temporary/0/task_local519626586_0001_r_000000 2015-05-11 00:08:19 INFO [LocalJobRunner.pool-6-thread-1] - reduce > reduce 2015-05-11 00:08:19 INFO [Task.pool-6-thread-1] - Task 'attempt_local519626586_0001_r_000000_0' done. 2015-05-11 00:08:19 INFO [LocalJobRunner.pool-6-thread-1] - Finishing task: attempt_local519626586_0001_r_000000_0 2015-05-11 00:08:19 INFO [LocalJobRunner.Thread-14] - reduce task executor complete. 2015-05-11 00:08:20 INFO [Job.main] - map 100% reduce 100% 2015-05-11 00:08:20 INFO [Job.main] - Job job_local519626586_0001 completed successfully 2015-05-11 00:08:20 INFO [Job.main] - Counters: 38 File System Counters FILE: Number of bytes read=77813788 FILE: Number of bytes written=78928898 FILE: Number of read operations=0 FILE: Number of large read operations=0 FILE: Number of write operations=0 HDFS: Number of bytes read=48 HDFS: Number of bytes written=24 HDFS: Number of read operations=13 HDFS: Number of large read operations=0 HDFS: Number of write operations=4 Map-Reduce Framework Map input records=2 Map output records=12 Map output bytes=72 Map output materialized bytes=54 Input split bytes=108 Combine input records=12 Combine output records=6 Reduce input groups=6 Reduce shuffle bytes=54 Reduce input records=6 Reduce output records=6 Spilled Records=12 Shuffled Maps =1 Failed Shuffles=0 Merged Map outputs=1 GC time elapsed (ms)=53 CPU time spent (ms)=0 Physical memory (bytes) snapshot=0 Virtual memory (bytes) snapshot=0 Total committed heap usage (bytes)=241442816 Shuffle Errors BAD_ID=0 CONNECTION=0 IO_ERROR=0 WRONG_LENGTH=0 WRONG_MAP=0 WRONG_REDUCE=0 File Input Format Counters Bytes Read=24 File Output Format Counters Bytes Written=24 6.总结 这里需要注意的是,我们应用部署架构没问题,思路是正确的,问题出在打包上,在打包的时候需要特别注意,另外,有些同学使用IDE的Export导出时也要注意一下,相关依赖是否存在,还有常见的第三方打包工具Fat,这个也是需要注意的。 7.结束语 这篇博客就和大家分享到这里,如果大家在研究学习的过程当中有什么问题,可以加群进行讨论或发送邮件给我,我会尽我所能为您解答,与君共勉!

优秀的个人博客,低调大师

高可用Hadoop平台-Ganglia安装部署

1.概述 最近,有朋友私密我,Hadoop有什么好的监控工具,其实,Hadoop的监控工具还是蛮多的。今天给大家分享一个老牌监控工具Ganglia,这个在企业用的也算是比较多的,Hadoop对它的兼容也很好,不过就是监控界面就不是很美观。下次给大家介绍另一款工具——Hue,这个界面官方称为Hadoop UI,界面美观,功能也比较丰富。今天,在这里主要给大家介绍Ganglia这款监控工具,介绍的内容主要包含如下: Ganglia背景 Ganglia安装部署、配置 Hadoop集群配置Ganglia 启动、预览Ganglia 下面开始今天的内容分享。 2.Ganglia背景 Ganglia是UC Berkeley发起的一个开源集群监视项目,设计用于测量数以千计的节点。Ganglia的核心包含gmond、gmetad以及一个Web前端。主要是用来监控系统性能,如:cpu 、mem、硬盘利用率, I/O负载、网络流量情况等,通过曲线很容易见到每个节点的工作状态,对合理调整、分配系统资源,提高系统整体性能起到重要作用。 Ganglia其核心由3部分组成: gmond:运行在每个节点上监视并收集节点信息,可以同时收发统计信息,它可以运行在广播模式和单播模式中。 gmetad:从gmond以poll的方式收集和存储原数据。 ganglia-web:部署在gmetad机器上,访问gmetad存储的元数据并由Apache Web提高用户访问接口。 下面,我们来看看Ganglia的架构图,如下图所示: 从架构图中,我们可以知道Ganglia支持故障转移,统计可以配置多个收集节点。所以我们在配置的时候,可以按需选择去配置Ganglia,既可以配置广播,也可以配置单播。根据实际需求和手上资源来决定。 3.Ganglia安装部署、配置 3.1安装 本次安装的Ganglia工具是基于Apache的Hadoop-2.6.0。另外系统环境是CentOS 6.6。首先,我们下载Ganglia软件包,步骤如下所示: 第一步:安装yum epel源 [hadoop@nna ~]$ rpm -Uvh http://dl.fedoraproject.org/pub/epel/6/i386/epel-release-6-8.noarch.rpm 第二步:安装依赖包 [hadoop@nna ~]$ yum -y install httpd-devel automake autoconf libtool ncurses-devel libxslt groff pcre-devel pkgconfig 第三步:查看Ganglia安装包 [hadoop@nna ~]$ yum search ganglia 然后,我为了简便,把Ganglia安装全部安装,安装命令如下所示: 第四步:安装Ganglia [hadoop@nna ~]$ yum -y install ganglia* 最后等待安装完成,由于这里资源有限,我将Ganglia Web也安装在NNA节点上,另外,其他节点也需要安装Ganglia的Gmond服务,该服务用来发送数据到Gmetad,安装方式参考上面的步骤。 3.2部署 在安装Ganglia时,我这里将Ganglia Web部署在NNA节点,其他节点部署Gmond服务,下表为各个节点的部署角色: 节点 Host 角色 NNA 10.211.55.26 Gmetad、Gmond、Ganglia-Web NNS 10.211.55.27 Gmond DN1 10.211.55.16 Gmond DN2 10.211.55.17 Gmond DN3 10.211.55.18 Gmond Ganglia部署在Hadoop集群的分布图,如下所示: 3.3配置 在安装好Ganglia后,我们需要对Ganglia工具进行配置,在由Ganglia-Web服务的节点上,我们需要配置Web服务。 ganglia.conf [hadoop@nna ~]$ vi /etc/httpd/conf.d/ganglia.conf 修改内容如下所示: # # Ganglia monitoring system php web frontend # Alias /ganglia /usr/share/ganglia <Location /ganglia> Order deny,allow # Deny from all Allow from all # Allow from 127.0.0.1 # Allow from ::1 # Allow from .example.com </Location> 注:红色为添加的内容,绿色为注销的内容。 gmetad.conf [hadoop@nna ~]$ vi /etc/ganglia/gmetad.conf 修改内容如下所示: data_source "hadoop" nna nns dn1 dn2 dn3 这里“hadoop”表示集群名,nna nns dn1 dn2 dn3表示节点域名或IP。 gmond.conf [hadoop@nna ~]$ vi /etc/ganglia/gmond.conf 修改内容如下所示: /* * The cluster attributes specified will be used as part of the <CLUSTER> * tag that will wrap all hosts collected by this instance. */ cluster { name = "hadoop" owner = "unspecified" latlong = "unspecified" url = "unspecified" } /* Feel free to specify as many udp_send_channels as you like. Gmond used to only support having a single channel */ udp_send_channel { #bind_hostname = yes # Highly recommended, soon to be default. # This option tells gmond to use a source address # that resolves to the machine's hostname. Without # this, the metrics may appear to come from any # interface and the DNS names associated with # those IPs will be used to create the RRDs. # mcast_join = 239.2.11.71 host = 10.211.55.26 port = 8649 ttl = 1 } /* You can specify as many udp_recv_channels as you like as well. */ udp_recv_channel { # mcast_join = 239.2.11.71 port = 8649 bind = 10.211.55.26 retry_bind = true # Size of the UDP buffer. If you are handling lots of metrics you really # should bump it up to e.g. 10MB or even higher. # buffer = 10485760 } 这里我采用的是单播,cluster下的name要与gmetad中的data_source配置的名称一致,发送节点地址配置为NNA的IP,接受节点配置在NNA上,所以绑定的IP是NNA节点的IP。以上配置是在有Gmetad服务和Ganglia-Web服务的节点上需要配置,在其他节点只需要配置gmond.conf文件即可,内容配置如下所示: /* Feel free to specify as many udp_send_channels as you like. Gmond used to only support having a single channel */ udp_send_channel { #bind_hostname = yes # Highly recommended, soon to be default. # This option tells gmond to use a source address # that resolves to the machine's hostname. Without # this, the metrics may appear to come from any # interface and the DNS names associated with # those IPs will be used to create the RRDs. # mcast_join = 239.2.11.71 host = 10.211.55.26 port = 8649 ttl = 1 } /* You can specify as many udp_recv_channels as you like as well. */ udp_recv_channel { # mcast_join = 239.2.11.71 port = 8649 # bind = 10.211.55.26 retry_bind = true # Size of the UDP buffer. If you are handling lots of metrics you really # should bump it up to e.g. 10MB or even higher. # buffer = 10485760 } 4.Hadoop集群配置Ganglia 在Hadoop中,对Ganglia的兼容是很好的,在Hadoop的目录下/hadoop-2.6.0/etc/hadoop,我们可以找到hadoop-metrics2.properties文件,这里我们修改文件内容如下所示,命令如下所示: [hadoop@nna hadoop]$ vi hadoop-metrics2.properties 修改内容如下所示: namenode.sink.ganglia.servers=nna:8649 #datanode.sink.ganglia.servers=yourgangliahost_1:8649,yourgangliahost_2:8649 resourcemanager.sink.ganglia.servers=nna:8649 #nodemanager.sink.ganglia.servers=yourgangliahost_1:8649,yourgangliahost_2:8649 mrappmaster.sink.ganglia.servers=nna:8649 jobhistoryserver.sink.ganglia.servers=nna:8649 这里修改的是NameNode节点的内容,若是修改DataNode节点信息,内容如下所示: #namenode.sink.ganglia.servers=nna:8649 datanode.sink.ganglia.servers=dn1:8649 #resourcemanager.sink.ganglia.servers=nna:8649 nodemanager.sink.ganglia.servers=dn1:8649 #mrappmaster.sink.ganglia.servers=nna:8649 #jobhistoryserver.sink.ganglia.servers=nna:8649 其他DN节点可以以此作为参考来进行修改。 另外,在配置完成后,若之前Hadoop集群是运行的,这里需要重启集群服务。 5.启动、预览Ganglia Ganglia的启动命令有start、restart以及stop,这里我们分别在各个节点启动相应的服务,各个节点需要启动的服务如下: NNA节点: [hadoop@nna ~]$ service gmetad start [hadoop@nna ~]$ service gmond start [hadoop@nna ~]$ service httpd start NNS节点: [hadoop@nns ~]$ service gmond start DN1节点: [hadoop@dn1 ~]$ service gmond start DN2节点: [hadoop@dn2 ~]$ service gmond start DN3节点: [hadoop@dn3 ~]$ service gmond start 然后,到这里Ganglia的相关服务就启动完毕了,下面给大家附上Ganglia监控的运行截图,如下所示: 6.总结 在安装Hadoop监控工具Ganglia时,需要在安装的时候注意一些问题,比如:系统环境的依赖,由于Ganglia需要依赖一些安装包,在安装之前把依赖环境准备好,另外在配置Ganglia的时候需要格外注意,理解Ganglia的架构很重要,这有助于我们在Hadoop集群上去部署相关的Ganglia服务,同时,在配置Hadoop安装包的配置文件下(/etc/hadoop)目录下,配置Ganglia配置文件。将hadoop-metrics2.properties配置文件集成到Hadoop集群中去。 7.结束语 这篇博客就和大家分享到这里,如果大家在研究学习的过程当中有什么问题,可以加群进行讨论或发送邮件给我,我会尽我所能为您解答,与君共勉!

优秀的个人博客,低调大师

大数据平台生产环境部署指南

版权声明:本文为博主原创文章,未经博主允许不得转载。 https://blog.csdn.net/qq1010885678/article/details/50922643 总结一下在生产环境部署Hadoop+Spark+HBase+Hue等产品遇到的问题、提高效率的方法和相关的配置。 集群规划 假设现在生产环境的信息如下: 服务器数量:6 操作系统:Centos7 Master节点数:2 Zookeeper节点数:3 Slave节点数:4 划分各个机器的角色如下: 主机名 角色 运行进程 hadoop1 Master Namenode hadoop2 Master_backup Namenode hadoop3 Slave、Yarn Datanode、ResourceManager、NodeManager hadoop4 Slave、Zookeeper Datanode、NodeManager、QuorumPeerMain hadoop5 Slave、Zookeeper Datanode、NodeManager、QuorumPeerMain hadoop6 Slave、Zookeeper Datanode、NodeManager、QuorumPeerMain 一些注意事项 尽量使用非root用户 这是为了避免出现一些安全问题,毕竟是生产环境,即使不是也养成习惯。 各个机器的用户名保持一致,需要超级用户权限时加入sudoers里面即可。 数据存放的目录和配置文件分离 一般我们在自己的虚拟机上搭建集群的时候这个可以忽略不计,但是生产机器上需要注意一下。 由于生产机一般配置都很高,几十T的硬盘很常见,但是这些硬盘都是mount上去的,如果我们按照虚拟机上的操作方式来部署的话,集群的所有数据还是会在/目录下,而这个目录肯定是不会大到哪里去, 有可能就出现跑着跑着抛磁盘空间爆满的异常,但是回头一查,90%的资源没有利用到。 所以,将集群存放数据的目录统一配置到空间大的盘上去,而配置文件保持不变,即配置文件和数据目录的分离,避免互相影响,另外在使用rsync进行集群文件同步的时候也比较方便。 规划集群部署的目录 部署之前提前将各个目录分配好,针对性的干活~ 这里将Hadoop、HBase、Spark等软件安装在:/usr/local/bigdata目录下 数据存放目录配置在:/data2/bigdata下 这里的/data2为mount上去的硬盘 集群部署 这里使用的各个软件版本号为: Zookeeper3.4.5 Hadoop2.2.0 HBase0.98 Spark1.4.1 Hive1.2.1 Hue3.7.0 必要准备 1、修改主机名和IP的映射关系 编辑/etc/hosts文件,确保各个机器主机名和IP地址的映射关系 2、防火墙设置 生产环境上防火墙不可能关闭,所以查考下方的端口表让网络管理员开通吧~ P.S. 当然如果你不care的话直接关防火墙很省事,不过不推荐。。 3、JDK的配置 先检查一下生产机上有没有预装了OpenJDK,有的话卸了吧~ rpm -qa | grep OracleJDK 把出现的所有包都 rpm -e --nodeps 卸载掉。 重新安装OracleJDK,版本没有太高要求,这里使用1.7。 到Oracle官网下载对应版本的JDK之后在安装在/usr/local下面,在~/.bash_profile中配置好环境变量,输入java -version出现对应信息即可。 4、ssh免密码登陆 这个步骤如果机器比较多的话就会很烦了,现在各个机器上生成ssh密钥: ssh-keygen -t rsa 一路回车保存默认目录:~/.ssh 通过ssh将各个机器的公钥复制到hadoop1的~/.ssh/authorized_keys中,然后发放出去: #本机的公钥 cat ~/.ssh/id_rsa.pub >> ~/.ssh/authorized_keys #各个节点的公钥 ssh hadoopN cat ~/.ssh/id_rsa.pub >> ~/.ssh/authorized_keys #复制完之后将authorized_keys发放给各个节点 scp ~/.ssh/authorized_keys hadoopN:~/.ssh/authorized_keys 测试: ssh date hadoop2 如果出现权限问题尝试使用: chmod -R 700 ~/.ssh Zookeeper 将zk上传到/usr/local/bigdata中解压缩 进入conf目录,修改zoo.cfg: cp zoo_sample.cfg zoo.cfg vim zoo.cfg #修改: dataDir=/data2/bigdata/zookeeper/tmp ticktickTime=20000 #在最后添加: server.1=hadoop4:2888:3888 server.2=hadoop5:2888:3888 server.3=hadoop6:2888:3888 ticktickTime默认为2000,2-20倍的minSessionTimeout与maxSessionTimeout 注: tickTime 心跳基本时间单位毫秒,ZK基本上所有的时间都是这个时间的整数倍。 zk的详细配置见: zookeeper配置文件详解 创建配置的dataDir: mkdir /data2/bigdata/zookeeper/tmp touch /data2/bigdata/zookeeper/tmp/myid echo 1 > /data2/bigdata/zookeeper/tmp/myid 配置结束,将Zookeeper传到hadoop5、6上,创建dataDir并修改myid为2、3 启动 在hadoop4、5、6上进入zk的bin目录: ./zkServer.sh start ./zkServer.sh status 正确的结果应该是一个leader,两个follower Hadoop 上传hadoop包到/usr/local/bigdata并解压缩,进入etc/hadoop目录 hadoop-env.sh 考虑到数据和程序的分离,决定将那些会不断增长的文件都配置到/data2/bigdata/hadoop下,包括:日志文件,pid目录,journal目录。 所以在此文件中需要配置: JAVA_HOME HADOOP_PID_DIR HADOOP_LOG_DIR HADOOP_CLASSPATH HADOOP_CLASSPATH根据需要配置其他jar包的路径 yarn-en.sh YARN_LOG_DIR YARN_PID_DIR 其他五个核心文件内容如下: core-site.xml: <configuration> <!--hdfs通讯地址--> <property> <name>fs.defaultFS</name> <value>hdfs://ns1</value> </property> <!--数据存放目录--> <property> <name>hadoop.tmp.dir</name> <value>/data2/bigdata/hadoop/tmp</value> </property> <!--zk地址--> <property> <name>ha.zookeeper.quorum</name> <value>hadoop4:2181,hadoop5:2181,hadoop6:2181</value> </property> <!--hdfs回收站文件保留时间--> <property> <name>fs.trash.interval</name> <value>4320</value> </property> <!--hue相关配置--> <property> <name>hadoop.proxyuser.hue.hosts</name> <value>*</value> </property> <property> <name>hadoop.proxyuser.hue.groups</name> <value>*</value> </property> <!--Zookeeper连接超时的设置--> <property> <name>ha.zookeeper.session-timeout.ms</name> <value>6000000</value> </property> <property> <name>ha.failover-controller.cli-check.rpc-timeout.ms</name> <value>6000000</value> </property> <property> <name>ipc.client.connect.timeout</name> <value>6000000</value> </property> </configuration> hdfs-site.xml: <configuration> <!--hdfs元数据存放路径--> <property> <name>dfs.name.dir</name> <value>/data2/hadoop/hdfs/name</value> </property> <!--hdfs数据目录,可配置多个--> <property> <name>dfs.data.dir</name> <value>/data2/hadoop/hdfs/data</value> </property> <!--节点上剩下多少空间时不再写入,配置为6G,手动调整--> <property> <name>dfs.datanode.reserved</name> <value>6000000000</value> </property> <!--节点访问控制--> <property> <name>dfs.hosts</name> <value>/usr/local/bigdata/hadoop/etc/hadoop/datanode-allow.list</value> </property> <property> <name>dfs.hosts.exclude</name> <value>/usr/local/bigdata/hadoop/etc/hadoop/datanode-deny.list</value> </property> <!--Namenode服务名--> <property> <name>dfs.nameservices</name> <value>ns1</value> </property> <!--Namenode配置--> <property> <name>dfs.ha.namenodes.ns1</name> <value>nn1,nn2</value> </property> <property> <name>dfs.namenode.rpc-address.ns1.nn1</name> <value>hadoop1:9000</value> </property> <property> <name>dfs.namenode.http-address.ns1.nn1</name> <value>hadoop1:50070</value> </property> <property> <name>dfs.namenode.rpc-address.ns1.nn2</name> <value>hadoop2:9000</value> </property> <property> <name>dfs.namenode.http-address.ns1.nn2</name> <value>hadoop2:50070</value> </property> <!--journalnode配置--> <property> <name>dfs.namenode.shared.edits.dir</name> <value>qjournal://hadoop4:8485;hadoop5:8485;hadoop6:8485/ns1</value> </property> <property> <name>dfs.journalnode.edits.dir</name> <value>/data2/hadoop/journal</value> </property> <!--其他--> <property> <name>dfs.ha.automatic-failover.enabled</name> <value>true</value> </property> <property> <name>dfs.client.failover.proxy.provider.ns1</name> <value> org.apache.hadoop.hdfs.server.namenode.ha.ConfiguredFailoverProxyProvider </value> </property> <property> <name>dfs.ha.fencing.methods</name> <value> sshfence shell(/bin/true) </value> </property> <property> <name>dfs.ha.fencing.ssh.private-key-files</name> <value>/home/hadoop/.ssh/id_rsa</value> </property> <property> <name>dfs.ha.fencing.ssh.connect-timeout</name> <value>30000</value> </property> <!--为hue开启webhdfs--> <property> <name>dfs.webhdfs.enabled</name> <value>true</value> </property> <property> <name>dfs.permissions</name> <value>false</value> </property> <!--连接超时的一些设置--> <property> <name>dfs.qjournal.start-segment.timeout.ms</name> <value>600000000</value> </property> <property> <name>dfs.qjournal.prepare-recovery.timeout.ms</name> <value>600000000</value> </property> <property> <name>dfs.qjournal.accept-recovery.timeout.ms</name> <value>600000000</value> </property> <property> <name>dfs.qjournal.prepare-recovery.timeout.ms</name> <value>600000000</value> </property> <property> <name>dfs.qjournal.accept-recovery.timeout.ms</name> <value>600000000</value> </property> <property> <name>dfs.qjournal.finalize-segment.timeout.ms</name> <value>600000000</value> </property> <property> <name>dfs.qjournal.select-input-streams.timeout.ms</name> <value>600000000</value> </property> <property> <name>dfs.qjournal.get-journal-state.timeout.ms</name> <value>600000000</value> </property> <property> <name>dfs.qjournal.new-epoch.timeout.ms</name> <value>600000000</value> </property> <property> <name>dfs.qjournal.write-txns.timeout.ms</name> <value>600000000</value> </property> <property> <name>ha.zookeeper.session-timeout.ms</name> <value>6000000</value> </property> </configuration> dfs.name.dir和dfs.data.dir分别是存储hdfs元数据信息和数据的目录,如果没有配置则默认存储到hadoop.tmp.dir中。 其中dfs.name.dir可以配置为多个目录,相当于备份,以免出现元数据被破坏的情况。 mapred-site.xml: <configuration> <property> <name>mapreduce.framework.name</name> <value>yarn</value> </property> <property> <name>mapreduce.jobhistory.webapp.address</name> <value>hadoop1:19888</value> </property> </configuration> yarn-site.xml: <configuration> <property> <name>yarn.resourcemanager.hostname</name> <value>hadoop1</value> </property> <property> <name>yarn.nodemanager.aux-services</name> <value>mapreduce_shuffle</value> </property> <property> <name>yarn.log-aggregation-enable</name> <value>true</value> </property> <property> <name>yarn.nodemanager.remote-app-log-dir</name> <value>/data2/bigdata/hadoop/logs/yarn</value> </property> <property> <name>yarn.log-aggregation.retain-seconds</name> <value>259200</value> </property> <property> <name>yarn.log-aggregation.retain-check-interval-seconds</name> <value>3600</value> </property> <property> <name>yarn.nodemanager.webapp.address</name> <value>0.0.0.0:8042</value> </property> <property> <name>yarn.nodemanager.log-dirs</name> <value>/data2/bigdata/hadoop/logs/yarn/containers</value> </property> </configuration> 修改slaves文件将各个子节点主机名加入 将配置好的hadoop通过scp拷贝到其他节点 第一次格式化HDFS 启动journalnode(在hadoop1上启动所有journalnode,注意:是调用的hadoop-daemons.sh这个脚本,注意是复数s的那个脚本) 进入hadoop/sbin目录: ./hadoop-daemons.sh start journalnode 运行jps命令检验,hadoop4、hadoop5、hadoop6上多了JournalNode进程 格式化HDFS(在bin目录下),在hadoop1上执行命令: ./hdfs namenode -format 格式化后会在根据core-site.xml中的hadoop.tmp.dir配置生成个文件,将对应tmp目录拷贝到hadoop2对应的目录下(hadoop初次格式化之后要将两个nn节点的tmp/dfs/name文件夹同步)。 格式化ZK(在hadoop1上执行即可,在bin目录下) ./hdfs zkfc -formatZK 之后启动hdfs和yarn,并用jps命令检查 HBase 解压之后配置hbase集群,要修改3个文件 注意:要把hadoop的hdfs-site.xml和core-site.xml 放到hbase/conf下,让hbase节点知道hdfs的映射关系,也可以在hbase-site.xml中配置 hbase-env.sh JAVA_HOME HBASE_MANAGES_ZK设置为false,使用外部的zk HBASE_CLASSPATH设置为hadoop配置文件的目录 HBASE_PID_DIR HBASE_LOG_DIR hbase-site.xml <configuration> <property> <name>hbase.rootdir</name> <value>hdfs://ns1/hbase</value> </property> <property> <name>hbase.cluster.distributed</name> <value>true</value> </property> <property> <name>hbase.zookeeper.quorum</name> <value>hadoop4:2181,hadoop5:2181,hadoop16:2181</value> </property> <property> <name>hbase.master</name> <value>hadoop11</value> </property> <property> <name>zookeeper.session.timeout</name> <value>6000000</value> </property> </configuration> 在regionservers中添加各个子节点的主机名并把zoo.cfg 拷贝到hbase的conf目录下 使用scp将配置好的hbase拷贝到集群的各个节点上,在hadoop1上通过hbase/bin/start-hbase.sh来启动 Spark 安装scala 将scala包解压到/usr/local下,配置环境变量即可 上传spark包到/usr/local/bigdata下并解压缩 进入conf目录,修改slaves,将各个子节点的主机名加入 spark-env.sh SPARK_MASTER_IP:master主机名 SPARK_WORKER_MEMORY:子节点可用内存 JAVA_HOME:java home路径 SCALA_HOME:scala home路径 SPARK_HOME:spark home路径 HADOOP_CONF_DIR:hadoop配置文件路径 SPARK_LIBRARY_PATH:spark lib目录 SCALA_LIBRARY_PATH:值同上 SPARK_WORKER_CORES:子节点的可用核心数 SPARK_WORKER_INSTANCES:子节点worker进程数 SPARK_MASTER_PORT:主节点开放端口 SPARK_CLASSPATH:其他需要添加的jar包路径 SPARK_DAEMON_JAVA_OPTS:”-Dspark.storage.blockManagerHeartBeatMs=6000000” SPARK_LOG_DIR:log目录 SpARK_PID_DIR:pid目录 spark配置详见: Spark 配置 将hadoop1上配置好的spark和scala通过scp复制到其他各个节点上(注意其他节点上的~/.bash_profle文件也要配置好) 通过spark/sbin/start-all.sh启动 Hue 安装hue要求有maven环境和其他环境,具体见: ant asciidoc cyrus-sasl-devel cyrus-sasl-gssapi gcc gcc-c++ krb5-devel libtidy (for unit tests only) libxml2-devel libxslt-devel make mvn (from maven package or maven3 tarball) mysql mysql-devel openldap-devel python-devel sqlite-devel openssl-devel (for version 7+) 上传hue的安装包到/usr/local/bigdata,解压缩并进入目录,执行: make apps 进行编译,期间会下载各种依赖包,如果默认中央仓库的地址链接太慢可以换成CSDN的中央仓库: 修改maven/conf/settings.xml,在中添加: <profile> <id>jdk-1.4</id> <activation> <jdk>1.4</jdk> </activation> <repositories> <repository> <id>nexus</id> <name>local private nexus</name> <url>http://maven.oschina.net/content/groups/public/</url> <releases> <enabled>true</enabled> </releases> <snapshots> <enabled>false</enabled> </snapshots> </repository> </repositories> <pluginRepositories> <pluginRepository> <id>nexus</id> <name>local private nexus</name> <url>http://maven.oschina.net/content/groups/public/</url> <releases> <enabled>true</enabled> </releases> <snapshots> <enabled>false</enabled> </snapshots> </pluginRepository> </pluginRepositories> </profile> 如果还是出现相关依赖的错误,可以尝试修改hue/maven/pom.xml,将 2.3.0-mr1-cdh5.0.1-SNAPSHOT 编译成功之后进入hue/desktop/conf修改pseudo-distributed.ini配置文件: # web监听地址 http_host=0.0.0.0 # web监听端口 http_port=8000 # 时区 time_zone=Asia/Shanghai # 在linux上运行hue的用户 server_user=hue # 在linux上运行hue的用户组 server_group=hue # hue默认用户 default_user=hue # hdfs配置的用户 default_hdfs_superuser=hadoop # hadoop->hdfs_clusters->default的选项下 # hdfs访问地址 fs_defaultfs=hdfs://ns1 # hdfs webapi地址 webhdfs_url=http://hadoop1:50070/webhdfs/v1 # hdfs是否使用Kerberos安全机制 security_enabled=false # hadoop配置文件目录 umask=022 hadoop_conf_dir=/usr/local/bigdata/hadoop/etc/hadoop # hadoop->yarn_clusters->default的选项下 # yarn主节点地址 resourcemanager_host=hadoop1 # yarn ipc监听端口 resourcemanager_port=8032 # 是否可以在集群上提交作业 submit_to=True # ResourceManager webapi地址 resourcemanager_api_url=http://hadoop1:8088 # 代理服务地址 proxy_api_url=http://hadoop1:8088 # hadoop->mapred_clusters->default的选项下 # jobtracker的主机 jobtracker_host=hadoop1 # beeswax选项下(hive) # hive运行的节点 hive_server_host=zx-hadoop1 # hive server端口 hive_server_port=10000 # hive配置文件路径 hive_conf_dir=/usr/local/bigdata/hive/conf # 连接超时时间等 server_conn_timeout=120 browse_partitioned_table_limit=250 download_row_limit=1000000 # zookeeper->clusters->default选项下 # zk地址 host_ports=hadoop4:2181,hadoop5:2181,hadoop6:2181 # spark选项下 # spark jobserver地址 server_url=http://hadoop1:8090/ 这里hue只配置了hadoop,hive(连接到spark需要部署spark jobserver)其余组件需要时进行配置即可。 进入hive目录执行启动metastrore和hiveserver2服务(如果已经启动就不需要了): bin/hive --service metastore bin/hiveserver2 进入hue,执行: build/env/bin/supervisor 进入hadoop:8000即可访问到hue的界面 相关的异常信息 1、hue界面没有读取hdfs的权限 错误现象:使用任何用户启动hue进程之后始终无法访问hdfs文件系统。 异常提示:WebHdfsException: SecurityException: Failed to obtain user group information: pache.hadoop.security.authorize.AuthorizationException: User: hue is not allowed to impersonate admin (error 401) 原因分析:用户权限问题。 解决方案:需要在hue的配置文件中设置以hue用户启动web进程,并且该用户需要在hadoop用户组中。 2、hue界面无法获取hdfs信息 错误现象:使用任何用户启动hue进程之后始终无法访问hdfs文件系统。 异常提示:not able to access the filesystem. 原因分析:hue通过hadoop的web api进行通讯,无法获取文件系统可能是这个环节出错。 解决方案:在pdfs-site.xml文件中添加dfs.webhdfs.enabled配置项,并重新加载集群配置! 使用rsync进行集群文件同步 参考:使用rsync进行多服务器同步 集群端口一览表 端口名 用途 50070 Hadoop Namenode UI端口 50075 Hadoop Datanode UI端口 50090 Hadoop SecondaryNamenode 端口 50030 JobTracker监控端口 50060 TaskTrackers端口 8088 Yarn任务监控端口 60010 Hbase HMaster监控UI端口 60030 Hbase HRegionServer端口 8080 Spark监控UI端口 4040 Spark任务UI端口 9000 HDFS连接端口 9090 HBase Thrift1端口 8000 Hue WebUI端口 9083 Hive metastore端口 10000 Hive service端口 不定时更新。 有时候各个集群之间,集群内部各个节点之间,以及外网内网等问题,如果网络组策略比较严格的话,会经常要求开通端口权限,可以参考这个表的内容,以免每次都会漏过一些端口影响效率。 其他一些可用技能 集群中的datanode出现数据分布不均匀的时候可以用hadoop的balancer工具将数据打散 # 进行数据的balancer操作,直到该节点的磁盘使用率低于集群的平均使用率的15% bin/start-balancer.sh -threshold 15 检查hdfs中出现损坏的block块 bin/hadoop fsck file -blocks -files -locations 作者:@小黑

优秀的个人博客,低调大师

微软Azure云平台Hbase 的使用

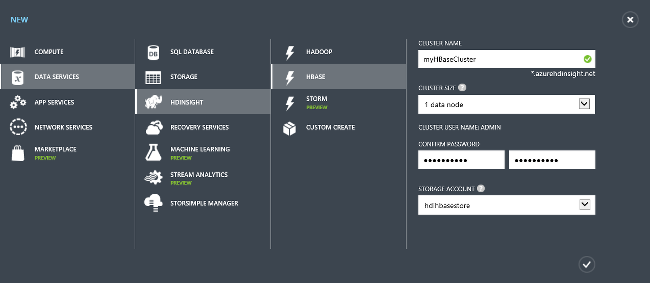
In this article What is HBase? Prerequisites Provision HBase clusters using Azure Management portal Mange HBase tables using HBase shell Use HiveQL to query HBase tables Use the Microsoft HBase REST client library to manage HBase tabels See also What is HBase? HBase is a low-latency NoSQL database that allows online transactional processing of big data. HBase is offered as a managed cluster integrated into the Azure environment. The clusters are configured to store data directly in Azure Blob storage, which provides low latency and increased elasticity in performance/cost choices. This enables customers to build interactive websites that work with large datasets, to build services that store sensor and telemetry data from millions of end points, and to analyze this data with Hadoop jobs. For more information on HBase and the scenarios it can be used for, seeHDInsight HBase overview. NOTE: HBase (version 0.98.0) is only available for use with HDInsight 3.1 clusters on HDInsight (based on Apache Hadoop and YARN 2.4.0). For version information, seeWhat's new in the Hadoop cluster versions provided by HDInsight? Prerequisites Before you begin this tutorial, you must have the following: An Azure subscriptionFor more information about obtaining a subscription, seePurchase Options,Member Offers, orFree Trial. An Azure storage accountFor instructions, seeHow To Create a Storage Account. A workstationwith Visual Studio 2013 installed. For instructions, seeInstalling Visual Studio. Provision an HBase cluster on the Azure portal This section describes how to provision an HBase cluster using the Azure Management portal. NOTE: The steps in this article create an HDInsight cluster using basic configuration settings. For information on other cluster configuration settings, such as using Azure Virtual Network or a metastore for Hive and Oozie, seeProvision an HDInsight cluster. To provision an HDInsight cluster in the Azure Management portal Sign in to theAzure Management Portal. ClickNEWon the lower left, and then clickDATA SERVICES,HDINSIGHT,HBASE. EnterCLUSTER NAME,CLUSTER SIZE, CLUSTER USER PASSWORD, andSTORAGE ACCOUNT. Click on the check icon on the lower left to create the HBase cluster. Create an HBase sample table from the HBase shell This section describes how to enable and use the Remote Desktop Protocol (RDP) to access the HBase shell and then use it to create an HBase sample table, add rows, and then list the rows in the table. It assumes you have completed the procedure outlined in the first section, and so have already successfully created an HBase cluster. To enable the RDP connection to the HBase cluster From the Management portal, clickHDINSIGHTfrom the left to view the list of the existing clusters. Click the HBase cluster where you want to open HBase Shell. ClickCONFIGURATIONfrom the top. ClickENABLE REMOTEfrom the bottom. Enter the RDP user name and password. The user name must be different from the cluster user name you used when provisioning the cluster. TheEXPIRES ONdata can be up to seven days from today. Click the check on the lower right to enable remote desktop. After the RPD is enabled, clickCONNECTfrom the bottom of theCONFIGURATIONtab, and follow the instructions. To open the HBase Shell Within your RDP session, click on theHadoop Command Lineshortcut located on the desktop. Change the folder to the HBase home directory: cd %HBASE_HOME%\bin Open the HBase shell: hbase shell To create a sample table, add data and retrieve the data Create a sample table: create 'sampletable', 'cf1' Add a row to the sample table: put 'sampletable', 'row1', 'cf1:col1', 'value1' List the rows in the sample table: scan 'sampletable' Check cluster status in the HBase WebUI HBase also ships with a WebUI that helps monitoring your cluster, for example by providing request statistics or information about regions. On the HBase cluster you can find the WebUI under the address of the zookeepernode. http://zookeepernode:60010/master-status In a HighAvailability (HA) cluster, you will find a link to the current active HBase master node hosting the WebUI. Bulk load a sample table Create samplefile1.txt containing the following data, and upload to Azure Blob Storage to /tmp/samplefile1.txt: row1 c1 c2 row2 c1 c2 row3 c1 c2 row4 c1 c2 row5 c1 c2 row6 c1 c2 row7 c1 c2 row8 c1 c2 row9 c1 c2 row10 c1 c2 Change the folder to the HBase home directory: cd %HBASE_HOME%\bin Execute ImportTsv: hbase org.apache.hadoop.hbase.mapreduce.ImportTsv -Dimporttsv.columns="HBASE_ROW_KEY,a:b,a:c" -Dimporttsv.bulk.output=/tmpOutput sampletable2 /tmp/samplefile1.txt Load the output from prior command into HBase: hbase org.apache.hadoop.hbase.mapreduce.LoadIncrementalHFiles /tmpOutput sampletable2 Use Hive to query an HBase table Now you have an HBase cluster provisioned and have created an HBase table, you can query it using Hive. This section creates a Hive table that maps to the HBase table and uses it to queries the data in your HBase table. To open cluster dashboard Sign in to theAzure Management Portal. ClickHDINSIGHTfrom the left pane. You shall see a list of clusters created including the one you just created in the last section. Click the cluster name where you want to run the Hive job. ClickQUERY CONSOLEfrom the bottom of the page to open cluster dashboard. It opens a Web page on a different browser tab. Enter the Hadoop User account username and password. The default username isadmin, the password is what you entered during the provision process. A new browser tab is opened. ClickHive Editorfrom the top. The Hive Editor looks like : To run Hive queries Enter the HiveQL script below into Hive Editor and clickSUBMITto create an Hive Table mapping to the HBase table. Make sure that you have created the sampletable table referenced here in HBase using the HBase Shell before executing this statement. CREATE EXTERNAL TABLE hbasesampletable(rowkey STRING, col1 STRING, col2 STRING) STORED BY 'org.apache.hadoop.hive.hbase.HBaseStorageHandler' WITH SERDEPROPERTIES ('hbase.columns.mapping' = ':key,cf1:col1,cf1:col2') TBLPROPERTIES ('hbase.table.name' = 'sampletable'); Wait until theStatusis updated toCompleted. Enter the HiveQL script below into Hive Editor, and then clickSUBMITbutton. The Hive query queries the data in the HBase table: SELECT count(*) FROM hbasesampletable; To retrieve the results of the Hive query, click on theView Detailslink in theJob Sessionwindow when the job finishes executing. The Job Output shall be 1 because you only put one record into the HBase table. To browse the output file From Query Console, clickFile Browserfrom the top. Click the Azure Storage account used as the default file system for the HBase cluster. Click the HBase cluster name. The default Azure storage account container uses the cluster name. Clickuser. Clickadmin. This is the Hadoop user name. Click the job name with theLast Modifiedtime matching the time when the SELECT Hive query ran. Clickstdout. Save the file and open the file with Notepad. The output shall be 1. Use HBase REST Client Library for .NET C# APIs to create an HBase table and retrieve data from the table The Microsoft HBase REST Client Library for .NET project must be downloaded from GitHub and the project built to use the HBase .NET SDK. The following procedure includes the instructions for this task. Create a new C# Visual Studio Windows Desktop Console application. Open NuGet Package Manager Console by click theTOOLSmenu,NuGet Package Manager,Package Manager Console. Run the following NuGet command in the console: Install-Package Microsoft.HBase.Client Add the following using statements on the top of the file: using Microsoft.HBase.Client; using org.apache.hadoop.hbase.rest.protobuf.generated; Replace the Main function with the following: static void Main(string[] args) { string clusterURL = "https://<yourHBaseClusterName>.azurehdinsight.net"; string hadoopUsername= "<yourHadoopUsername>"; string hadoopUserPassword = "<yourHadoopUserPassword>"; string hbaseTableName = "sampleHbaseTable"; // Create a new instance of an HBase client. ClusterCredentials creds = new ClusterCredentials(new Uri(clusterURL), hadoopUsername, hadoopUserPassword); HBaseClient hbaseClient = new HBaseClient(creds); // Retrieve the cluster version var version = hbaseClient.GetVersion(); Console.WriteLine("The HBase cluster version is " + version); // Create a new HBase table. TableSchema testTableSchema = new TableSchema(); testTableSchema.name = hbaseTableName; testTableSchema.columns.Add(new ColumnSchema() { name = "d" }); testTableSchema.columns.Add(new ColumnSchema() { name = "f" }); hbaseClient.CreateTable(testTableSchema); // Insert data into the HBase table. string testKey = "content"; string testValue = "the force is strong in this column"; CellSet cellSet = new CellSet(); CellSet.Row cellSetRow = new CellSet.Row { key = Encoding.UTF8.GetBytes(testKey) }; cellSet.rows.Add(cellSetRow); Cell value = new Cell { column = Encoding.UTF8.GetBytes("d:starwars"), data = Encoding.UTF8.GetBytes(testValue) }; cellSetRow.values.Add(value); hbaseClient.StoreCells(hbaseTableName, cellSet); // Retrieve a cell by its key. cellSet = hbaseClient.GetCells(hbaseTableName, testKey); Console.WriteLine("The data with the key '" + testKey + "' is: " + Encoding.UTF8.GetString(cellSet.rows[0].values[0].data)); // with the previous insert, it should yield: "the force is strong in this column" //Scan over rows in a table. Assume the table has integer keys and you want data between keys 25 and 35. Scanner scanSettings = new Scanner() { batch = 10, startRow = BitConverter.GetBytes(25), endRow = BitConverter.GetBytes(35) }; ScannerInformation scannerInfo = hbaseClient.CreateScanner(hbaseTableName, scanSettings); CellSet next = null; Console.WriteLine("Scan results"); while ((next = hbaseClient.ScannerGetNext(scannerInfo)) != null) { foreach (CellSet.Row row in next.rows) { Console.WriteLine(row.key + " : " + Encoding.UTF8.GetString(row.values[0].data)); } } Console.WriteLine("Press ENTER to continue ..."); Console.ReadLine(); } Set the first three variables in the Main function. PressF5to run the application. What's Next? In this tutorial, you have learned how to provision an HBase cluster, how to create tables, and and view the data in those tables from the HBase shell. You also learned how use Hive to query the data in HBase tables and how to use the HBase C# APIs to create an HBase table and retrieve data from the table. To learn more, see: HDInsight HBase overview: HBase is an Apache open source NoSQL database built on Hadoop that provides random access and strong consistency for large amounts of unstructured and semi-structured data. Provision HBase clusters on Azure Virtual Network: With the virtual network integration, HBase clusters can be deployed to the same virtual network as your applications so that applications can communicate with HBase directly. Analyze Twitter sentiment with HBase in HDInsight: Learn how to do real-timesentiment analysisof big data using HBase in an Hadoop cluster in HDInsight.

优秀的个人博客,低调大师

数据治理平台如何清理脏数据问题?数据治理平台怎样落地统一数据治理流程?

前阵子跟一家制造企业的数据负责人聊天,他说了一件事让我印象很深。月度经营分析会上,管理层发现华东区销售额比上月跌了18%,要求业务部门解释。销售部查了两天没找到原因,财务部又查了一天,最后才发现是CRM系统里有一批客户记录的所属区域字段填错了——华东的客户被标记成了华南。

优秀的个人博客,低调大师

数据资产平台如何规范数据资产申请流程?数据资产平台怎样推动资产跨业务复用?

前阵子跟一家零售企业的业务负责人聊天,他说了一件事让我印象很深。他想分析一下会员复购情况,需要一份近90天会员消费明细。结果申请流程走了整整一周——先找IT部门填申请表,IT说你得先让数据治理团队确认这个数据的权限,数据治理团队说你得先让业务部门负责人审批,业务负责人说你直接找IT要就行。三个人互相推了一圈,最后他放弃了,自己从CRM导了一份不完整的数据凑合用了。

资源下载

更多资源
Mario

Mario

马里奥是站在游戏界顶峰的超人气多面角色。马里奥靠吃蘑菇成长,特征是大鼻子、头戴帽子、身穿背带裤,还留着胡子。与他的双胞胎兄弟路易基一起,长年担任任天堂的招牌角色。

Nacos

Nacos

Nacos /nɑ:kəʊs/ 是 Dynamic Naming and Configuration Service 的首字母简称,一个易于构建 AI Agent 应用的动态服务发现、配置管理和AI智能体管理平台。Nacos 致力于帮助您发现、配置和管理微服务及AI智能体应用。Nacos 提供了一组简单易用的特性集,帮助您快速实现动态服务发现、服务配置、服务元数据、流量管理。Nacos 帮助您更敏捷和容易地构建、交付和管理微服务平台。

Spring

Spring

Spring框架(Spring Framework)是由Rod Johnson于2002年提出的开源Java企业级应用框架,旨在通过使用JavaBean替代传统EJB实现方式降低企业级编程开发的复杂性。该框架基于简单性、可测试性和松耦合性设计理念,提供核心容器、应用上下文、数据访问集成等模块,支持整合Hibernate、Struts等第三方框架,其适用范围不仅限于服务器端开发,绝大多数Java应用均可从中受益。

Sublime Text

Sublime Text

Sublime Text具有漂亮的用户界面和强大的功能,例如代码缩略图,Python的插件,代码段等。还可自定义键绑定,菜单和工具栏。Sublime Text 的主要功能包括:拼写检查,书签,完整的 Python API , Goto 功能,即时项目切换,多选择,多窗口等等。Sublime Text 是一个跨平台的编辑器,同时支持Windows、Linux、Mac OS X等操作系统。

用户登录
用户注册