首页 文章 精选 留言 我的

精选列表

搜索[笔记工具],共10000篇文章
优秀的个人博客,低调大师

Android开发学习笔记:浅谈ToggleButton

ToggleButton(开关按钮)是Android系统中比较简单的一个组件,是一个具有选中和未选择状态双状态的按钮,并且需要为不同的状态设置不同的显示文本。 ToggleButton常用的XML属性 属性名称 描述 android:disabledAlpha 设置按钮在禁用时透明度。 android:textOff 未选中时按钮的文本 android:textOn 选中时按钮的文本 下面是具体的例子: 第一个例子是通过Toast显示ToggleButton不同的状态时的信息 MainActivity.java packagecom.android.togglebutton; importandroid.app.Activity; importandroid.os.Bundle; importandroid.view.View; importandroid.view.View.OnClickListener; importandroid.widget.Toast; importandroid.widget.ToggleButton; publicclassMainActivityextendsActivity{ //声明ToggleButton privateToggleButtontogglebutton; @Override publicvoidonCreate(BundlesavedInstanceState){ super.onCreate(savedInstanceState); setContentView(R.layout.main); togglebutton=(ToggleButton)findViewById(R.id.togglebutton); togglebutton.setOnClickListener(newOnClickListener(){ publicvoidonClick(Viewv){ //当按钮第一次被点击时候响应的事件 if(togglebutton.isChecked()){ Toast.makeText(MainActivity.this,"你喜欢球类运动",Toast.LENGTH_SHORT).show(); } //当按钮再次被点击时候响应的事件 else{ Toast.makeText(MainActivity.this,"你不喜欢球类运动",Toast.LENGTH_SHORT).show(); } } }); } } main.xml <?xmlversion="1.0"encoding="utf-8"?> <LinearLayoutxmlns:android="http://schemas.android.com/apk/res/android" android:orientation="vertical" android:layout_width="fill_parent" android:layout_height="fill_parent" > <TextView android:layout_width="fill_parent" android:layout_height="wrap_content" android:text="@string/hello" /> <ToggleButton android:id="@+id/togglebutton" android:layout_width="wrap_content" android:layout_height="wrap_content" android:textOn="喜欢" android:textOff="不喜欢" /> </LinearLayout> strings.xml <?xmlversion="1.0"encoding="utf-8"?> <resources> <stringname="hello">你喜不喜欢球类运动?</string> <stringname="app_name">测试ToggleButton</string> </resources> 效果图: 第二个例子通过图片的变化显示ToggleButton不同的状态时的图片 MainActivity.java packagecom.android.togglebutton; importandroid.app.Activity; importandroid.os.Bundle; importandroid.widget.CompoundButton; importandroid.widget.CompoundButton.OnCheckedChangeListener; importandroid.widget.ImageView; importandroid.widget.ToggleButton; publicclassMainActivityextendsActivity{ //声明ImageView,ToggleButton privateImageViewimageView; privateToggleButtontoggleButton; @Override publicvoidonCreate(BundlesavedInstanceState){ super.onCreate(savedInstanceState); setContentView(R.layout.main); //通过findViewById获得ImageView,ToggleButton imageView=(ImageView)findViewById(R.id.imageView); toggleButton=(ToggleButton)findViewById(R.id.toggleButton); toggleButton.setOnCheckedChangeListener(newOnCheckedChangeListener(){ publicvoidonCheckedChanged(CompoundButtonbuttonView,booleanisChecked){ toggleButton.setChecked(isChecked); //使用三目运算符来响应按钮变换的事件 imageView.setImageResource(isChecked?R.drawable.pic_on:R.drawable.pic_off); } }); } } main.xml <?xmlversion="1.0"encoding="utf-8"?> <LinearLayoutxmlns:android="http://schemas.android.com/apk/res/android" android:orientation="vertical" android:layout_width="fill_parent" android:layout_height="fill_parent"> <ImageView android:id="@+id/imageView" android:layout_width="wrap_content" android:layout_height="wrap_content" android:src="@drawable/pic_off" android:layout_gravity="center_horizontal" /> <ToggleButton android:id="@+id/toggleButton" android:layout_width="130dip" android:layout_height="wrap_content" android:textOn="开灯" android:textOff="关灯" android:layout_gravity="center_horizontal" /> </LinearLayout> 效果图: 本文转自 lingdududu 51CTO博客,原文链接:http://blog.51cto.com/liangruijun/655014

优秀的个人博客,低调大师

Android开发学习笔记:浅谈Toast

一.Toast的简介 Toast是Android中一种提供给用户简短信息的视图,该视图已浮于应用程序之上的形式呈现给用户。因为它并不获得焦点,即使用户正在输入什么也不会受到影响。它的目标是尽可能已不显眼的方式,使用户看到你提供的信息。显示的时间是有限制的,过一段时间后会自动消失,不过Toast本身可以控制显示时间的长短。 二.Toast的常用方法 int getDuration() 返回Toast视图显示持续的时间. int getGravity() 取得提示信息在屏幕上显示的位置. float getHorizontalMargin() 返回横向栏外空白 float getVerticalMargin() 返回纵向栏外空白. View getView() 返回View对象. int getXOffset() 返回相对于参照位置的横向偏移像素量。 int getYOffset() 返回相对于参照位置的纵向偏移像素量 staticToast makeText(Contextcontext, int resId, int duration) 生成一个从资源中取得的包含文本视图的标准Toast对象。 context使用的上下文。通常是你的Application或Activity对象 resId要使用的字符串资源ID,可以是已格式化文本。 duration该信息的存续期间。值为LENGTH_SHORT或LENGTH_LONG staticToast makeText(Contextcontext,CharSequencetext, int duration) 生成一个包含文本视图的标准Toast对象. void setDuration(int duration) 设置Toast视图显示持续的时间,LENGTH_LONG表示持续时间较长,LENGTH_SHORT表示持续时间较短 void setGravity(int gravity, int xOffset, int yOffset) 设置提示信息在屏幕上的显示位置.(自定义Toast的显示位置,例如toast.setGravity(Gravity.CENTER_VERTICAL, 0, 0)可以把Toast定位在左上角。Toast提示的位置xOffset:大于0向右移,小于0向左移) void setMargin(float horizontalMargin, float verticalMargin) 设置视图的栏外空白. horizontalMargin容器的边缘与提示信息的横向空白(与容器宽度的比) verticalMargin容器的边缘与提示信息的纵向空白(与容器高度的比)。 void setText(int resId) 更新之前通过makeText()方法生成的Toast对象的文本内容.resId为Toast指定的新的字符串资源ID。 void setText(CharSequences) 更新之前通过makeText()方法生成的Toast对象的文本内容. s为Toast指定的新的文本 void setView(Viewview) 设置要显示的View.注意这个方法可以显示自定义的toast视图,可以包含图像,文字等等。是比较常用的方法 void show() 按照指定的存续期间显示提示信息 三.Toast的不同显示样式 效果图(有五种不同的Toast显示样式): main.xml <?xmlversion="1.0"encoding="utf-8"?> <LinearLayout xmlns:android="http://schemas.android.com/apk/res/android" android:orientation="vertical" android:layout_width="fill_parent" android:layout_height="fill_parent" > <Button android:id="@+id/btn_1" android:text="@string/btn1" android:layout_width="fill_parent" android:layout_height="wrap_content" /> <Button android:id="@+id/btn_2" android:text="@string/btn2" android:layout_width="fill_parent" android:layout_height="wrap_content" /> <Button android:id="@+id/btn_3" android:text="@string/btn3" android:layout_width="fill_parent" android:layout_height="wrap_content" /> <Button android:id="@+id/btn_4" android:text="@string/btn4" android:layout_width="fill_parent" android:layout_height="wrap_content" /> <Button android:id="@+id/btn_5" android:text="@string/btn5" android:layout_width="fill_parent" android:layout_height="wrap_content" /> </LinearLayout> toast.xml <?xmlversion="1.0"encoding="utf-8"?> <LinearLayout xmlns:android="http://schemas.android.com/apk/res/android" android:orientation="horizontal" android:layout_width="fill_parent" android:layout_height="fill_parent" android:padding="5dp" android:background="#708090" > <ImageView android:id="@+id/img" android:layout_width="wrap_content" android:layout_height="wrap_content" /> <TextView android:layout_width="wrap_content" android:layout_height="wrap_content" android:text="带图片文字的Toast" /> </LinearLayout> strings.xml <?xmlversion="1.0"encoding="utf-8"?> <resources> <stringname="hello">HelloToast!</string> <stringname="app_name">ToastDemo</string> <stringname="btn1">系统默认的Toast</string> <stringname="btn2">自定义位置的Toast</string> <stringname="btn3">带只有图片的Toast</string> <stringname="btn4">有图有文字的Toast</string> <stringname="btn5">自定义布局的Toast</string> </resources> ToastDemoActivity.java packagecom.android.toast.activity; importandroid.app.Activity; importandroid.content.Context; importandroid.os.Bundle; importandroid.view.Gravity; importandroid.view.LayoutInflater; importandroid.view.View; importandroid.view.View.OnClickListener; importandroid.widget.Button; importandroid.widget.ImageView; importandroid.widget.LinearLayout; importandroid.widget.Toast; publicclassToastDemoActivityextendsActivity{ privateButtonbtn_1,btn_2,btn_3,btn_4,btn_5; privateToasttoast=null; @Override protectedvoidonCreate(BundlesavedInstanceState){ //TODOAuto-generatedmethodstub super.onCreate(savedInstanceState); setContentView(R.layout.main); btn_1=(Button)findViewById(R.id.btn_1); btn_2=(Button)findViewById(R.id.btn_2); btn_3=(Button)findViewById(R.id.btn_3); btn_4=(Button)findViewById(R.id.btn_4); btn_5=(Button)findViewById(R.id.btn_5); btn_1.setOnClickListener(newButtonClick()); btn_2.setOnClickListener(newButtonClick()); btn_3.setOnClickListener(newButtonClick()); btn_4.setOnClickListener(newButtonClick()); btn_5.setOnClickListener(newButtonClick()); } classButtonClickimplementsOnClickListener{ @Override publicvoidonClick(Viewv){ //TODOAuto-generatedmethodstub switch(v.getId()){ caseR.id.btn_1: toast.makeText(ToastDemoActivity.this,"默认的Toast显示",Toast.LENGTH_LONG).show(); break; caseR.id.btn_2: //getApplicationContext()得到程序当前的默认Context toast=Toast.makeText(getApplicationContext(),"自定义位置的Toast显示", Toast.LENGTH_LONG); //设置Toast的位置 toast.setGravity(Gravity.CENTER,toast.getXOffset()/2,toast.getYOffset()/2); toast.show(); break; caseR.id.btn_3: toast=Toast.makeText(getApplicationContext(),"只有图片的Toast显示", Toast.LENGTH_LONG); ImageViewimg=newImageView(ToastDemoActivity.this); img.setImageResource(R.drawable.android); toast.setView(img); toast.show(); break; caseR.id.btn_4: toast=Toast.makeText(getApplicationContext(),"有图有字的Toast",Toast.LENGTH_LONG); LinearLayoutlayout=(LinearLayout)toast.getView(); ImageViewimg1=newImageView(getApplicationContext()); img1.setImageResource(R.drawable.android); layout.addView(img1,0); toast.show(); break; caseR.id.btn_5: //将一个xml布局转换成一个view对象 LayoutInflaterinflater=(LayoutInflater)getSystemService(Context.LAYOUT_INFLATER_SERVICE); Viewview=inflater.inflate(R.layout.toast,null); Toasttoast=newToast(getApplicationContext()); //在view中查找查找ImageView控件 ImageViewimage=(ImageView)view.findViewById(R.id.img); image.setImageResource(R.drawable.android); toast.setView(view); toast.show(); break; default: break; } } } } 本文转自 lingdududu 51CTO博客,原文链接: http://blog.51cto.com/liangruijun/638913

优秀的个人博客,低调大师

Android学习笔记(四)Android 组件

EditText和setOnKeyListener事件实现文本处理 package com.example.test12; import android.os.Bundle; import android.app.Activity; import android.view.KeyEvent; import android.view.Menu; import android.view.MenuItem; import android.view.View; import android.widget.EditText; import android.widget.TextView; import android.support.v4.app.NavUtils; public class MainActivity extends Activity { private TextView text; private EditText edit; @Override public void onCreate(Bundle savedInstanceState) { super.onCreate(savedInstanceState); setContentView(R.layout.activity_main); text=(TextView)findViewById(R.id.textView1); edit=(EditText)findViewById(R.id.editText1); edit.setOnKeyListener(editlistener); } @Override public boolean onCreateOptionsMenu(Menu menu) { getMenuInflater().inflate(R.menu.activity_main, menu); return true; } View.OnKeyListener editlistener=new View.OnKeyListener() { public boolean onKey(View v, int keyCode, KeyEvent event) { // TODO Auto-generated method stub text.setText(edit.getText()); return false; } }; } 带背景图片的按钮 使用ImageButton来实现带背景图片的按钮。 OnFocusChangeListener焦点变化监听 ImageButton.setImageResourse()用来指定按钮的背景颜色 package com.example.test13; import android.os.Bundle; import android.app.Activity; import android.view.Menu; import android.view.MenuItem; import android.view.View; import android.widget.Button; import android.widget.ImageButton; import android.widget.TextView; import android.support.v4.app.NavUtils; public class MainActivity extends Activity { private TextView tv; private ImageButton ibt; private Button bt; @Override public void onCreate(Bundle savedInstanceState) { super.onCreate(savedInstanceState); setContentView(R.layout.activity_main); tv=(TextView)findViewById(R.id.textView1); ibt=(ImageButton)findViewById(R.id.imageButton1); bt=(Button)findViewById(R.id.button1); ibt.setOnFocusChangeListener(focusChange); bt.setOnClickListener(clicked); } @Override public boolean onCreateOptionsMenu(Menu menu) { getMenuInflater().inflate(R.menu.activity_main, menu); return true; } View.OnFocusChangeListener focusChange=new View.OnFocusChangeListener() { public void onFocusChange(View v, boolean hasFocus) { // TODO Auto-generated method stub if(hasFocus){ tv.setText("Got Focus!!!"); ibt.setImageResource(R.drawable.image1); } else{ tv.setText("Lost Focus!!!"); ibt.setImageResource(R.drawable.image2); } } }; View.OnClickListener clicked=new View.OnClickListener() { public void onClick(View v) { // TODO Auto-generated method stub if(tv.getText()=="Got Focus!!!"){ tv.setText("Lost Focus!!!"); ibt.setImageResource(R.drawable.image2); } else{ tv.setText("Got Focus!!!"); ibt.setImageResource(R.drawable.image1); } } }; } Toast实现提示条(Toast总结) Toast.makeText()让文字显示与Toast对象中,会显示一段时间后自动消失。 Toast.makeText( MainActivity.this, "这个是Toast.makeText提示", Toast.LENGTH_LONG).show(); CheckBox和RadioButton复选框 通过CheckBox.setOnCheckedChangeLister来监听CheckBox 相框的实现 可以通过ImageButton和ImageView来实现,推荐ImageButton,它可以直接添加点击监听 java.io.File实现文件搜索 在JAVA I/O的API中,提供了java.io.File对象。 package com.example.test14; import java.io.File; import android.os.Bundle; import android.app.Activity; import android.view.Menu; import android.view.MenuItem; import android.view.View; import android.widget.Button; import android.widget.EditText; import android.widget.TextView; import android.widget.Toast; import android.support.v4.app.NavUtils; public class MainActivity extends Activity { private TextView result; private Button bt; private EditText edit; @Override public void onCreate(Bundle savedInstanceState) { super.onCreate(savedInstanceState); setContentView(R.layout.activity_main); result=(TextView)findViewById(R.id.textView2); bt=(Button)findViewById(R.id.button1); edit=(EditText)findViewById(R.id.editText1); bt.setOnClickListener(new Button.OnClickListener() { public void onClick(View v) { // TODO Auto-generated method stub String keyword=edit.getText().toString(); if(keyword.equals("")){ Toast.makeText( MainActivity.this, "不能为空!", Toast.LENGTH_LONG).show(); } else{ result.setText(searchFile(keyword)); } } }); } @Override public boolean onCreateOptionsMenu(Menu menu) { getMenuInflater().inflate(R.menu.activity_main, menu); return true; } private String searchFile(String Keyword){ String searchResult=""; File[] files=new File("/").listFiles(); for(File f:files){ if(f.getName().indexOf(Keyword)>=0) searchResult+=f.getPath()+"\n";// \n换行 } if(searchResult.equals("")) searchResult="找不到文件!!!!"; return searchResult; } } 本文转自cococo点点博客园博客,原文链接:http://www.cnblogs.com/coder2012/archive/2013/05/17/3083991.html,如需转载请自行联系原作者

优秀的个人博客,低调大师

openstack学习笔记四 组件框架

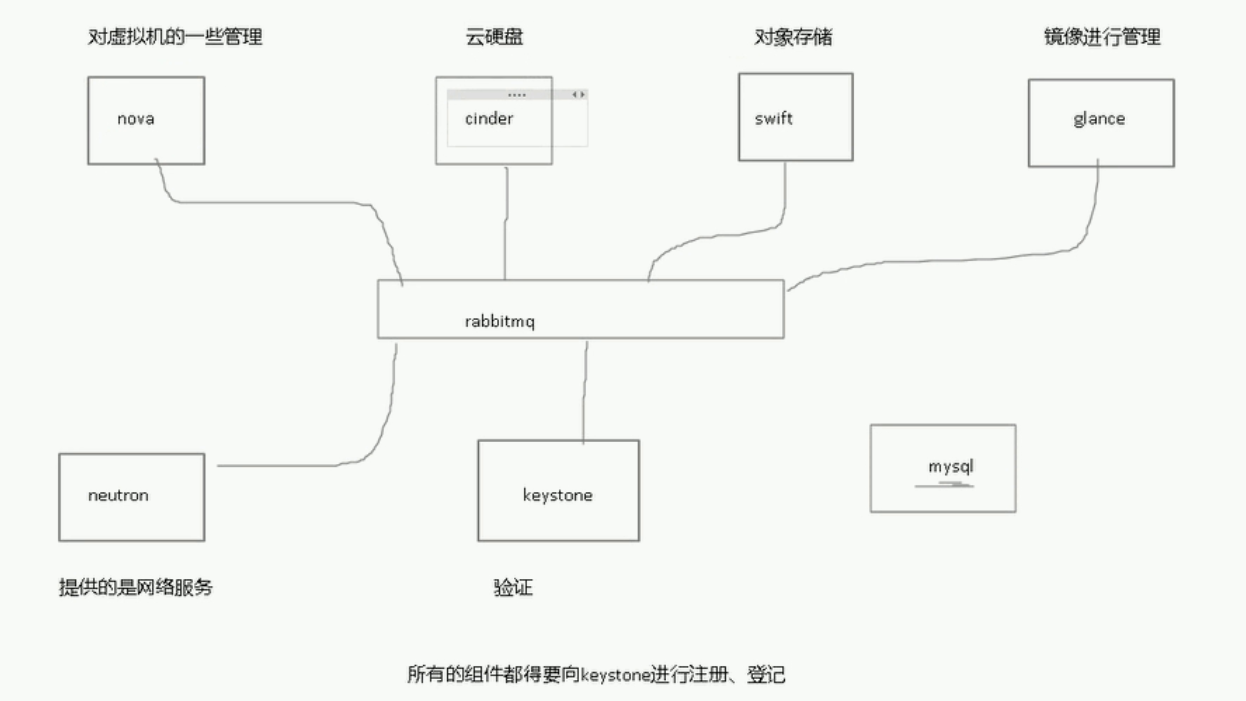
组件 nova 对虚拟机管理 cinder 云硬盘 swift 对象存储 容器 glance 镜像 neutron 网络 kestone 验证 所有的组件都得要向keystone进行注册,登记 利用 rebitmq互相通信 环境需要mysql 框架 控制节点 keystone dashboard 计算节点 跑虚拟机的机器 网络节点 为计算节点里的虚拟机提供路由 DHCP 存储节点 1 2 3 4 5 6 7 8 9 10 11 12 13 14 15 16 17 18 19 20 21 22 23 24 25 26 27 28 29 30 31 32 33 34 35 36 37 38 39 40 41 42 43 44 45 46 47 48 49 50 51 52 53 54 55 56 57 58 59 60 61 62 63 64 65 66 67 68 69 70 71 72 73 74 75 76 77 78 79 80 81 82 83 84 85 86 87 88 89 90 91 92 93 94 95 96 97 98 99 100 101 102 103 104 105 106 107 108 109 110 111 112 113 114 115 116 117 118 119 [root@h1~] #sourcekeystonerc_admin [root@h1~(keystone_admin)] #open open openstack-configopenstack-service opensslopenstack-dbopenstack-status openstackopenstack-keystone-sample-dataopenvt [root@h1~(keystone_admin)] #openstack-status ==Novaservices== openstack-nova-api:active openstack-nova-compute:active openstack-nova-network:inactive(disabledonboot) openstack-nova-scheduler:active openstack-nova-cert:active openstack-nova-conductor:active openstack-nova-console:inactive(disabledonboot) openstack-nova-consoleauth:active openstack-nova-xvpvncproxy:inactive(disabledonboot) ==Glanceservices== openstack-glance-api:active openstack-glance-registry:active ==Keystoneservice== openstack-keystone:inactive(disabledonboot) ==Horizonservice== openstack-dashboard:active ==neutronservices== neutron-server:active neutron-dhcp-agent:active neutron-l3-agent:active neutron-metadata-agent:active neutron-openvswitch-agent:active ==Swiftservices== openstack-swift-proxy:active openstack-swift-account:active openstack-swift-container:active openstack-swift-object:active ==Cinderservices== openstack-cinder-api:active openstack-cinder-scheduler:active openstack-cinder-volume:active openstack-cinder-backup:active ==Ceilometerservices== openstack-ceilometer-api:active openstack-ceilometer-central:active openstack-ceilometer-compute:active openstack-ceilometer-collector:active openstack-ceilometer-alarm-notifier:active openstack-ceilometer-alarm-evaluator:active openstack-ceilometer-notification:active ==Supportservices== mysqld:active(disabledonboot) openvswitch:active dbus:active target:active rabbitmq-server:active memcached:active ==Keystone users == /usr/lib/python2 .7 /site-packages/keystoneclient/shell .py:64:DeprecationWarning:ThekeystoneCLIisdeprecated in favorofpython-openstackclient.ForaPythonlibrary, continue usingpython-keystoneclient. 'python-keystoneclient.' ,DeprecationWarning) /usr/lib/python2 .7 /site-packages/keystoneclient/v2_0/client .py:145:DeprecationWarning:Constructinganinstanceofthekeystoneclient.v2_0.client.Clientclasswithoutasessionisdeprecatedasofthe1.7.0releaseandmayberemoved in the2.0.0release. 'the2.0.0release.' ,DeprecationWarning) /usr/lib/python2 .7 /site-packages/keystoneclient/v2_0/client .py:147:DeprecationWarning:Usingthe 'tenant_name' argumentisdeprecated in version '1.7.0' andwillberemoved in version '2.0.0' ,pleaseusethe 'project_name' argumentinstead super(Client,self).__init__(**kwargs) /usr/lib/python2 .7 /site-packages/debtcollector/renames .py:43:DeprecationWarning:Usingthe 'tenant_id' argumentisdeprecated in version '1.7.0' andwillberemoved in version '2.0.0' ,pleaseusethe 'project_id' argumentinstead return f(*args,**kwargs) /usr/lib/python2 .7 /site-packages/keystoneclient/httpclient .py:376:DeprecationWarning:ConstructinganHTTPClientinstancewithoutusingasessionisdeprecatedasofthe1.7.0releaseandmayberemoved in the2.0.0release. 'the2.0.0release.' ,DeprecationWarning) +----------------------------------+------------+---------+----------------------+ | id |name|enabled|email| +----------------------------------+------------+---------+----------------------+ |1627cc3d61c04f9db9608e9703a01371|admin|True|root@localhost| |04247710cdf34914a7f5b315ab166731|ceilometer|True|ceilometer@localhost| |cb5e12e30a4a4c1dae57255c184b8b30|cinder|True|cinder@localhost| |632fb20205ea4c40988d7d65b2844ff6|glance|True|glance@localhost| |23c4fb48a5a247d68e50c6b74fb6f035|http|True|| |80069f5c8edc454b8038e7f116df4ff5|neutron|True|neutron@localhost| |adbcaaf58d09495988b57be8e82b4e6b|nova|True|nova@localhost| |4f488ff4859e4973afefea6e7872ed83|swift|True|swift@localhost| +----------------------------------+------------+---------+----------------------+ ==Glanceimages== +--------------------------------------+-----------+ |ID|Name| +--------------------------------------+-----------+ |2a0db075-f221-4285-9ff9-38b755a322c1|centos7.2| +--------------------------------------+-----------+ ==Novamanagedservices== +----+------------------+---------------+----------+---------+-------+----------------------------+-----------------+ |Id|Binary|Host|Zone|Status|State|Updated_at|DisabledReason| +----+------------------+---------------+----------+---------+-------+----------------------------+-----------------+ |1|nova-consoleauth|h1.hequan.com|internal|enabled|up|2016-07-05T07:06:34.000000|-| |2|nova-scheduler|h1.hequan.com|internal|enabled|up|2016-07-05T07:06:34.000000|-| |3|nova-conductor|h1.hequan.com|internal|enabled|up|2016-07-05T07:06:34.000000|-| |5|nova-compute|h1.hequan.com|nova|enabled|up|2016-07-05T07:06:34.000000|-| |6|nova-cert|h1.hequan.com|internal|enabled|up|2016-07-05T07:06:34.000000|-| |7|nova-compute|h2.hequan.com|nova|enabled|up|2016-07-05T07:06:34.000000|-| +----+------------------+---------------+----------+---------+-------+----------------------------+-----------------+ ==Novanetworks== +--------------------------------------+---------+------+ |ID|Label|Cidr| +--------------------------------------+---------+------+ |bebbc903-5846-4e8d-9c19-f0248cb6e08d|put-ex|-| |494cbfae-b26d-4e29-859e-35c55f017f19|he_sub2|-| |1f8a8d0c-2e32-4aaa-83d6-3ba52a768292|quan|-| |67d35cd2-3b95-48a7-96b7-6ba1f0eb7d5d|he_sub|-| +--------------------------------------+---------+------+ ==Novainstanceflavors== +----+-----------+-----------+------+-----------+------+-------+-------------+-----------+ |ID|Name|Memory_MB|Disk|Ephemeral|Swap|VCPUs|RXTX_Factor|Is_Public| +----+-----------+-----------+------+-----------+------+-------+-------------+-----------+ |1|m1.tiny|512|1|0||1|1.0|True| |2|m1.small|2048|20|0||1|1.0|True| |3|m1.medium|4096|40|0||2|1.0|True| |4|m1.large|8192|80|0||4|1.0|True| |5|m1.xlarge|16384|160|0||8|1.0|True| +----+-----------+-----------+------+-----------+------+-------+-------------+-----------+ ==Novainstances== +--------------------------------------+------+----------------------------------+--------+------------+-------------+-----------------------------------+ |ID|Name|TenantID|Status|TaskState|PowerState|Networks| +--------------------------------------+------+----------------------------------+--------+------------+-------------+-----------------------------------+ |95311ed2-6091-4ce7-a2be-caab8e2760ce|1|43986fb013804aa0a04ca277e4d0e69c|ACTIVE|-|Running|quan=192.168.10.12,192.168.2.104| +--------------------------------------+------+------ 本文转自 295631788 51CTO博客,原文链接:http://blog.51cto.com/hequan/1795980,如需转载请自行联系原作者

优秀的个人博客,低调大师

Android笔记:热门标签,流式布局

一、测试效果未成功 1 2 3 4 5 6 7 8 9 10 11 12 13 14 15 16 17 18 19 20 21 22 23 24 25 26 27 28 29 30 31 32 33 34 35 36 37 38 39 40 41 42 43 44 45 46 47 48 49 50 51 52 53 54 55 56 57 58 59 60 61 62 63 64 65 66 67 68 69 70 71 72 73 74 75 76 77 78 79 80 81 82 83 84 85 86 87 88 89 90 91 92 93 94 95 96 97 98 99 100 101 102 103 104 105 106 107 108 109 110 111 112 113 114 115 116 117 118 119 120 121 122 123 124 125 126 127 128 129 130 131 132 133 134 135 136 137 138 139 140 141 142 143 144 145 146 147 148 149 150 151 152 153 154 155 156 157 158 159 160 161 162 163 164 165 166 167 168 169 170 171 172 173 174 package cn.app.meiya.aa.widget; import android.content.Context; import android.util.AttributeSet; import android.view.View; import android.view.ViewGroup; import java.util.ArrayList; import java.util.List; /** *类似话题标签的流式布局,测试效果无效 *http://www.apkbus.com/android-239725-1-1.html *Createdbylonshineon15/7/16. */ public class TopicFlowLayout extends ViewGroup{ //存储所有子View private List<List<View>>mAllChildViews= new ArrayList<>(); //每一行的高度 private List<Integer>mLineHeight= new ArrayList<>(); public TopicFlowLayout(Contextcontext){ this (context, null ); //TODOAuto-generatedconstructorstub } public TopicFlowLayout(Contextcontext,AttributeSetattrs){ this (context,attrs, 0 ); //TODOAuto-generatedconstructorstub } public TopicFlowLayout(Contextcontext,AttributeSetattrs, int defStyle){ super (context,attrs,defStyle); //TODOAuto-generatedconstructorstub } @Override protected void onMeasure( int widthMeasureSpec, int heightMeasureSpec){ //TODOAuto-generatedmethodstub //父控件传进来的宽度和高度以及对应的测量模式 int sizeWidth=MeasureSpec.getSize(widthMeasureSpec); int modeWidth=MeasureSpec.getMode(widthMeasureSpec); int sizeHeight=MeasureSpec.getSize(heightMeasureSpec); int modeHeight=MeasureSpec.getMode(heightMeasureSpec); //如果当前ViewGroup的宽高为wrap_content的情况 int width= 0 ; //自己测量的宽度 int height= 0 ; //自己测量的高度 //记录每一行的宽度和高度 int lineWidth= 0 ; int lineHeight= 0 ; //获取子view的个数 int childCount=getChildCount(); for ( int i= 0 ;i<childCount;i++){ Viewchild=getChildAt(i); //测量子View的宽和高 measureChild(child,widthMeasureSpec,heightMeasureSpec); //得到LayoutParams MarginLayoutParamslp=(MarginLayoutParams)getLayoutParams(); //子View占据的宽度 int childWidth=child.getMeasuredWidth()+lp.leftMargin+lp.rightMargin; //子View占据的高度 int childHeight=child.getMeasuredHeight()+lp.topMargin+lp.bottomMargin; //换行时候 if (lineWidth+childWidth>sizeWidth){ //对比得到最大的宽度 width=Math.max(width,lineWidth); //重置lineWidth lineWidth=childWidth; //记录行高 height+=lineHeight; lineHeight=childHeight; } else { //不换行情况 //叠加行宽 lineWidth+=childWidth; //得到最大行高 lineHeight=Math.max(lineHeight,childHeight); } //处理最后一个子View的情况 if (i==childCount- 1 ){ width=Math.max(width,lineWidth); height+=lineHeight; } } //wrap_content setMeasuredDimension(modeWidth==MeasureSpec.EXACTLY?sizeWidth:width, modeHeight==MeasureSpec.EXACTLY?sizeHeight:height); super .onMeasure(widthMeasureSpec,heightMeasureSpec); } @Override protected void onLayout( boolean changed, int l, int t, int r, int b){ //TODOAuto-generatedmethodstub mAllChildViews.clear(); mLineHeight.clear(); //获取当前ViewGroup的宽度 int width=getWidth(); int lineWidth= 0 ; int lineHeight= 0 ; //记录当前行的view List<View>lineViews= new ArrayList<View>(); int childCount=getChildCount(); for ( int i= 0 ;i<childCount;i++){ Viewchild=getChildAt(i); MarginLayoutParamslp=(MarginLayoutParams)child.getLayoutParams(); int childWidth=child.getMeasuredWidth(); int childHeight=child.getMeasuredHeight(); //如果需要换行 if (childWidth+lineWidth+lp.leftMargin+lp.rightMargin>width){ //记录LineHeight mLineHeight.add(lineHeight); //记录当前行的Views mAllChildViews.add(lineViews); //重置行的宽高 lineWidth= 0 ; lineHeight=childHeight+lp.topMargin+lp.bottomMargin; //重置view的集合 lineViews= new ArrayList(); } lineWidth+=childWidth+lp.leftMargin+lp.rightMargin; lineHeight=Math.max(lineHeight,childHeight+lp.topMargin+lp.bottomMargin); lineViews.add(child); } //处理最后一行 mLineHeight.add(lineHeight); mAllChildViews.add(lineViews); //设置子View的位置 int left= 0 ; int top= 0 ; //获取行数 int lineCount=mAllChildViews.size(); for ( int i= 0 ;i<lineCount;i++){ //当前行的views和高度 lineViews=mAllChildViews.get(i); lineHeight=mLineHeight.get(i); for ( int j= 0 ;j<lineViews.size();j++){ Viewchild=lineViews.get(j); //判断是否显示 if (child.getVisibility()==View.GONE){ continue ; } MarginLayoutParamslp=(MarginLayoutParams)child.getLayoutParams(); int cLeft=left+lp.leftMargin; int cTop=top+lp.topMargin; int cRight=cLeft+child.getMeasuredWidth(); int cBottom=cTop+child.getMeasuredHeight(); //进行子View进行布局 child.layout(cLeft,cTop,cRight,cBottom); left+=child.getMeasuredWidth()+lp.leftMargin+lp.rightMargin; } left= 0 ; top+=lineHeight; } } /** *与当前ViewGroup对应的LayoutParams */ @Override public LayoutParamsgenerateLayoutParams(AttributeSetattrs){ //TODOAuto-generatedmethodstub return new MarginLayoutParams(getContext(),attrs); } } 用法: 1 2 3 4 5 6 7 8 9 10 11 12 13 14 15 16 17 18 19 20 21 22 23 24 25 26 27 28 29 30 31 32 33 34 35 36 37 38 39 40 41 42 43 44 45 46 47 48 49 50 <fontcolor= "#362e2b" ><fontstyle= "background-color:rgb(255,255,255)" ><fontface= "Arial" ><fontstyle= "font-size:14px" > package com.czm.flowlayout; import android.app.Activity; import android.graphics.Color; import android.os.Bundle; import android.view.ViewGroup.LayoutParams; import android.view.ViewGroup.MarginLayoutParams; import android.widget.TextView; /** * *@authorcaizhiming *@createdon2015-4-13 */ public class MainActivity extends Activity{ private StringmNames[]={ "welcome" , "android" , "TextView" , "apple" , "jamy" , "kobebryant" , "jordan" , "layout" , "viewgroup" , "margin" , "padding" , "text" , "name" , "type" , "search" , "logcat" }; private XCFlowLayoutmFlowLayout; @Override protected void onCreate(BundlesavedInstanceState){ super .onCreate(savedInstanceState); setContentView(R.layout.activity_main); initChildViews(); } private void initChildViews(){ //TODOAuto-generatedmethodstub mFlowLayout=(XCFlowLayout)findViewById(R.id.flowlayout); MarginLayoutParamslp= new MarginLayoutParams( LayoutParams.WRAP_CONTENT,LayoutParams.WRAP_CONTENT); lp.leftMargin= 5 ; lp.rightMargin= 5 ; lp.topMargin= 5 ; lp.bottomMargin= 5 ; for ( int i= 0 ;i<mNames.length;i++){ TextViewview= new TextView( this ); view.setText(mNames[i]); view.setTextColor(Color.WHITE); view.setBackgroundDrawable(getResources().getDrawable(R.drawable.textview_bg)); mFlowLayout.addView(view,lp); } } }</font></font></font></font> 二、测试可用 1 2 3 4 5 6 7 8 9 10 11 12 13 14 15 16 17 18 19 20 21 22 23 24 25 26 27 28 29 30 31 32 33 34 35 36 37 38 39 40 41 42 43 44 45 46 47 48 49 50 51 52 53 54 55 56 57 58 59 60 61 62 63 64 65 66 67 68 69 70 71 72 73 74 75 76 77 78 79 80 81 82 83 84 85 86 87 88 89 90 91 92 93 94 95 96 97 98 99 100 101 102 103 package cn.app.meiya.aa.widget; import android.content.Context; import android.util.AttributeSet; import android.view.View; import android.view.ViewGroup; /** *http://www.bkjia.com/Androidjc/1013458.html *Createdbylonshineon15/7/16. */ public class FlowLayout extends ViewGroup{ private float mVerticalSpacing; //每个item纵向间距 private float mHorizontalSpacing; //每个item横向间距 public FlowLayout(Contextcontext){ super (context); } public FlowLayout(Contextcontext,AttributeSetattrs){ super (context,attrs); } public void setHorizontalSpacing( float pixelSize){ mHorizontalSpacing=pixelSize; } public void setVerticalSpacing( float pixelSize){ mVerticalSpacing=pixelSize; } @Override protected void onMeasure( int widthMeasureSpec, int heightMeasureSpec){ int selfWidth=resolveSize( 0 ,widthMeasureSpec); int paddingLeft=getPaddingLeft(); int paddingTop=getPaddingTop(); int paddingRight=getPaddingRight(); int paddingBottom=getPaddingBottom(); int childLeft=paddingLeft; int childTop=paddingTop; int lineHeight= 0 ; //通过计算每一个子控件的高度,得到自己的高度 for ( int i= 0 ,childCount=getChildCount();i<childCount;++i){ ViewchildView=getChildAt(i); LayoutParamschildLayoutParams=childView.getLayoutParams(); childView.measure( getChildMeasureSpec(widthMeasureSpec,paddingLeft+paddingRight, childLayoutParams.width), getChildMeasureSpec(heightMeasureSpec,paddingTop+paddingBottom, childLayoutParams.height)); int childWidth=childView.getMeasuredWidth(); int childHeight=childView.getMeasuredHeight(); lineHeight=Math.max(childHeight,lineHeight); if (childLeft+childWidth+paddingRight>selfWidth){ childLeft=paddingLeft; childTop+=mVerticalSpacing+lineHeight; lineHeight=childHeight; } else { childLeft+=childWidth+mHorizontalSpacing; } } int wantedHeight=childTop+lineHeight+paddingBottom; setMeasuredDimension(selfWidth,resolveSize(wantedHeight,heightMeasureSpec)); } @Override protected void onLayout( boolean changed, int l, int t, int r, int b){ int myWidth=r-l; int paddingLeft=getPaddingLeft(); int paddingTop=getPaddingTop(); int paddingRight=getPaddingRight(); int childLeft=paddingLeft; int childTop=paddingTop; int lineHeight= 0 ; //根据子控件的宽高,计算子控件应该出现的位置。 for ( int i= 0 ,childCount=getChildCount();i<childCount;++i){ ViewchildView=getChildAt(i); if (childView.getVisibility()==View.GONE){ continue ; } int childWidth=childView.getMeasuredWidth(); int childHeight=childView.getMeasuredHeight(); lineHeight=Math.max(childHeight,lineHeight); if (childLeft+childWidth+paddingRight>myWidth){ childLeft=paddingLeft; childTop+=mVerticalSpacing+lineHeight; lineHeight=childHeight; } childView.layout(childLeft,childTop,childLeft+childWidth,childTop+childHeight); childLeft+=childWidth+mHorizontalSpacing; } } } 本文转自 glblong 51CTO博客,原文链接:http://blog.51cto.com/glblong/1675221,如需转载请自行联系原作者

优秀的个人博客,低调大师

XenDesktop学习笔记3之架构

架构: 1、物理组件: DDC一台 PVS+XenCenter 一台 AD+DHCP+DNS 一台 XenServer 一台 用户设备 一台 2、软件要求 XenServer 5.5 (目前5.6还存在不稳定性) XenCenter 5.5 Xendesktop Delivery Controller Provisiong servies 5.1 citrix 联机插件11.2 操作系统 服务器为server 2003 sp2 标准版或企业版 客户机:Xp Sp3 或Win 7 3、网络要求 划分在同一个Vlan里或者一个单独的网段 4、硬件要求 服务器三台 CPU支持虚拟化 内存最少8G 硬盘:100G的本地存储 网卡:100M,千兆最好不过了。 本文转自shj1985122951CTO博客,原文链接:http://blog.51cto.com/shenhj/397523,如需转载请自行联系原作者

优秀的个人博客,低调大师

学习笔记TF065:TensorFlowOnSpark

Hadoop生态大数据系统分为Yam、 HDFS、MapReduce计算框架。TensorFlow分布式相当于MapReduce计算框架,Kubernetes相当于Yam调度系统。TensorFlowOnSpark,利用远程直接内存访问(Remote Direct Memory Access,RDMA)解决存储功能和调度,实现深度学习和大数据融合。TensorFlowOnSpark(TFoS),雅虎开源项目。https://github.com/yahoo/TensorFlowOnSpark 。支持ApacheSpark集群分布式TensorFlow训练、预测。TensorFlowOnSpark提供桥接程序,每个Spark Executor启动一个对应TensorFlow进程,通过远程进程通信(RPC)交互。 TensorFlowOnSpark架构。TensorFlow训练程序用Spark集群运行,管理Spark集群步骤:预留,在Executor执行每个TensorFlow进程保留一个端口,启动数据消息监听器。启动,在Executor启动TensorFlow主函数。数据获取,TensorFlow Readers和QueueRunners机制直接读取HDFS数据文件,Spark不访问数据;Feeding,SparkRDD 数据发送TensorFlow节点,数据通过feed_dict机制传入TensorFlow计算图。关闭,关闭Executor TensorFlow计算节点、参数服务节点。Spark Driver->Spark Executor->参数服务器->TensorFlow Core->gRPC、RDMA->HDFS数据集。http://yahoohadoop.tumblr.com/post/157196317141/open-sourcing-tensorflowonspark-distributed-deep 。 TensorFlowOnSpark MNIST。https://github.com/yahoo/TensorFlowOnSpark/wiki/GetStarted_standalone 。Standalone模式Spark集群,一台计算机。安装 Spark、Hadoop。部署Java 1.8.0 JDK。下载Spark2.1.0版 http://spark.apache.org/downloads.html 。下载Hadoop2.7.3版 http://hadoop.apache.org/#Download+Hadoop 。0.12.1版本支持较好。修改配置文件,设置环境变量,启动Hadoop:$HADOOP_HOME/sbin/start-all.sh。检出TensorFlowOnSpark源代码: git clone --recurse-submodules https://github.com/yahoo/TensorFlowOnSpark.git cd TensorFlowOnSpark git submodule init git submodule update --force git submodule foreach --recursive git clean -dfx 源代码打包,提交任务使用: cd TensorflowOnSpark/src zip -r ../tfspark.zip * 设置TensorFlowOnSpark根目录环境变量: cd TensorFlowOnSpark export TFoS_HOME=$(pwd) 启动Spark主节点(master): $(SPARK_HOME)/sbin/start-master.sh 配置两个工作节点(worker)实例,master-spark-URL连接主节点: export MASTER=spark://$(hostname):7077 export SPARK_WORKER_INSTANCES=2 export CORES_PER_WORKER=1 export TOTAL_CORES=$(($(CORES_PER_WORKER)*$(SPARK_WORKER_INSTANCES))) $(SPARK_HOME)/sbin/start-slave.sh -c $CORES_PER_WORKER -m 3G $(MASTER) 提交任务,MNIST zip文件转换为HDFS RDD 数据集: $(SPARK_HOME)/bin/spark-submit \ --master $(MASTER) --conf spark.ui.port=4048 --verbose \ $(TFoS_HOME)/examples/mnist/mnist_data_setup.py \ --output examples/mnist/csv \ --format csv 查看处理过的数据集: hadoop fs -ls hdfs://localhost:9000/user/libinggen/examples/mnist/csv 查看保存图片、标记向量: hadoop fs -ls hdfs://localhost:9000/user/libinggen/examples/mnist/csv/train/labels 把训练集、测试集分别保存RDD数据。https://github.com/yahoo/TensorFlowOnSpark/blob/master/examples/mnist/mnist_data_setup.py 。 from __future__ import absolute_import from __future__ import division from __future__ import print_function import numpy import tensorflow as tf from array import array from tensorflow.contrib.learn.python.learn.datasets import mnist def toTFExample(image, label): """Serializes an image/label as a TFExample byte string""" example = tf.train.Example( features = tf.train.Features( feature = { 'label': tf.train.Feature(int64_list=tf.train.Int64List(value=label.astype("int64"))), 'image': tf.train.Feature(int64_list=tf.train.Int64List(value=image.astype("int64"))) } ) ) return example.SerializeToString() def fromTFExample(bytestr): """Deserializes a TFExample from a byte string""" example = tf.train.Example() example.ParseFromString(bytestr) return example def toCSV(vec): """Converts a vector/array into a CSV string""" return ','.join([str(i) for i in vec]) def fromCSV(s): """Converts a CSV string to a vector/array""" return [float(x) for x in s.split(',') if len(s) > 0] def writeMNIST(sc, input_images, input_labels, output, format, num_partitions): """Writes MNIST image/label vectors into parallelized files on HDFS""" # load MNIST gzip into memory # MNIST图像、标记向量写入HDFS with open(input_images, 'rb') as f: images = numpy.array(mnist.extract_images(f)) with open(input_labels, 'rb') as f: if format == "csv2": labels = numpy.array(mnist.extract_labels(f, one_hot=False)) else: labels = numpy.array(mnist.extract_labels(f, one_hot=True)) shape = images.shape print("images.shape: {0}".format(shape)) # 60000 x 28 x 28 print("labels.shape: {0}".format(labels.shape)) # 60000 x 10 # create RDDs of vectors imageRDD = sc.parallelize(images.reshape(shape[0], shape[1] * shape[2]), num_partitions) labelRDD = sc.parallelize(labels, num_partitions) output_images = output + "/images" output_labels = output + "/labels" # save RDDs as specific format # RDDs保存特定格式 if format == "pickle": imageRDD.saveAsPickleFile(output_images) labelRDD.saveAsPickleFile(output_labels) elif format == "csv": imageRDD.map(toCSV).saveAsTextFile(output_images) labelRDD.map(toCSV).saveAsTextFile(output_labels) elif format == "csv2": imageRDD.map(toCSV).zip(labelRDD).map(lambda x: str(x[1]) + "|" + x[0]).saveAsTextFile(output) else: # format == "tfr": tfRDD = imageRDD.zip(labelRDD).map(lambda x: (bytearray(toTFExample(x[0], x[1])), None)) # requires: --jars tensorflow-hadoop-1.0-SNAPSHOT.jar tfRDD.saveAsNewAPIHadoopFile(output, "org.tensorflow.hadoop.io.TFRecordFileOutputFormat", keyClass="org.apache.hadoop.io.BytesWritable", valueClass="org.apache.hadoop.io.NullWritable") # Note: this creates TFRecord files w/o requiring a custom Input/Output format # else: # format == "tfr": # def writeTFRecords(index, iter): # output_path = "{0}/part-{1:05d}".format(output, index) # writer = tf.python_io.TFRecordWriter(output_path) # for example in iter: # writer.write(example) # return [output_path] # tfRDD = imageRDD.zip(labelRDD).map(lambda x: toTFExample(x[0], x[1])) # tfRDD.mapPartitionsWithIndex(writeTFRecords).collect() def readMNIST(sc, output, format): """Reads/verifies previously created output""" output_images = output + "/images" output_labels = output + "/labels" imageRDD = None labelRDD = None if format == "pickle": imageRDD = sc.pickleFile(output_images) labelRDD = sc.pickleFile(output_labels) elif format == "csv": imageRDD = sc.textFile(output_images).map(fromCSV) labelRDD = sc.textFile(output_labels).map(fromCSV) else: # format.startswith("tf"): # requires: --jars tensorflow-hadoop-1.0-SNAPSHOT.jar tfRDD = sc.newAPIHadoopFile(output, "org.tensorflow.hadoop.io.TFRecordFileInputFormat", keyClass="org.apache.hadoop.io.BytesWritable", valueClass="org.apache.hadoop.io.NullWritable") imageRDD = tfRDD.map(lambda x: fromTFExample(str(x[0]))) num_images = imageRDD.count() num_labels = labelRDD.count() if labelRDD is not None else num_images samples = imageRDD.take(10) print("num_images: ", num_images) print("num_labels: ", num_labels) print("samples: ", samples) if __name__ == "__main__": import argparse from pyspark.context import SparkContext from pyspark.conf import SparkConf parser = argparse.ArgumentParser() parser.add_argument("-f", "--format", help="output format", choices=["csv","csv2","pickle","tf","tfr"], default="csv") parser.add_argument("-n", "--num-partitions", help="Number of output partitions", type=int, default=10) parser.add_argument("-o", "--output", help="HDFS directory to save examples in parallelized format", default="mnist_data") parser.add_argument("-r", "--read", help="read previously saved examples", action="store_true") parser.add_argument("-v", "--verify", help="verify saved examples after writing", action="store_true") args = parser.parse_args() print("args:",args) sc = SparkContext(conf=SparkConf().setAppName("mnist_parallelize")) if not args.read: # Note: these files are inside the mnist.zip file writeMNIST(sc, "mnist/train-images-idx3-ubyte.gz", "mnist/train-labels-idx1-ubyte.gz", args.output + "/train", args.format, args.num_partitions) writeMNIST(sc, "mnist/t10k-images-idx3-ubyte.gz", "mnist/t10k-labels-idx1-ubyte.gz", args.output + "/test", args.format, args.num_partitions) if args.read or args.verify: readMNIST(sc, args.output + "/train", args.format) 提交训练任务,开始训练,在HDFS生成mnist_model,命令: ${SPARK_HOME}/bin/spark-submit \ --master ${MASTER} \ --py-files ${TFoS_HOME}/examples/mnist/spark/mnist_dist.py \ --conf spark.cores.max=${TOTAL_CORES} \ --conf spark.task.cpus=${CORES_PER_WORKER} \ --conf spark.executorEnv.JAVA_HOME="$JAVA_HOME" \ ${TFoS_HOME}/examples/mnist/spark/mnist_spark.py \ --cluster_size ${SPARK_WORKER_INSTANCES} \ --images examples/mnist/csv/train/images \ --labels examples/mnist/csv/train/labels \ --format csv \ --mode train \ --model mnist_model mnist_dist.py 构建TensorFlow 分布式任务,定义分布式任务主函数,启动TensorFlow主函数map_fun,数据获取方式Feeding。获取TensorFlow集群和服务器实例: cluster, server = TFNode.start_cluster_server(ctx, 1, args.rdma) TFNode调用tfspark.zip TFNode.py文件。 mnist_spark.py文件是训练主程序,TensorFlowOnSpark部署步骤: from __future__ import absolute_import from __future__ import division from __future__ import print_function from pyspark.context import SparkContext from pyspark.conf import SparkConf import argparse import os import numpy import sys import tensorflow as tf import threading import time from datetime import datetime from tensorflowonspark import TFCluster import mnist_dist sc = SparkContext(conf=SparkConf().setAppName("mnist_spark")) executors = sc._conf.get("spark.executor.instances") num_executors = int(executors) if executors is not None else 1 num_ps = 1 parser = argparse.ArgumentParser() parser.add_argument("-b", "--batch_size", help="number of records per batch", type=int, default=100) parser.add_argument("-e", "--epochs", help="number of epochs", type=int, default=1) parser.add_argument("-f", "--format", help="example format: (csv|pickle|tfr)", choices=["csv","pickle","tfr"], default="csv") parser.add_argument("-i", "--images", help="HDFS path to MNIST images in parallelized format") parser.add_argument("-l", "--labels", help="HDFS path to MNIST labels in parallelized format") parser.add_argument("-m", "--model", help="HDFS path to save/load model during train/inference", default="mnist_model") parser.add_argument("-n", "--cluster_size", help="number of nodes in the cluster", type=int, default=num_executors) parser.add_argument("-o", "--output", help="HDFS path to save test/inference output", default="predictions") parser.add_argument("-r", "--readers", help="number of reader/enqueue threads", type=int, default=1) parser.add_argument("-s", "--steps", help="maximum number of steps", type=int, default=1000) parser.add_argument("-tb", "--tensorboard", help="launch tensorboard process", action="store_true") parser.add_argument("-X", "--mode", help="train|inference", default="train") parser.add_argument("-c", "--rdma", help="use rdma connection", default=False) args = parser.parse_args() print("args:",args) print("{0} ===== Start".format(datetime.now().isoformat())) if args.format == "tfr": images = sc.newAPIHadoopFile(args.images, "org.tensorflow.hadoop.io.TFRecordFileInputFormat", keyClass="org.apache.hadoop.io.BytesWritable", valueClass="org.apache.hadoop.io.NullWritable") def toNumpy(bytestr): example = tf.train.Example() example.ParseFromString(bytestr) features = example.features.feature image = numpy.array(features['image'].int64_list.value) label = numpy.array(features['label'].int64_list.value) return (image, label) dataRDD = images.map(lambda x: toNumpy(str(x[0]))) else: if args.format == "csv": images = sc.textFile(args.images).map(lambda ln: [int(x) for x in ln.split(',')]) labels = sc.textFile(args.labels).map(lambda ln: [float(x) for x in ln.split(',')]) else: # args.format == "pickle": images = sc.pickleFile(args.images) labels = sc.pickleFile(args.labels) print("zipping images and labels") dataRDD = images.zip(labels) #1.为在Executor执行每个TensorFlow进程保留一个端口 cluster = TFCluster.run(sc, mnist_dist.map_fun, args, args.cluster_size, num_ps, args.tensorboard, TFCluster.InputMode.SPARK) #2.启动Tensorflow主函数 cluster.start(mnist_dist.map_fun, args) if args.mode == "train": #3.训练 cluster.train(dataRDD, args.epochs) else: #3.预测 labelRDD = cluster.inference(dataRDD) labelRDD.saveAsTextFile(args.output) #4.关闭Executor TensorFlow计算节点、参数服务节点 cluster.shutdown() print("{0} ===== Stop".format(datetime.now().isoformat())) 预测命令: ${SPARK_HOME}/bin/spark-submit \ --master ${MASTER} \ --py-files ${TFoS_HOME}/examples/mnist/spark/mnist_dist.py \ --conf spark.cores.max=${TOTAL_CORES} \ --conf spark.task.cpus=${CORES_PER_WORKER} \ --conf spark.executorEnv.JAVA_HOME="$JAVA_HOME" \ ${TFoS_HOME}/examples/mnist/spark/mnist_spark.py \ --cluster_size ${SPARK_WORKER_INSTANCES} \ --images examples/mnist/csv/test/images \ --labels examples/mnist/csv/test/labels \ --mode inference \ --format csv \ --model mnist_model \ --output predictions 还可以Amazon EC2运行及在Hadoop集群采用YARN模式运行。 参考资料:《TensorFlow技术解析与实战》 欢迎推荐上海机器学习工作机会,我的微信:qingxingfengzi

优秀的个人博客,低调大师

MQTT 折腾笔记----协议简读

导言 第一次听说MQTT 这玩意是由于要找个做手机推送的方案,后来发现,JPush这家伙做的实在不错,然后就不折腾了,最近,忽然心血来潮,把MQTT 协议看了一遍,网上的很多中文的资料都是坑爹的,全部都是说MQTT 做推送,我按图索骥全部都是转载翻译自老外2010写的这篇文章实在汗颜...后来,我改用全英文关键字,搜索总算发现了MQTT 的用处.如果,你不愿意看我的长篇大论我建议你去wiki那里看下MQTT 详细介绍 MQTT 解决什么事情? 对于需要要了解一个什么玩意,我们需要这玩意,解决我们什么事情.从WIKI 来看MQTT 协议主要解决的是机器与机器之间数据通信,各位想到什么没?有接触过物联网的话,可能有所了解了,当我们所有机器都能在一个网络上面分配的一个地址的话,由于,设备间的性能差异,低到可能就是一个插座,而你需要这个插座能进行数据通信,例如,控制这个插座的开-闭这类的,就需要一个极其轻量级的协议而MQTT 协议就是为此目的诞生的. 比较有趣的是,MQTT这个协议在1999 年就有了最新的版本是v3.1(2010/12/06),其适用于如下但不限于这几点: 即时传输的轻量级协议 专门设计用于低带宽或者高昂的网络费用 具备三种服务品质层级 MQTT 协议简读 MQTT 协议相对某些协议来说,实在是简短的令人发指,整个协议只用42页就说完了. MQTT v3 到 v3.1 有几点比较重要的变化个人感觉最重要的是从ascii 码转向 utf8的支持,不过我估计没人用过v3 所有我这里不多说了,有兴趣的,请翻阅一下协议文档..... 传输开销的比较 MQTT 最引以为豪的就是最小的2 byte 头部传输开销.我们看下其他流行的协议的message format的设计 XMPP消息体用的是xml |--------------------| | <stream> | |--------------------| | <presence> | | <show/> | | </presence> | |--------------------| | <message to='foo'> | | <body/> | | </message> | |--------------------| | <iq to='bar'> | | <query/> | | </iq> | |--------------------| | ... | |--------------------| | </stream> | |--------------------| HTTP HTTP-message = Request | Response ; HTTP/1.1 messages 还有很多协议,就不一样细说了,就举两个我比较了解的.就目前通用的协议来看很少有比MQTT 还要低的传输开销了.如果,你有了解的希望介绍一下. 消息体的设计简说 bit 7 6 5 4 3 2 1 0 byte 1 Message Type DUP flag QoS level RETAIN byte 2 Remaining Length 第一个byte 用于说明消息体的信息. 第二个byte 用于传输我们需要传输的数据. 更多详情请看协议 msg-format 部分 接下来,结合一个最简例子来对这个消息体进行说明 MQTT 最简例子 为了方便进行MQTT的了解与使用,目前MQTT的资料极其匮乏,也找不到什么给力的例子所以,随着我研究的深度,来慢慢提高这些例子的难度. 准备 服务端: nodejs:MQTT.js 客户端: nodejs:MQTT.js java:Paho 例子地址:https://github.com/youxiachai/mqttlesson/tree/master/LessonOnejava 版本暂未提供,晚些时候写个android的客户端.... 例子设计 为了简单,方便理解,这个例子: 服务器是一个广播模型 对于订阅/发布没有限制使用topic(主要是为了后面的知识做准备) 订阅者获取到一次发布者消息就断开连接 首先服务端启动,接着启动 mqttClientSub 例子流程图: clientA ->(connect) server 启动发布者:mqttClientPub 例子流程图: clientB ->(publish) server ->(pub) clientA 以上就是整个例子的流程 版权声明:原创作品,如需转载,请注明出处。否则将追究法律责任 本文转自 liam2199 博客,原文链接: http://blog.51cto.com/youxilua/1186126 如需转载请自行联系原作者

优秀的个人博客,低调大师

Android学习笔记--Content Provider 1

MicrosoftInternetExplorer402DocumentNotSpecified7.8Normal0 1.ContentProvider基本概念 A:ContentProvider提供为存储和获取数据提供了统一的接口 B:使用ContentProvider可以在不同的应用程序之间共享数据 C:Android为常见的一些数据提供了ContentProvider(包括音频,视频,图片和通讯录等等) 2.Uri A:每一个ContnetProvider都拥有一个公共的URI,这个URI用于表示这个ContnetProvider所提供的数据 B:Android所提供的ContentProvider都存放在android.provider包当中 3.ContnetProvider实现方法 Query Insert Update Delete getType onCreate 4.实现ContentProvider的过程 A:定义一个Content_URI常量 B:定义一个类,继承ContentProvider C:实现query,insertupdate,deletegetType,和onCreate方法; D:在AnroidManifest.xml当中进行声明; 例: //DatabaseHelper所为一个访问SQLite的助手类,提供两个方面的功能 //第一,getReadableDatabase()和getWritableDatabasr()可以获得SQLiteDatabase对象 //第二,提供onCreate和onUpgrade两个回调函数,允许我们在创建和升级数据库时,进行操作 例:publicclassDatabaseHelperextendsSQLiteOpenHelper{ //数据库版本号 PrivatestaticfinalintVERSION=1; //必须的构造函数 PublicDatabaseHelper(Contextcontext,Stringname,CursorFactoryfactory,intversion){ Super(context,name,factory,version); } PublicDatabaseHelper(Contextcontext,Stringname,intversion){ Super(context,name,null,version); } PublicDatabaseHelper(Contextcontext,Stringname){ Super(context,name,null,VERSION); } PublicvoidonCreate(SQLiteDatabasedb){ System.out.println("createadatabase"); //拼出了建表的语句 db..execSQL("createtable"+ FirstMetaData.USER_TABLE_NAME +"("+FirstMetaData.UserTableMetaData._ID +"INTEGERPRIMARYKEYAUTOINCREMENT," +FirstMetaData.UserTableMetaData.USER_NAME +"varchar(20));"; } PublicvoidonUpgrade(SQLiteDatabasedb){ System.out.println("updateadatabase"); } } ContentProviderActivity例: 1.声明控件对象(略) 2.获得控件对象(略) 3.绑定事件(略) 4.创建监听器对象 //insert PublicvoidonClick(Viewv){ ContentValuesvalues=newContentValues(); Values.put( FirstMetaData.UserTableMetaData.USER_NAME,"zhangsan" ); Uriuri=getContentesolver().insert( FirstMetaData.UserTableMetaData.CONTENT_URI,values ); System.out.println("uri---->"+uri.toString()); } //query PublicvoidonClick(Viewv){ Cursorc=getContentResolver().query( FirstMetaData.UserTableMetaData.CONTENT_URI,null,null,null,null ); While(c.moveToNext()){ System.out.println(c.getString(c.getColumnIndex(UserTableMeatData.USER_NAME))); } } 本文转自My_King1 51CTO博客,原文链接:http://blog.51cto.com/apprentice/1360568,如需转载请自行联系原作者

优秀的个人博客,低调大师

Android笔记:intent方法使用总结

1 2 3 4 5 6 7 8 9 10 11 12 13 14 15 16 17 18 19 20 21 22 23 24 25 26 27 28 29 30 31 32 33 34 35 36 37 38 39 40 41 42 43 44 45 46 47 48 49 50 51 52 53 54 55 56 57 58 59 60 61 62 63 64 65 66 67 68 69 70 71 72 73 74 75 76 77 78 79 80 81 82 83 84 85 86 87 88 89 90 91 92 93 94 95 96 97 98 99 100 101 102 103 104 105 106 107 108 109 110 111 112 113 114 115 116 117 118 119 120 121 122 123 124 125 126 127 128 129 130 //showwebapp: Uriuri=Uri.parse( "http://www.google.com" ); Intentit= new Intent(Intent.ACTION_VIEW,uri); startActivity(it); //showmaps: Uriuri=Uri.parse( "geo:38.899533,-77.036476" ); Intentit= new Intent(Intent.Action_VIEW,uri); startActivity(it); //showways Uriuri=Uri.parse( "http://maps.google.com/maps?f=d&saddr=startLat%20startLng&daddr=endLat%20endLng&hl=en" ); Intentit= new Intent(Intent.ACTION_VIEW,URI); startActivity(it); //calldialprogram Uriuri=Uri.parse( "tel:xxxxxx" ); Intentit= new Intent(Intent.ACTION_DIAL,uri); startActivity(it); Uriuri=Uri.parse( "tel.xxxxxx" ); Intentit= new Intent(Intent.ACTION_CALL,uri); //don'tforgetaddthisconfig:<uses-permissionid="android.permission.CALL_PHONE"/> //sendsms/mms //callsenderprogram Intentit= new Intent(Intent.ACTION_VIEW); it.putExtra( "sms_body" , "TheSMStext" ); it.setType( "vnd.android-dir/mms-sms" ); startActivity(it); //sendsms Uriuri=Uri.parse( "smsto:0800000123" ); Intentit= new Intent(Intent.ACTION_SENDTO,uri); it.putExtra( "sms_body" , "TheSMStext" ); startActivity(it); //sendmms Uriuri=Uri.parse( "content://media/external/images/media/23" ); Intentit= new Intent(Intent.ACTION_SEND); it.putExtra( "sms_body" , "sometext" ); it.putExtra(Intent.EXTRA_STREAM,uri); it.setType( "image/png" ); startActivity(it); //sendemail Uriuri=Uri.parse( "mailto:xxx@abc.com" ); Intentit= new Intent(Intent.ACTION_SENDTO,uri); startActivity(it); Intentit= new Intent(Intent.ACTION_SEND); it.putExtra(Intent.EXTRA_EMAIL, "me@abc.com" ); it.putExtra(Intent.EXTRA_TEXT, "Theemailbodytext" ); it.setType( "text/plain" ); startActivity(Intent.createChooser(it, "ChooseEmailClient" )); Intentit= new Intent(Intent.ACTION_SEND); String[]tos={ "me@abc.com" }; String[]ccs={ "you@abc.com" }; it.putExtra(Intent.EXTRA_EMAIL,tos); it.putExtra(Intent.EXTRA_CC,ccs); it.putExtra(Intent.EXTRA_TEXT, "Theemailbodytext" ); it.putExtra(Intent.EXTRA_SUBJECT, "Theemailsubjecttext" ); it.setType( "message/rfc822" ); startActivity(Intent.createChooser(it, "ChooseEmailClient" )); //addextra Intentit= new Intent(Intent.ACTION_SEND); it.putExtra(Intent.EXTRA_SUBJECT, "Theemailsubjecttext" ); it.putExtra(Intent.EXTRA_STREAM, "file:///sdcard/mysong.mp3" ); sendIntent.setType( "audio/mp3" ); startActivity(Intent.createChooser(it, "ChooseEmailClient" )); //playmedia Intentit= new Intent(Intent.ACTION_VIEW); Uriuri=Uri.parse( "file:///sdcard/song.mp3" ); it.setDataAndType(uri, "audio/mp3" ); startActivity(it); Uriuri=Uri.withAppendedPath(MediaStore.Audio.Media.INTERNAL_CONTENT_URI, "1" ); Intentit= new Intent(Intent.ACTION_VIEW,uri); startActivity(it); //Uninstall Uriuri=Uri.fromParts( "package" ,strPackageName, null ); Intentit= new Intent(Intent.ACTION_DELETE,uri); startActivity(it); //uninstallapk UriuninstallUri=Uri.fromParts( "package" , "xxx" , null ); returnIt= new Intent(Intent.ACTION_DELETE,uninstallUri); //installapk UriinstallUri=Uri.fromParts( "package" , "xxx" , null ); returnIt= new Intent(Intent.ACTION_PACKAGE_ADDED,installUri); //playaudio UriplayUri=Uri.parse( "file:///sdcard/download/everything.mp3" ); returnIt= new Intent(Intent.ACTION_VIEW,playUri); //sendextra Intentit= new Intent(Intent.ACTION_SEND); it.putExtra(Intent.EXTRA_SUBJECT, "Theemailsubjecttext" ); it.putExtra(Intent.EXTRA_STREAM, "file:///sdcard/eoe.mp3" ); sendIntent.setType( "audio/mp3" ); startActivity(Intent.createChooser(it, "ChooseEmailClient" )); //search Uriuri=Uri.parse( "market://search?q=pname:pkg_name" ); Intentit= new Intent(Intent.ACTION_VIEW,uri); startActivity(it); //wherepkg_nameisthefullpackagepathforanapplication //showprogramdetailpage Uriuri=Uri.parse( "market://details?id=app_id" ); Intentit= new Intent(Intent.ACTION_VIEW,uri); startActivity(it); //whereapp_idistheapplicationID,findtheID //byclickingonyourapplicationonMarkethome //page,andnoticetheIDfromtheaddressbar //searchgoogle Intentintent= new Intent(); intent.setAction(Intent.ACTION_WEB_SEARCH); intent.putExtra(SearchManager.QUERY, "searchString" ) startActivity(intent); 本文转自 glblong 51CTO博客,原文链接:http://blog.51cto.com/glblong/1613249,如需转载请自行联系原作者

优秀的个人博客,低调大师

Android笔记:onSaveInstanceState和onRestoreInstanceState总结

一、方法调用时间 onSaveInstanceState是用来保存UI状态,在Activity杀死之前,它一般在onStop或者onPause之前触发; onRestoreInstanceState是在onResume之前触发来恢复状态; Activity被杀死了,onCreate会被调用,且onRestoreInstanceState在 onResume之前恢复上次保存的信息; Activity没被杀死,onCreate不会被调用,但onRestoreInstanceState 仍然会被调用,在 onResume之前恢复上次保存的信息; 二、方法使用场景 onSaveInstanceState() 只有在Acitivity被系统kill掉时才会调用。所以通常onSaveInstanceState()只适合用于保存一些临时性的状态,而onPause()适合用于数据的持久化保存。 onSaveInstanceState()方法只适合保存瞬态数据, 比如UI控件的状态, 成员变量的值等,而不应该用来保存持久化数据,持久化数据应该当用户离开当前的activity时,在onPause()中保存(比如将数据保存到数据库或文件中)。说到这里,还要说一点的就是在onPause()中不适合用来保存比较费时的数据,所以这点要理解。 由于onSaveInstanceState()方法方法不一定会被调用, 因此不适合在该方法中保存持久化数据, 例如向数据库中插入记录等. 保存持久化数据的操作应该放在onPause()中。若是永久性值,则在onPause()中保存;若大量,则另开线程吧,别阻塞UI线程。 三、使用方法 1.在onSaveInstanceState方法中保存bundle: 1 2 3 4 5 6 7 8 9 10 11 12 13 14 15 16 17 @Override protected void onSaveInstanceState(BundleoutState) { super .onSaveInstanceState(outState); mMapView.onSaveInstanceState(outState); saveState(outState); } @Override protected void onRestoreInstanceState(BundleInState) { super .onRestoreInstanceState(InState); mMapView.onSaveInstanceState(InState); restoreState(InState); } 1 2 3 4 5 6 7 8 9 10 11 12 13 14 15 16 17 18 /** *进入三维模块后,该activity会被kill掉,此处保存被杀掉前的一些状态数据 * *@paramoutState */ private void saveState(BundleoutState) { outState.putParcelable(HBContant.KEY_STATE_ESTATEINFO_JSON,mJson); outState.putParcelable(HBContant.KEY_STATE_ESTATEINFO_GALLERY,mGalleryJson); outState.putParcelable(HBContant.KEY_STATE_ESTATEINFO_FLASH,mFlashJson); outState.putParcelableArrayList(HBContant.KEY_STATE_ESTATEINFO_VIDEO,mVideoList); outState.putParcelableArrayList(HBContant.KEY_STATE_ESTATEINFO_NEWS,mNewsList); outState.putParcelableArrayList(HBContant.KEY_STATE_ESTATEINFO_HOUSELIST,mEstateHouseList); } private void restoreState(BundleinState) { } 2.在oncreate或者onRestoreInstanceState方法中读取保存的bundle: 1 2 3 4 5 6 7 8 9 10 11 12 13 14 15 16 17 18 19 20 21 22 23 24 25 if (savedInstanceState== null ) { //正常情况 loadTask(); } else { //进入三维图被kill后返回,恢复页面数据 mJson=savedInstanceState.getParcelable(HBContant.KEY_STATE_ESTATEINFO_JSON); mGalleryJson=savedInstanceState.getParcelable(HBContant.KEY_STATE_ESTATEINFO_GALLERY); mFlashJson=savedInstanceState.getParcelable(HBContant.KEY_STATE_ESTATEINFO_FLASH); mVideoList=savedInstanceState.getParcelableArrayList(HBContant.KEY_STATE_ESTATEINFO_VIDEO); mNewsList=savedInstanceState.getParcelableArrayList(HBContant.KEY_STATE_ESTATEINFO_NEWS); mEstateHouseList=savedInstanceState.getParcelableArrayList(HBContant.KEY_STATE_ESTATEINFO_HOUSELIST); if (mJson!= null &&mGalleryJson!= null &&mFlashJson!= null &&mVideoList!= null &&mEstateHouseList!= null ) { loadComplete(); } else { loadTask(); } } 本文转自 glblong 51CTO博客,原文链接:http://blog.51cto.com/glblong/1432616,如需转载请自行联系原作者

优秀的个人博客,低调大师

Android学习笔记--WIFI的操作

MicrosoftInternetExplorer402DocumentNotSpecified7.8Normal0 1.什么是WIFI WIFI就是一种无线联网的技术,则又称为"热点" 2.获取WIFI网卡的状态 0-->正在关闭 1-->关闭状态 2-->正在打开 3-->网卡可用 4-->位置状态 3.操作WIFI所需要的权限 4.改变WIFI网卡的状态 例: 1.声明控件对象(略) 2.获得控件对象(略) 3.绑定事件(略) 4.创建监听器对象 PublicvoidonClick(Viewv){ WifiManagerwifiManager=(WifiManager)WifiActivity.this.getSystemService(Serivce.WIFI_SERVICE); wifiManager.setWifiEnabled(true);//打开WIfi网卡false关闭 System.out.println("wifistate--->"+wifiManager.getWifiState()); Toast.makeText(WifuActivity.this,"当前的WIFI网卡状态为"+wifiManager.getWifiState()); } 本文转自My_King1 51CTO博客,原文链接:http://blog.51cto.com/apprentice/1360563,如需转载请自行联系原作者

优秀的个人博客,低调大师

Android OpenGL 学习笔记 --开始篇

1、什么是 OpenGL? OpenGL是个专业的3D程序接口,是一个功能强大,调用方便的底层3D图形库。 OpenGL 的前身是 SGI 公司为其图形工作站开的 IRIS GL。IRIS GL 是一个工业标准的3D图形软件接口,功能虽然强大但是移植性不好,于是 SGI 公司便在 IRIS GL 的基础上开发 OpenGL 。具体详细的介绍请 点击这里。 2、OpenGL 的发展历程 1992年7月 发布了 OpenGL 1.0版本,并与微软共同推出 Windows NT 版本的 OpenGL。 1995年 OpenGL 1.1版本面市,加入了新功能,并引入了纹理特性等等。 一直到 2009年8月Khronos小组发布了 OpenGL3.2,这是一年以来 OpenGL进行的第三次重要升级。 具体特点及功能、 OpenGL现状、发展历程、 OpenGL规范、编程入门请 点击这里。 3、OpenGL ES 简介 Android 3D 引擎采用的是 OpenGL ES 。 OpenGL ES 是一套为手持和嵌入式系统设计的3D 引擎API ,由Khronos 公司维护。在PC 领域,一直有两种标准的3D API 进行竞争, OpenGL 和DirectX 。一般主流的游戏和显卡都支持这两种渲染方式,DirectX 在Windows 平台上有很大的优势,但是 OpenGL 具有更好的跨平台性。 由于嵌入式系统和PC 相比,一般说来,CPU 、内存等都比PC 差很多,而且对能耗有着特殊的要求,许多嵌入式设备并没有浮点运算协处理器,针对嵌入式系统的以上特点,Khronos 对标准的 OpenGL 系统进行了维护和改动,以期望满足嵌入式设备对3D 绘图的要求。 4、Android OpenGL ES简介 Android 系统使用 OpenGL 的标准接口来支持3D 图形功能,android 3D 图形系统也分为java 框架和本地代码两部分。本地代码主要实现的 OpenGL 接口的库,在Java 框架层,javax.microedition.khronos.opengles 是java 标准的 OpenGL 包,android.opengl 包提供了 OpenGL 系统和Android GUI 系统之间的联系。 5、Android 支持 OpenGL 列表 1、GL 2、GL 10 3、GL 10 EXT 4、GL 11 5、GL 11 EXT 6、GL 11 ExtensionPack 我们将使用 GL10 这个类开始接触 OpenGL,探索3D 领域。 6、一步一步实现自己的 Renderer 类 在 Android 中我们使用 GLSurfaceView 来显示 OpenGL视图,该类位于 android.opengl 包里面。它提供了一个专门用于渲染3D 的接口 Renderer 。接下来我们就来一步步构建自己的 Renderer 类。 1、为 Renderer 类赶回命名空间 import android.opengl.GLSurfaceView.Renderer; 2、新建一个类来实现 Renderer 接口,代码如下: public class ThreeDGl implements Renderer { } 3、如上代码所写,程序实现了 Renderer 类,则必须重写以下方法 public void onDrawFrame(GL10gl) { } public void onSurfaceChanged(GL10gl, int width, int height) {} public void onSurfaceCreated(GL10gl,EGLConfigconfig) {} 4、当窗口被创建时需要调用 onSurfaceCreate ,我们可以在这里对OpenGL做一些初始化工作,例如: // 启用阴影平滑 gl.glShadeModel(GL10.GL_SMOOTH); // 黑色背景 gl.glClearColor( 0 , 0 , 0 , 0 ); // 设置深度缓存 gl.glClearDepthf( 1.0f ); // 启用深度测试 gl.glEnable(GL10.GL_DEPTH_TEST); // 所作深度测试的类型 gl.glDepthFunc(GL10.GL_LEQUAL); // 告诉系统对透视进行修正 gl.glHint(GL10.GL_PERSPECTIVE_CORRECTION_HINT,GL10.GL_FASTEST); glHint 用于告诉OpenGL我们希望进行最好的透视修正,这会轻微地影响性能,但会使得透视图更好看。 glClearColor 设置清除屏幕时所用的颜色,色彩值的范围从 0.0f~1.0f 大小从暗到这的过程。 glShadeModel 用于启用阴影平滑度。阴影平滑通过多边形精细地混合色彩,并对外部光进行平滑。 glDepthFunc 为将深度缓存设想为屏幕后面的层,它不断地对物体进入屏幕内部的深度进行跟踪。 glEnable 启用深度测试。 5、当窗口大小发生改变时系统将调用 onSurfaceChange 方法,可以在该方法中设置OpenGL场景大小 ,代码如下: // 设置OpenGL场景的大小 gl.glViewport( 0 , 0 ,width,height); 6、场景画出来了,接下来我们就要实现场景里面的内容,比如:设置它的透视图,让它有种越远的东西看起来越小的感觉,代码如下: // 设置投影矩阵 gl.glMatrixMode(GL10.GL_PROJECTION); // 重置投影矩阵 gl.glLoadIdentity(); // 设置视口的大小 gl.glFrustumf( - ratio,ratio, - 1 , 1 , 1 , 10 ); // 选择模型观察矩阵 gl.glMatrixMode(GL10.GL_MODELVIEW); // 重置模型观察矩阵 gl.glLoadIdentity(); gl.glMatrixMode(GL10.GL_PROJECTION); 指明接下来的代码将影响 projection matrix (投影矩阵),投影矩阵负责为场景增加透视度。 gl.glLoadIdentity(); 此方法相当于我们手机的重置功能,它将所选择的矩阵状态恢复成原始状态,调用glLoadIdentity(); 之后为场景设置透视图。 gl.glMatrixMode(GL10.GL_MODELVIEW);指明任何新的变换将会影响 modelview matrix (模型观察矩阵)。 gl.glFrustumf(-ratio,ratio,-1,1,1,10);此方法,前面4个参数用于确定窗口的大小,而后面两个参数分别是在场景中所能绘制深度的起点和终点。 7、了解了上面两个重写方法的作用和功能之后,第三个方法 onDrawFrame 从字面上理解就知道此方法做绘制图操作的。嗯,没错。在绘图之前,需要将屏幕清除成前面所指定的颜色,清除尝试缓存并且重置场景,然后就可以绘图了, 代码如下: // 清除屏幕和深度缓存 gl.glClear(GL10.GL_COLOR_BUFFER_BIT | GL10.GL_DEPTH_BUFFER_BIT); // 重置当前的模型观察矩阵 gl.glLoadIdentity(); 8、Renderer 类在实现了上面的三个重写之后,在程序入口中只需要调用 Rendererrender = new ThreeDGl( this ); /** Calledwhentheactivityisfirstcreated. */ @Override public void onCreate(BundlesavedInstanceState){ super .onCreate(savedInstanceState); GLSurfaceViewgview = new GLSurfaceView( this ); gview.setRenderer(render); setContentView(gview); } 即可将我们绘制的图形显示出来。 下面分享一段使用Renderer类绘制的三角形和四边形的代码: OpenGL 参考代码 package com.terry; import java.nio.IntBuffer; import javax.microedition.khronos.egl.EGLConfig; import javax.microedition.khronos.opengles.GL10; import android.opengl.GLSurfaceView.Renderer; public class GLRender implements Renderer{ float rotateTri,rotateQuad; int one = 0x10000 ; // 三角形的一个顶点 private IntBuffertriggerBuffer = IntBuffer.wrap( new int []{ 0 ,one, 0 , // 上顶点 - one, - one, 0 , // 左顶点 one, - one, 0 // 右下点 }); // 正方形的四个顶点 private IntBufferquateBuffer = IntBuffer.wrap( new int []{ one,one, 0 , - one, - one, 0 , one, - one, 0 , - one, - one, 0 }); private IntBuffercolorBuffer = IntBuffer.wrap( new int []{ one, 0 , 0 ,one, 0 ,one, 0 ,one, 0 , 0 ,one,one }); @Override public void onDrawFrame(GL10gl){ // TODOAuto-generatedmethodstub // 清除屏幕和深度缓存 gl.glClear(GL10.GL_COLOR_BUFFER_BIT | GL10.GL_DEPTH_BUFFER_BIT); // 重置当前的模型观察矩阵 gl.glLoadIdentity(); // 左移1.5单位,并移入屏幕6.0 gl.glTranslatef( - 1.5f , 0.0f , - 6.0f ); // 设置旋转 gl.glRotatef(rotateTri, 0.0f , 1.0f , 0.0f ); // 设置定点数组 gl.glEnableClientState(GL10.GL_VERTEX_ARRAY); // 设置颜色数组 gl.glEnableClientState(GL10.GL_COLOR_ARRAY); gl.glColorPointer( 4 ,GL10.GL_FIXED, 0 ,colorBuffer); // 设置三角形顶点 gl.glVertexPointer( 3 ,GL10.GL_FIXED, 0 ,triggerBuffer); // 绘制三角形 gl.glDrawArrays(GL10.GL_TRIANGLES, 0 , 3 ); gl.glDisableClientState(GL10.GL_COLOR_ARRAY); // 绘制三角形结束 gl.glFinish(); /** ******************** */ /* 渲染正方形 */ // 重置当前的模型观察矩阵 gl.glLoadIdentity(); // 左移1.5单位,并移入屏幕6.0 gl.glTranslatef( 1.5f , 0.0f , - 6.0f ); // 设置当前色为蓝色 gl.glColor4f( 0.5f , 0.5f , 1.0f , 1.0f ); // 设置旋转 gl.glRotatef(rotateQuad, 1.0f , 0.0f , 0.0f ); // 设置和绘制正方形 gl.glVertexPointer( 3 ,GL10.GL_FIXED, 0 ,quateBuffer); gl.glDrawArrays(GL10.GL_TRIANGLE_STRIP, 0 , 4 ); // 绘制正方形结束 gl.glFinish(); // 取消顶点数组 gl.glDisableClientState(GL10.GL_VERTEX_ARRAY); // 改变旋转的角度 rotateTri += 0.5f ; rotateQuad -= 0.5f ; } @Override public void onSurfaceChanged(GL10gl, int width, int height){ // TODOAuto-generatedmethodstub float ratio = ( float )width / height; // 设置OpenGL场景的大小 gl.glViewport( 0 , 0 ,width,height); // 设置投影矩阵 gl.glMatrixMode(GL10.GL_PROJECTION); // 重置投影矩阵 gl.glLoadIdentity(); // 设置视口的大小 gl.glFrustumf( - ratio,ratio, - 1 , 1 , 1 , 10 ); // 选择模型观察矩阵 gl.glMatrixMode(GL10.GL_MODELVIEW); // 重置模型观察矩阵 gl.glLoadIdentity(); } @Override public void onSurfaceCreated(GL10gl,EGLConfigconfig){ // TODOAuto-generatedmethodstub // 启用阴影平滑 gl.glShadeModel(GL10.GL_SMOOTH); // 黑色背景 gl.glClearColor( 0 , 0 , 0 , 0 ); // 设置深度缓存 gl.glClearDepthf( 1.0f ); // 启用深度测试 gl.glEnable(GL10.GL_DEPTH_TEST); // 所作深度测试的类型 gl.glDepthFunc(GL10.GL_LEQUAL); // 告诉系统对透视进行修正 gl.glHint(GL10.GL_PERSPECTIVE_CORRECTION_HINT,GL10.GL_FASTEST); } } 到此基本对 OpenGL 有一些了解,当然OpenGL 还有更多的东西需要我们去探索,努力吧。 本文转自 terry_龙 51CTO博客,原文链接:http://blog.51cto.com/terryblog/346996,如需转载请自行联系原作者

优秀的个人博客,低调大师

Android学习笔记--Content Provider 2

FirstContentProvider继承ContentProvider例: PublicclassFirstContentProviderextendsContentProvider{ PublicstaticfinalUriMatcheruriMatcher; PublicstaticfinalintINCOMING_USER_COLLECTION=1; PublicstaticfinalintINCOMING_USER_SINGLE=2; Private DatabaseHelperdh; Static{ uriMatcher=newUriMatcher(UriMatcher.NO_MATCH); //URI限定名的添加验证定义了一个验证的规则 uriMatcher.addURI(FirstMetaData.AUTHORTY,"/users",INCOMING_USER_COLLECTION); uriMatcher.addURI(FirstMetaData.AUTHORTY,"/users/#",INCOMING_USER_SINGLE); } PublicstaticHashMap<String,String>userProjectionMap; Static { userProjectionMap=newHashMap<String,String>(); //._ID就是baseColumns实现的结果 userProjectionMap.put( FirstMetaData._ID,FirstMetaData._ID ); userProjectionMap.put( FirstMetaData.USER_NAME,FirstMetaData.USER_NAME ); } @Override Publicintdelete(Uriarg0,Stringarg1,String[]arg2){ System.out.println("delete"); Return0; } //根据传入的Uri,返回该Uri所表示的数据类型 @Override PublicStringgetType(Uriuri){ System.out.println("getType"); Switch(uriMatcher.match(uri)){ CaseINCOMING_USER_COLLECTION: Return FirstMetaData.CONTENT_TYPE; CaseINCOMING_USER_SINGLE: ReturnFirstMetaData.CONTENT_TYPE_ITEM; Default: ThrownewIllegalArgumentExecption("UnknownURI"+uri); } } //该函数的返回值是一个Uri,这个URi表示的是刚刚使用这个函数所插入的数据 //content:// com.android.FirstContentProvider/users/1 @Override PublicUriinsert(Uriuri,ContentValuevalues){ System.out.println("insert"); SQLiteDatabasedb=dh.getWrittableDatabase(); LongrowId=db.insert( FirstMetaData.TABLE_NAME,null,values ); If(rowId>0){ //以Content起头的Uri都可以用ContentUris来处理 UriinsertedUserUri=ContentUris.withAppendedId(UserTableMetaData.CONTENT_URI,rowId); //通知监听器,数据已经改变 getContext().getContentResolver().notifyChange(insertedUserUri,null); ReturninsertedUserUri; } ThrownewSQLExecption("Failedtoinsertrowinto"+uri); } @Override PublicbooleanonCreate(){ Dh=newDatabaseHelper(getContext(), FirstMetaData.DATABASE_NAME ); System.out.println("onCreate"); Returntrue; } @Override PublicCursorquery(Uriuri,String[]projection,Stringselection,String[]selectionArgs,StringsortOrder){ SQLiteQueryBuilderqb=newSQLiteQueryBuilder(); Switch(uriMatcher.match(uri)){ CaseINCOMING_USER_COLLECTION: qb.setTables( FirstMetaData.TABLE_NAME ); qb.setProjectionMap(userProjectionMap); Break; CaseINCOMING_USER_SINGLE: qb.setTables( FirstMetaData.TABLE_NAME ); qb.setProjectionMap(userProjectionMap); //取回了单条数据list qb.appendWhere( FirstMetaData._ID+"="+uri.getPathSeqments().get(1) ); Break; } StringorderBy; If(TextUtils.isEmpty(sortOrder)){ orderBy= FirstMetaData.DEFAULT_SORT_ORDER; }else{ orderBy=sortOrder; } SQLiteDatabasedb=dh.getWritableDatabase(); Cursorc=qb.query(db,projection,selection,selectionArgs,null,null,orderBy); c.setNotificationUri(getContext().getContentResolver(),uri); System.out.println("query"); Returnc; } @Override Publicintupdate(Uriarg0,ContentValuesarg1,Stringarg2,String[]arg3){ System.out.println("update"); } } FirstMetaData(一些静态常量)例: PublicclassFirstMetaData{ //URI限定名的名称包名+类名 PublicstaticfinalStringAUTHORTY="com.android.FirstContentProvider"; //数据库名称 PublicstaticfinalStringDATABASE_NAME="FirstContentProvider.db"; //数据库版本 PublicstaticfinalintDATABASE_VERSION=1; //表名 PublicstaticfinalStrintUSERS_TABLE_NAME="users"; //BaseColumns实现了表的_id列 PublicstaticfinalclassUserTableMetaDataimplementsBaseColumns{ //表名 PublicstaticfinalStringTABLE_NAME="users"; //访问该ContentProvider的URI PublicstaticfinalUriCONTENG_URI=Uri.parse("content://"+AUTHORY+"/users"); //整张表的数据类型是vnd.android.cursor.dir/vnd+name; PublicstaticfinalStringCONTENT_TYPE="vnd.android.cursor.dir/vnd.FinrstContentProvider.ser"; //单条数据类型定义vnd.android.cursor.item/vnd+name PublicstaticfinalStringCONTENT_TYPE_ITEM="vnd.android.cursor.item/vnd.FinrstContentProvider.user"; //列名 PublicstaticfinalStringUSER_NAME="name"; //默认排序方法 PublicstaticfinalStringDEFAULT_SORT_ORDER="_iddesc"; } } 最后在androidMnaifest.xml中注册provider与Activity同级authorities中的数据一定要与CONTENG_URI的一致 <providerandroid:name="com.android.FirstContentProvider" Android:authorities="com.android.FirstContentProvider"/> 本文转自My_King1 51CTO博客,原文链接:http://blog.51cto.com/apprentice/1360567,如需转载请自行联系原作者

资源下载

更多资源
腾讯云软件源

腾讯云软件源

为解决软件依赖安装时官方源访问速度慢的问题,腾讯云为一些软件搭建了缓存服务。您可以通过使用腾讯云软件源站来提升依赖包的安装速度。为了方便用户自由搭建服务架构,目前腾讯云软件源站支持公网访问和内网访问。

Nacos

Nacos

Nacos /nɑ:kəʊs/ 是 Dynamic Naming and Configuration Service 的首字母简称,一个易于构建 AI Agent 应用的动态服务发现、配置管理和AI智能体管理平台。Nacos 致力于帮助您发现、配置和管理微服务及AI智能体应用。Nacos 提供了一组简单易用的特性集,帮助您快速实现动态服务发现、服务配置、服务元数据、流量管理。Nacos 帮助您更敏捷和容易地构建、交付和管理微服务平台。

Spring

Spring

Spring框架(Spring Framework)是由Rod Johnson于2002年提出的开源Java企业级应用框架,旨在通过使用JavaBean替代传统EJB实现方式降低企业级编程开发的复杂性。该框架基于简单性、可测试性和松耦合性设计理念,提供核心容器、应用上下文、数据访问集成等模块,支持整合Hibernate、Struts等第三方框架,其适用范围不仅限于服务器端开发,绝大多数Java应用均可从中受益。

Sublime Text

Sublime Text

Sublime Text具有漂亮的用户界面和强大的功能,例如代码缩略图,Python的插件,代码段等。还可自定义键绑定,菜单和工具栏。Sublime Text 的主要功能包括:拼写检查,书签,完整的 Python API , Goto 功能,即时项目切换,多选择,多窗口等等。Sublime Text 是一个跨平台的编辑器,同时支持Windows、Linux、Mac OS X等操作系统。

用户登录
用户注册