Sentinel Java 客户端限流原理解析
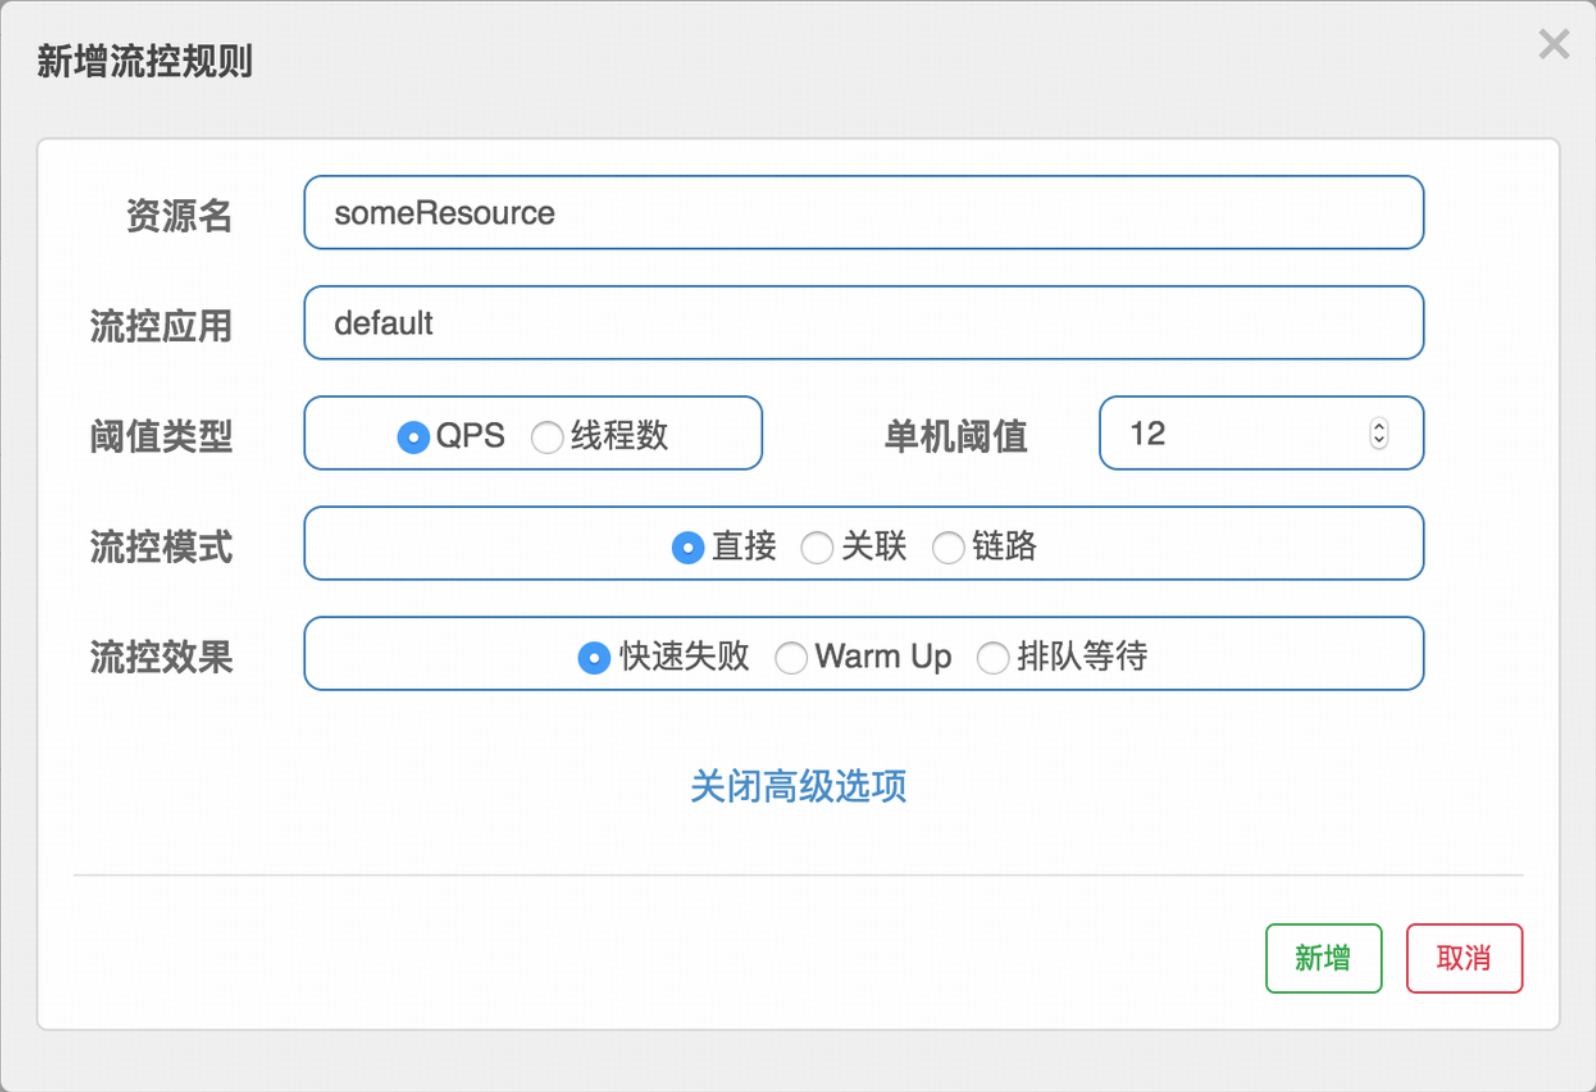
一、从一次 HTTP 请求开始 在一个生产环境中,服务节点通常暴露了成百上千个 HTTP 接口对外提供服务。为了保证系统的稳定性,核心 HTTP 接口往往需要配置限流规则。给 HTTP 接口配置限流,可以防止突发或恶意的高并发请求耗尽服务器资源(如 CPU、内存、数据库连接等),从而避免服务崩溃或引发雪崩效应。 基础示例 假设我们有下面这样一个 HTTP 接口,需要给它配置限流规则: @RestController @RequiredArgsConstructor @RequestMapping("/demo") public class DemoController { @RequestMapping("/hello") @SentinelResource("test_sentinel") public String hello() { return "hello world"; } } 使用起来非常简单。首先我们可以选择给接口加上 @SentinelResource 注解(也可以不加,如果不加 Sentinel 客户端会使用请求路径作为资源名,详细原理在后面章节讲解),然后到流控控制台给该资源配置流控规则即可。 二、限流规则的加载 限流规则的生效,是从限流规则的加载开始的。聚焦到客户端的 RuleLoader 类,可以看到它支持了多种规则的加载: 流控规则; 集群限流规则; 熔断规则; ...... RuleLoader 核心逻辑 RuleLoader 类的核心作用是将这些规则加载到缓存中,方便后续使用: public class RuleLoader { /** * 加载所有 Sentinel 规则到内存缓存 * * @param sentinelRules 包含各种规则的配置对象 */ public static void loadRule(SentinelRules sentinelRules) { if (sentinelRules == null) { return; } // 加载流控规则 FlowRuleManager.loadRules(sentinelRules.getFlowRules()); // 加载集群流控规则 RuleManager.loadClusterFlowRule(sentinelRules.getFlowRules()); // 加载参数流控规则 ParamFlowRuleManager.loadRules(sentinelRules.getParamFlowRules()); // 加载参数集群流控规则 RuleManager.loadClusterParamFlowRule(sentinelRules.getParamFlowRules()); // 加载熔断规则 DegradeRuleManager.loadRules(sentinelRules.getDegradeRules()); // 加载参数熔断规则 ParamDegradeRuleManager.loadRules(sentinelRules.getParamDegradeRules()); // 加载系统限流规则 SystemRuleManager.loadRules(sentinelRules.getSystemRules()); } } 流控规则加载详情 以流控规则的加载为例深入FlowRuleManager.loadRules 方法可以看到其完整的加载逻辑: public static void loadRules(List<FlowRule> rules) { // 通过动态配置属性更新规则值 currentProperty.updateValue(rules); } updateValue 方法负责通知所有监听器配置变更: public boolean updateValue(T newValue) { // 如果新旧值相同,无需更新 if (isEqual(value, newValue)) { return false; } RecordLog.info("[DynamicSentinelProperty] Config will be updated to: " + newValue); // 更新配置值 value = newValue; // 通知所有监听器配置已更新 for (PropertyListener<T> listener : listeners) { listener.configUpdate(newValue); } return true; } FlowPropertyListener 是流控规则变更的具体监听器实现: private static final class FlowPropertyListener implements PropertyListener<List<FlowRule>> { @Override public void configUpdate(List<FlowRule> value) { // 构建流控规则映射表(按资源名分组) Map<String, List<FlowRule>> rules = FlowRuleUtil.buildFlowRuleMap(value); if (rules != null) { // 清空旧规则 flowRules.clear(); // 加载新规则 flowRules.putAll(rules); } RecordLog.info("[FlowRuleManager] Flow rules received: " + flowRules); } } 三、SentinelServletFilter 过滤器 在 Sentinel 中,所有的资源都对应一个资源名称和一个 Entry。Entry 可以通过对主流框架的适配自动创建,也可以通过注解的方式或调用 API 显式创建。Entry 是限流的入口类,通过 @SentinelResource 注解的限流本质上也是通过 AOP 的方式进行了对 Entry 类的调用。 Entry 的编程范式 Entry 类的标准使用方式如下: // 资源名可使用任意有业务语义的字符串,比如方法名、接口名或其它可唯一标识的字符串 try (Entry entry = SphU.entry("resourceName")) { // 被保护的业务逻辑 // do something here... } catch (BlockException ex) { // 资源访问阻止,被限流或被降级 // 在此处进行相应的处理操作 } Servlet Filter 拦截逻辑 对于一个 HTTP 资源,在没有显式标注 @SentinelResource 注解的情况下,会有一个 Servlet Filter 类 SentinelServletFilter 统一进行拦截: public class SentinelServletFilter implements Filter { @Override public void doFilter(ServletRequest request, ServletResponse response, FilterChain chain) throws IOException, ServletException { HttpServletRequest sRequest = (HttpServletRequest) request; Entry urlEntry = null; try { // 获取并清理请求路径 String target = FilterUtil.filterTarget(sRequest); // 统一 URL 清理逻辑 // 对于 RESTful API,必须对 URL 进行清理(例如将 /foo/1 和 /foo/2 统一为 /foo/:id), // 否则上下文和资源的数量会超过阈值 SentinelUrlCleaner urlCleaner = SentinelUrlCleaner.SENTINEL_URL_CLEANER; if (urlCleaner != null) { target = urlCleaner.clean(sRequest, target); } // 如果请求路径不为空且非安全扫描,则进入限流逻辑 if (!StringUtil.isEmpty(target) && !isSecScan) { // 解析来源标识(用于来源限流) String origin = parseOrigin(sRequest); // 确定上下文名称 String contextName = webContextUnify ? WebServletConfig.WEB_SERVLET_CONTEXT_NAME : target; // 使用 WEB_SERVLET_CONTEXT_NAME 作为当前 Context 的名字 ContextUtil.enter(contextName, origin); // 根据配置决定是否包含 HTTP 方法 if (httpMethodSpecify) { String pathWithHttpMethod = sRequest.getMethod().toUpperCase() + COLON + target; // 实际进入到限流统计判断逻辑,资源名是 "方法:路径" urlEntry = SphU.entry(pathWithHttpMethod, ResourceTypeConstants.COMMON_WEB, EntryType.IN); } else { // 实际进入到限流统计判断逻辑,资源名是请求路径 urlEntry = SphU.entry(target, ResourceTypeConstants.COMMON_WEB, EntryType.IN); } } // 继续执行后续过滤器 chain.doFilter(request, response); } catch (BlockException e) { // 处理被限流的情况 HttpServletResponse sResponse = (HttpServletResponse) response; // 返回限流页面或重定向到其他 URL WebCallbackManager.getUrlBlockHandler().blocked(sRequest, sResponse, e); } catch (IOException * ServletException * RuntimeException e2) { // 记录异常信息用于统计 Tracer.traceEntry(e2, urlEntry); throw e2; } finally { // 释放 Entry 资源 if (urlEntry != null) { urlEntry.exit(); } // 退出当前上下文 ContextUtil.exit(); } } } 四、SentinelResourceAspect 切面 如果在接口上标注了 @SentinelResource 注解,还会有另外的逻辑处理。Sentinel 定义了一个单独的 AOP 切面 SentinelResourceAspect 专门用于处理注解限流。 SentinelResource 注解定义 先来看看 @SentinelResource 注解的完整定义: @Target({ElementType.METHOD, ElementType.TYPE}) @Retention(RetentionPolicy.RUNTIME) @Inherited public @interface SentinelResource { /** * Sentinel 资源的名称(即资源标识) * 必填项,不能为空 */ String value() default ""; /** * 资源的入口类型(入站 IN 或出站 OUT) * 默认为出站(OUT) */ EntryType entryType() default EntryType.OUT; /** * 资源的分类(类型) * 自 1.7.0 版本起支持 */ int resourceType() default 0; /** * 限流或熔断时调用的 block 异常处理方法的名称 * 默认为空(即不指定) */ String blockHandler() default ""; /** * blockHandler 所在的类 * 如果与原方法不在同一个类,需要指定此参数 */ Class<?>[] blockHandlerClass() default {}; /** * 降级(fallback)方法的名称 * 默认为空(即不指定) */ String fallback() default ""; /** * 用作通用的默认降级方法 * 该方法不能接收任何参数,且返回类型需与原方法兼容 */ String defaultFallback() default ""; /** * fallback 所在的类 * 如果与原方法不在同一个类,需要指定此参数 */ Class<?>[] fallbackClass() default {}; /** * 需要被追踪并触发 fallback 的异常类型列表 * 默认为 Throwable(即所有异常都会触发 fallback) */ Class<? extends Throwable>[] exceptionsToTrace() default {Throwable.class}; /** * 指定需要忽略的异常类型(即这些异常不会触发 fallback) * 注意:exceptionsToTrace 和 exceptionsToIgnore 不应同时使用; * 若同时存在,exceptionsToIgnore 优先级更高 */ Class<? extends Throwable>[] exceptionsToIgnore() default {}; } 实际使用示例 下面是一个完整的使用示例,展示了 @SentinelResource 注解的各种配置方式: @RestController public class SentinelController { @Autowired private ISentinelService service; @GetMapping(value = "/hello/{s}") public String apiHello(@PathVariable long s) { return service.hello(s); } } public interface ISentinelService { String hello(long s); } @Service @Slf4j public class SentinelServiceImpl implements ISentinelService { /** * Sentinel 提供了 @SentinelResource 注解用于定义资源 * * @param s 输入参数 * @return 返回结果 */ @Override // value:资源名称,必需项(不能为空) // blockHandler:对应处理 BlockException 的函数名称 // fallback:用于在抛出异常的时候提供 fallback 处理逻辑 @SentinelResource(value = "hello", blockHandler = "exceptionHandler", fallback = "helloFallback") public String hello(long s) { log.error("hello:{}", s); return String.format("Hello at %d", s); } /** * Fallback 函数 * 函数签名与原函数一致,或加一个 Throwable 类型的参数 */ public String helloFallback(long s) { log.error("helloFallback:{}", s); return String.format("Halooooo %d", s); } /** * Block 异常处理函数 * 参数最后多一个 BlockException,其余与原函数一致 */ public String exceptionHandler(long s, BlockException ex) { // Do some log here. log.error("exceptionHandler:{}", s); ex.printStackTrace(); return "Oops, error occurred at " + s; } } SentinelResourceAspect 核心逻辑 @SentinelResource 注解由 SentinelResourceAspect 切面处理,核心逻辑如下: @Aspect public class SentinelResourceAspect extends AbstractSentinelAspectSupport { @Pointcut("@annotation(com.alibaba.csp.sentinel.annotation.SentinelResource)") public void sentinelResourceAnnotationPointcut() { } @Around("sentinelResourceAnnotationPointcut()") public Object invokeResourceWithSentinel(ProceedingJoinPoint pjp) throws Throwable { // 获取目标方法 Method originMethod = resolveMethod(pjp); // 获取注解信息 SentinelResource annotation = originMethod.getAnnotation(SentinelResource.class); if (annotation == null) { throw new IllegalStateException("Wrong state for SentinelResource annotation"); } // 获取资源配置信息 String resourceName = getResourceName(annotation.value(), originMethod); EntryType entryType = annotation.entryType(); int resourceType = annotation.resourceType(); Entry entry = null; try { // 创建限流入口 entry = SphU.entry(resourceName, resourceType, entryType, pjp.getArgs()); // 执行原方法 Object result = pjp.proceed(); return result; } catch (BlockException ex) { // 处理被限流异常 return handleBlockException(pjp, annotation, ex); } catch (Throwable ex) { // 处理业务异常 Class<? extends Throwable>[] exceptionsToIgnore = annotation.exceptionsToIgnore(); // 优先检查忽略列表 if (exceptionsToIgnore.length > 0 && exceptionBelongsTo(ex, exceptionsToIgnore)) { throw ex; } // 检查异常是否在追踪列表中 if (exceptionBelongsTo(ex, annotation.exceptionsToTrace())) { traceException(ex); // 执行 fallback 逻辑 return handleFallback(pjp, annotation, ex); } // 没有 fallback 函数可以处理该异常,直接抛出 throw ex; } finally { // 释放 Entry 资源 if (entry != null) { entry.exit(1, pjp.getArgs()); } } } /** * 处理 BlockException * * blockHandler / blockHandlerClass 说明: * - blockHandler:对应处理 BlockException 的函数名称,可选项 * - blockHandler 函数签名:与原方法相匹配并且最后加一个额外的参数,类型为 BlockException * - blockHandler 函数默认需要和原方法在同一个类中 * - 若希望使用其他类的函数,则可以指定 blockHandlerClass 为对应的类的 Class 对象 * - 注意:blockHandlerClass 中对应的函数必须为 static 函数,否则无法解析 */ protected Object handleBlockException(ProceedingJoinPoint pjp, SentinelResource annotation, BlockException ex) throws Throwable { // 执行 blockHandler 方法(如果配置了的话) Method blockHandlerMethod = extractBlockHandlerMethod(pjp, annotation.blockHandler(), annotation.blockHandlerClass()); if (blockHandlerMethod != null) { Object[] originArgs = pjp.getArgs(); // 构造参数:原方法参数 + BlockException Object[] args = Arrays.copyOf(originArgs, originArgs.length + 1); args[args.length - 1] = ex; try { // 根据 static 方法与否进行不同的调用 if (isStatic(blockHandlerMethod)) { return blockHandlerMethod.invoke(null, args); } return blockHandlerMethod.invoke(pjp.getTarget(), args); } catch (InvocationTargetException e) { // 抛出实际的异常 throw e.getTargetException(); } } // 如果没有 blockHandler,则尝试执行 fallback return handleFallback(pjp, annotation, ex); } /** * 处理 Fallback 逻辑 * * fallback / fallbackClass 说明: * - fallback:fallback 函数名称,可选项,用于在抛出异常的时候提供 fallback 处理逻辑 * - fallback 函数可以针对所有类型的异常(除了 exceptionsToIgnore 里面排除掉的异常类型)进行处理 * * fallback 函数签名和位置要求: * - 返回值类型必须与原函数返回值类型一致 * - 方法参数列表需要和原函数一致,或者可以额外多一个 Throwable 类型的参数用于接收对应的异常 * - fallback 函数默认需要和原方法在同一个类中 * - 若希望使用其他类的函数,则可以指定 fallbackClass 为对应的类的 Class 对象 * - 注意:fallbackClass 中对应的函数必须为 static 函数,否则无法解析 */ protected Object handleFallback(ProceedingJoinPoint pjp, String fallback, String defaultFallback, Class<?>[] fallbackClass, Throwable ex) throws Throwable { Object[] originArgs = pjp.getArgs(); // 执行 fallback 函数(如果配置了的话) Method fallbackMethod = extractFallbackMethod(pjp, fallback, fallbackClass); if (fallbackMethod != null) { // 构造参数:根据 fallback 方法的参数数量决定是否添加异常参数 int paramCount = fallbackMethod.getParameterTypes().length; Object[] args; if (paramCount == originArgs.length) { args = originArgs; } else { args = Arrays.copyOf(originArgs, originArgs.length + 1); args[args.length - 1] = ex; } try { // 根据 static 方法与否进行不同的调用 if (isStatic(fallbackMethod)) { return fallbackMethod.invoke(null, args); } return fallbackMethod.invoke(pjp.getTarget(), args); } catch (InvocationTargetException e) { // 抛出实际的异常 throw e.getTargetException(); } } // 如果没有 fallback,尝试使用 defaultFallback return handleDefaultFallback(pjp, defaultFallback, fallbackClass, ex); } } 五、流控处理核心逻辑 从入口函数开始,我们深入到流控处理的核心逻辑。 入口函数调用链 public class SphU { /** * 创建限流入口 * * @param name 资源名称 * @param resourceType 资源类型 * @param trafficType 流量类型(IN 或 OUT) * @param args 参数数组 * @return Entry 对象 * @throws BlockException 如果被限流则抛出此异常 */ public static Entry entry(String name, int resourceType, EntryType trafficType, Object[] args) throws BlockException { return Env.sph.entryWithType(name, resourceType, trafficType, 1, args); } public static Entry entry(String name, EntryType trafficType, int batchCount) throws BlockException { return Env.sph.entry(name, trafficType, batchCount, OBJECTS0); } } public class CtSph implements Sph { @Override public Entry entry(String name, EntryType type, int count, Object... args) throws BlockException { StringResourceWrapper resource = new StringResourceWrapper(name, type); return entry(resource, count, args); } public Entry entry(ResourceWrapper resourceWrapper, int count, Object... args) throws BlockException { return entryWithPriority(resourceWrapper, count, false, args); } /** * 带优先级的入口方法,这是限流的核心逻辑 */ private Entry entryWithPriority(ResourceWrapper resourceWrapper, int count, boolean prioritized, Object... args) throws BlockException { Context context = ContextUtil.getContext(); // 如果上下文数量超过阈值,则不进行规则检查 if (context instanceof NullContext) { // NullContext 表示上下文数量超过了阈值,这里只初始化 Entry,不进行规则检查 return new CtEntry(resourceWrapper, null, context); } // 如果没有上下文,使用默认上下文 if (context == null) { context = InternalContextUtil.internalEnter(Constants.CONTEXT_DEFAULT_NAME); } // 如果全局开关关闭,则不进行规则检查 if (!Constants.ON) { return new CtEntry(resourceWrapper, null, context); } // 获取或创建 ProcessorSlotChain(责任链) ProcessorSlot<Object> chain = lookProcessChain(resourceWrapper); /* * 如果资源(slot chain)数量超过 {@link Constants.MAX_SLOT_CHAIN_SIZE}, * 则不进行规则检查 */ if (chain == null) { return new CtEntry(resourceWrapper, null, context); } // 创建 Entry 对象 Entry e = new CtEntry(resourceWrapper, chain, context); try { // 执行责任链进行规则检查 chain.entry(context, resourceWrapper, null, count, prioritized, args); } catch (BlockException e1) { // 如果被限流,释放 Entry 并抛出异常 e.exit(count, args); throw e1; } catch (Throwable e1) { // 这不应该发生,除非 Sentinel 内部存在错误 log.warn("Sentinel unexpected exception,{}", e1.getMessage()); } return e; } } ProcessorSlotChain 功能插槽链 lookProcessChain 方法实际创建了 ProcessorSlotChain 功能插槽链。ProcessorSlotChain 采用责任链模式,将不同的功能(限流、降级、系统保护)组合在一起。 SlotChain 的获取与创建 ProcessorSlot<Object> lookProcessChain(ResourceWrapper resourceWrapper) { // 先从缓存中获取 ProcessorSlotChain chain = chainMap.get(resourceWrapper); if (chain == null) { // 双重检查锁,保证线程安全 synchronized (LOCK) { chain = chainMap.get(resourceWrapper); if (chain == null) { // Entry 大小限制 if (chainMap.size() >= Constants.MAX_SLOT_CHAIN_SIZE) { return null; } // 创建新的 SlotChain chain = SlotChainProvider.newSlotChain(); // 使用不可变模式更新缓存 Map<ResourceWrapper, ProcessorSlotChain> newMap = new HashMap<ResourceWrapper, ProcessorSlotChain>(chainMap.size() + 1); newMap.putAll(chainMap); newMap.put(resourceWrapper, chain); chainMap = newMap; } } } return chain; } SlotChain 的构建 public class DefaultSlotChainBuilder implements SlotChainBuilder { @Override public ProcessorSlotChain build() { ProcessorSlotChain chain = new DefaultProcessorSlotChain(); // 通过 SPI 加载所有 ProcessorSlot 并排序 List<ProcessorSlot> sortedSlotList = SpiLoader.loadPrototypeInstanceListSorted(ProcessorSlot.class); for (ProcessorSlot slot : sortedSlotList) { // 只处理继承自 AbstractLinkedProcessorSlot 的 Slot if (!(slot instanceof AbstractLinkedProcessorSlot)) { RecordLog.warn("The ProcessorSlot(" + slot.getClass().getCanonicalName() + ") is not an instance of AbstractLinkedProcessorSlot, can't be added into ProcessorSlotChain"); continue; } // 将 Slot 添加到责任链尾部 chain.addLast((AbstractLinkedProcessorSlot<?>) slot); } return chain; } } SlotChain 的功能划分 Slot Chain 可以分为两部分: 统计数据构建部分(statistic):负责收集各种指标数据; 判断部分(rule checking):根据规则判断是否限流。 官方架构图很好地解释了各个 Slot 的作用及其负责的部分。目前 ProcessorSlotChain 的设计是一个资源对应一个,构建好后缓存起来,方便下次直接取用。 各 Slot 的执行顺序 以下是 Sentinel 中各个 Slot 的默认执行顺序: NodeSelectorSlot ↓ ClusterBuilderSlot ↓ StatisticSlot ↓ ParamFlowSlot ↓ SystemSlot ↓ AuthoritySlot ↓ FlowSlot ↓ DegradeSlot NodeSelectorSlot - 上下文节点选择 这个功能插槽主要为资源下不同的上下文创建对应的 DefaultNode(实际用于统计指标信息)。解释一下Sentinel中的Node是什么,简单来说就是每个资源统计指标存放的容器,只不过内部由于不同的统计口径(秒级、分钟及)而分别有不同的统计窗口。Node在Sentinel不是单一的结构,而是总体上形成父子关系的树形结构。 不同的调用会有不同的 context 名称,如在当前 MVC 场景下,上下文为 sentinel_web_servlet_context。 public class NodeSelectorSlot extends AbstractLinkedProcessorSlot<Object> { /** * 同一个资源在不同上下文中的 DefaultNode 映射 */ private volatile Map<String, DefaultNode> map = new HashMap<String, DefaultNode>(10); @Override public void entry(Context context, ResourceWrapper resourceWrapper, Object obj, int count, boolean prioritized, Object... args) throws Throwable { // 从映射表中获取当前上下文对应的节点 DefaultNode node = map.get(context.getName()); if (node == null) { // 双重检查锁,保证线程安全 synchronized (this) { node = map.get(context.getName()); if (node == null) { // 创建新的 DefaultNode node = new DefaultNode(resourceWrapper, null); // 使用写时复制更新缓存 HashMap<String, DefaultNode> cacheMap = new HashMap<String, DefaultNode>(map.size()); cacheMap.putAll(map); cacheMap.put(context.getName(), node); map = cacheMap; // 构建调用树 ((DefaultNode) context.getLastNode()).addChild(node); } } } // 设置当前上下文的当前节点 context.setCurNode(node); // 继续执行后续 Slot fireEntry(context, resourceWrapper, node, count, prioritized, args); } @Override public void exit(Context context, ResourceWrapper resourceWrapper, int count, Object... args) { fireExit(context, resourceWrapper, count, args); } } ClusterBuilderSlot - 集群节点构建 这个功能槽主要用于创建 ClusterNode。ClusterNode 和 DefaultNode 的区别是: DefaultNode 是特定于上下文的(context-specific); ClusterNode 是不区分上下文的(context-independent),用于统计该资源在所有上下文中的整体数据。 @public class ClusterBuilderSlot extends AbstractLinkedProcessorSlot<DefaultNode> { /** * 全局 ClusterNode 映射表 */ private static volatile Map<ResourceWrapper, ClusterNode> clusterNodeMap = new HashMap<>(); private static final Object lock = new Object(); private volatile ClusterNode clusterNode = null; @Override public void entry(Context context, ResourceWrapper resourceWrapper, DefaultNode node, int count, boolean prioritized, Object... args) throws Throwable { // 创建 ClusterNode(如果不存在) if (clusterNode == null) { synchronized (lock) { if (clusterNode == null) { // 创建集群节点 clusterNode = new ClusterNode(resourceWrapper.getName(), resourceWrapper.getResourceType()); // 更新全局映射表 HashMap<ResourceWrapper, ClusterNode> newMap = new HashMap<>(Math.max(clusterNodeMap.size(), 16)); newMap.putAll(clusterNodeMap); newMap.put(node.getId(), clusterNode); clusterNodeMap = newMap; } } } // 将 ClusterNode 设置到 DefaultNode 中 node.setClusterNode(clusterNode); // 如果有来源标识,则创建 origin node if (!"".equals(context.getOrigin())) { Node originNode = node.getClusterNode().getOrCreateOriginNode(context.getOrigin()); context.getCurEntry().setOriginNode(originNode); } // 继续执行后续 Slot fireEntry(context, resourceWrapper, node, count, prioritized, args); } } StatisticSlot - 统计插槽 StatisticSlot 是 Sentinel 最重要的类之一,用于根据规则判断结果进行相应的统计操作。 统计逻辑说明 entry 的时候: 依次执行后续的判断 Slot; 每个 Slot 触发流控会抛出异常(BlockException 的子类); 若有 BlockException 抛出,则记录 block 数据; 若无异常抛出则算作可通过(pass),记录 pass 数据。 exit 的时候: 若无 error(无论是业务异常还是流控异常),记录 complete(success)以及 RT,线程数 -1。 记录数据的维度: 线程数 +1; 记录当前 DefaultNode 数据; 记录对应的 originNode 数据(若存在 origin); 累计 IN 统计数据(若流量类型为 IN)。 @public class StatisticSlot extends AbstractLinkedProcessorSlot<DefaultNode> { @Override public void entry(Context context, ResourceWrapper resourceWrapper, DefaultNode node, int count, boolean prioritized, Object... args) throws Throwable { try { // 此位置会调用 SlotChain 中后续的所有 Slot,完成所有规则检测 fireEntry(context, resourceWrapper, node, count, prioritized, args); // 请求通过,增加线程数和通过数 // 代码运行到这个位置,就证明之前的所有 Slot 检测都通过了 // 此时就可以统计请求的相应数据了 // 增加线程数(+1) node.increaseThreadNum(); // 增加通过请求的数量(这里涉及到滑动窗口算法) node.addPassRequest(count); // 省略其他统计逻辑... } catch (PriorityWaitException ex) { // 如果是优先级等待异常,记录优先级等待数 node.increaseThreadNum(); if (context.getCurEntry().getOriginNode() != null) { context.getCurEntry().getOriginNode().increaseThreadNum(); } if (resourceWrapper.getEntryType() == EntryType.IN) { // 记录入站统计数据 Constants.ENTRY_NODE.increaseThreadNum(); } throw ex; } catch (BlockException e) { // 如果被限流,记录被限流数 // 省略 block 统计逻辑... throw e; } catch (Throwable ex) { // 如果发生业务异常,记录异常数 // 省略异常统计逻辑... throw ex; } } @Override public void exit(Context context, ResourceWrapper resourceWrapper, int count, Object... args) { // 若无 error(无论是业务异常还是流控异常),记录 complete(success)以及 RT,线程数-1 // 记录数据的维度:线程数+1、记录当前 DefaultNode 数据、记录对应的 originNode 数据(若存在 origin) // 、累计 IN 统计数据(若流量类型为 IN) // 省略 exit 统计逻辑... } } StatisticNode 数据结构 到这里,StatisticSlot 的作用已经比较清晰了。接下来我们需要分析它的统计数据结构。fireEntry 调用向下的节点和之前的方式一样,剩下的节点主要包括: ParamFlowSlot; SystemSlot; AuthoritySlot; FlowSlot; DegradeSlot; 其中比较常见的是流控和熔断:FlowSlot、DegradeSlot,所以下面我们着重分析 FlowSlot。 六、FlowSlot - 流控插槽 这个 Slot 主要根据预设的资源的统计信息,按照固定的次序依次生效。如果一个资源对应两条或者多条流控规则,则会根据如下次序依次检验,直到全部通过或者有一个规则生效为止。 FlowSlot 核心逻辑 @SpiOrder(-2000) public class FlowSlot extends AbstractLinkedProcessorSlot<DefaultNode> { @Override public void entry(Context context, ResourceWrapper resourceWrapper, DefaultNode node, int count, boolean prioritized, Object... args) throws Throwable { // 执行流控检查 checkFlow(resourceWrapper, context, node, count, prioritized); // 继续执行后续 Slot fireEntry(context, resourceWrapper, node, count, prioritized, args); } // 省略其他方法... } checkFlow 方法详解 /** * 执行流控检查 * * @param ruleProvider 规则提供者函数 * @param resource 资源包装器 * @param context 上下文 * @param node 节点 * @param count 请求数量 * @param prioritized 是否优先 * @throws BlockException 如果被限流则抛出异常 */ public void checkFlow(Function<String, Collection<FlowRule>> ruleProvider, ResourceWrapper resource, Context context, DefaultNode node, int count, boolean prioritized) throws BlockException { // 判断规则和资源不能为空 if (ruleProvider == null ** resource == null) { return; } // 获取指定资源的所有流控规则 Collection<FlowRule> rules = ruleProvider.apply(resource.getName()); // 逐个应用流控规则。若无法通过则抛出异常,后续规则不再应用 if (rules != null) { for (FlowRule rule : rules) { if (!canPassCheck(rule, context, node, count, prioritized)) { // FlowException 继承 BlockException throw new FlowException(rule.getLimitApp(), rule); } } } } 通过这里我们就可以得知,流控规则是通过 FlowRule 来完成的,数据来源是我们使用的流控控制台,也可以通过代码进行设置。 FlowRule 流控规则 每条流控规则主要由三个要素构成: grade(阈值类型):按 QPS(每秒请求数)还是线程数进行限流; strategy(调用关系策略):基于调用关系的流控策略; controlBehavior(流控效果):当 QPS 超过阈值时的流量整形行为。 public class FlowRule extends AbstractRule { public FlowRule() { super(); // 来源默认 Default setLimitApp(RuleConstant.LIMIT_APP_DEFAULT); } public FlowRule(String resourceName) { super(); // 资源名称 setResource(resourceName); setLimitApp(RuleConstant.LIMIT_APP_DEFAULT); } /** * 流控的阈值类型 * 0: 线程数 * 1: QPS */ private int grade = RuleConstant.FLOW_GRADE_QPS; /** * 流控阈值 */ private double count; /** * 基于调用链的流控策略 * STRATEGY_DIRECT: 直接流控(按来源) * STRATEGY_RELATE: 关联流控(关联资源) * STRATEGY_CHAIN: 链路流控(按入口资源) */ private int strategy = RuleConstant.STRATEGY_DIRECT; /** * 关联流控模式下的关联资源 */ private String refResource; /** * 流控效果(流量整形行为) * 0: 默认(直接拒绝) * 1: 预热(Warm Up) * 2: 排队等待(Rate Limiter) * 3: 预热 + 排队等待(目前控制台没有) */ private int controlBehavior = RuleConstant.CONTROL_BEHAVIOR_DEFAULT; /** * 预热时长(秒) */ private int warmUpPeriodSec = 10; /** * 排队等待的最大超时时间(毫秒) */ private int maxQueueingTimeMs = 500; /** * 是否为集群模式 */ private boolean clusterMode; /** * 集群模式配置 */ private ClusterFlowConfig clusterConfig; /** * 流量整形控制器 */ private TrafficShapingController controller; // 省略 getter/setter 方法... } 七、滑动窗口算法 不管流控规则采用何种流控算法,在底层都需要有支持指标统计的数据结构作为支撑。在 Sentinel 中,用于支撑基于 QPS 等限流的数据结构是 StatisticNode。 StatisticNode 数据结构 public class StatisticNode implements Node { /** * 保存最近 1 秒内的统计数据 * 每个桶(bucket)500ms,共 2 个桶 */ private transient volatile Metric rollingCounterInSecond = new ArrayMetric(SampleCountProperty.SAMPLE_COUNT, IntervalProperty.INTERVAL); /** * 保存最近 60 秒的统计数据 * windowLengthInMs 被特意设置为 1000 毫秒,即每个桶代表 1 秒 * 共 60 个桶,这样可以获得每秒精确的统计信息 */ private transient Metric rollingCounterInMinute = new ArrayMetric(60, 60 * 1000, false); // 省略其他字段和方法... } ArrayMetric 核心实现 ArrayMetric 是 Sentinel 中数据采集的核心,内部使用了 BucketLeapArray,即滑动窗口的思想进行数据的采集。 public class ArrayMetric implements Metric { /** * 滑动窗口数组 */ private final LeapArray<MetricBucket> data; public ArrayMetric(int sampleCount, int intervalInMs) { this.data = new OccupiableBucketLeapArray(sampleCount, intervalInMs); } public ArrayMetric(int sampleCount, int intervalInMs, boolean enableOccupy) { if (enableOccupy) { // 可抢占的滑动窗口,支持借用未来窗口的配额 this.data = new OccupiableBucketLeapArray(sampleCount, intervalInMs); } else { // 普通滑动窗口 this.data = new BucketLeapArray(sampleCount, intervalInMs); } } } 这里有两种实现: BucketLeapArray:普通滑动窗口,每个时间桶仅记录固定时间窗口内的指标数据; OccupiableBucketLeapArray:扩展实现,支持"抢占"未来时间窗口的令牌或容量,在流量突发时允许借用后续窗口的配额,实现更平滑的限流效果。 BucketLeapArray - 滑动窗口实现 LeapArray 核心属性 LeapArray 是滑动窗口的基础类,其核心属性如下: /** * 窗口大小(长度),单位:毫秒 * 例如:1000ms */ private int windowLengthInMs; /** * 样本数(桶的数量) * 例如:5(表示 5 个桶,每个 1000ms,总共 5 秒) */ private int sampleCount; /** * 采集周期(总时间窗口长度),单位:毫秒 * 例如:5 * 1000ms(5 秒) */ private int intervalInMs; /** * 窗口数组,array 长度就是样本数 sampleCount */ protected final AtomicReferenceArray<WindowWrap<T>> array; /** * 更新窗口数据的锁,保证数据的正确性 */ private final ReentrantLock updateLock; WindowWrap 窗口包装器 每个窗口包装器包含三个属性: public class WindowWrap<T> { /** * 窗口大小(长度),单位:毫秒 * 与 LeapArray 中的 windowLengthInMs 一致 */ private final long windowLengthInMs; /** * 窗口开始时间戳 * 它的值是 windowLengthInMs 的整数倍 */ private long windowStart; /** * 窗口数据(泛型 T) * Sentinel 目前只有 MetricBucket 类型,存储统计数据 */ private T value; } MetricBucket 指标桶 public class MetricBucket { /** * 计数器数组 * 长度是需要统计的事件种类数,目前是 6 个 * LongAdder 是线程安全的计数器,性能优于 AtomicLong */ private final LongAdder[] counters; // 省略其他字段和方法... } 滑动窗口工作原理 LeapArray 统计数据的基本思路: 创建一个长度为 n 的数组,数组元素就是窗口; 每个窗口包装了 1 个指标桶,桶中存放了该窗口时间范围内对应的请求统计数据; 可以想象成一个环形数组在时间轴上向右滚动; 请求到达时,会命中数组中的一个窗口,该请求的数据就会存到命中的这个窗口包含的指标桶中; 当数组转满一圈时,会回到数组的开头; 此时下标为 0 的元素需要重复使用,它里面的窗口数据过期了,需要重置,然后再使用。 获取当前窗口 LeapArray 获取当前时间窗口的方法: /** * 获取当前时间戳对应的窗口 * * @return 当前时间的窗口 */ public WindowWrap<T> currentWindow() { return currentWindow(TimeUtil.currentTimeMillis()); } /** * 获取指定时间戳对应的窗口(核心方法) * * @param timeMillis 时间戳(毫秒) * @return 对应的窗口 */ public WindowWrap<T> currentWindow(long timeMillis) { if (timeMillis < 0) { return null; } // 计算数组下标 int idx = calculateTimeIdx(timeMillis); // 计算当前请求对应的窗口开始时间 long windowStart = calculateWindowStart(timeMillis); // 无限循环,确保能够获取到窗口 while (true) { // 取窗口 WindowWrap<T> old = array.get(idx); if (old == null) { // 第一次使用,创建新窗口 WindowWrap<T> window = new WindowWrap<T>(windowLengthInMs, windowStart, newEmptyBucket(timeMillis)); // CAS 操作,确保只初始化一次 if (array.compareAndSet(idx, null, window)) { // 成功更新,返回创建的窗口 return window; } else { // CAS 失败,让出时间片,等待其他线程完成初始化 Thread.yield(); } } else if (windowStart == old.windowStart()) { // 命中:取出的窗口的开始时间和本次请求计算出的窗口开始时间一致 return old; } else if (windowStart > old.windowStart()) { // 窗口过期:本次请求计算出的窗口开始时间大于取出的窗口 // 说明取出的窗口过期了,需要重置 if (updateLock.tryLock()) { try { // 成功获取锁,更新窗口开始时间,计数器重置 return resetWindowTo(old, windowStart); } finally { updateLock.unlock(); } } else { // 获取锁失败,让出时间片,等待其他线程更新 Thread.yield(); } } else if (windowStart < old.windowStart()) { // 异常情况:机器时钟回拨等 // 正常情况不会进入该分支 return new WindowWrap<T>(windowLengthInMs, windowStart, newEmptyBucket(timeMillis)); } } } 数据存储 在获取到窗口之后,就可以存储数据了。ArrayMetric 实现了 Metric 中存取数据的接口方法。 示例:存储 RT(响应时间) /** * 添加响应时间数据 * * @param rt 响应时间(毫秒) */ public void addRT(long rt) { // 获取当前时间窗口,data 为 BucketLeapArray WindowWrap<MetricBucket> wrap = data.currentWindow(); // 计数 wrap.value().addRT(rt); } /** * MetricBucket 的 addRT 方法 * * @param rt 响应时间 */ public void addRT(long rt) { // 记录 RT 时间对 rt 值 add(MetricEvent.RT, rt); // 记录最小响应时间(非线程安全,但没关系) if (rt < minRt) { minRt = rt; } } /** * 通用的计数方法 * * @param event 事件类型 * @param n 增加的数量 * @return 当前桶 */ public MetricBucket add(MetricEvent event, long n) { counters[event.ordinal()].add(n); return this; } 数据读取 示例:读取 RT(响应时间) /** * 获取总响应时间 * * @return 总响应时间 */ public long rt() { // 触发当前窗口更新(处理过期窗口) data.currentWindow(); long rt = 0; // 取出所有的 bucket List<MetricBucket> list = data.values(); for (MetricBucket window : list) { rt += window.rt(); // 求和 } return rt; } /** * 获取所有有效的窗口 * * @return 有效窗口列表 */ public List<T> values() { return values(TimeUtil.currentTimeMillis()); } /** * 获取指定时间之前的所有有效窗口 * * @param timeMillis 时间戳 * @return 有效窗口列表 */ public List<T> values(long timeMillis) { if (timeMillis < 0) { return new ArrayList<T>(); // 正常情况不会到这里 } int size = array.length(); List<T> result = new ArrayList<T>(size); for (int i = 0; i < size; i++) { WindowWrap<T> windowWrap = array.get(i); // 过滤掉没有初始化过的窗口和过期的窗口 if (windowWrap == null ** isWindowDeprecated(timeMillis, windowWrap)) { continue; } result.add(windowWrap.value()); } return result; } /** * 判断窗口是否过期 * * @param time 给定时间(通常是当前时间) * @param windowWrap 窗口包装器 * @return 如果过期返回 true */ public boolean isWindowDeprecated(long time, WindowWrap<T> windowWrap) { // 给定时间与窗口开始时间超过了一个采集周期 return time - windowWrap.windowStart() > intervalInMs; } OccupiableBucketLeapArray - 可抢占窗口 为什么需要 OccupiableBucketLeapArray? 假设一个资源的访问 QPS 稳定是 10,请求是均匀分布的: 在时间 0.0-1.0 秒区间中,通过了 10 个请求; 在 1.1 秒的时候,观察到的 QPS 可能只有 5,因为此时第一个时间窗口被重置了,只有第二个时间窗口有值; 当在秒级统计的情形下,用 BucketLeapArray 会有 0~50%的数据误这时就要用 OccupiableBucketLeapArray 来解决这个问题。 OccupiableBucketLeapArray 实现 从上面我们可以看到在秒级统计 rollingCounterInSecond 中,初始化实例时有两种构造参数: public class OccupiableBucketLeapArray extends LeapArray<MetricBucket> { /** * 借用未来窗口的数组 */ private final FutureBucketLeapArray borrowArray; public OccupiableBucketLeapArray(int sampleCount, int intervalInMs) { super(sampleCount, intervalInMs); // 创建借用窗口数组 this.borrowArray = new FutureBucketLeapArray(sampleCount, intervalInMs); } /** * 创建新的空桶 * 会从 borrowArray 中借用数据 */ @Override public MetricBucket newEmptyBucket(long time) { MetricBucket newBucket = new MetricBucket(); // 获取借用窗口的数据 MetricBucket borrowBucket = borrowArray.getWindowValue(time); if (borrowBucket != null) { // 将借用数据复制到新桶中 newBucket.reset(borrowBucket); } return newBucket; } /** * 重置窗口 * 会从 borrowArray 中借用 pass 数据 */ @Override protected WindowWrap<MetricBucket> resetWindowTo(WindowWrap<MetricBucket> w, long time) { // 更新开始时间并重置值 w.resetTo(time); MetricBucket borrowBucket = borrowArray.getWindowValue(time); if (borrowBucket != null) { // 重置桶值并添加借用的 pass 数据 w.value().reset(); w.value().addPass((int) borrowBucket.pass()); } else { w.value().reset(); } return w; } /** * 获取当前等待中的请求数量 */ @Override public long currentWaiting() { borrowArray.currentWindow(); long currentWaiting = 0; List<MetricBucket> list = borrowArray.values(); for (MetricBucket window : list) { currentWaiting += window.pass(); } return currentWaiting; } /** * 添加等待中的请求数量 * * @param time 时间 * @param acquireCount 获取数量 */ @Override public void addWaiting(long time, int acquireCount) { WindowWrap<MetricBucket> window = borrowArray.currentWindow(time); window.value().add(MetricEvent.PASS, acquireCount); } } 八、总结 至此,Sentinel 的基本情况都已经分析完成。以上内容主要讲解了 Sentinel 的核心处理流程,包括: 核心流程总结 规则加载: 通过 RuleLoader 将各种规则(流控、熔断、系统限流等)加载到内存缓存中。 请求拦截: 通过 SentinelServletFilter 过滤器拦截 HTTP 请求; 通过SentinelResourceAspect切面处理 @SentinelResource 注解。 责任链处理: 使用 ProcessorSlotChain 责任链模式组合多个功能插槽; 每个插槽负责特定的功能(统计、流控、熔断等)。 流控判断: FlowSlot 根据流控规则判断是否限流; 通过滑动窗口算法统计 QPS、线程数等指标。 异常处理: 被限流时抛出 BlockException; 通过 blockHandler 或 fallback 处理异常。 核心技术点 责任链模式: 通过 ProcessorSlotChain 将不同的限流功能组合在一起。 滑动窗口算法: LeapArray 实现环形滑动窗口; BucketLeapArray 普通滑动窗口; OccupiableBucketLeapArray 可抢占窗口,支持借用未来配额。 数据结构: DefaultNode:特定于上下文的统计节点; ClusterNode:不区分上下文的集群统计节点; StatisticNode:核心统计节点,包含秒级和分钟级统计。 限流算法: QPS 限流:通过滑动窗口统计 QPS; 线程数限流:通过原子计数器统计线程数; 流控效果:快速失败、预热、排队等待等; Sentinel 通过精心设计的架构,实现了高效、灵活、可扩展的流量控制能力,为微服务系统提供了强大的保护机制。 往期回顾 1.社区推荐重排技术:双阶段框架的实践与演进|得物技术 2.Flink ClickHouse Sink:生产级高可用写入方案|得物技术 3.服务拆分之旅:测试过程全揭秘|得物技术 4.大模型网关:大模型时代的智能交通枢纽|得物技术 5.从"人治"到"机治":得物离线数仓发布流水线质量门禁实践 文 /万钧 关注得物技术,每周更新技术干货 要是觉得文章对你有帮助的话,欢迎评论转发点赞~ 未经得物技术许可严禁转载,否则依法追究法律责任。