首页 文章 精选 留言 我的

精选列表

搜索[标签页组],共10000篇文章
优秀的个人博客,低调大师

[Android1.5]标签TabHost图片文字覆盖的问题

正文 一、 调整前贴图 二、 调整后贴图 三、 调整代码 Viewview = tabs.getTabWidget().getChildAt( 0 ); ((TextView)view.findViewById(android.R.id.title)).setTextSize( 12 ); ((ImageView)view.findViewById(android.R.id.icon)).setPadding( 0 , - 5 , 0 , 0 ); 代码说明: a). 这里使用系统默认的容器com.android.internal.R.layout.tab_content,title和icon为系统内置的id号。 本文转自over140 51CTO博客,原文链接:http://blog.51cto.com/over140/582227,如需转载请自行联系原作者

优秀的个人博客,低调大师

怒肝一页,搞定这篇MyBatis 缓存结构(下)

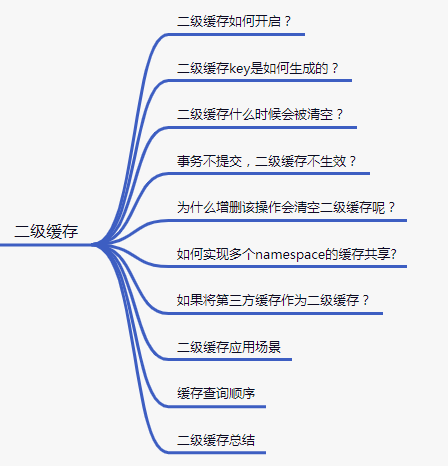
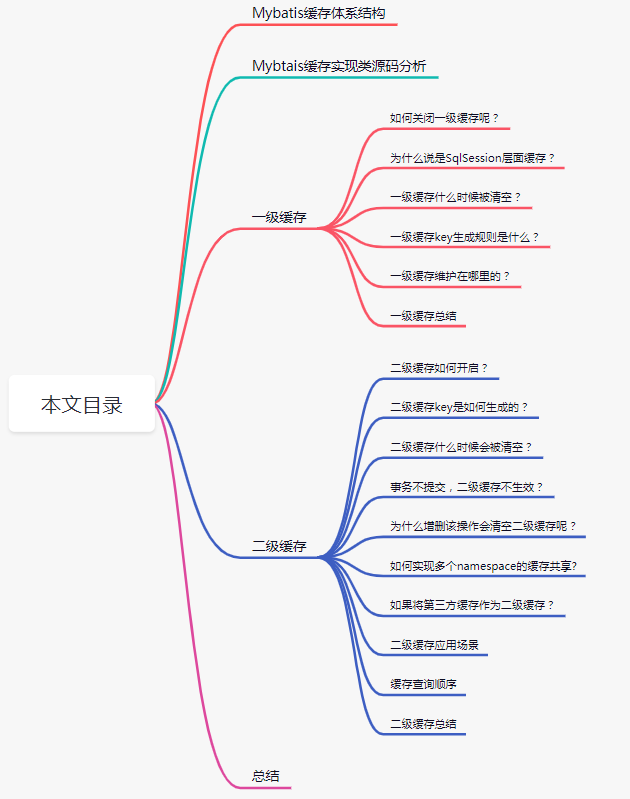
二级缓存 主要内容: 二级缓存构建在一级缓存之上,在收到查询请求时,MyBatis 首先会查询二级缓存。若二级缓存未命中,再去查询一级缓存。与一级缓存不同,二级缓存和具体的命名空间绑定,一级缓存则是和 SqlSession 绑定。 在按照 MyBatis 规范使用 SqlSession 的情况下,一级缓存不存在并发问题。二级缓存则不然,二级缓存可在多个命名空间间共享。这种情况下,会存在并发问题,因此需要针对性去处理。除了并发问题,二级缓存还存在事务问题。 二级缓存如何开启? 配置项 <configuration> <settings> <setting name="cacheEnabled" value="true|false" /> </settings> </configuration> cacheEnabled=true表示二级缓存可用,但是要开启话,需要在Mapper.xml内配置。 <cache eviction="FIFO" flushInterval="60000" size="512" readOnly="true"/> 或者 简单方式 <cache/> 对配置项属性说明: flushInterval="60000",间隔60秒清空缓存,这个间隔60秒,是被动触发的,而不是定时器轮询的。 size=512,表示队列最大512个长度,大于则移除队列最前面的元素,这里的长度指的是CacheKey的个数,默认为1024。 readOnly="true",表示任何获取对象的操作,都将返回同一实例对象。如果readOnly="false",则每次返回该对象的拷贝对象,简单说就是序列化复制一份返回。 eviction:缓存会使用默认的Least Recently Used(LRU,最近最少使用的)算法来收回。FIFO:First In First Out先进先出队列。 在Configuration类的newExecutor方法中是否开启二级缓存 public Executor newExecutor(Transaction transaction, ExecutorType executorType) { executorType = executorType == null ? defaultExecutorType : executorType; executorType = executorType == null ? ExecutorType.SIMPLE : executorType; Executor executor; if (ExecutorType.BATCH == executorType) { executor = new BatchExecutor(this, transaction); } else if (ExecutorType.REUSE == executorType) { executor = new ReuseExecutor(this, transaction); } else { executor = new SimpleExecutor(this, transaction); } //是否开启二级缓存 if (cacheEnabled) { executor = new CachingExecutor(executor); } executor = (Executor) interceptorChain.pluginAll(executor); return executor; } 二级缓存通过CachingExecutor来实现的,原理是缓存里存在,就返回,不存在就调用Executor ,如果一级缓存未关闭,则先查一级缓存,不存在,再到数据库中查询。 下面使用一张图来表示: 下面是源码: @Override public <E> List<E> query(MappedStatement ms, Object parameterObject, RowBounds rowBounds, ResultHandler resultHandler) throws SQLException { // 获得 BoundSql 对象 BoundSql boundSql = ms.getBoundSql(parameterObject); // 创建 CacheKey 对象 CacheKey key = createCacheKey(ms, parameterObject, rowBounds, boundSql); // 查询 return query(ms, parameterObject, rowBounds, resultHandler, key, boundSql); } @Override public <E> List<E> query(MappedStatement ms, Object parameterObject, RowBounds rowBounds, ResultHandler resultHandler, CacheKey key, BoundSql boundSql) throws SQLException { // 调用 MappedStatement#getCache() 方法,获得 Cache 对象, //即当前 MappedStatement 对象的二级缓存。 Cache cache = ms.getCache(); if (cache != null) { // <2> // 如果需要清空缓存,则进行清空 flushCacheIfRequired(ms); //当 MappedStatement#isUseCache() 方法,返回 true 时,才使用二级缓存。默认开启。 //可通过@Options(useCache = false) 或 <select useCache="false"> 方法,关闭。 if (ms.isUseCache() && resultHandler == null) { // <2.2> // 暂时忽略,存储过程相关 ensureNoOutParams(ms, boundSql); @SuppressWarnings("unchecked") //从二级缓存中,获取结果 List<E> list = (List<E>) tcm.getObject(cache, key); if (list == null) { // 如果不存在,则从数据库中查询 list = delegate.query(ms, parameterObject, rowBounds, resultHandler, key, boundSql); // 缓存结果到二级缓存中 tcm.putObject(cache, key, list); // issue #578 and #116 } // 如果存在,则直接返回结果 return list; } } // 不使用缓存,则从数据库中查询 return delegate.query(ms, parameterObject, rowBounds, resultHandler, key, boundSql); } 二级缓存key是如何生成的? 也是使用的是BaseExecutor类中的createCacheKey方法生成的,所以二级缓存key和一级缓存生成规则是一样的。 二级缓存范围 二级缓存有一个非常重要的空间划分策略: namespace="com.tian.mybatis.mappers.UserMapper" namespace="com.tian.mybatis.mappers.RoleMapper" 即,按照namespace划分,同一个namespace,同一个Cache空间,不同的namespace,不同的Cache空间。 比如: 在这个namespace下的二级缓存是同一个。 二级缓存什么时候会被清空? 每当执行insert、update、delete,flushCache=true时,二级缓存都会被清空。 事务不提交,二级缓存不生效? SqlSession sqlSession = sqlSessionFactory.openSession(); System.out.println("第一次查询"); User user = sqlSession.selectOne("com.tian.mybatis.mapper.UserMapper.selectById", 1); System.out.println(user); //sqlSession.commit(); SqlSession sqlSession1 = sqlSessionFactory.openSession(); System.out.println("第二次查询"); User user2 = sqlSession1.selectOne("com.tian.mybatis.mapper.UserMapper.selectById", 1); System.out.println(user2); 因为二级缓存使用的是TransactionalCaheManager(tcm)来管理的,最后又调用了TranscatinalCache的getObject()、putObject()、commit方法。 TransactionalCache里面又持有真正的Cache对象,比如:经过层层装饰的PrepetualCache。 在putObject的时候,只是添加到entriesToAddOnCommit里面。 //TransactionalCache类中 @Override public void putObject(Object key, Object object) { // 暂存 KV 到 entriesToAddOnCommit 中 entriesToAddOnCommit.put(key, object); } 只有conmit方法被调用的时候,才会调用flushPendingEntries方法,真正写入到缓存里。DefaultSqlSession调用commit方法的时候就会调到这个commit方法。 //TransactionalCache类中 public void commit() { //如果 clearOnCommit 为 true ,则清空 delegate 缓存 if (clearOnCommit) { delegate.clear(); } // 将 entriesToAddOnCommit、entriesMissedInCache 刷入 delegate 中 flushPendingEntries(); // 重置 reset(); } private void flushPendingEntries() { // 将 entriesToAddOnCommit 刷入 delegate 中 for (Map.Entry<Object, Object> entry : entriesToAddOnCommit.entrySet()) { delegate.putObject(entry.getKey(), entry.getValue()); } // 将 entriesMissedInCache 刷入 delegate 中 for (Object entry : entriesMissedInCache) { if (!entriesToAddOnCommit.containsKey(entry)) { delegate.putObject(entry, null); } } } private void reset() { // 重置 clearOnCommit 为 false clearOnCommit = false; // 清空 entriesToAddOnCommit、entriesMissedInCache entriesToAddOnCommit.clear(); entriesMissedInCache.clear(); } 为什么增删该操作会清空二级缓存呢? 因为在CachingExecutor的update方法中 @Override public int update(MappedStatement ms, Object parameterObject) throws SQLException { flushCacheIfRequired(ms); return delegate.update(ms, parameterObject); } private void flushCacheIfRequired(MappedStatement ms) { Cache cache = ms.getCache(); // 是否需要清空缓存 //通过 @Options(flushCache = Options.FlushCachePolicy.TRUE) 或 <select flushCache="true"> 方式, //开启需要清空缓存。 if (cache != null && ms.isFlushCacheRequired()) { //调用 TransactionalCache#clear() 方法,清空缓存。 //注意,此时清空的仅仅,当前事务中查询数据产生的缓存。 //而真正的清空,在事务的提交时。这是为什么呢? //还是因为二级缓存是跨 Session 共享缓存,在事务尚未结束时,不能对二级缓存做任何修改。 tcm.clear(cache); } } 如何实现多个namespace的缓存共享? 关于多个namespace的缓存共享的问题,可以使用来解决。 比如: <cache-ref namespace="com.tian.mybatis.mapper.RoleMapper" cache-ref代表引用别名的命名空间的Cache配置,两个命名空间的操作使用的是同一个Cache。在关联的表比较少或者按照业务可以对表进行分组的时候可以使用。 「注意」:在这种情况下,多个mapper的操作都会引起缓存刷新,所以这里的缓存的意义已经不是很大了。 如果将第三方缓存作为二级缓存? Mybatis除了自带的二级换以外,我们还可以通过是想Cache接口来自定义二级缓存。 添加依赖 <dependency> <groupId>org.mybatis.caches</groupId> <artifactId>mybatis-redis</artifactId> <version>1.0.0-beta2</version> </dependency> redis基础配置项 host=127.0.0.1 port=6379 connectionTimeOut=5000 soTimeout=5000 datebase=0 在我们的UserMapper.xml中添加 <cache type="org.mybatis.caches.redis.RedisCache" eviction="FIFO" flushInterval="60000" size="512" readOnly="true"/> RedisCache类图,Cache就是Mybatis中缓存的顶层接口。 二级缓存应用场景 对于访问多的查询请求且用户对查询结果实时性要求不高,此时可采用mybatis二级缓存技术降低数据库访问量,提高访问速度,业务场景比如:耗时较高的统计分析sql、电话账单查询sql等。 缓存查询顺序 先查二级缓存,不存在则坚持一级缓存是否关闭,没关闭,则再查一级缓存,还不存在,最后查询数据库。 二级缓存总结 二级缓存开启方式有两步: 第一步:在全局配置中添加配置 <settings> <setting name="cacheEnabled" value="true"/> </settings> 第二步,在Mapper中添加配置 <cache type="org.mybatis.caches.redis.RedisCache" eviction="FIFO" flushInterval="60000" size="512" readOnly="true"/> 二级换是默认开启的,但是针对每一个Mapper的二级缓存是需要手动开启的。 二级缓存的key和一级缓存的key是一样的。 每当执行insert、update、delete,flushCache=true时,二级缓存都会被清空。 我们可以继承第三方缓存来作为Mybatis的二级缓存。 总结 本文先从整体分析了Mybatis的缓存体系结构,然后就是对每个缓存实现类的源码进行分析,有详细的讲述一级缓存和二级缓存,如何开启关闭,缓存的范围的说明,缓存key是如何生成的,对应缓存是什么时候会被清空,先走二级缓存在走以及缓存,二级缓存使用第三方缓存。

优秀的个人博客,低调大师

怒肝一页,搞定这篇MyBatis 缓存结构(中)

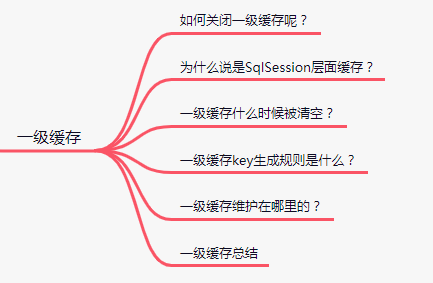
一级缓存 主要内容: 一级缓存也叫本地缓存(LocalCache),Mybatis的一级缓存是会话级别(SqlSession)层面进行缓存的。Mybatis的一级缓存是默认开启的。我们开发项目中不需要做任何配置,但是如果想关闭一级缓存,可以使用localCacheScopde=statement来关闭。 如何关闭一级缓存呢? 在BaseExecutor的中,请看下面代码: 为什么说是SqlSession层面缓存? 就是一级缓存的生命周期和一个SqlSession对象的生命周期一样。 下面这段中,就会使用到一级缓存。 SqlSession sqlSession1 = sqlSessionFactory.openSession(); User user1 = sqlSession1.selectOne("com.tian.mybatis.mapper.UserMapper.selectUserById", 1); User user2 = sqlSession1.selectOne("com.tian.mybatis.mapper.UserMapper.selectUserById", 1); 结果输出: 用两张图来总结: 第一次:查数据库,放入到缓存中。 第二次:直接从缓存中获取。 下面这段代码中就使用不到缓存 SqlSessionFactory sqlSessionFactory = new SqlSessionFactoryBuilder().build(inputStream); sqlSession = sqlSessionFactory.openSession(); sqlSession1 = sqlSessionFactory.openSession(); UserMapper userMapper = sqlSession.getMapper(UserMapper.class); UserMapper userMapper1 = sqlSession1.getMapper(UserMapper.class); System.out.println("第一次查询"); System.out.println(userMapper.selectById(1)); User user = new User(); user.setUserName("tian111"); user.setId(1); userMapper1.updateAuthorIfNecessary(user); System.out.println("第二次查询"); System.out.println(userMapper.selectById(1)); 输出结果: 用三张图来总结: 第一次查询:sqlSession1查询数据库,放入到缓存中。 更新:sqlSession2进行更新,注意这里写入的是sqlSession自己的本地缓存。 第二次查询:sqlSession1第二次查询。 记住是一级缓存只能是同一个SqlSession对象就行了。 一级缓存维护在哪里的? 既然一级缓存的生命周期和SqlSession一致,那么我们可以猜想,这个缓存是不是就维护在SqlSession中呢? SqlSession的默认实现类DefaultSqlSession,在DefaultSqlSession中只有两个属性可能存放缓存: private final Configuration configuration; private final Executor executor; configuration是全局的,肯定不会放缓存。 那就只能把希望寄托于Executor了。由于Executor是个接口,我们可以看看他的实现类: 另外这里有个BaseExecutor。有各类也得瞄瞄。一看居然有东西。 public abstract class BaseExecutor implements Executor { private static final Log log = LogFactory.getLog(BaseExecutor.class); protected Transaction transaction; protected Executor wrapper; protected ConcurrentLinkedQueue<DeferredLoad> deferredLoads; //熟悉的家伙,基本缓存 protected PerpetualCache localCache; protected PerpetualCache localOutputParameterCache; protected Configuration configuration; protected int queryStack; private boolean closed; protected BaseExecutor(Configuration configuration, Transaction transaction) { this.transaction = transaction; this.deferredLoads = new ConcurrentLinkedQueue<>(); this.localCache = new PerpetualCache("LocalCache"); this.localOutputParameterCache = new PerpetualCache("LocalOutputParameterCache"); this.closed = false; this.configuration = configuration; this.wrapper = this; } } 再看看BaseExecutor类图: 所以这就证明了,这个缓存是维护在SqlSession里。 一级缓存什么时候被清空? 在执行update、insert、delete、flushCache="true"、commit、rollback、LocalCacheScope.STATEMENT等情况下,一级缓存就都会被清空。 @Override public void clearLocalCache() { if (!closed) { localCache.clear(); localOutputParameterCache.clear(); } } update时,一级缓存会被清空。delete和insert都是调用这个update。可以从SqlSession的insert、update、delete方法跟踪。 LocalCacheScope.STATEMENT时,一级缓存会被清空。在BaseExecutor里的query方法中: 事务提交回滚时,一级缓存会被清空。 flushCache="true"时,一级缓存会被清空。 一级缓存key是什么? 下面就是一级缓存key的创建过程 @Override public CacheKey createCacheKey(MappedStatement ms, Object parameterObject, RowBounds rowBounds, BoundSql boundSql) { if (closed) { throw new ExecutorException("Executor was closed."); } CacheKey cacheKey = new CacheKey(); cacheKey.update(ms.getId()); cacheKey.update(rowBounds.getOffset()); cacheKey.update(rowBounds.getLimit()); cacheKey.update(boundSql.getSql()); List<ParameterMapping> parameterMappings = boundSql.getParameterMappings(); TypeHandlerRegistry typeHandlerRegistry = ms.getConfiguration().getTypeHandlerRegistry(); // mimic DefaultParameterHandler logic for (ParameterMapping parameterMapping : parameterMappings) { if (parameterMapping.getMode() != ParameterMode.OUT) { Object value; String propertyName = parameterMapping.getProperty(); if (boundSql.hasAdditionalParameter(propertyName)) { value = boundSql.getAdditionalParameter(propertyName); } else if (parameterObject == null) { value = null; } else if (typeHandlerRegistry.hasTypeHandler(parameterObject.getClass())) { value = parameterObject; } else { MetaObject metaObject = configuration.newMetaObject(parameterObject); value = metaObject.getValue(propertyName); } cacheKey.update(value); } } if (configuration.getEnvironment() != null) { // issue #176 cacheKey.update(configuration.getEnvironment().getId()); } return cacheKey; } id:com.tian.mybatis.mapper.UserMapper.selectById key的生成策略:id + offset + limit + sql + param value + environment id,这些值都相同,生成的key就相同。 示例: 一级缓存总结 一级缓存的生命周期和SqlSession对象的生命周期一致。所以缓存维护在SqlSession中的属性executor里。 一级缓存默认开启。可以通过修改配置项把一级缓存关掉。 清空一级缓存的方式有: update、insert、delete flushCache="true" commit、rollback LocalCacheScope.STATEMENT

优秀的个人博客,低调大师

怒肝一页,搞定这篇MyBatis 缓存结构(上)

在 Web 应用中,缓存是必不可少的组件。通常我们都会用 Redis 或 memcached 等缓存中间件,拦截大量奔向数据库的请求,减轻数据库压力。作为一个重要的组件,MyBatis 自然也在内部提供了相应的支持。通过在框架层面增加缓存功能,可减轻数据库的压力,同时又可以提升查询速度,可谓一举两得。MyBatis 缓存结构由一级缓存和二级缓存构成,这两级缓存均是使用 Cache 接口的实现类。因此,我将首先会向大家介绍 Cache 几种实现类的源码,然后再分析一级和二级缓存的实现。 本文主要内容: Mybatis缓存体系结构 Mybatis跟缓存相关的类都在cache包目录下,在前面的文章中我们也提过,今天才来详细说说。其中有一个顶层接口Cache,并且只有一个默认的实现类PerpetualCache。 下面是Cached的类图: 既然PerpetualCache是默认实现类,那么我们就从他下手。 PerpetualCache PerpetualCache这个对象会创建,所以这个叫做基础缓存。但是缓存又可以有很多额外的功能,比如说:回收策略、日志记录、定时刷新等等,如果需要的话,就可以在基础缓存上加上这些功能,如果不喜欢就不加。这里是不是想到了一种设计模式-----装饰器设计模式。PerpetualCache 相当于装饰模式中的 ConcreteComponent。 装饰器模式是指在不改变原有对象的基础之上,将功能附加到对象上,提供了比继承更有弹性的替换方案,即扩展原有对象的功能。 除了缓存之外,Mybatis也定义很多的装饰器,同样实现了Cache接口,通过这些装饰器可以额外实现很多功能。 这些缓存是怎么分类的呢? 所有的缓存可以大体归为三类:基本类缓存、淘汰算法缓存、装饰器缓存。 下面把每个缓存进行详细说明和对比: 缓存实现类源码 PerpetualCache源码 PerpetualCache 是一个具有基本功能的缓存类,内部使用了 HashMap 实现缓存功能。它的源码如下: public class PerpetualCache implements Cache { private final String id; //使用Map作为缓存 private Map<Object, Object> cache = new HashMap<>(); public PerpetualCache(String id) { this.id = id; } @Override public String getId() { return id; } @Override public int getSize() { return cache.size(); } // 存储键值对到 HashMap @Override public void putObject(Object key, Object value) { cache.put(key, value); } // 查找缓存项 @Override public Object getObject(Object key) { return cache.get(key); } // 移除缓存项 @Override public Object removeObject(Object key) { return cache.remove(key); } //清空缓存 @Override public void clear() { cache.clear(); } //部分代码省略 } 上面是 PerpetualCache 的全部代码,也就是所谓的基本缓存,很简单。接下来,我们通过装饰类对该类进行装饰,使其功能变的丰富起来。 LruCache LruCache,顾名思义,是一种具有 LRU(Least recently used,最近最少使用)算法的缓存实现类。 除此之外,MyBatis 还提供了具有 FIFO 策略的缓存 FifoCache。不过并未提供 LFU (Least Frequently Used ,最近最少使用算法)缓存,也是一种常见的缓存算法 ,如果大家有兴趣,可以自行拓展。 接下来,我们来看一下 LruCache 的实现。 public class LruCache implements Cache { private final Cache delegate; private Map<Object, Object> keyMap; private Object eldestKey; public LruCache(Cache delegate) { this.delegate = delegate; setSize(1024); } public int getSize() { return delegate.getSize(); } public void setSize(final int size) { /* * 初始化 keyMap,注意,keyMap 的类型继承自 LinkedHashMap, * 并覆盖了 removeEldestEntry 方法 */ keyMap = new LinkedHashMap<Object, Object>(size, .75F, true) { private static final long serialVersionUID = 4267176411845948333L; // 覆盖 LinkedHashMap 的 removeEldestEntry 方法 @Override protected boolean removeEldestEntry(Map.Entry<Object, Object> eldest) { boolean tooBig = size() > size; if (tooBig) { // 获取将要被移除缓存项的键值 eldestKey = eldest.getKey(); } return tooBig; } }; } @Override public void putObject(Object key, Object value) { // 存储缓存项 delegate.putObject(key, value); cycleKeyList(key); } @Override public Object getObject(Object key) { // 刷新 key 在 keyMap 中的位置 keyMap.get(key); // 从被装饰类中获取相应缓存项 return delegate.getObject(key); } @Override public Object removeObject(Object key) { // 从被装饰类中移除相应的缓存项 return delegate.removeObject(key); } //清空缓存 @Override public void clear() { delegate.clear(); keyMap.clear(); } private void cycleKeyList(Object key) { // 存储 key 到 keyMap 中 keyMap.put(key, key); if (eldestKey != null) { // 从被装饰类中移除相应的缓存项 delegate.removeObject(eldestKey); eldestKey = null; } } // 省略部分代码 } 从上面代码中可以看出,LruCache 的 keyMap 属性是实现 LRU 策略的关键,该属性类型继承自 LinkedHashMap,并覆盖了 removeEldestEntry 方法。LinkedHashMap 可保持键值对的插入顺序,当插入一个新的键值对时, LinkedHashMap 内部的 tail 节点会指向最新插入的节点。head 节点则指向第一个被插入的键值对,也就是最久未被访问的那个键值对。默认情况下,LinkedHashMap 仅维护键值对的插入顺序。若要基于 LinkedHashMap 实现 LRU 缓存,还需通过构造方法将 LinkedHashMap 的 accessOrder 属性设为 true,此时 LinkedHashMap 会维护键值对的访问顺序。 比如,上面代码中 getObject 方法中执行了这样一句代码 keyMap.get(key),目的是刷新 key 对应的键值对在 LinkedHashMap 的位置。LinkedHashMap 会将 key 对应的键值对移动到链表的尾部,尾部节点表示最久刚被访问过或者插入的节点。除了需将 accessOrder 设为 true,还需覆盖 removeEldestEntry 方法。LinkedHashMap 在插入新的键值对时会调用该方法,以决定是否在插入新的键值对后,移除老的键值对。 在上面的代码中,当被装饰类的容量超出了 keyMap 的所规定的容量(由构造方法传入)后,keyMap 会移除最长时间未被访问的键,并保存到 eldestKey 中,然后由 cycleKeyList 方法将 eldestKey 传给被装饰类的 removeObject 方法,移除相应的缓存项目。 BlockingCache BlockingCache 实现了阻塞特性,该特性是基于 Java 重入锁实现的。同一时刻下,BlockingCache 仅允许一个线程访问指定 key 的缓存项,其他线程将会被阻塞住。 下面我们来看一下 BlockingCache 的源码。 public class BlockingCache implements Cache { private long timeout; private final Cache delegate; private final ConcurrentHashMap<Object, ReentrantLock> locks; public BlockingCache(Cache delegate) { this.delegate = delegate; this.locks = new ConcurrentHashMap<Object, ReentrantLock>(); } @Override public void putObject(Object key, Object value) { try { // 存储缓存项 delegate.putObject(key, value); } finally { // 释放锁 releaseLock(key); } } @Override public Object getObject(Object key) { // 请 // 请求锁 acquireLock(key); Object value = delegate.getObject(key); // 若缓存命中,则释放锁。需要注意的是,未命中则不释放锁 if (value != null) { // 释放锁 releaseLock(key); } return value; } @Override public Object removeObject(Object key) { // 释放锁 releaseLock(key); return null; } private ReentrantLock getLockForKey(Object key) { ReentrantLock lock = new ReentrantLock(); // 存储 <key, Lock> 键值对到 locks 中 ReentrantLock previous = locks.putIfAbsent(key, lock); return previous == null ? lock : previous; } private void acquireLock(Object key) { Lock lock = getLockForKey(key); if (timeout > 0) { try { // 尝试加锁 boolean acquired = lock.tryLock(timeout, TimeUnit.MILLISECONDS); if (!acquired) { throw new CacheException("..."); } } catch (InterruptedException e) { throw new CacheException("..."); } } else { // 加锁 lock.lock(); } } private void releaseLock(Object key) { // 获取与当前 key 对应的锁 ReentrantLock lock = locks.get(key); if (lock.isHeldByCurrentThread()) { // 释放锁 lock.unlock(); } } // 省略部分代码 } 如上,查询缓存时,getObject 方法会先获取与 key 对应的锁,并加锁。若缓存命中,getObject 方法会释放锁,否则将一直锁定。getObject 方法若返回 null,表示缓存未命中。此时 MyBatis 会进行数据库查询,并调用 putObject 方法存储查询结果。同时,putObject 方法会将指定 key 对应的锁进行解锁,这样被阻塞的线程即可恢复运行。 上面的描述有点啰嗦,倒是 BlockingCache 类的注释说到比较简单明了。这里引用一下: It sets a lock over a cache key when the element is not found in cache. This way, other threads will wait until this element is filled instead of hitting the database. 这段话的意思是,当指定 key 对应元素不存在于缓存中时,BlockingCache 会根据 lock 进行加锁。此时,其他线程将会进入等待状态,直到与 key 对应的元素被填充到缓存中。而不是让所有线程都去访问数据库。 在上面代码中,removeObject 方法的逻辑很奇怪,仅调用了 releaseLock 方法释放锁,却没有调用被装饰类的 removeObject 方法移除指定缓存项。这样做是为什么呢?大家可以先思考,答案将在分析二级缓存的相关逻辑时分析。 CacheKey 在 MyBatis 中,引入缓存的目的是为提高查询效率,降低数据库压力。既然 MyBatis 引入了缓存,那么大家思考过缓存中的 key 和 value 的值分别是什么吗?大家可能很容易能回答出 value 的内容,不就是 SQL 的查询结果吗。 那 key 是什么呢?是字符串,还是其他什么对象?如果是字符串的话,那么大家首先能想到的是用 SQL 语句作为 key。但这是不对的. 比如: SELECT * FROM author where id > ? d > 1 和 id > 10 查出来的结果可能是不同的,所以我们不能简单的使用 SQL 语句作为 key。从这里可以看出来,运行时参数将会影响查询结果,因此我们的 key 应该涵盖运行时参数。除此之外呢,如果进行分页查询也会导致查询结果不同,因此 key 也应该涵盖分页参数。综上,我们不能使用简单的 SQL 语句作为 key。应该考虑使用一种复合对象,能涵盖可影响查询结果的因子。在 MyBatis 中,这种复合对象就是 CacheKey。 下面来看一下它的定义。 public class CacheKey implements Cloneable, Serializable { private static final int DEFAULT_MULTIPLYER = 37; private static final int DEFAULT_HASHCODE = 17; // 乘子,默认为37 private final int multiplier; // CacheKey 的 hashCode,综合了各种影响因子 private int hashcode; // 校验和 private long checksum; // 影响因子个数 private int count; // 影响因子集合 private List<Object> updateList; public CacheKey() { this.hashcode = DEFAULT_HASHCODE; this.multiplier = DEFAULT_MULTIPLYER; this.count = 0; this.updateList = new ArrayList<Object>(); } // 省略其他方法 } 如上,除了 multiplier 是恒定不变的 ,其他变量将在更新操作中被修改。 下面看一下更新操作的代码。 /** 每当执行更新操作时,表示有新的影响因子参与计算 */ public void update(Object object) { int baseHashCode = object == null ? 1 : ArrayUtil.hashCode(object); // 自增 count count++; // 计算校验和 checksum += baseHashCode; // 更新 baseHashCode baseHashCode *= count; // 计算 hashCode hashcode = multiplier * hashcode + baseHashCode; // 保存影响因子 updateList.add(object); } 当不断有新的影响因子参与计算时,hashcode 和 checksum 将会变得愈发复杂和随机。这样可降低冲突率,使 CacheKey 可在缓存中更均匀的分布。CacheKey 最终要作为键存入 HashMap,因此它需要覆盖 equals 和 hashCode 方法。 下面我们来看一下这两个方法的实现。 public boolean equals(Object object) { // 检测是否为同一个对象 if (this == object) { return true; } // 检测 object 是否为 CacheKey if (!(object instanceof CacheKey)) { return false; } final CacheKey cacheKey = (CacheKey) object; // 检测 hashCode 是否相等 if (hashcode != cacheKey.hashcode) { return false; } // 检测校验和是否相同 if (checksum != cacheKey.checksum) { return false; } // 检测 coutn 是否相同 if (count != cacheKey.count) { return false; } // 如果上面的检测都通过了,下面分别对每个影响因子进行比较 for (int i = 0; i < updateList.size(); i++) { Object thisObject = updateList.get(i); Object thatObject = cacheKey.updateList.get(i); if (!ArrayUtil.equals(thisObject, thatObject)) { return false; } } return true; } public int hashCode() { // 返回 hashcode 变量 return hashcode; } equals 方法的检测逻辑比较严格,对 CacheKey 中多个成员变量进行了检测,已保证两者相等。hashCode 方法比较简单,返回 hashcode 变量即可。 关于 CacheKey 就先分析到这,CacheKey 在一二级缓存中会被用到,接下来还会看到它的身影。 好吧,终于把源码缓存实现类的源码说完了。

优秀的个人博客,低调大师

自己实现 ECS 购买页需要用到的 API

1. 查询可购买的地域 DescribeRegions 入参: 付费类型: instanceChargeType(选填),取值:PrePaid|PostPaid,分别代表 包年包月|按量付费 2. 查询可购买的可用区 DescribeAvailableResource 入参: 付费类型:instanceChargeType(必填),PrePaid|PostPaid 地域:regionId(必填) 要查询的目标资源:destinationResource=Zone 3. 查询可购买的实例规格 DescribeAvailableResource 入参: 地域:regionId(必填) 可用区:zoneId(选填) I/O优化:ioOptimized=optimized 要查询的目标资源:destinationResource=InstanceType 4. 查询实

优秀的个人博客,低调大师

linux环境安装docker和dockercompose 命令页表快速完成

此文目的, 如果你熟悉docker, 就没必要每次都去一个一个命令开始复制 粘贴 执行 浪费时间. 直接把整理好的所有命令放入一次执行即可. 如果你是小白, 需要直接搭建环境成功,看到直观效果, 这里就可以. 可以增长信息,提升学习兴趣. 不至于浪费时间太多,热情冷却. docker快速直接执行: #Uninstall old versions O#lder versions of Docker were called docker or docker-engine. If these are installed, uninstall them, along with associated sudo yum remove docker \ docker-client \ docker-client-latest \ docker-common \ docker-latest \ docker-latest-logrotate \ docker-logrotate \ docker-selinux \ docker-engine-selinux \ docker-engine #SET UP THE REPOSITORY #Install required packages. yum-utils provides the yum-config-manager utility, and device-mapper-persistent-data and lvm2 are required by the devicemapper storage driver. sudo yum install -y yum-utils \ device-mapper-persistent-data \ lvm2 #Use the following command to set up the stable repository. You always need the stable repository, even if you want to install builds from the edge or test repositories as well. sudo yum-config-manager \ --add-repo \ https://download.docker.com/linux/centos/docker-ce.repo #Optional: Enable the edge and test repositories. These repositories are included in the docker.repo file above but are disabled by default. You can enable them alongside the stable repository. sudo yum-config-manager --enable docker-ce-edge sudo yum-config-manager --enable docker-ce-test #You can disable the edge or test repository by running the yum-config-manager command with the --disable flag. To re-enable it, use the --enable flag. The following command disables the edge repository. sudo yum-config-manager --disable docker-ce-edge #INSTALL DOCKER CE #Install the latest version of Docker CE, or go to the next step to install a specific version: sudo yum install docker-ce #If prompted to accept the GPG key, verify that the fingerprint matches 060A 61C5 1B55 8A7F 742B 77AA C52F EB6B 621E 9F35, and if so, accept it #Got multiple Docker repositories? #If you have multiple Docker repositories enabled, installing or updating without specifying a version in the yum install or yum update command always installs the highest possible version, which may not be appropriate for your stability needs. #Docker is installed but not started. The docker group is created, but no users are added to the group. #To install a specific version of Docker CE, list the available versions in the repo, then select and install: #a. List and sort the versions available in your repo. This example sorts results by version number, highest to lowest, and is truncated: yum list docker-ce --showduplicates | sort -r #Start Docker. sudo systemctl start docker #Verify that docker is installed correctly by running the hello-world image. sudo docker run hello-world docker-compose快速直接执行: #Run this command to download the latest version of Docker Compose: sudo curl -L "https://github.com/docker/compose/releases/download/1.22.0/docker-compose-$(uname -s)-$(uname -m)" -o /usr/local/bin/docker-compose #Apply executable permissions to the binary: sudo chmod +x /usr/local/bin/docker-compose #Test the installation. docker-compose --version 参考: 安装docker和docker-compose 具体安装步骤: docker:https://docs.docker.com/engine/installation/ docker-compose:https://docs.docker.com/compose/install/ 注意:Docker安装要求Linux 3.10以上版本,用uname -a命令可查看到。 安装之后,可查看版本: $ docker -v $ docker-compose -v 然后把当前用户加到docker用户组里面: $ sudo gpasswd -a ${USER} docker 就不用每次启动Docker都得加sudo了。 注意,执行gpasswd命令之后要重新登陆才有效。 来源: https://www.awaimai.com/2120.html 阿里云服务器在搞限时活动优惠卷, 100多个产品通用, 需要的自取. 注意, 领取的优惠券30天内有效,尽快使用! 领取链接: https://promotion.aliyun.com/ntms/act/ambassador/sharetouser.html?userCode=s306eooi&utm_source=s306eooi

优秀的个人博客,低调大师

H5网页判断终端并唤起app

1.完成目标 通过打开一个h5 网页,这个h5 页面做一个中转(期间可能要拉接口,拉取后台配置的跳转页面url,比如跳转到一个活动页面),最后跳转对应app对应的界面中。 2.H5 网页嵌入app 现在很多app并不是所有的页面都是原生的,很多页面都是嵌入了H5的页面,这个就是App混合开发(hybrid app)。这样设计灵活,方便快速开发自己的产品,把一些经常改动的页面,比如活动页面嵌入app中,这个页面单独部署就好。就不需要app 发版,减少用户更新app的次数。 那么问题来了,网页如果跟APP的交互呢? webview,UIWebView。 如何去完成,这里不是小编的专长,推荐文章,有兴趣的童鞋可以看看,https://bxbxbai.github.io/2015/08/16/talk-about-bybird-app/ 。下面是在网页里如何唤起app的方法总结。 3.基于vue的h5 开发。 2.1 项目背景: vue-cli 脚手架生成的模板。 2.2 代码介绍 data: data () { return { schemeUrl: '', appurl: '' } }, schemeUrl: 就是和APP约定的一个URL,在浏览器打开这个URL,继而打开我们的app 或者调到对应的下载页面appurl: 对应是app里面的具体页面的。 这个也是和app 约定,和上面 schemeUrl进行拼接成最终我们想要跳转到app界面。 created: created () { if (/(iPhone|iPad|iPod|iOS)/i.test(navigator.userAgent)) { this.ios = true } else if (/(Android)/i.test(navigator.userAgent)) { this.Android = true } else if (/MicroMessenger/i){ this.weixin = true } else { window.location.href = 'pc.html' } } 检查 navigator 里面具体的内容,判断设备是什么。 methods: judgeMachine () { let IOSUrlDownload = 'https://itunes.apple.com/us/app/***' let AndroidUrlDownload = 'http://a.app.qq.com/o/simple.jsp?****' if (this.ios) { let loadDateTime = new Date() window.setTimeout(function () { let timeOutDateTime = new Date() if (timeOutDateTime - loadDateTime < 5000) { window.location.href = IOSUrlDownload } else { alert('对不起,暂时无法打开') } }, 25) window.location.href = this.schemeUrl } else if (this.Andriod) { let loadDateTime = new Date() window.location.href = this.schemeUrl window.setTimeout(function () { let timeOutDateTime = new Date() if (timeOutDateTime - loadDateTime < 5000) { window.location.href = AndroidUrlDownload } }, 1500) } else if (this.weixin) { window.wx.ready(function () { window.location.href = this.schemeUrl }) } } 上面方法的思路: 先跳转到对应的 schemeUrl,通过定时器来监测时间,一段时间内如果打开app了,那么就是有app的,没有打开则是没有app, 需要跳转到对应的下载页面,安卓的应用市场, iOS 的appstore。 注意: 在微信里面需要有一个微信的js, 不然会没有效果。微信js的引入可以查看上一篇文章 https://www.cnblogs.com/adouwt/p/9045881.html 。 本篇就是一个小应用,如果这方法还不够应用于生产,后期还会在追加修改代码。目前此方案,已经通过测试。如果有不妥之处,敬请指出。不吝赐教,thank U。

资源下载

更多资源
Mario

Mario

马里奥是站在游戏界顶峰的超人气多面角色。马里奥靠吃蘑菇成长,特征是大鼻子、头戴帽子、身穿背带裤,还留着胡子。与他的双胞胎兄弟路易基一起,长年担任任天堂的招牌角色。

Nacos

Nacos

Nacos /nɑ:kəʊs/ 是 Dynamic Naming and Configuration Service 的首字母简称,一个易于构建 AI Agent 应用的动态服务发现、配置管理和AI智能体管理平台。Nacos 致力于帮助您发现、配置和管理微服务及AI智能体应用。Nacos 提供了一组简单易用的特性集,帮助您快速实现动态服务发现、服务配置、服务元数据、流量管理。Nacos 帮助您更敏捷和容易地构建、交付和管理微服务平台。

Spring

Spring

Spring框架(Spring Framework)是由Rod Johnson于2002年提出的开源Java企业级应用框架,旨在通过使用JavaBean替代传统EJB实现方式降低企业级编程开发的复杂性。该框架基于简单性、可测试性和松耦合性设计理念,提供核心容器、应用上下文、数据访问集成等模块,支持整合Hibernate、Struts等第三方框架,其适用范围不仅限于服务器端开发,绝大多数Java应用均可从中受益。

WebStorm

WebStorm

WebStorm 是jetbrains公司旗下一款JavaScript 开发工具。目前已经被广大中国JS开发者誉为“Web前端开发神器”、“最强大的HTML5编辑器”、“最智能的JavaScript IDE”等。与IntelliJ IDEA同源,继承了IntelliJ IDEA强大的JS部分的功能。

用户登录
用户注册