一、Swagger2简介
1、Swagger2优点
整合到Spring Boot中,构建强大RESTful API文档。省去接口文档管理工作,修改代码,自动更新,Swagger2也提供了强大的页面测试功能来调试RESTful API。
2、Swagger2常用注解
Api:修饰整个类,描述Controller的作用
ApiOperation:描述一个类的一个方法,或者说一个接口
ApiParam:单个参数描述
ApiModel:用对象来接收参数
ApiProperty:用对象接收参数时,描述对象的一个字段
ApiResponse:HTTP响应其中1个描述
ApiResponses:HTTP响应整体描述
ApiIgnore:使用该注解忽略这个API
ApiError :发生错误返回的信息
ApiImplicitParam:一个请求参数
ApiImplicitParams:多个请求参数
二、与SpringBoot2.0 整合
1、核心依赖
spring-boot:2.1.3.RELEASE
swagger:2.6.1
2、Swagger2 配置
import org.springframework.context.annotation.Bean;
import org.springframework.context.annotation.Configuration;
import springfox.documentation.builders.ApiInfoBuilder;
import springfox.documentation.builders.PathSelectors;
import springfox.documentation.builders.RequestHandlerSelectors;
import springfox.documentation.service.ApiInfo;
import springfox.documentation.spi.DocumentationType;
import springfox.documentation.spring.web.plugins.Docket;
/**
 * Swagger 配置文件
 */
@Configuration
public class SwaggerConfig {
    @Bean
    public Docket createRestApi() {
        return new Docket(DocumentationType.SWAGGER_2)
                .apiInfo(apiInfo())
                .select()
                .apis(RequestHandlerSelectors.basePackage("com.swagger.two"))
                .paths(PathSelectors.any())
                .build();
    }
    private ApiInfo apiInfo() {
        return new ApiInfoBuilder()
                .title("SpringBoot利用Swagger构建API文档")
                .description("使用RestFul风格, 创建人:知了一笑")
                .termsOfServiceUrl("https://github.com/cicadasmile")
                .version("version 1.0")
                .build();
    }
}
3、启动类添加注解
@EnableSwagger2
@SpringBootApplication
public class SwaggerApplication {
    public static void main(String[] args) {
        SpringApplication.run(SwaggerApplication.class,args) ;
    }
}
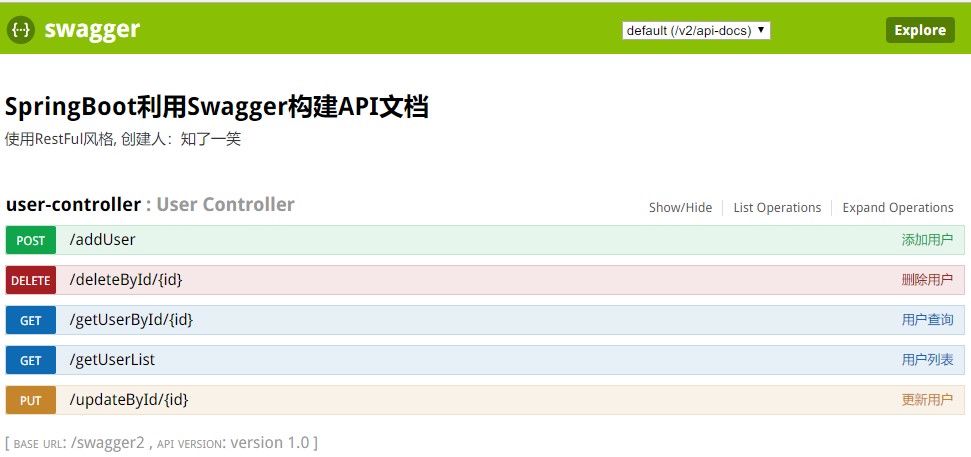
4、启动效果图
![21_1 21_1]()
三、增删改查案例
1、添加用户
(1)、代码块
@ApiOperation(value="添加用户", notes="创建新用户")
@ApiImplicitParam(name = "user", value = "用户详细实体user", required = true, dataType = "User")
@RequestMapping(value = "/addUser", method = RequestMethod.POST)
public ResponseEntity<JsonResult> addUser (@RequestBody User user){
    JsonResult result = new JsonResult();
    try {
        users.put(user.getId(), user);
        result.setResult(user.getId());
        result.setStatus("ok");
    } catch (Exception e) {
        result.setResult("服务异常");
        result.setStatus("500");
        e.printStackTrace();
    }
    return ResponseEntity.ok(result);
}
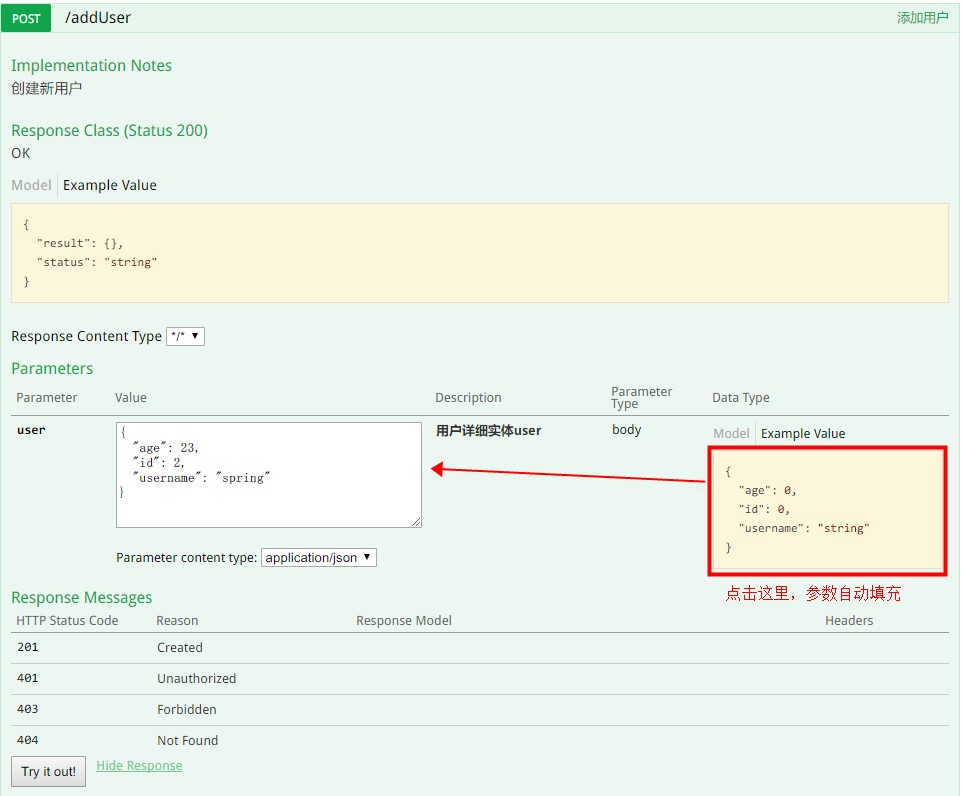
(2)、效果图
![21_2 21_2]()
2、用户列表
(1)、代码块
@ApiOperation(value="用户列表", notes="查询用户列表")
@RequestMapping(value = "/getUserList", method = RequestMethod.GET)
public ResponseEntity<JsonResult> getUserList (){
    JsonResult result = new JsonResult();
    try {
        List<User> userList = new ArrayList<>(users.values());
        result.setResult(userList);
        result.setStatus("200");
    } catch (Exception e) {
        result.setResult("服务异常");
        result.setStatus("500");
        e.printStackTrace();
    }
    return ResponseEntity.ok(result);
}
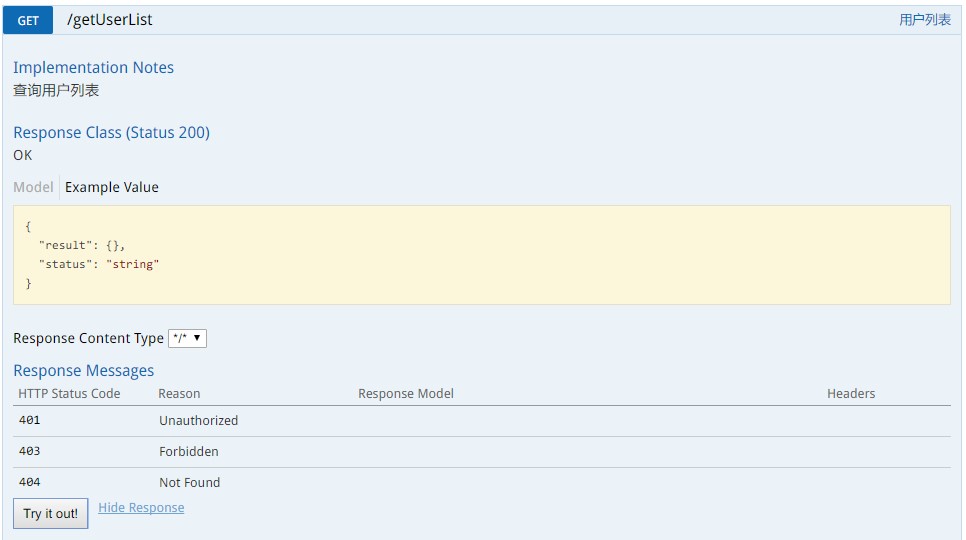
(2)、效果图
![21_3 21_3]()
3、用户查询
(1)、代码块
@ApiOperation(value="用户查询", notes="根据ID查询用户")
@ApiImplicitParam(name = "id", value = "用户ID", required = true, dataType = "Integer", paramType = "path")
@RequestMapping(value = "/getUserById/{id}", method = RequestMethod.GET)
public ResponseEntity<JsonResult> getUserById (@PathVariable(value = "id") Integer id){
    JsonResult result = new JsonResult();
    try {
        User user = users.get(id);
        result.setResult(user);
        result.setStatus("200");
    } catch (Exception e) {
        result.setResult("服务异常");
        result.setStatus("500");
        e.printStackTrace();
    }
    return ResponseEntity.ok(result);
}
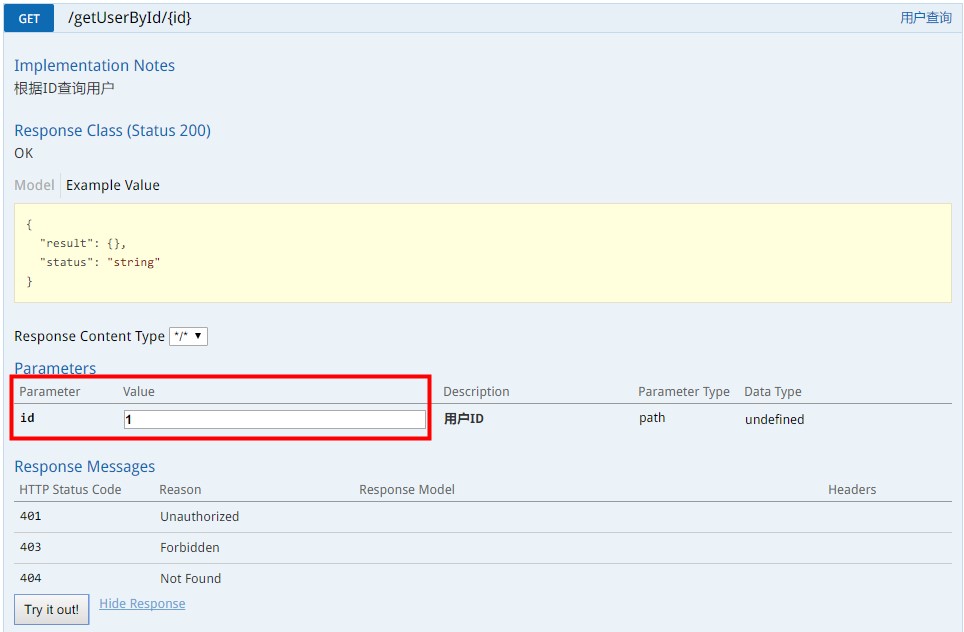
(2)、效果图
![21_4 21_4]()
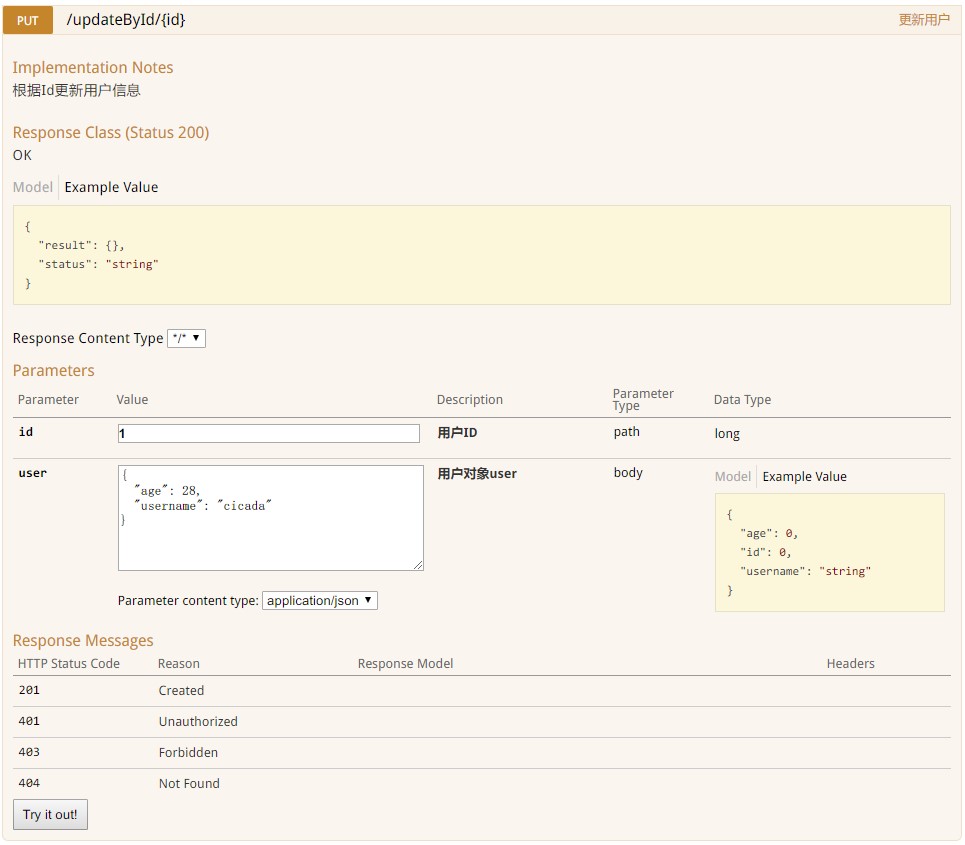
4、更新用户
(1)、代码块
@ApiOperation(value="更新用户", notes="根据Id更新用户信息")
@ApiImplicitParams({
        @ApiImplicitParam(name = "id", value = "用户ID", required = true, dataType = "Long",paramType = "path"),
        @ApiImplicitParam(name = "user", value = "用户对象user", required = true, dataType = "User")
})
@RequestMapping(value = "/updateById/{id}", method = RequestMethod.PUT)
public ResponseEntity<JsonResult> updateById (@PathVariable("id") Integer id, @RequestBody User user){
    JsonResult result = new JsonResult();
    try {
        User user1 = users.get(id);
        user1.setUsername(user.getUsername());
        user1.setAge(user.getAge());
        users.put(id, user1);
        result.setResult(user1);
        result.setStatus("ok");
    } catch (Exception e) {
        result.setResult("服务异常");
        result.setStatus("500");
        e.printStackTrace();
    }
    return ResponseEntity.ok(result);
}
(2)、效果图
![21_5 21_5]()
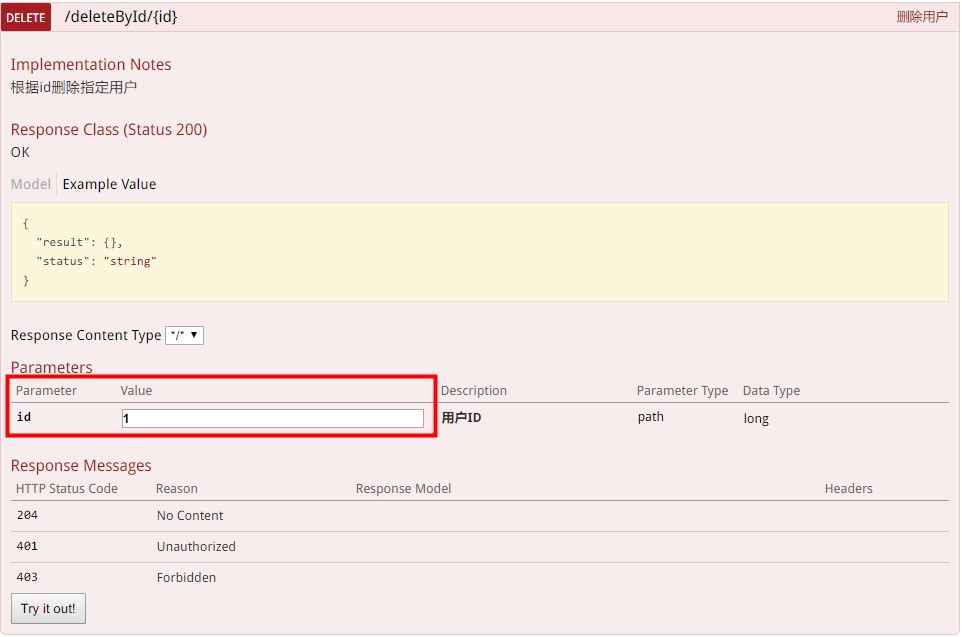
5、删除用户
(1)、代码块
@ApiOperation(value="删除用户", notes="根据id删除指定用户")
@ApiImplicitParam(name = "id", value = "用户ID", required = true, dataType = "Long", paramType = "path")
@RequestMapping(value = "/deleteById/{id}", method = RequestMethod.DELETE)
public ResponseEntity<JsonResult> deleteById (@PathVariable(value = "id") Integer id){
    JsonResult result = new JsonResult();
    try {
        users.remove(id);
        result.setResult(id);
        result.setStatus("ok");
    } catch (Exception e) {
        result.setResult("服务异常");
        result.setStatus("500");
        e.printStackTrace();
    }
    return ResponseEntity.ok(result);
}
(2)、效果图
![21_6 21_6]()
四、源代码
GitHub地址:知了一笑
https://github.com/cicadasmile/middle-ware-parent
码云地址:知了一笑
https://gitee.com/cicadasmile/middle-ware-parent
