原文:
跨过几个坑,终于完成了我的第一个Xamarin Android App!
时间过得真快,距离上次发随笔又是一年多。作为上次发的我的第一个WP8.1应用总结的后继,这次同样的主要功能,改为实现安卓版APP。前几个月巨硬收购Xamarin,把Xamarin集成到VS里了,大大方便了我广大.net码农。由于年初脱了WP的坑,换了个安卓低端机,想着什么时候装Xamarin开发个App玩玩。
上个月笔记本100G的C盘莫名其妙快满了,趁着重装系统的机会,安装了VS2015 with sp3,下载开发Android App需要的各种东东。这里要感谢【C#】VS2015开发环境的安装和配置系列文章,2016-07-03更新的,已经算是最新的vs2015 with update3的安装说明了。可惜看到这篇文章还是有点相见恨晚,文章里的流程是先下载安装JDK和Android SDK等,最后安装VS,我反过来做,浪费了一些时间。PS:对于使用Hyper-V的同学,可以使用VS自带的安卓模拟器,省却了下载和安装GOOGLE模拟器的一堆时间,据说GOOGLE模拟器还挺坑。。。
================================扯得太多,言归正传======================================
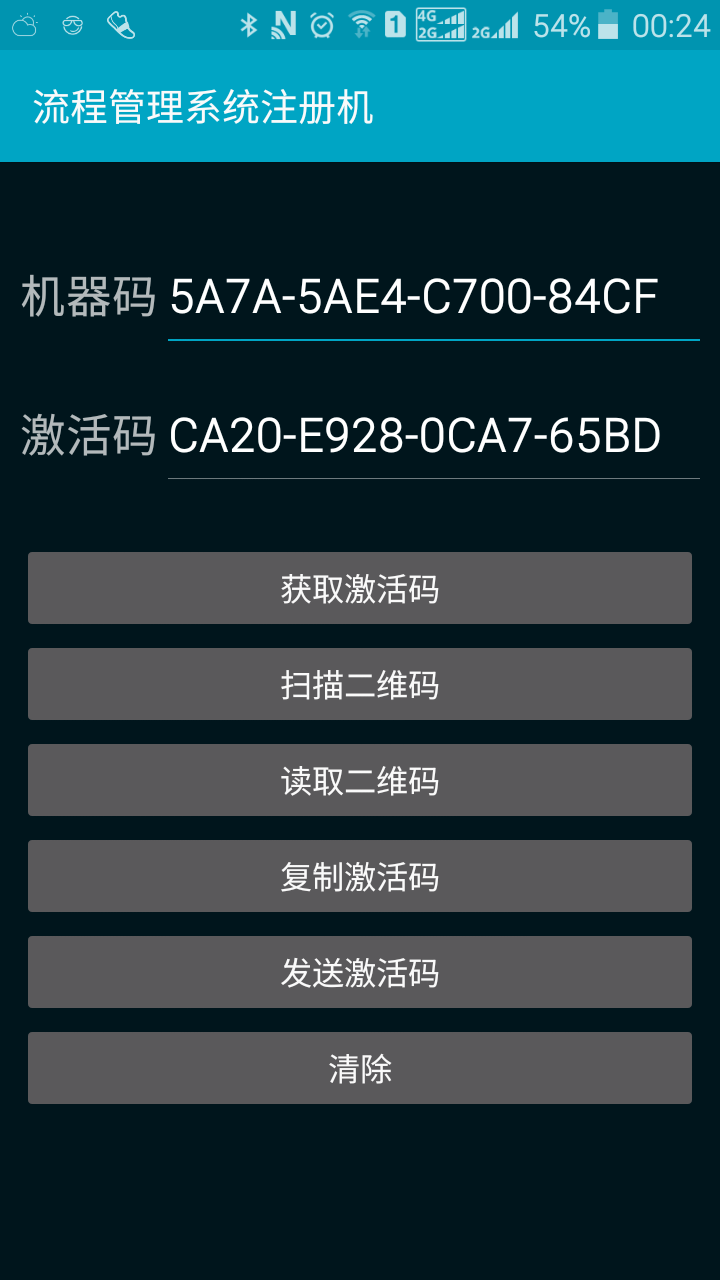
App项目用的是VS里的Android Blank App,先上个图让大家看看我手机上的显示效果,自己用就不需要那么华丽丽了(关键是不会。。。)。
![App界面]()
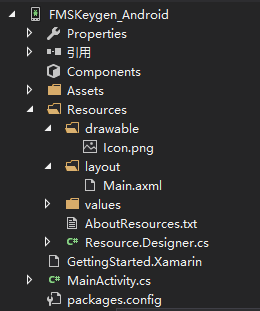
Android App使用的是显示与逻辑分离的设计模式,虽然我基本是做Winform的,也是基本能看懂的。Resources\layout文件夹里放视图文件,而代码逻辑文件放在最外层,整个项目的结构如下图:
![]()
这个App主界面使用的是GridLayout进行垂直布局,用法类似于HTML中的Table和WPF中的Grid,代码如下:
![]()
![]()
 1 <?xml version="1.0" encoding="utf-8"?>
 2 <GridLayout xmlns:android="http://schemas.android.com/apk/res/android"
 3     android:layout_width="match_parent"
 4     android:layout_height="match_parent"
 5     android:orientation="horizontal"
 6     android:paddingLeft="10dp"
 7     android:paddingRight="10dp"
 8     android:rowCount="6"
 9     android:columnCount="2">
10     <TextView
11         android:id="@+id/tvMachineCode"
12         android:layout_width="wrap_content"
13         android:layout_marginRight="5dp"
14         android:textSize="20sp"
15         android:layout_marginTop="50dp"
16         android:text="机器码" />
17     <EditText
18         android:id="@+id/txtMachineCode"
19         android:textSize="20sp"
20         android:maxLength ="20"
21         android:layout_marginTop="50dp"
22         android:layout_width="fill_parent" />
23     <TextView
24         android:id="@+id/tvActiviationCode"
25         android:layout_width="wrap_content"
26         android:layout_marginRight="5dp"
27         android:textSize="20sp"
28         android:layout_marginTop="30dp"
29         android:text="激活码" />
30     <EditText
31         android:id="@+id/txtActiviationCode"
32         android:textSize="20sp"
33         android:layout_marginTop="30dp"
34         android:layout_width="fill_parent" />
35     <Button
36         android:id="@+id/btnGetActiviationCode"
37         android:layout_marginTop="30dp"
38         android:layout_columnSpan="2"
39         android:layout_width="match_parent"
40         android:text="获取激活码" />
41     <Button
42         android:id="@+id/btnScanQRCode"
43         android:layout_columnSpan="2"
44         android:layout_width="match_parent"
45         android:text="扫描二维码" />
46     <Button
47         android:id="@+id/btnReadQRCode"
48         android:layout_columnSpan="2"
49         android:layout_width="match_parent"
50         android:text="读取二维码" />
51   <Button
52       android:id="@+id/btnCopy"
53       android:layout_columnSpan="2"
54       android:layout_width="match_parent"
55       android:text="复制激活码" />
56   <Button
57       android:id="@+id/btnShare"
58       android:layout_columnSpan="2"
59       android:layout_width="match_parent"
60       android:text="发送激活码" />
61     <Button
62         android:id="@+id/btnClear"
63         android:layout_columnSpan="2"
64         android:layout_width="match_parent"
65         android:text="清除" />
66 </GridLayout>
Main.axml
界面设计好之后,开始写逻辑代码。App默认是从MainActivity开始启动(JAVA开发可以在Properties\AndroidManifest.xml中修改,有谁知道Xamarin里是怎么改的?)。开始实现第一个按钮的功能,自我感觉还是比较容易的,基本可以直接复制粘贴我Winform里的代码,然而,我发现掉到第一个坑里去了。先看看从Winform里复制来的字符串取MD5的代码,这个在VS自带的模拟器中执行是正常的,得到的结果与Winform一致,但安装到手机里得到的就不对了。
1         private string MD5(string str, bool clearsplitter = true, bool islower = true)
2         {
3             var md5 = MD5CryptoServiceProvider.Create();
4             var output = md5.ComputeHash(Encoding.Default.GetBytes(str));
5             StringBuilder strbvalue = new StringBuilder(BitConverter.ToString(output).Replace("-", string.Empty).Substring(8, 16));
6             if (!clearsplitter)
7                 strbvalue.Insert(12, '-').Insert(8, '-').Insert(4, '-');
8             return islower ? strbvalue.ToString().ToLower() : strbvalue.ToString().ToUpper();
9         }
上网查了下,也问了下别人,电脑里Encoding.Default用的编码是GB2312,而手机里可能是ASCII。由于不能修改之前的代码,只能改这个了,把Encoding.Default改成了Encoding.GetEncoding("gb2312"),结果出乎预料,竟然闪退了。。。又上网搜了下,需要引用Xamarin安装自带的I18N.CJK,总算是搞定了第一个按钮。以下是【获取激活码】和【清除】的代码:
![]()
![]()
        private void Btngetactiviationcode_Click(object sender, EventArgs e)
        {
            string strerr = ValidateFormat(txtMachineCode.Text);
            if (strerr != string.Empty)
            {
                var dlg = new AlertDialog.Builder(this).SetTitle("警告")
                    .SetMessage("输入的机器码格式不正确!\n" + strerr);
                dlg.Show();
                Btnclear_Click(this, null);
                return;
            }
            txtActiviationCode.Text = GetActiveCode(txtMachineCode.Text);
        }

        private void Btnclear_Click(object sender, EventArgs e)
        {
            txtMachineCode.Text = txtActiviationCode.Text = string.Empty;
        }

        private string GetActiveCode(string machinecode)
        {
            string guid = "cd89e66c-b897-4ed8-a19f-ef5a30846f0a";
            return MD5(machinecode + MD5(guid, false, false), false, false);
        }

        private string MD5(string str, bool clearsplitter = true, bool islower = true)
        {
            var md5 = MD5CryptoServiceProvider.Create();
            var output = md5.ComputeHash(Encoding.GetEncoding("gb2312").GetBytes(str));
            StringBuilder strbvalue = new StringBuilder(BitConverter.ToString(output).Replace("-", string.Empty).Substring(8, 16));
            if (!clearsplitter)
                strbvalue.Insert(12, '-').Insert(8, '-').Insert(4, '-');
            return islower ? strbvalue.ToString().ToLower() : strbvalue.ToString().ToUpper();
        }
【获取激活码】和【清除】
这个App的主要便利用途就是能够扫描和识别二维码,上网搜了下,使用ZXing库会比较简单,它有个.net移动开发版本叫ZXing.Net.Mobile,可以使用Nuget直接下载添加引用,由于它依赖于Xamarin.Android.Support.v4,所以也要一起下载安装。直接按照ZXing.Net.Mobile官网上的扫描二维码示例代码,就做好了最简单的二维码扫描功能。注意:要在OnCreate方法里先初始化一下:
1 MobileBarcodeScanner.Initialize(Application);
1         private async void Btnscanqrcode_Click(object sender, EventArgs e)
2         {
3             var scanner = new ZXing.Mobile.MobileBarcodeScanner();
4             var result = await scanner.Scan();
5             if (result == null)
6                 return;
7             txtMachineCode.Text = result.Text.Trim();
8             Btngetactiviationcode_Click(this, null);
9         }
完成扫描二维码的功能,顿时信心大增,以为识别图片中的二维码也很简单,结果发现又掉第二个坑里去了。原来,ZXing.Net.Mobile里没有现成简单的识别二维码的方法,只查到可以用IBarcodeReader.Decode()方法来识别,然而它第一个参数byte[] rawRGB是个什么鬼?为毛不能提供一个Bitmap让我爽一下?!去网上搜JAVA版的都是传递Bitmap对象,再去看了下ZXing.Net.Mobile的源码,竟然是有些项目类型是Bitmap对象,有些是byte[]。没时间深究,我还是自己来弄个byte[]吧。
印象中看到过一篇教程里介绍过这个方法,说rawRGB参数指的是每个像素点的RGB值数组,而不是图像文件的二进制数组,这就要读取图像中的所有点的颜色值到数组里里再传递了。
 1         private void Btnreadqrcode_Click(object sender, EventArgs e)
 2         {
 3             Intent = new Intent();
 4             //从文件浏览器和相册等选择图像文件
 5             Intent.SetType("image/*");
 6             Intent.SetAction(Intent.ActionGetContent);
 7             StartActivityForResult(Intent, 1);
 8         }
 9
10         protected override void OnActivityResult(int requestCode, [GeneratedEnum] Android.App.Result resultCode, Intent data)
11         {
12             base.OnActivityResult(requestCode, resultCode, data);
13             if(requestCode == 1 && resultCode == Android.App.Result.Ok && data != null)
14             {
15                 // create a barcode reader instance
16                 IBarcodeReader reader = new BarcodeReader();
17                 // load a bitmap
18                 int width = 0, height = 0;
19                 //像素颜色值列表(注意:一个像素的每个颜色值都是一个列表中单独的元素,
20                 //后面将会把像素颜色值转换成ARGB32格式的颜色,每个像素颜色值就有4个元素加入到列表中)
21                 List<byte> pixelbytelist = new List<byte>();
22                 try
23                 {
24                     //根据选择的文件路径生成Bitmap对象
25                     using (Bitmap bmp = Android.Provider.MediaStore.Images.Media.GetBitmap(ContentResolver, data.Data))
26                     {
27                         width = bmp.Width; //图像宽度
28                         height = bmp.Height;  //图像高度
29                         // detect and decode the barcode inside the bitmap
30                         bmp.LockPixels();
31                         int[] pixels = new int[width * height];
32                         //一次性读取所有像素的颜色值(一个整数)到pixels
33                         bmp.GetPixels(pixels, 0, width, 0, 0, width, height);
34                         bmp.UnlockPixels();
35                         for (int i = 0; i < pixels.Length; i++)
36                         {
37                             int p = pixels[i];  //取出一个像素颜色值
38                             //将像素颜色值中的alpha颜色(透明度)添加到列表
39                             pixelbytelist.Add((byte)Color.GetAlphaComponent(p));
40                             //将像素颜色值中的红色添加到列表
41                             pixelbytelist.Add((byte)Color.GetRedComponent(p));
42                             //将像素颜色值中的绿色添加到列表
43                             pixelbytelist.Add((byte)Color.GetGreenComponent(p));
44                             //将像素颜色值中的蓝色添加到列表
45                             pixelbytelist.Add((byte)Color.GetBlueComponent(p));
46                         }
47                     }
48                     //识别
49                     var result = reader.Decode(pixelbytelist.ToArray(), width, height, RGBLuminanceSource.BitmapFormat.ARGB32);
50                     if (result != null)
51                     {
52                         txtMachineCode.Text = result.Text.Trim();
53                         Btngetactiviationcode_Click(this, null);
54                     }
55                     else
56                         Toast.MakeText(this, "未能识别到二维码!", ToastLength.Short).Show();
57                 }
58                 catch (Exception ex)
59                 {
60                     var dlg = new AlertDialog.Builder(this).SetTitle("警告")
61                         .SetMessage("获取图像时发生错误!\n" + ex.ToString());
62                     dlg.Show();
63                 }
64             }
65         }
上面就完成了识别二维码的功能,不过上面红色文字那里又出现个只在手机上出现的诡异问题,识别出来的二维码后面会多出一个不可见的字符,它会影响EditText中Text的长度,但不影响Text的值,可以被删除,删除前后计算出的激活码是相同的。没有去看源码,不知道怎么产生的,有人知道吗?
后面的复制激活码和发送激活码比较简单,都是直接找的网上的代码,调用系统功能来做。
![]()
![]()
 1         private void Btncopy_Click(object sender, EventArgs e)
 2         {
 3             ClipboardManager clip = (ClipboardManager)GetSystemService(ClipboardService);
 4             StringBuilder strbcontent = new StringBuilder();
 5             strbcontent.AppendLine("机器码:" + txtMachineCode.Text)
 6                 .AppendLine("激活码:" + txtActiviationCode.Text);
 7             ClipData clipdata = ClipData.NewPlainText("激活码", strbcontent.ToString());
 8             clip.PrimaryClip = clipdata;
 9             Toast.MakeText(this, "激活码已复制到剪贴板", ToastLength.Short).Show();
10         }
11
12         private void Btnshare_Click(object sender, EventArgs e)
13         {
14             if (string.IsNullOrWhiteSpace(txtActiviationCode.Text))
15             {
16                 var dlg = new AlertDialog.Builder(this).SetTitle("警告")
17                     .SetMessage("请先获取激活码!");
18                 dlg.Show();
19                 return;
20             }
21             string strerr = ValidateFormat(txtMachineCode.Text);
22             if (strerr != string.Empty)
23             {
24                 var dlg = new AlertDialog.Builder(this).SetTitle("警告")
25                     .SetMessage("输入的机器码格式不正确!\n" + strerr);
26                 dlg.Show();
27                 return;
28             }
29             Intent intent = new Intent(Intent.ActionSend);
30             intent.SetType("text/plain");//所有可以分享文本的app
31             StringBuilder strbcontent = new StringBuilder();
32             strbcontent.AppendLine("机器码:" + txtMachineCode.Text)
33                 .AppendLine("激活码:" + txtActiviationCode.Text);
34             intent.PutExtra(Intent.ExtraText, strbcontent.ToString());
35             StartActivity(Intent.CreateChooser(intent, "发送激活码"));
36         }
37
38         private string ValidateFormat(string str)
39         {
40             if(str.Length<19)
41                 return "输入的格式不正确";
42             if (str.Length != 19)
43                 str = str.Substring(0, 19);
44             string[] strs = str.Split('-');
45             if (strs.Length != 4)
46                 return "不能分隔为4组";
47             foreach (string s in strs)
48             {
49                 if (s.Length != 4)
50                     return s + "的长度不是4";
51                 if (!System.Text.RegularExpressions.Regex.IsMatch(s, "^[A-F0-9]{4}$"))
52                     return s + "的格式不正确";
53             }
54             return string.Empty;
55         }
【复制激活码】和【发送激活码】
断断续续写了几个晚上,终于写完这篇随笔了。在眼睛彻底睁不开之前赶紧贴上完整代码。
![]()
![]()
  1 using System;
  2 using Android.App;
  3 using Android.Content;
  4 using Android.Runtime;
  5 using Android.Views;
  6 using Android.Widget;
  7 using Android.OS;
  8 using System.Text;
  9 using System.Security.Cryptography;
 10 using ZXing.Mobile;
 11 using Android.Graphics;
 12 using ZXing;
 13 using Android.Database;
 14 using System.Collections.Generic;
 15
 16 namespace FMSKeygen_Android
 17 {
 18     [Activity(Label = "流程管理系统注册机", MainLauncher = true, Icon = "@drawable/icon")]
 19     public class MainActivity : Activity
 20     {
 21         private EditText txtMachineCode = null;
 22         private EditText txtActiviationCode = null;
 23
 24         protected override void OnCreate(Bundle bundle)
 25         {
 26             base.OnCreate(bundle);
 27
 28             // Set our view from the "main" layout resource
 29             SetContentView(Resource.Layout.Main);
 30
 31             // 初始化二维码扫描仪,后面要用到
 32             MobileBarcodeScanner.Initialize(Application);
 33
 34             txtMachineCode = FindViewById<EditText>(Resource.Id.txtMachineCode);
 35             //设置自动转换小写字母为大写
 36             txtMachineCode.SetFilters(new Android.Text.IInputFilter[] { new Android.Text.InputFilterAllCaps() });
 37             txtActiviationCode = FindViewById<EditText>(Resource.Id.txtActiviationCode);
 38             //取消对验证码文本框的所有按键监听
 39             txtActiviationCode.KeyListener = null;
 40             Button btnclear = FindViewById<Button>(Resource.Id.btnClear);
 41             btnclear.Click += Btnclear_Click;
 42             Button btngetactiviationcode = FindViewById<Button>(Resource.Id.btnGetActiviationCode);
 43             btngetactiviationcode.Click += Btngetactiviationcode_Click;
 44             Button btnscanqrcode = FindViewById<Button>(Resource.Id.btnScanQRCode);
 45             btnscanqrcode.Click += Btnscanqrcode_Click;
 46             Button btncopy = FindViewById<Button>(Resource.Id.btnCopy);
 47             btncopy.Click += Btncopy_Click;
 48             Button btnreadqrcode = FindViewById<Button>(Resource.Id.btnReadQRCode);
 49             btnreadqrcode.Click += Btnreadqrcode_Click;
 50             Button btnshare = FindViewById<Button>(Resource.Id.btnShare);
 51             btnshare.Click += Btnshare_Click;
 52         }
 53
 54
 55         private void Btnshare_Click(object sender, EventArgs e)
 56         {
 57             if (string.IsNullOrWhiteSpace(txtActiviationCode.Text))
 58             {
 59                 var dlg = new AlertDialog.Builder(this).SetTitle("警告")
 60                     .SetMessage("请先获取激活码!");
 61                 dlg.Show();
 62                 return;
 63             }
 64             string strerr = ValidateFormat(txtMachineCode.Text);
 65             if (strerr != string.Empty)
 66             {
 67                 var dlg = new AlertDialog.Builder(this).SetTitle("警告")
 68                     .SetMessage("输入的机器码格式不正确!\n" + strerr);
 69                 dlg.Show();
 70                 return;
 71             }
 72             Intent intent = new Intent(Intent.ActionSend);
 73             intent.SetType("text/plain");//所有可以分享文本的app
 74             StringBuilder strbcontent = new StringBuilder();
 75             strbcontent.AppendLine("机器码:" + txtMachineCode.Text)
 76                 .AppendLine("激活码:" + txtActiviationCode.Text);
 77             intent.PutExtra(Intent.ExtraText, strbcontent.ToString());
 78             StartActivity(Intent.CreateChooser(intent, "发送激活码"));
 79         }
 80
 81         private string ValidateFormat(string str)
 82         {
 83             if(str.Length<19)
 84                 return "输入的格式不正确";
 85             if (str.Length != 19)
 86                 str = str.Substring(0, 19);
 87             string[] strs = str.Split('-');
 88             if (strs.Length != 4)
 89                 return "不能分隔为4组";
 90             foreach (string s in strs)
 91             {
 92                 if (s.Length != 4)
 93                     return s + "的长度不是4";
 94                 if (!System.Text.RegularExpressions.Regex.IsMatch(s, "^[A-F0-9]{4}$"))
 95                     return s + "的格式不正确";
 96             }
 97             return string.Empty;
 98         }
 99
100         private void Btnreadqrcode_Click(object sender, EventArgs e)
101         {
102             Intent = new Intent();
103             //从文件浏览器和相册等选择图像文件
104             Intent.SetType("image/*");
105             Intent.SetAction(Intent.ActionGetContent);
106             StartActivityForResult(Intent, 1);
107         }
108
109         protected override void OnActivityResult(int requestCode, [GeneratedEnum] Android.App.Result resultCode, Intent data)
110         {
111             base.OnActivityResult(requestCode, resultCode, data);
112             if(requestCode == 1 && resultCode == Android.App.Result.Ok && data != null)
113             {
114                 // create a barcode reader instance
115                 IBarcodeReader reader = new BarcodeReader();
116                 // load a bitmap
117                 int width = 0, height = 0;
118                 //像素颜色值列表(注意:一个像素的每个颜色值都是一个列表中单独的元素,
119                 //后面将会把像素颜色值转换成ARGB32格式的颜色,每个像素颜色值就有4个元素加入到列表中)
120                 List<byte> pixelbytelist = new List<byte>();
121                 try
122                 {
123                     //根据选择的文件路径生成Bitmap对象
124                     using (Bitmap bmp = Android.Provider.MediaStore.Images.Media.GetBitmap(ContentResolver, data.Data))
125                     {
126                         width = bmp.Width; //图像宽度
127                         height = bmp.Height;  //图像高度
128                         // detect and decode the barcode inside the bitmap
129                         bmp.LockPixels();
130                         int[] pixels = new int[width * height];
131                         //一次性读取所有像素的颜色值(一个整数)到pixels
132                         bmp.GetPixels(pixels, 0, width, 0, 0, width, height);
133                         bmp.UnlockPixels();
134                         for (int i = 0; i < pixels.Length; i++)
135                         {
136                             int p = pixels[i];  //取出一个像素颜色值
137                             //将像素颜色值中的alpha颜色(透明度)添加到列表
138                             pixelbytelist.Add((byte)Color.GetAlphaComponent(p));
139                             //将像素颜色值中的红色添加到列表
140                             pixelbytelist.Add((byte)Color.GetRedComponent(p));
141                             //将像素颜色值中的绿色添加到列表
142                             pixelbytelist.Add((byte)Color.GetGreenComponent(p));
143                             //将像素颜色值中的蓝色添加到列表
144                             pixelbytelist.Add((byte)Color.GetBlueComponent(p));
145                         }
146                     }
147                     //识别
148                     var result = reader.Decode(pixelbytelist.ToArray(), width, height, RGBLuminanceSource.BitmapFormat.ARGB32);
149                     if (result != null)
150                     {
151                         txtMachineCode.Text = result.Text.Trim();
152                         Btngetactiviationcode_Click(this, null);
153                     }
154                     else
155                         Toast.MakeText(this, "未能识别到二维码!", ToastLength.Short).Show();
156                 }
157                 catch (Exception ex)
158                 {
159                     var dlg = new AlertDialog.Builder(this).SetTitle("警告")
160                         .SetMessage("获取图像时发生错误!\n" + ex.ToString());
161                     dlg.Show();
162                 }
163             }
164         }
165
166         private void Btncopy_Click(object sender, EventArgs e)
167         {
168             ClipboardManager clip = (ClipboardManager)GetSystemService(ClipboardService);
169             StringBuilder strbcontent = new StringBuilder();
170             strbcontent.AppendLine("机器码:" + txtMachineCode.Text)
171                 .AppendLine("激活码:" + txtActiviationCode.Text);
172             ClipData clipdata = ClipData.NewPlainText("激活码", strbcontent.ToString());
173             clip.PrimaryClip = clipdata;
174             Toast.MakeText(this, "激活码已复制到剪贴板", ToastLength.Short).Show();
175         }
176
177         private async void Btnscanqrcode_Click(object sender, EventArgs e)
178         {
179             var scanner = new ZXing.Mobile.MobileBarcodeScanner();
180             var result = await scanner.Scan();
181             if (result == null)
182                 return;
183             txtMachineCode.Text = result.Text.Trim();
184             Btngetactiviationcode_Click(this, null);
185         }
186
187         private void Btngetactiviationcode_Click(object sender, EventArgs e)
188         {
189             string strerr = ValidateFormat(txtMachineCode.Text);
190             if (strerr != string.Empty)
191             {
192                 var dlg = new AlertDialog.Builder(this).SetTitle("警告")
193                     .SetMessage("输入的机器码格式不正确!\n" + strerr);
194                 dlg.Show();
195                 Btnclear_Click(this, null);
196                 return;
197             }
198             txtActiviationCode.Text = GetActiveCode(txtMachineCode.Text);
199         }
200
201         private void Btnclear_Click(object sender, EventArgs e)
202         {
203             txtMachineCode.Text = txtActiviationCode.Text = string.Empty;
204         }
205
206         private string GetActiveCode(string machinecode)
207         {
208             string guid = "cd89e66c-b897-4ed8-a19f-ef5a30846f0a";
209             return MD5(machinecode + MD5(guid, false, false), false, false);
210         }
211
212         private string MD5(string str, bool clearsplitter = true, bool islower = true)
213         {
214             var md5 = MD5CryptoServiceProvider.Create();
215             var output = md5.ComputeHash(Encoding.GetEncoding("gb2312").GetBytes(str));
216             StringBuilder strbvalue = new StringBuilder(BitConverter.ToString(output).Replace("-", string.Empty).Substring(8, 16));
217             if (!clearsplitter)
218                 strbvalue.Insert(12, '-').Insert(8, '-').Insert(4, '-');
219             return islower ? strbvalue.ToString().ToLower() : strbvalue.ToString().ToUpper();
220         }
221     }
222 }
完整代码
碎觉。。