这篇文章呢我们谈一谈,约束布局常用的一些需求和坑
一、如果我想让一个控件在父布局里左右填充怎么办(上下填充,上下左右都填充同理)
- match_parent 方式
<View
        android:id="@+id/a"
        android:layout_width="match_parent"
        android:layout_height="60dp"
        android:background="@android:color/holo_red_light" />
- 相对布局的方式(
android:layout_width="0dp" 是关键)
<View
        android:id="@+id/a"
        android:layout_width="0dp"
        android:layout_height="60dp"
        android:background="@android:color/holo_red_light"
        app:layout_constraintLeft_toLeftOf="parent"
        app:layout_constraintRight_toRightOf="parent" />
ConstraintLayout 没有 match_parent 所以推荐使用第二种方式,虽然看效果是没啥事,但是官方的坑我表示不踩
二、替代百分比布局
有时候想把控件按照比例填充父布局,Android 屏幕适配这么复杂,好像不容易实现
这时候约束布局有两个属性 layout_constraintWidth_percent layout_constraintHeight_percent
这岂不是把一直不温不火的百分比布局给革命了
<View
        android:id="@+id/a"
        android:layout_width="0dp"
        android:layout_height="50dp"
        android:background="@android:color/holo_red_light"
        app:layout_constraintLeft_toLeftOf="parent"
        app:layout_constraintRight_toRightOf="parent"
        app:layout_constraintWidth_percent="0.3" />
我只放这么一段代码大家应该就知道怎么用了,我也就不多了说了。
默认是居中的如果想调整位置请结合 app:layout_constraintHorizontal_bias="0.3" 食用
三、控件宽度一定,我想左右居中显示怎么办(上下居中同理)
<View
        android:id="@+id/a"
        android:layout_width="120dp"
        android:layout_height="60dp"
        android:background="@android:color/holo_red_light"
        app:layout_constraintLeft_toLeftOf="parent"
        app:layout_constraintRight_toRightOf="parent" />
与左右填充相似,只不过宽度固定了而已,两条绳子拉着一个控件居中
四、控件宽度一定,左右按百分比显示怎么办,我就是不想居中(上下同理)
<View
        android:id="@+id/a"
        android:layout_width="120dp"
        android:layout_height="60dp"
        android:background="@android:color/holo_red_light"
        app:layout_constraintHorizontal_bias="0.3"
        app:layout_constraintLeft_toLeftOf="parent"
        app:layout_constraintRight_toRightOf="parent" />
app:layout_constraintHorizontal_bias="0.3" 一个属性就搞定了
上下使用 app:layout_constraintVertical_bias 来实现
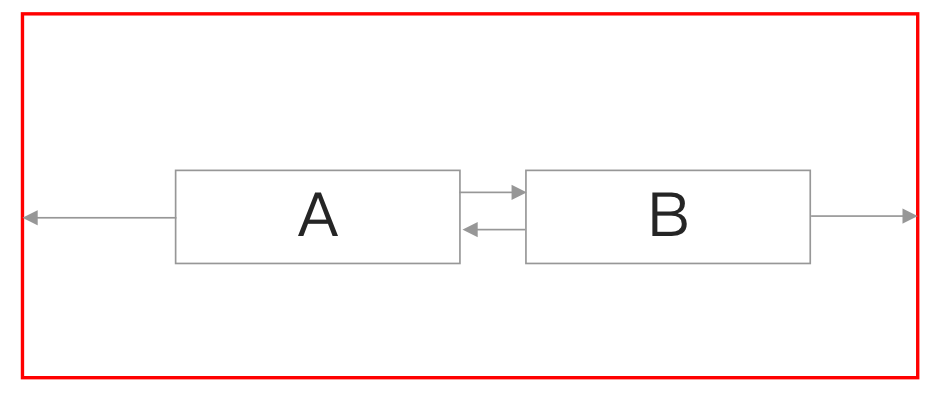
五、我想两个控件左右平分空间,对没错就是抢 LinearLayout 的饭碗(上下居中同理)
<View
        android:id="@+id/a"
        android:layout_width="0dp"
        android:layout_height="60dp"
        android:background="@android:color/holo_red_light"
        app:layout_constraintLeft_toLeftOf="parent"
        app:layout_constraintRight_toLeftOf="@+id/b" />

<View
        android:id="@+id/b"
        android:layout_width="0dp"
        android:layout_height="60dp"
        android:background="@android:color/holo_blue_light"
        app:layout_constraintLeft_toRightOf="@+id/a"
        app:layout_constraintRight_toRightOf="parent" />
因为有个约束链的存在所以这个稍微有点复杂,先来一张约束示意图看一下,约束链下边在讲
六、我想两个控件左右按比例平分空间,平分多没有意思啊(上下同理)
<View
        android:id="@+id/a"
        android:layout_width="0dp"
        android:layout_height="60dp"
        android:background="@android:color/holo_red_light"
        app:layout_constraintHorizontal_weight="1"
        app:layout_constraintLeft_toLeftOf="parent"
        app:layout_constraintRight_toLeftOf="@+id/b" />

<View
        android:id="@+id/b"
        android:layout_width="0dp"
        android:layout_height="60dp"
        android:background="@android:color/holo_blue_light"
        app:layout_constraintHorizontal_weight="2"
        app:layout_constraintLeft_toRightOf="@+id/a"
        app:layout_constraintRight_toRightOf="parent" />
上面的例子是 1:2 看写法是不是和 LinearLayout 的权重写法简直一毛一样
上下权重设置 app:layout_constraintVertical_weight="" 一定记得 android:layout_width="0dp" 是 0dp
坑点
宽高在需要自动控制长度的时候一定是设置为 0dp,不然没什么效果,甚至达不到预期,我也推荐约束布局中只是用 0dp 、wrap_content 、固定的值。切记 match_parent 是没啥卵用,虽然看着有效果,但是我也不敢碰,说多了都是泪。
切记只有约束过的边设置 margin 才能看出效果,注意我说的是能看出,虽然设置了 margin 也是有意义的但是看不出来
平时我们摞控件的时候一定记得处理右边和底部的约束,好多人控件显示不全就是这个问题