谷歌之前推出了 ConstraintLayout 动画,做一些基本的动画让我们更省时省力了,今天我们就看一下这个小知识点。
首先你需要引入 constraint-layout 这就不用我多说了
然后还需要引入 transition 包,如果不引入,从而使用系统自带的 transition 的话,则你的约束布局动画只能兼容到 API 19
implementation 'com.android.support.constraint:constraint-layout:1.1.2'
implementation 'com.android.support:transition:27.1.1'
我们先说一说最简单的实现方式,使用两个布局,第一个是我们正常的布局,另一个是记录控件变换后位置与约束信息的布局
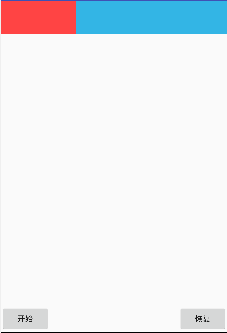
首先贴上正常的布局
<android.support.constraint.ConstraintLayout xmlns:android="http://schemas.android.com/apk/res/android"
    xmlns:app="http://schemas.android.com/apk/res-auto"
    xmlns:tools="http://schemas.android.com/tools"
    android:layout_width="match_parent"
    android:layout_height="match_parent"
    android:id="@+id/root_layout"
    tools:context=".MainActivity">

    <View
        android:id="@+id/a"
        android:layout_width="0dp"
        android:layout_height="60dp"
        android:background="@android:color/holo_red_light"
        app:layout_constraintHorizontal_weight="1"
        app:layout_constraintLeft_toLeftOf="parent"
        app:layout_constraintRight_toLeftOf="@+id/b" />

    <View
        android:id="@+id/b"
        android:layout_width="0dp"
        android:layout_height="60dp"
        android:background="@android:color/holo_blue_light"
        app:layout_constraintHorizontal_weight="2"
        app:layout_constraintLeft_toRightOf="@+id/a"
        app:layout_constraintRight_toRightOf="parent" />

    <Button
        android:id="@+id/btn_start"
        android:layout_width="wrap_content"
        android:layout_height="wrap_content"
        android:text="开始"
        android:onClick="onClick"
        app:layout_constraintBottom_toBottomOf="parent"
        app:layout_constraintLeft_toLeftOf="parent" />

    <Button
        android:id="@+id/btn_reset"
        android:layout_width="wrap_content"
        android:layout_height="wrap_content"
        android:text="恢复"
        android:onClick="onClick"
        app:layout_constraintBottom_toBottomOf="parent"
        app:layout_constraintRight_toRightOf="parent" />

</android.support.constraint.ConstraintLayout>
预览下原始布局
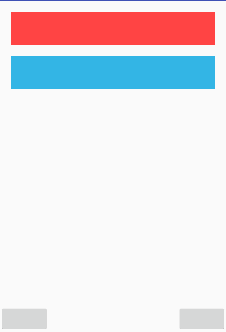
然后贴上标定位置的布局
<android.support.constraint.ConstraintLayout xmlns:android="http://schemas.android.com/apk/res/android"
    xmlns:app="http://schemas.android.com/apk/res-auto"
    xmlns:tools="http://schemas.android.com/tools"
    android:layout_width="match_parent"
    android:layout_height="match_parent"
    tools:context=".MainActivity">

    <View
        android:id="@+id/a"
        android:layout_width="0dp"
        android:layout_height="60dp"
        android:layout_margin="20dp"
        app:layout_constraintLeft_toLeftOf="parent"
        app:layout_constraintRight_toRightOf="parent"
        app:layout_constraintTop_toTopOf="parent" />

    <View
        android:id="@+id/b"
        android:layout_width="0dp"
        android:layout_height="60dp"
        android:layout_margin="20dp"
        app:layout_constraintLeft_toLeftOf="parent"
        app:layout_constraintRight_toRightOf="parent"
        app:layout_constraintTop_toBottomOf="@+id/a" />

    <Button
        android:id="@+id/btn_start"
        android:layout_width="wrap_content"
        android:layout_height="wrap_content"
        app:layout_constraintBottom_toBottomOf="parent"
        app:layout_constraintLeft_toLeftOf="parent" />

    <Button
        android:id="@+id/btn_reset"
        android:layout_width="wrap_content"
        android:layout_height="wrap_content"
        app:layout_constraintBottom_toBottomOf="parent"
        app:layout_constraintRight_toRightOf="parent" />

</android.support.constraint.ConstraintLayout>
大家发现了没有这个布局颜色,按钮文字什么属性我都没有写,因为不需要,这个布局只提供一个控件的位置与约束信息,做动画就是从默认布局到这个布局的一个渐变
我放的图片有颜色是我故意加的,为了能让大家直观的看到两个控件的位置,代码中其实是并不需要的
再看一下 Activity 的写法
    private ConstraintSet mConstraintSet1, mConstraintSet2, mConstraintReset;
    private ConstraintLayout constraintLayout;

    @Override
    protected void onCreate(Bundle savedInstanceState) {
        super.onCreate(savedInstanceState);
        setContentView(R.layout.activity_main);

        mConstraintSet1 = new ConstraintSet();
        mConstraintSet2 = new ConstraintSet();

        constraintLayout = findViewById(R.id.root_layout);
        //把默认 constraintLayout 布局放到 mConstraintSet1 中
        mConstraintSet1.clone(constraintLayout);
        //把标定位置变换的 constraintLayout 布局放到 mConstraintSet2 中
        mConstraintSet2.clone(this, R.layout.activity_main_anim);
    }

    public void onClick(View view) {
        switch (view.getId()) {
            case R.id.btn_start:
                TransitionManager.beginDelayedTransition(constraintLayout);
                mConstraintSet2.applyTo(constraintLayout);
                break;
            case R.id.btn_reset:
                AutoTransition transition = new AutoTransition();
                transition.setDuration(500);
                TransitionManager.beginDelayedTransition(constraintLayout,transition);
                mConstraintSet1.applyTo(constraintLayout);
                break;
        }
    }
首先动画效果看了,看了一眼代码是不是觉得这种写法代码冗余很严重有木有,这个动画不止有这一种写法,先不要放弃他,我们就来逼叨逼叨!
- 首先我们有两个布局,第一个是正常的布局,包括文字颜色什么的都有,第二个布局只有与约束相关的代码和相关控件以及 ID。我们第二个布局就算你写了其他的属性系统再做动画的时候他也不会读,所以就是没什么卵用。
看到这里大家心里肯定有一个疑问,我们平常设置 View 的字体、文字、颜色、背景什么的会不会出现什么问题,我这里试过了,什么问题都没有,包括 View 的 ID 只要我们默认布局有就不会有问题。
再说一点本来应该和第一点写一起的但是我觉得这一点很重要:我们第一个布局里面各个控件以及 ID 在第二个布局一定要保持不变,切记 ID 不要变,因为变了系统去做动画的时候就达不到预期效果了,举个例子:
本来我们有两个控件 ID 分别为 A,B ,但是我们在第二个布局改成了 B,C 那么做动画 A 就会因为没有约束而乱做动画,只有 B 做动画效果
想做动画必须用 ConstraintLayout ,并且子布局里面的控件是不会做动画的
用法简述
- 有几种动画状态就需要创建几个 ConstraintSet 因为约束布局的动画都依赖于 ConstraintSet
-
ConstraintSet.clone(); 使用这个方法把布局位置以及约束关系记录到 ConstraintSet 中。该方法有以下几种构造方法自己按需求选择
public void clone(Context context, int constraintLayoutId)public void clone(ConstraintSet set)public void clone(ConstraintLayout constraintLayout)public void clone(Constraints constraints)
- 我们上面说的如果不想再画一个布局那就是用代码自己编辑约束关系,例如:
mConstraintSet2.clone(constraintLayout);
mConstraintSet2.centerVertically(R.id.a, 0)
ConstraintSet 里面的 API 可以自己看一下,基本就是 ConstraintLayout 里面的那些属性,如果懒得话,乖乖再画一遍布局吧
-
TransitionManager.beginDelayedTransition(constraintLayout) 准备开始动画
我们还可以自定义动画时长等等操作,具体 AutoTransition API ,例子:
AutoTransition transition = new AutoTransition();
transition.setDuration(500);
TransitionManager.beginDelayedTransition(constraintLayout,transition);
-
mConstraintSet1.applyTo(constraintLayout); 然后把 ConstraintSet 位置和约束信息应用到 ConstraintLayout 布局,并且做动画
如果手动修改了 ConstraintLayout 中元素的布局位置,那么动画不会同步这个变化,因为他们的位置等信息都存在 ConstraintSet 中,你就算改了 ConstraintLayout 中元素位置也没什么用,除非你自己改了,记得要重新记录到 ConstraintSet 中。
小结
虽然这个知识点很小,但是用好了能给我们的 APP 添加很多逼格,学习这个知识点的收益真的是很划算