界面无小事(一): RecyclerView+CardView了解一下
界面无小事(二): 让RecyclerView展示更多不同视图
界面无小事(三):用RecyclerView + Toolbar做个文件选择器
界面无小事(四):来写个滚动选择器吧!
界面无小事(五):自定义TextView
界面无小事(六):来做个好看得侧拉菜单!
github传送门
目录
- 效果图
- 前言
- 自定义属性
- MeasureSpec类
- 颜色解析
- 字号转换
- 最后
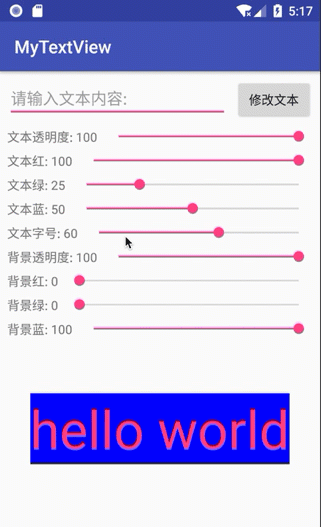
效果图
不多废话, 直接上图, 如果感兴趣再看下去.
![效果图]()
效果图
前言
写第四篇滚动选择器的时候, 在自定义视图这里含糊了, 有些地方没说清楚, 这次补上关于自定义视图的部分.
自定义属性
自定义视图的一个要点就是添加自定义属性. 这里我们填上三个常用的, 文本, 颜色, 字号. 然后在布局文件中就可以使用了. 最后在自定义类中获取属性并赋值.
<?xml version="1.0" encoding="utf-8"?>
<resources>
    <declare-styleable name="MyTextView">
        <attr name="text" format="string" />
        <attr name="color" format="color" />
        <attr name="size" format="dimension" />
    </declare-styleable>
</resources>
xmlns:app="http://schemas.android.com/apk/res-auto"
<com.so.mytextview.ui.view.MyTextView
    android:id="@+id/mtv_test"
    android:layout_width="wrap_content"
    android:layout_height="wrap_content"
    android:layout_centerInParent="true"
    app:color="@color/colorAccent"
    app:size="60sp"
    app:text="hello world" />
public MyTextView(Context context, @Nullable AttributeSet attrs, int defStyleAttr) {
    super(context, attrs, defStyleAttr);

    init(context, attrs);
}

private void init(Context context, AttributeSet attrs) {
    // 获取自定义属性
    TypedArray ta = context.obtainStyledAttributes(attrs, R.styleable.MyTextView);

    mSize = ta.getDimension(R.styleable.MyTextView_size, 16);
    mText = ta.getString(R.styleable.MyTextView_text);
    mColor = ta.getColor(R.styleable.MyTextView_color, Color.BLACK);

    ta.recycle();

    // 设置画笔
    mPaint = new Paint(Paint.ANTI_ALIAS_FLAG);
    mPaint.setTextSize(mSize);

    // 设置背景颜色
    mBkColor = Color.BLUE;
}
MeasureSpec类
MeasureSpec类官方文档
关于onMeasure方法, 最重要的就是就是MeasureSpec类的使用了. 其实主要也就是要算好match_parent和wrap_content. match_parent和具体数值都是EXACTLY. wrap_content是AT_MOST. ScrollView或者是ListView就会是UNSPECIFIED.
@Override
protected void onMeasure(int widthMeasureSpec, int heightMeasureSpec) {
    super.onMeasure(widthMeasureSpec, heightMeasureSpec);

    int width = 0;
    int height = 0;

    int specMode = MeasureSpec.getMode(widthMeasureSpec);
    int specSize = MeasureSpec.getSize(widthMeasureSpec);

    switch (specMode) {
        case MeasureSpec.EXACTLY:
            width = getPaddingLeft() + getPaddingRight() + specSize;
            break;

        case MeasureSpec.AT_MOST:
        case MeasureSpec.UNSPECIFIED:
            width = (int) (getPaddingLeft() + getPaddingRight()
                    + mPaint.measureText(mText));
            break;
    }

    specMode = MeasureSpec.getMode(heightMeasureSpec);
    specSize = MeasureSpec.getSize(heightMeasureSpec);

    switch (specMode) {
        case MeasureSpec.EXACTLY:
            height = getPaddingTop() + getPaddingBottom() + specSize;
            break;

        case MeasureSpec.AT_MOST:
        case MeasureSpec.UNSPECIFIED:
            Paint.FontMetrics fmi = mPaint.getFontMetrics();
            float textHeight = Math.abs(fmi.bottom - fmi.top);
            height = (int) (getPaddingTop() + getPaddingBottom() + textHeight);
            break;
    }

    setMeasuredDimension(width, height);
}
有两个要点, 就是算字符串的宽度和高度, 宽度用Paint实例的measureText方法即可. 高度涉及到我在第四篇写的Paint.FontMetrics类, 就是用底部减去顶部取绝对值.
颜色解析
Color是个要处理的类, 当你用getColor函数获取到函数, 它是一个int值, 如果我们需要重新在原有颜色基础上变化, 就需要解析这个int, 将它还原成RGB.
/**
 * 依据颜色值获取rgb值
 *
 * @param color 颜色值
 * @return rgb值
 */
public int[] setColor(int color) {
    int[] rgb = new int[3];
    rgb[0] = (color & 0x00ff0000) >> 16;
    rgb[1] = (color & 0x0000ff00) >> 8;
    rgb[2] = (color & 0x000000ff);
    return rgb;
}
字号转换
要处理好字号问题, 最重要的就是转换, 代码中都是用px的, 但是布局文件一般用sp.
/**
 * sp转px
 */
public static int sp2px(float spVal) {
    return (int) TypedValue.applyDimension(TypedValue.COMPLEX_UNIT_SP,
            spVal, getContext().getResources().getDisplayMetrics());
}

/**
 * px转sp
 */
public static float px2sp(float pxVal) {
    return (pxVal / getContext().getResources().getDisplayMetrics().scaledDensity);
}
最后
这样可以自定义一些简单的视图类了, 如果要更复杂的, 还需要去处理更多的参数, 特别是构造方法那个四参数的. 有意见或者建议评论区见, 喜欢记得点赞或者关注我哦~