原文:
【.NET Core项目实战-统一认证平台】第三章 网关篇-数据库存储配置(1)
本篇将介绍如何扩展Ocelot中间件实现自定义网关,并使用2种不同数据库来演示Ocelot配置信息存储和动态更新功能,内容也是从实际设计出发来编写我们自己的中间件,本文内容涵盖设计思想内容和代码内容,我希望园友们最好跟着我这个文章的思路先理解好后再看源代码,这样有利于融会贯通,本篇的文档及源码将会在GitHub上开源,每篇的源代码我将用分支的方式管理,本篇使用的分支为course1。
附文档及源码下载地址:[https://github.com/jinyancao/CtrAuthPlatform/tree/course1]
一、数据库设计
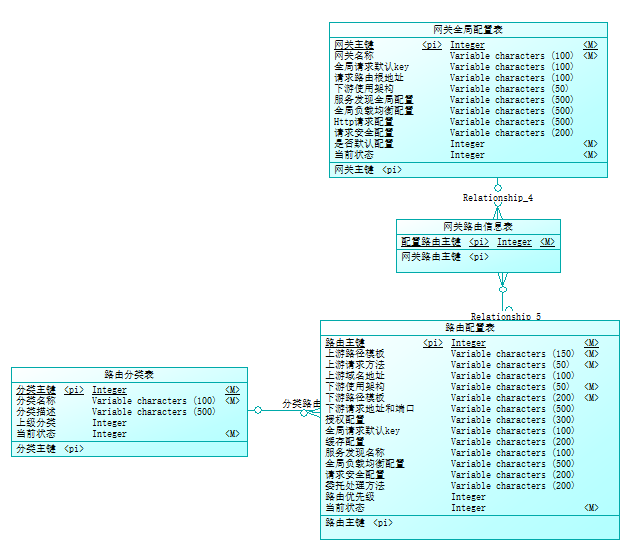
上一篇中我们介绍了Ocelot中要满足我们需求,我们需要把配置信息转到数据库存储,今天我们就从数据库设计开始,数据库设计我采用的是PowerDesigner,首先打开软件,新建一个概念模型。根据Ocelot的配置文件,我们可以发现,配置信息由全局配置信息和路由信息组成,这时候我们可以设计表结构如下,为了满足后续多个路由的切换,增加了网关和路由多对多关系,以后我们可以随时根据不同规则切换,详细的表字段可以自行根据Ocelot配置文档和设计文档对照查看,这里我移除了限流的字段,因为我们后续需要自定义限流,用不上原来的方法。
![img_ab1f8e34a8631caecfbede1d8aa93f7d.png]()
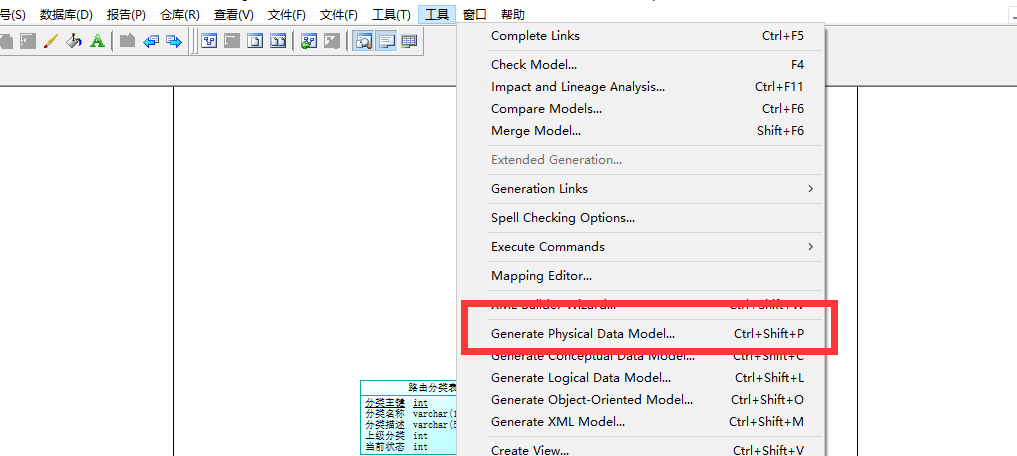
生成物理模型
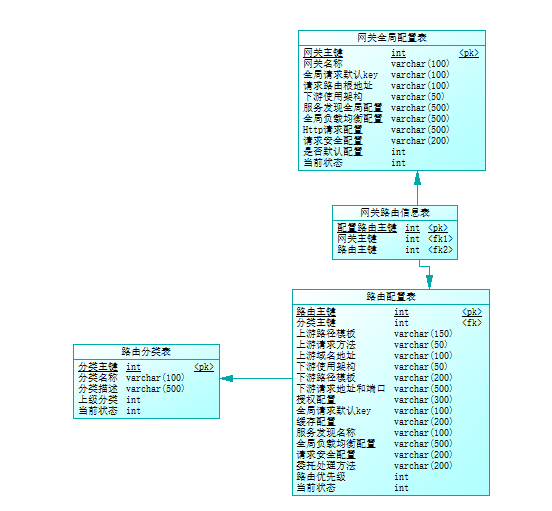
数据库设计好后,我们需要把概念模型转成物理模型,使用Ctrl+Shift+P快捷键,我们默认使用MSSQL2008R2实现配置存储,所有在弹出的对话框中选择,然后点击确认后会自动生成MSSQL2008R2的物理模型,可以看到数据类型和表之间的关连关系都生成好了,奈斯,一切都是那么完美,如果主键为自增类型,手动标记下即可。
![img_bd40273214c3426a6745ecfb6465a15e.png]()
![img_309a10139aae8432ac332cdfc5f6ba77.png]()
![img_c328913a1d79d44cd03933e59c60466b.png]()
现在我们需要生成我们创建数据库的SQL脚本了,别忘了保存下刚才生成的物理模型,因为以后还需要用到。
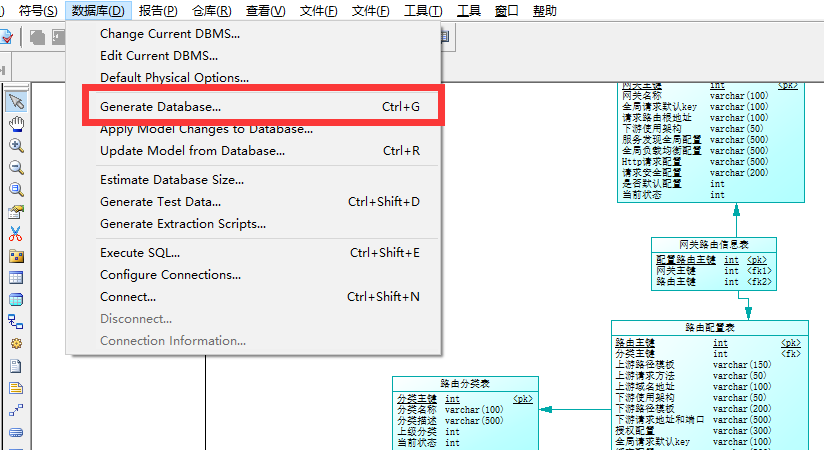
生成数据库脚本
如图所示,可以使用快捷键Ctrl+G生成数据库脚本,点击确认生成并保存,然后把生成的脚本在我们新建的数据库里执行,这样我们的数据库就设计完成了。
![img_ccf8e9a037daa4ae2ca08f1b880ef204.png]()
![img_8027acdba796b6efa2b7ac7fa89e8680.png]()
二、搭建并测试中间件
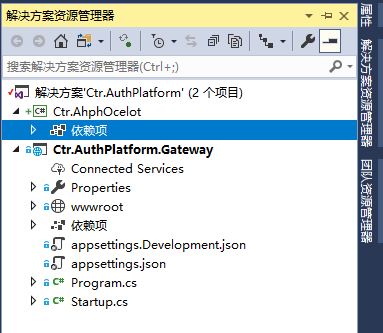
我们使用VS2017新建一个.NETCORE2.1项目,然后新建一个类库来实现我们Ocelot定制版中间件,建好后项目结构如下,现在开始我们第一个AhphOcelot定制中间件编写。
![img_04e78647aeae7cd234f4584a658b9d13.png]()
首先我们回顾下【.NET Core项目实战-统一认证平台】第二章网关篇-重构Ocelot来满足需求的源码解析,关于配置信息的读取如下,我们只需要重写下CreateConfiguration方法实现从数据库里取就可以了,既然有思路了,
public static async Task<IApplicationBuilder> UseOcelot(this IApplicationBuilder builder, OcelotPipelineConfiguration pipelineConfiguration)
{
    //创建配置信息
    var configuration = await CreateConfiguration(builder);
    ConfigureDiagnosticListener(builder);
    return CreateOcelotPipeline(builder, pipelineConfiguration);
}
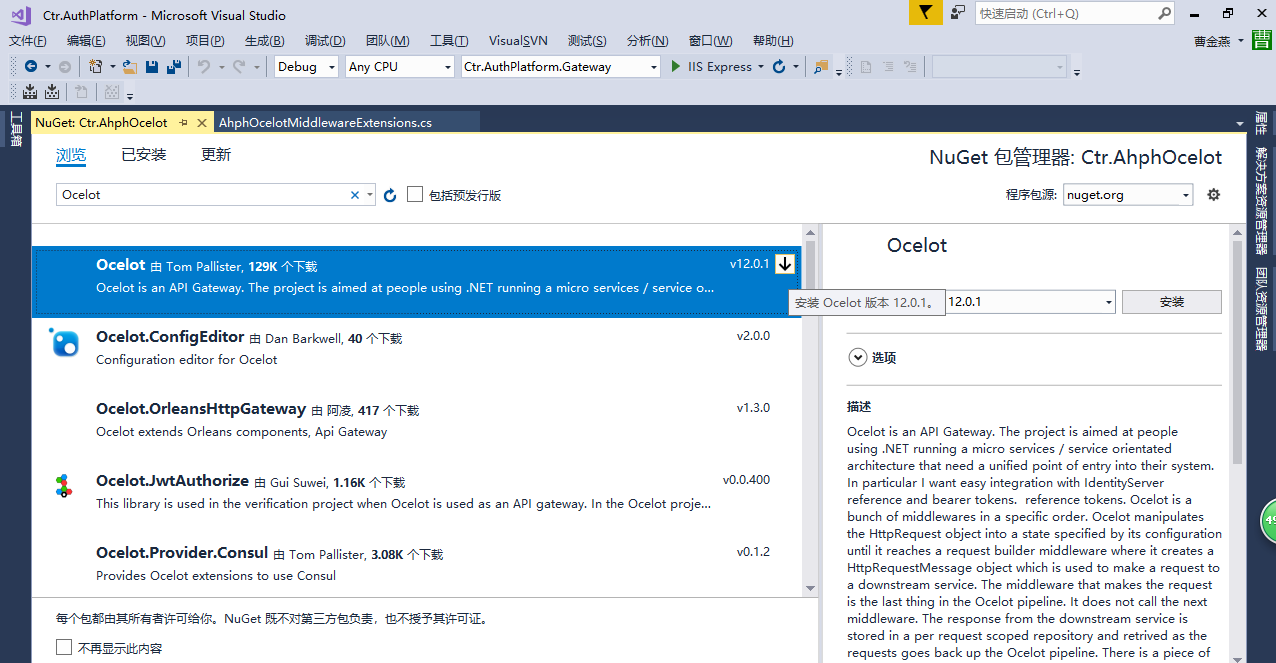
那就开始改造吧,我们新建一个Ctr.AhphOcelot类库,来实现这个中间件,首先新建自定义中间件扩展,这个扩展是在原有的Ocelot的基础上进行改造,所以需要先在Nuget中安装Ocelot,这系列课程我们以最新的Ocelot 12.0.1版本进行扩展。
![img_6c604cd9cbf1e2044ebb5c98f272831e.png]()
首先我们要了解,Ocelot的配置信息是怎么加载进来的呢?
private static async Task<IInternalConfiguration> CreateConfiguration(IApplicationBuilder builder)
{
    // make configuration from file system?
    // earlier user needed to add ocelot files in startup configuration stuff, asp.net will map it to this
    var fileConfig = builder.ApplicationServices.GetService<IOptionsMonitor<FileConfiguration>>();

    // now create the config
    var internalConfigCreator = builder.ApplicationServices.GetService<IInternalConfigurationCreator>();
    var internalConfig = await internalConfigCreator.Create(fileConfig.CurrentValue);
    //Configuration error, throw error message
    if (internalConfig.IsError)
    {
        ThrowToStopOcelotStarting(internalConfig);
    }

    // now save it in memory
    var internalConfigRepo = builder.ApplicationServices.GetService<IInternalConfigurationRepository>();
    internalConfigRepo.AddOrReplace(internalConfig.Data);

    fileConfig.OnChange(async (config) =>
                        {
                            var newInternalConfig = await internalConfigCreator.Create(config);
                            internalConfigRepo.AddOrReplace(newInternalConfig.Data);
                        });

    var adminPath = builder.ApplicationServices.GetService<IAdministrationPath>();

    var configurations = builder.ApplicationServices.GetServices<OcelotMiddlewareConfigurationDelegate>();

    // Todo - this has just been added for consul so far...will there be an ordering problem in the future? Should refactor all config into this pattern?
    foreach (var configuration in configurations)
    {
        await configuration(builder);
    }

    if(AdministrationApiInUse(adminPath))
    {
        //We have to make sure the file config is set for the ocelot.env.json and ocelot.json so that if we pull it from the
        //admin api it works...boy this is getting a spit spags boll.
        var fileConfigSetter = builder.ApplicationServices.GetService<IFileConfigurationSetter>();

        await SetFileConfig(fileConfigSetter, fileConfig);
    }

    return GetOcelotConfigAndReturn(internalConfigRepo);
}
查看源码后发现是是从OcelotBuilder加载的配置文件,也就是最早的AddOcelot()方法时注入的。
public OcelotBuilder(IServiceCollection services, IConfiguration configurationRoot)
{
    Configuration = configurationRoot;
    Services = services;
    //服务注册,可以使用IOptions<FileConfiguration>调用
    Services.Configure<FileConfiguration>(configurationRoot);
    ....
}
现在我们要实现从数据库提取配置信息,可以查看下Ocelot是否给我们提供了相关扩展接口,通过Ctrl+F查找FileConfiguration实体在哪些地方可以返回,IFileConfigurationRepository接口一眼就能认出,配置文件仓储类,我们可以重写这个接口实现即可完成配置文件从数据库提取,果然Ocelot是为定制而生,其实如果没有这个接口问题也不大,我们自己去定义和实现这个接口也一样可以完成。
using System.Threading.Tasks;
using Ocelot.Configuration.File;
using Ocelot.Responses;

namespace Ocelot.Configuration.Repository
{
    public interface IFileConfigurationRepository
    {
        Task<Response<FileConfiguration>> Get();
        Task<Response> Set(FileConfiguration fileConfiguration);
    }
}
我们看看这个接口是否有默认实现,DiskFileConfigurationRepository方法实现了这个接口,通过名称就知道是直接从配置文件提取配置信息,再看下这个接口应用到哪里,继续Ctrl+F找到,FileConfigurationPoller和FileAndInternalConfigurationSetter两个地方用到了这个接口,其中FileConfigurationPoller实现了IHostedService后台任务,我们不难看出,这个是一个定时更新任务,实际我们配置信息变更,肯定由管理员自己修改测试无误后发起,这里我们用不上,但是实现思路可以了解下。FileAndInternalConfigurationSetter是配置文件更新方法,这里我们如果使用数据库存储,更新肯定由我们自己管理界面更新,所以也用不上,这时有人会问,那如果配置文件发生变更了,我们怎么去更新。这时候我们需要了解配置信息在哪里使用,是否使用了缓存。其实上面也给出了答案,就是IInternalConfiguration.
// now create the config
var internalConfigCreator = builder.ApplicationServices.GetService<IInternalConfigurationCreator>();
var internalConfig = await internalConfigCreator.Create(fileConfig.CurrentValue);
现在问题都梳理清楚了,现在我们实现的思路就是,首先通过数据库实现IFileConfigurationRepository接口内容(更新不需要实现,前面说过了),然后再我们数据库里修改了配置,更新IInternalConfiguration配置信息,即可完成我们的自定义任何地方的存储。
开发的思路就是顶层开始一步一步往下实现,最后完成我们的扩展。现在回到我们自己的代码,修改配置信息代码如下,是不是精简很多了,但是有2个问题未解决,一是需要实现IFileConfigurationRepository,二是还没实现动态更新。
private static async Task<IInternalConfiguration> CreateConfiguration(IApplicationBuilder builder)
{
    //提取文件配置信息
    var fileConfig = await builder.ApplicationServices.GetService<IFileConfigurationRepository>().Get();
    var internalConfigCreator = builder.ApplicationServices.GetService<IInternalConfigurationCreator>();
    var internalConfig = await internalConfigCreator.Create(fileConfig.Data);
    //如果配置文件错误直接抛出异常
    if (internalConfig.IsError)
    {
        ThrowToStopOcelotStarting(internalConfig);
    }
    //配置信息缓存,这块需要注意实现方式,因为后期我们需要改造下满足分布式架构,这篇不做讲解
    var internalConfigRepo = builder.ApplicationServices.GetService<IInternalConfigurationRepository>();
    internalConfigRepo.AddOrReplace(internalConfig.Data);
    return GetOcelotConfigAndReturn(internalConfigRepo);
}
1、实现IFileConfigurationRepository接口
本系列所有课程都是基于轻量级的ORM框架dapper实现
首先需要NuGet包里添加Dapper,然后我们需要把设计的表生成实体,至于如何生成这里就不介绍了,实现方式很多,相关的帖子很多。使用Dapper时,我们需要知道知道连接方式,这时需要在中间件的基础上扩充一个配置文件接收配置数据,这样我们才能使用配置的信息内容。
namespace Ctr.AhphOcelot.Configuration
{
    /// <summary>
    /// 金焰的世界
    /// 2018-11-11
    /// 自定义配置信息
    /// </summary>
    public class AhphOcelotConfiguration
    {
        /// <summary>
        /// 数据库连接字符串
        /// </summary>
        public string DbConnectionStrings { get; set; }
    }
}
现在可以实现接口了,详细代码如下,代码很简单,就是从数据库查询出录入的内容,使用dapper实现。
using Ctr.AhphOcelot.Configuration;
using Ctr.AhphOcelot.Model;
using Dapper;
using Ocelot.Configuration.File;
using Ocelot.Configuration.Repository;
using Ocelot.Responses;
using System;
using System.Collections.Generic;
using System.Data.SqlClient;
using System.Text;
using System.Threading.Tasks;

namespace Ctr.AhphOcelot.DataBase.SqlServer
{
    /// <summary>
    /// 金焰的世界
    /// 2018-11-11
    /// 使用SqlServer来实现配置文件仓储接口
    /// </summary>
    public class SqlServerFileConfigurationRepository : IFileConfigurationRepository
    {
        private readonly AhphOcelotConfiguration _option;
        public SqlServerFileConfigurationRepository(AhphOcelotConfiguration option)
        {
            _option = option;
        }

        /// <summary>
        /// 从数据库中获取配置信息
        /// </summary>
        /// <returns></returns>
        public async Task<Response<FileConfiguration>> Get()
        {
            #region 提取配置信息
            var file = new FileConfiguration();
            //提取默认启用的路由配置信息
            string glbsql = "select * from AhphGlobalConfiguration where IsDefault=1 and InfoStatus=1";
            //提取全局配置信息
            using (var connection = new SqlConnection(_option.DbConnectionStrings))
            {
                var result = await connection.QueryFirstOrDefaultAsync<AhphGlobalConfiguration>(glbsql);
                if (result != null)
                {
                    var glb = new FileGlobalConfiguration();
                    //赋值全局信息
                    glb.BaseUrl = result.BaseUrl;
                    glb.DownstreamScheme = result.DownstreamScheme;
                    glb.RequestIdKey = result.RequestIdKey;
                    glb.HttpHandlerOptions = result.HttpHandlerOptions?.ToObject<FileHttpHandlerOptions>();
                    glb.LoadBalancerOptions = result.LoadBalancerOptions?.ToObject<FileLoadBalancerOptions>();
                    glb.QoSOptions = result.QoSOptions?.ToObject<FileQoSOptions>();
                    glb.ServiceDiscoveryProvider = result.ServiceDiscoveryProvider?.ToObject<FileServiceDiscoveryProvider>();
                    file.GlobalConfiguration = glb;

                    //提取所有路由信息
                    string routesql = "select T2.* from AhphConfigReRoutes T1 inner join AhphReRoute T2 on T1.ReRouteId=T2.ReRouteId where AhphId=@AhphId and InfoStatus=1";
                    var routeresult = (await connection.QueryAsync<AhphReRoute>(routesql, new { result.AhphId }))?.AsList();
                    if (routeresult != null && routeresult.Count > 0)
                    {
                        var reroutelist = new List<FileReRoute>();
                        foreach (var model in routeresult)
                        {
                            var m = new FileReRoute();
                            m.AuthenticationOptions = model.AuthenticationOptions?.ToObject<FileAuthenticationOptions>();
                            m.FileCacheOptions = model.CacheOptions?.ToObject<FileCacheOptions>();
                            m.DelegatingHandlers = model.DelegatingHandlers?.ToObject<List<string>>();
                            m.LoadBalancerOptions = model.LoadBalancerOptions?.ToObject<FileLoadBalancerOptions>();
                            m.QoSOptions = model.QoSOptions?.ToObject<FileQoSOptions>();
                            m.DownstreamHostAndPorts = model.DownstreamHostAndPorts?.ToObject<List<FileHostAndPort>>();
                            //开始赋值
                            m.DownstreamPathTemplate = model.DownstreamPathTemplate;
                            m.DownstreamScheme = model.DownstreamScheme;
                            m.Key = model.RequestIdKey;
                            m.Priority = model.Priority ?? 0;
                            m.RequestIdKey = model.RequestIdKey;
                            m.ServiceName = model.ServiceName;
                            m.UpstreamHost = model.UpstreamHost;
                            m.UpstreamHttpMethod = model.UpstreamHttpMethod?.ToObject<List<string>>();
                            m.UpstreamPathTemplate = model.UpstreamPathTemplate;
                            reroutelist.Add(m);
                        }
                        file.ReRoutes = reroutelist;
                    }
                }
                else
                {
                    throw new Exception("未监测到任何可用的配置信息");
                }
            }
            #endregion
            if (file.ReRoutes == null || file.ReRoutes.Count == 0)
            {
                return new OkResponse<FileConfiguration>(null);
            }
            return new OkResponse<FileConfiguration>(file);
        }

        //由于数据库存储可不实现Set接口直接返回
        public async Task<Response> Set(FileConfiguration fileConfiguration)
        {
            return new OkResponse();
        }
    }
}
现在又延伸出两个问题.第一个是AhphOcelotConfiguration这个信息从哪读取的?第二是SqlServerFileConfigurationRepository在哪注入。
其实读过我前面中间件源码解析的同学可能已经知道了,就是在AddOcelot里注入的,现在我们就可以使用相同的方式实现自己的扩展。添加自己的ServiceCollectionExtensions扩展。
using Ctr.AhphOcelot.Configuration;
using Ctr.AhphOcelot.DataBase.SqlServer;
using Microsoft.Extensions.DependencyInjection;
using Microsoft.Extensions.Options;
using Ocelot.Configuration.Repository;
using Ocelot.DependencyInjection;
using System;

namespace Ctr.AhphOcelot.Middleware
{
    /// <summary>
    /// 金焰的世界
    /// 2018-11-11
    /// 扩展Ocelot实现的自定义的注入
    /// </summary>
    public static class ServiceCollectionExtensions
    {
        /// <summary>
        /// 添加默认的注入方式,所有需要传入的参数都是用默认值
        /// </summary>
        /// <param name="builder"></param>
        /// <returns></returns>
        public static IOcelotBuilder AddAhphOcelot(this IOcelotBuilder builder, Action<AhphOcelotConfiguration> option)
        {
            builder.Services.Configure(option);
            //配置信息
            builder.Services.AddSingleton(
                resolver => resolver.GetRequiredService<IOptions<AhphOcelotConfiguration>>().Value);
            //配置文件仓储注入
            builder.Services.AddSingleton<IFileConfigurationRepository, SqlServerFileConfigurationRepository>();
            return builder;
        }
    }
}
有木有很简单呢?到这里从数据库中提取配置信息都完成啦,现在我们开始来测试下,看是否满足了我们的需求。
新建一个Ctr.AuthPlatform.Gateway网关项目,添加我们的中间件项目引用,修改Startup.cs代码如下
using System;
using System.Collections.Generic;
using System.Linq;
using System.Threading.Tasks;
using Microsoft.AspNetCore.Builder;
using Microsoft.AspNetCore.Hosting;
using Microsoft.AspNetCore.Http;
using Microsoft.AspNetCore.Mvc;
using Microsoft.Extensions.Configuration;
using Microsoft.Extensions.DependencyInjection;
using Ocelot.DependencyInjection;
using Ctr.AhphOcelot.Middleware;
namespace Ctr.AuthPlatform.Gateway
{
    public class Startup
    {
        public Startup(IConfiguration configuration)
        {
            Configuration = configuration;
        }

        public IConfiguration Configuration { get; }

        public void ConfigureServices(IServiceCollection services)
        {
            services.AddOcelot().AddAhphOcelot(option=>
            {
                option.DbConnectionStrings = "Server=.;Database=Ctr_AuthPlatform;User ID=sa;Password=bl123456;";
            });
        }
        public void Configure(IApplicationBuilder app, IHostingEnvironment env)
        {
            if (env.IsDevelopment())
            {
                app.UseDeveloperExceptionPage();
            }
            else
            {
                app.UseExceptionHandler("/Error");
            }
            app.UseAhphOcelot().Wait();
        }
    }
}
就实现了自定义的网关,是不是很优雅呢?但是是否达到了我们预期的网关效果了,我们来直接从数据库里插入测试数据,并新建一个测试项目。测试数据脚本如下
--插入全局测试信息
insert into AhphGlobalConfiguration(GatewayName,RequestIdKey,IsDefault,InfoStatus)
values('测试网关','test_gateway',1,1);

--插入路由分类测试信息
insert into AhphReRoutesItem(ItemName,InfoStatus) values('测试分类',1);

--插入路由测试信息
insert into AhphReRoute values(1,'/ctr/values','[ "GET" ]','','http','/api/Values','[{"Host": "localhost","Port": 9000 }]',
'','','','','','','',0,1);

--插入网关关联表
insert into dbo.AhphConfigReRoutes values(1,1);
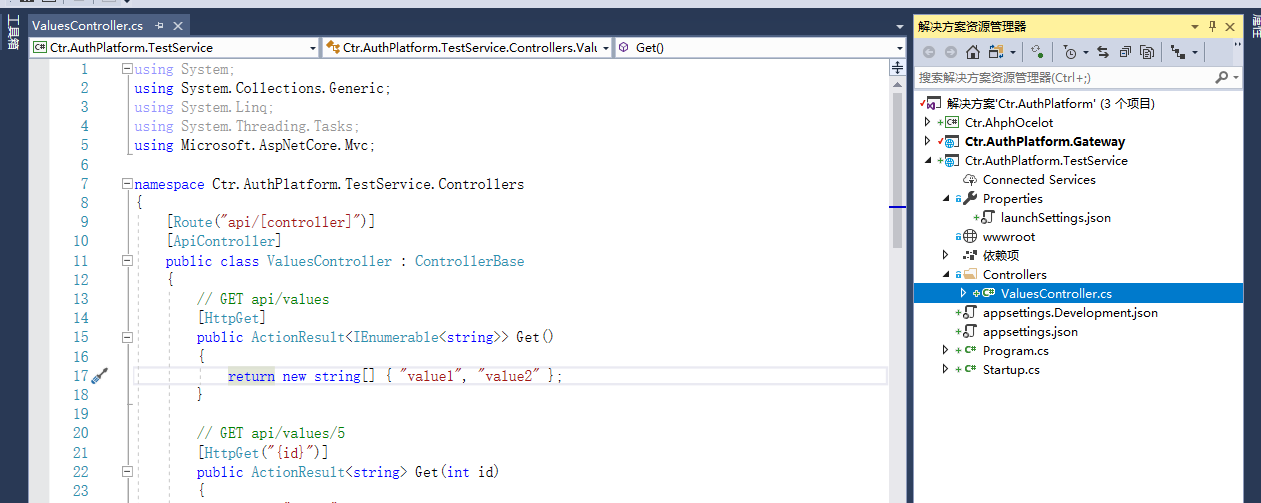
测试项目结构如下,就是默认的一个api项目,修改下启动端口为9000。
![img_0b90576485b053dacd437c4a2691cabb.png]()
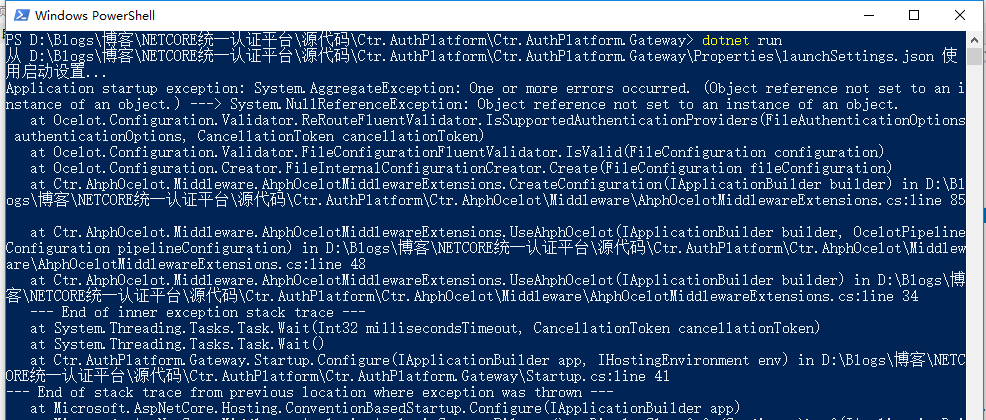
为了方便调试.NETCORE项目,我建议使用dotnet run方式,分别启动网关(7777端口)和测试服务(9999端口)。优先启动网关项目,想一想还有点小激动呢,开始运行项目,纳尼,尽然报错,而且是熟悉的未将对象引用到实例化错误,根据异常内容可以看到是在验证的时候报错,我们可以查看下Ocelot对应的源代码,发现问题所在了。
![img_4b77d234a7120f543eaea845a44af2b2.png]()
我们在一些未定义的配置项目使用了为空的赋值。而Ocleot里面对于不少配置项目未做非空验证。比如RateLimitOptionsCreator对于FileGlobalConfiguration未做非空验证,类似这样的地方还有不少,我希望下次Ocelot更新时最好增加这类非空验证,这样便于自定义扩展,而Ocelot内部实现了默认实例化,所以我们之前从数据库取值赋值时写法需要改进,修改后的代码如下。
using Ctr.AhphOcelot.Configuration;
using Ctr.AhphOcelot.Model;
using Dapper;
using Ocelot.Configuration.File;
using Ocelot.Configuration.Repository;
using Ocelot.Responses;
using System;
using System.Collections.Generic;
using System.Data.SqlClient;
using System.Text;
using System.Threading.Tasks;

namespace Ctr.AhphOcelot.DataBase.SqlServer
{
    /// <summary>
    /// 金焰的世界
    /// 2018-11-11
    /// 使用SqlServer来实现配置文件仓储接口
    /// </summary>
    public class SqlServerFileConfigurationRepository : IFileConfigurationRepository
    {
        private readonly AhphOcelotConfiguration _option;
        public SqlServerFileConfigurationRepository(AhphOcelotConfiguration option)
        {
            _option = option;
        }

        /// <summary>
        /// 从数据库中获取配置信息
        /// </summary>
        /// <returns></returns>
        public async Task<Response<FileConfiguration>> Get()
        {
            #region 提取配置信息
            var file = new FileConfiguration();
            //提取默认启用的路由配置信息
            string glbsql = "select * from AhphGlobalConfiguration where IsDefault=1 and InfoStatus=1";
            //提取全局配置信息
            using (var connection = new SqlConnection(_option.DbConnectionStrings))
            {
                var result = await connection.QueryFirstOrDefaultAsync<AhphGlobalConfiguration>(glbsql);
                if (result != null)
                {
                    var glb = new FileGlobalConfiguration();
                    //赋值全局信息
                    glb.BaseUrl = result.BaseUrl;
                    glb.DownstreamScheme = result.DownstreamScheme;
                    glb.RequestIdKey = result.RequestIdKey;
                    //glb.HttpHandlerOptions = result.HttpHandlerOptions?.ToObject<FileHttpHandlerOptions>();
                    //glb.LoadBalancerOptions = result.LoadBalancerOptions?.ToObject<FileLoadBalancerOptions>();
                    //glb.QoSOptions = result.QoSOptions?.ToObject<FileQoSOptions>();
                    //glb.ServiceDiscoveryProvider = result.ServiceDiscoveryProvider?.ToObject<FileServiceDiscoveryProvider>();
                    if (!String.IsNullOrEmpty(result.HttpHandlerOptions))
                    {
                        glb.HttpHandlerOptions = result.HttpHandlerOptions.ToObject<FileHttpHandlerOptions>();
                    }
                    if (!String.IsNullOrEmpty(result.LoadBalancerOptions))
                    {
                        glb.LoadBalancerOptions = result.LoadBalancerOptions.ToObject<FileLoadBalancerOptions>();
                    }
                    if (!String.IsNullOrEmpty(result.QoSOptions))
                    {
                        glb.QoSOptions = result.QoSOptions.ToObject<FileQoSOptions>();
                    }
                    if (!String.IsNullOrEmpty(result.ServiceDiscoveryProvider))
                    {
                        glb.ServiceDiscoveryProvider = result.ServiceDiscoveryProvider.ToObject<FileServiceDiscoveryProvider>();
                    }
                    file.GlobalConfiguration = glb;

                    //提取所有路由信息
                    string routesql = "select T2.* from AhphConfigReRoutes T1 inner join AhphReRoute T2 on T1.ReRouteId=T2.ReRouteId where AhphId=@AhphId and InfoStatus=1";
                    var routeresult = (await connection.QueryAsync<AhphReRoute>(routesql, new { result.AhphId }))?.AsList();
                    if (routeresult != null && routeresult.Count > 0)
                    {
                        var reroutelist = new List<FileReRoute>();
                        foreach (var model in routeresult)
                        {
                            var m = new FileReRoute();
                            //m.AuthenticationOptions = model.AuthenticationOptions?.ToObject<FileAuthenticationOptions>();
                            //m.FileCacheOptions = model.CacheOptions?.ToObject<FileCacheOptions>();
                            //m.DelegatingHandlers = model.DelegatingHandlers?.ToObject<List<string>>();
                            //m.LoadBalancerOptions = model.LoadBalancerOptions?.ToObject<FileLoadBalancerOptions>();
                            //m.QoSOptions = model.QoSOptions?.ToObject<FileQoSOptions>();
                            //m.DownstreamHostAndPorts = model.DownstreamHostAndPorts?.ToObject<List<FileHostAndPort>>();
                            if (!String.IsNullOrEmpty(model.AuthenticationOptions))
                            {
                                m.AuthenticationOptions = model.AuthenticationOptions.ToObject<FileAuthenticationOptions>();
                            }
                            if (!String.IsNullOrEmpty(model.CacheOptions))
                            {
                                m.FileCacheOptions = model.CacheOptions.ToObject<FileCacheOptions>();
                            }
                            if (!String.IsNullOrEmpty(model.DelegatingHandlers))
                            {
                                m.DelegatingHandlers = model.DelegatingHandlers.ToObject<List<string>>();
                            }
                            if (!String.IsNullOrEmpty(model.LoadBalancerOptions))
                            {
                                m.LoadBalancerOptions = model.LoadBalancerOptions.ToObject<FileLoadBalancerOptions>();
                            }
                            if (!String.IsNullOrEmpty(model.QoSOptions))
                            {
                                m.QoSOptions = model.QoSOptions.ToObject<FileQoSOptions>();
                            }
                            if (!String.IsNullOrEmpty(model.DownstreamHostAndPorts))
                            {
                                m.DownstreamHostAndPorts = model.DownstreamHostAndPorts.ToObject<List<FileHostAndPort>>();
                            }
                            //开始赋值
                            m.DownstreamPathTemplate = model.DownstreamPathTemplate;
                            m.DownstreamScheme = model.DownstreamScheme;
                            m.Key = model.RequestIdKey;
                            m.Priority = model.Priority ?? 0;
                            m.RequestIdKey = model.RequestIdKey;
                            m.ServiceName = model.ServiceName;
                            m.UpstreamHost = model.UpstreamHost;
                            m.UpstreamHttpMethod = model.UpstreamHttpMethod?.ToObject<List<string>>();
                            m.UpstreamPathTemplate = model.UpstreamPathTemplate;
                            reroutelist.Add(m);
                        }
                        file.ReRoutes = reroutelist;
                    }
                }
                else
                {
                    throw new Exception("未监测到任何可用的配置信息");
                }
            }
            #endregion
            if (file.ReRoutes == null || file.ReRoutes.Count == 0)
            {
                return new OkResponse<FileConfiguration>(null);
            }
            return new OkResponse<FileConfiguration>(file);
        }

        //由于数据库存储可不实现Set接口直接返回
        public async Task<Response> Set(FileConfiguration fileConfiguration)
        {
            return new OkResponse();
        }
    }
}
然后重新运行,网关启动成功。
接着我们启动我们测试的服务,然后浏览器先访问http://localhost:9000/api/values地址,测试地址正常访问。
![img_f108f43a240827ae17da5de24c48d013.png]()
然后使用测试网关路由地址访问http://localhost:7777/ctr/values,显示内容和本地访问一样,证明网关路由生效,是不是有点小激动呢?我们完成了从配置信息中取网关路由信息扩展。
![img_1c0645672fbd9a3580dcc0b41548844f.png]()
三、下篇预告
最后我们回顾下这篇内容,我是从设计到实现一步一步讲解和实现的,而且实现过程是根据需求慢慢剖析再局部实现的,我发现现在很多人在平时学习基本都是结果未导向,很少去关心中间的实现过程,久而久之基本就会丧失解决问题的思路,写的这么详细,也是希望给大家一个解决问题的思路,目前我们实现了从数据库中提取配置信息并在网关中生效,但是还未实现动态更新和扩展其他数据库存储,大家也可以先自己尝试如何实现。
下一篇我们将会实现网关路由的动态更新,会提供几种更新思路,根据实际情况择优选择。然后在使用Mysql数据库来存储配置信息,并扩展此网关实现很优雅的配置,为什么使用mysql扩展实现呢?因为.netcore已经跨平台啦,后期我们准备在Centos下实现容器化部署,这时我们就准备以mysql为例进行讲解,本网关所有内容源码都会实现sqlserver和mysql两种方式,其他存储方式可自行扩展即可。
最后项目所有的文档在源码的文档目录,文档按照课程源码文件夹区分,本文的文档标识course1。
我的博客即将同步至腾讯云+社区,邀请大家一同入驻:https://cloud.tencent.com/developer/support-plan?invite_code=l0q6lfr3asgg