学习springMVC需要Javaweb的基础,有需要的朋友可以先看看这两篇博客再来学习此论内容会容易接受:JavaWeb基础知识点之一Servlet,JavaWeb基础知识点。
一,什么是MVC
MVC全名是模型视图控制器,是模型(模型) - 视图(视图) - 控制器(控制器)的缩写,一种软件设计典范,用一种业务逻辑,数据,界面显示分离的方法组织代码,将业务逻辑聚集到一个部件里面,在改进和个性化定制界面及用户交互的同时,不需要重新编写业务逻辑.MVC被独特的发展起来用于映射传统的输入,处理和输出功能在一个逻辑的图形化用户界面的结构中。
二,用SpringMVC用
1,组件:
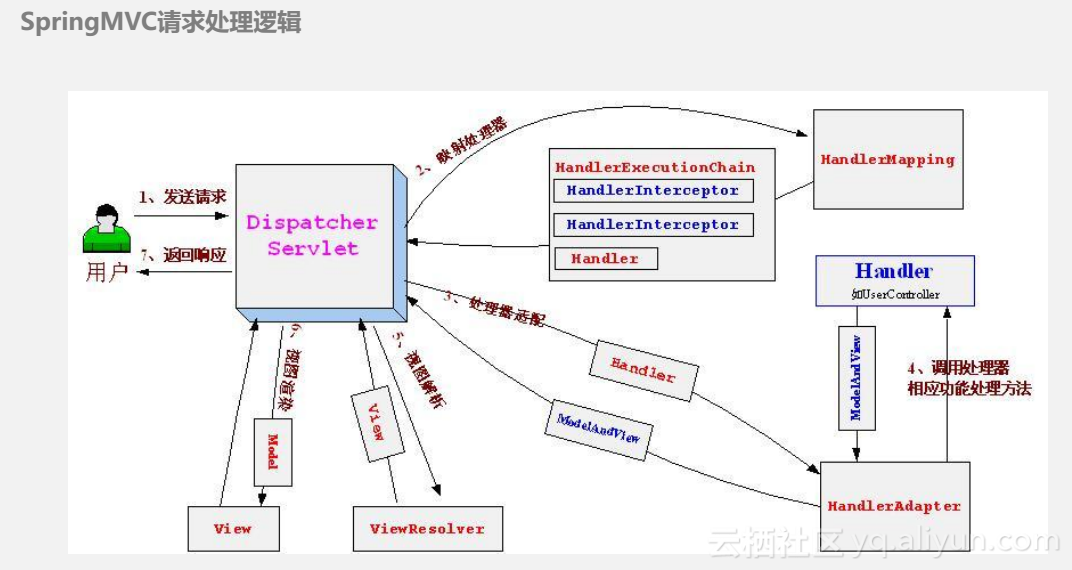
如图1所示,前端控制器的DispatcherServlet的(不需要程序员开发,只需要在web.xml中中中配置)
作用:接收请求,响应结果,相当于转发器,中央处理器有了的DispatcherServlet的减少了其它组件之间的耦合度。
2,处理器映射器的的HandlerMapping(不需要程序员开发)
作用:的的HandlerMapping为每个URL请求找到合适的处理器的处理程序(平常也叫控制),维持一个URL到控制器的关系的映射它将会把请求映射为HandlerExecutionChain对象(包含一个Handler处理器对象,多个HandlerInterceptor拦截器)
.3,处理器适配器HandlerAdapter
作用:HandlerAdapter的功能就是具体执行URL映射的方法(Controller,Servlet,HttpRequestHandler),完成真正的调用,返回一个ModelAndView中的对象。
几个主要的的的HandlerAdapter实现:
- SimpleServletHandlerAdapter:执行的HttpServlet中的服务方法;
- SimpleControllerHandlerAdapter:执行控制器的的的handleRequest方法;
- HttpRequestHandlerAdapter:执行HttpRequestHandler的的的handleRequest方法;
- RequestMappingHandlerAdapter:执行@RequestMapping注解的方法;
如图4所示,处理器处理程序(平常也叫控制,需要程序员开发)
注意:编写处理程序时按照的的HandlerAdapter的要求去做,这样适配器才可以去正确执行处理程序,使用注解的控制类的映射方法相当于处理程序接口的的的handleRequest方法,至少用注解不用那么多的配置,框架可以根据映射路径找到方法。
5,视图解析器查看解析器(不需要程序员开发)
作用:进行视图解析,根据逻辑视图名解析成真正的视图(查看)
6,视图查看(需要程序员开发jsp)
查看是一个接口,实现类支持不同的查看类型(jsp,freemarker,pdf ...)
7,拦截器HandlerInterceptor(可根据需要开发或不开发)
拦截器分为前,中,后三种拦截:
a,前置拦截:经常用于权限,API认证,参数过滤
.b,中置拦截:经常用于进一步的封装ModelAndView.c
,中置旁截:经常用于异常处理,资源的释放。
2,用用SpringMVC处理请求的过程:
第一步:发起请求到前端控制器(DispatcherServlet的)
第二步:前端控制器请求的HandlerMapping查找处理程序(平常也叫控制),可以根据XML配置,注解进行查找,
第三步:处理器映射器的HandlerMapping向控制器前端报道查看处理程序
第四步:控制器前端处理器调用去适配器执行处理程序
第五步:适配器处理器去执行处理程序
第六步:处理程序执行完成给适配器返回的ModelAndView的
第七步:处理器适配器向前端控制返回的ModelAndView,ModelAndView的是用SpringMVC框架的一个底层对象,模型包括状语从句:视图
第八步:前端控制器请求视图解析器去进行视图解析,根据逻辑视图名解析成真正的视图(JSP)
第九步:解析器视图向前端控制器报道查看查看
第十步:前端控制器进行视图渲染,视图渲染将模型数据(在ModelAndView的对象中)
填充到请求域第十一步:前端控制器向用户响应结果。
补充:器的执行步骤如 下:
一,前置拦截:请求的HandlerMapping查找处理程序(平常也叫控制)之前
.B,中置拦截:在走完处理程序(平常也叫控制)的映射方法之后,响应之前
C,中置拦截:在响应之后。
三,自制MVC演示
为了能够简单的理解这种MVC设计模式,下面贴上一个简单的MVC响应演示。当然这里只是简单的模拟这个过程,只是为了大概了解这个过程,让我们更好理解些,不可能像框架写得那么完美,考虑得那么全面,我们基本的处理过程都在MyDispatcherServlet中,并且没有拦截器的处理
。1,简单配置wen.xml:
<?xml version="1.0" encoding="UTF-8"?>
<web-app id="WebApp_ID" version="3.0" xmlns="http://java.sun.com/xml/ns/javaee" xmlns:xsi="http://www.w3.org/2001/XMLSchema-instance" xsi:schemaLocation="http://java.sun.com/xml/ns/javaee http://java.sun.com/xml/ns/javaee/web-app_3_0.xsd">

    <servlet>
        <servlet-name>springMVC</servlet-name>
        <servlet-class>com.prosay.web.MyDispatcherServlet</servlet-class>
        <load-on-startup>1</load-on-startup>
    </servlet>
    <servlet-mapping>
        <servlet-name>springMVC</servlet-name>
        <url-pattern>/</url-pattern>
    </servlet-mapping>

</web-app>
2,注解:
package com.prosay.web.annotation
import java.lang.annotation.ElementType
import java.lang.annotation.Retention
import java.lang.annotation.RetentionPolicy
import java.lang.annotation.Target
@Target({ElementType.FIELD})
@Retention(RetentionPolicy.RUNTIME)
public @interface Autowired {
}
package com.prosay.web.annotation
import java.lang.annotation.ElementType
import java.lang.annotation.Retention
import java.lang.annotation.RetentionPolicy
import java.lang.annotation.Target
@Target({ElementType.TYPE})
@Retention(RetentionPolicy.RUNTIME)
public @interface Controller {
}
package com.prosay.web.annotation
import java.lang.annotation.ElementType
import java.lang.annotation.Retention
import java.lang.annotation.RetentionPolicy
import java.lang.annotation.Target
@Target({ElementType.TYPE})
@Retention(RetentionPolicy.RUNTIME)
public @interface Service {
String value() default ""
}
package com.prosay.web.annotation
import java.lang.annotation.ElementType
import java.lang.annotation.Retention
import java.lang.annotation.RetentionPolicy
import java.lang.annotation.Target
@Target({ElementType.FIELD})
@Retention(RetentionPolicy.RUNTIME)
public @interface Qualifier {
String value()
}
package com.prosay.web.annotation
import java.lang.annotation.Documented
import java.lang.annotation.ElementType
import java.lang.annotation.Retention
import java.lang.annotation.RetentionPolicy
import java.lang.annotation.Target
@Target({ElementType.TYPE, ElementType.METHOD})
@Retention(RetentionPolicy.RUNTIME)
public @interface RequestMapping {
String value()
}
3,ModelAndView中的
package com.prosay.web;

public class ModelAndView {

    private String view;
    private String prefix="/";
    private String suffix=".jsp";
    public String getView() {
        return view;
    }
    public void setView(String view) {
        this.view = view;
    }
    public String getPrefix() {
        return prefix;
    }
    public void setPrefix(String prefix) {
        this.prefix = prefix;
    }
    public String getSuffix() {
        return suffix;
    }
    public void setSuffix(String suffix) {
        this.suffix = suffix;
    }
}
4,最最重要的MyDispatcherServlet,处理过程参考注释
package com.prosay.web
import java.io.File
import java.io.IOException
import java.lang.reflect.Field
import java.lang.reflect.Method
import java.util.ArrayList
import java.util.HashMap
import java.util.List
import java.util.Map
import java.util.Map.Entry
import javax.servlet.ServletException
import javax.servlet.http.HttpServlet
import javax.servlet.http.HttpServletRequest
import javax.servlet.http.HttpServletResponse
import com.prosay.web.annotation.Autowired
import com.prosay.web.annotation.Controller
import com.prosay.web.annotation.Qualifier
import com.prosay.web.annotation.RequestMapping
import com.prosay.web.annotation.Service
public class MyDispatcherServlet extends HttpServlet {
//定义了一个存储Spring需要扫描的所有的类名称
private List<String> clzList = new ArrayList<String>()
//定义一个存储实例的Map集合, KEY:Object
private Map<String, Object> beansMap = new HashMap<String, Object>()
//定义一个存储URL与Method映射关系的集合
private Map<String, Object> mappings = new HashMap<String, Object>()
@Override
protected void doGet(HttpServletRequest req, HttpServletResponse resp) throws ServletException, IOException {
this.doPost(req, resp)
}
@Override
protected void doPost(HttpServletRequest req, HttpServletResponse resp) throws ServletException, IOException {
try {
//1、通过URL映射关系, 找到Controler Method方法 【HandlerMapping】
String requestURI = req.getRequestURI()
String contextPath = req.getContextPath()
String uri = requestURI.replace(contextPath, "")
Method method = (Method)mappings.get(uri)
//2、将Method方法通过反射来进行调用,返回方法的返回值Object 【HandlerAdapter】
if(method == null){
System.out.println("404 找不到URL的映射")
return
}
Object result = method.invoke(beansMap.get("/"+uri.split("/")[1]), req)
//3、包装响应的页面
ModelAndView mv = new ModelAndView()
if(result.getClass().equals(ModelAndView.class)){
mv = (ModelAndView) result
}else{
mv.setView((String) result)
}
//4、响应
doDispatcher(req, resp, mv)
} catch (Exception e) {
// TODO Auto-generated catch block
e.printStackTrace()
}
}
private void doDispatcher(HttpServletRequest req, HttpServletResponse resp, ModelAndView mv) throws Exception {
req.getRequestDispatcher(mv.getPrefix()+mv.getView()+mv.getSuffix()).forward(req, resp)
}
@Override
public void init() throws ServletException {
try {
//1、扫描配置给Spring管理的这些类
scanPackages("com.prosay")
//2、实例化这些类
doInstance()
//3、依赖注入
ioc()
//4、建立URL与Controller.Method映射关系
setMapping()
System.out.println("--")
} catch (Exception e) {
e.printStackTrace()
}
}
private void scanPackages(String packagesName) {
String packagesClassUrl = this.getClass().getClassLoader().getResource("/"+packagesName.replaceAll("\\.", "/")).getFile()
//
File sacnFile = new File(packagesClassUrl)
String[] filenameList = sacnFile.list()
for (String filename : filenameList) {
File file = new File(packagesClassUrl, filename)
if(file.isDirectory()){
//文件夹, 继续扫描
scanPackages(packagesName+"."+filename)
}else{
//packagesName+"."+filename
clzList.add(packagesName+"."+filename.replace(".class", ""))
}
}
}
private void doInstance() throws Exception{
if(clzList != null && clzList.size()>0){
//如果clzList中有类名, 则循环这些类名, 进行实例化操作
for (String clzName : clzList) {
//类的Class对象
Class<?> clz = Class.forName(clzName)
if(clz.isAnnotationPresent(Controller.class)){
//是一个Controller
RequestMapping annotation = clz.getAnnotation(RequestMapping.class)
beansMap.put(annotation.value(), clz.newInstance())
}
if(clz.isAnnotationPresent(Service.class)){
//是一个Service
Service annotation = clz.getAnnotation(Service.class)
beansMap.put(annotation.value(), clz.newInstance())
}
//////.......
}
}
}
private void ioc() throws Exception {
if(beansMap !=null && beansMap.size()>0){
for(Entry<String, Object> entry: beansMap.entrySet()){
//实例对象
Object object = entry.getValue()
Field[] fields = object.getClass().getDeclaredFields()
for (Field field : fields) {
field.setAccessible(true)
if(field.isAnnotationPresent(Autowired.class)){
Qualifier annotation = field.getAnnotation(Qualifier.class)
field.set(object, beansMap.get(annotation.value()))
}
}
}
}
}
private void setMapping() {
if(beansMap !=null && beansMap.size()>0){
for(Entry<String, Object> entry: beansMap.entrySet()){
Class<? extends Object> clz = entry.getValue().getClass()
if(clz.isAnnotationPresent(Controller.class)){
Method[] methods = clz.getDeclaredMethods()
for (Method method : methods) {
//判断这个Method是否是有RequestMappint注解
if(method.isAnnotationPresent(RequestMapping.class)){
RequestMapping rm = method.getAnnotation(RequestMapping.class)
String methodName = rm.value()
RequestMapping cm = clz.getAnnotation(RequestMapping.class)
String className = cm.value()
mappings.put(className+methodName, method)
}
}
}
}
}
}
}
5,简单的使用
public interface ILoginService {

    public void doLogin();
}
@Service("loginService")
public class LoginService implements ILoginService {

    @Override
    public void doLogin() {
        System.out.println("LoginServiceDoLogin");
    }

}
@Controller
@RequestMapping("/login")
public class LoginController {

    @Autowired
    @Qualifier("loginService")
    private ILoginService loginService;


    @RequestMapping("/doLogin")
    public ModelAndView doLogin(HttpServletRequest request){

        loginService.doLogin();
        System.out.println("name:"+request.getParameter("name"));
        request.setAttribute("name", request.getParameter("name"));
        ModelAndView mv = new ModelAndView();
        mv.setView("login");
        return mv;
    }

    @RequestMapping("/logout")
    public String logout(){

        return "logout";
    }
}
四,用用SpringMVC开发流程
使用注解开发
1,新建网络项目后配置的web.xml中:
<?xml version="1.0" encoding="UTF-8"?>
<web-app id="WebApp_ID" version="3.0" xmlns="http://java.sun.com/xml/ns/javaee" xmlns:xsi="http://www.w3.org/2001/XMLSchema-instance" xsi:schemaLocation="http://java.sun.com/xml/ns/javaee http://java.sun.com/xml/ns/javaee/web-app_3_0.xsd">
<filter>
<filter-name>characterEncodingFilter</filter-name>
<filter-class>org.springframework.web.filter.CharacterEncodingFilter</filter-class>
<init-param>
<param-name>encoding</param-name>
<param-value>UTF-8</param-value>
</init-param>
<init-param>
<param-name>forceEncoding</param-name>
<param-value>true</param-value>
</init-param>
</filter>
<filter-mapping>
<filter-name>characterEncodingFilter</filter-name>
<url-pattern>/*</url-pattern>
</filter-mapping>
<context-param>
<param-name>contextConfigLocation</param-name>
<param-value>/WEB-INF/spring-servlet.xml</param-value>
</context-param>
<listener>
<listener-class>org.springframework.web.context.ContextLoaderListener</listener-class>
</listener>
<servlet>
<servlet-name>spring</servlet-name>
<servlet-class>org.springframework.web.servlet.DispatcherServlet</servlet-class>
<load-on-startup>1</load-on-startup>
</servlet>
<servlet-mapping>
<servlet-name>spring</servlet-name>
<url-pattern>/</url-pattern>
</servlet-mapping>
</web-app>
为为spring-servlet.xml
<?xml version="1.0" encoding="UTF-8"?>
<beans xmlns="http://www.springframework.org/schema/beans"
xmlns:xsi="http://www.w3.org/2001/XMLSchema-instance"
xmlns:context="http://www.springframework.org/schema/context"
xmlns:tx="http://www.springframework.org/schema/tx"
xmlns:aop="http://www.springframework.org/schema/aop"
xmlns:mvc="http://www.springframework.org/schema/mvc"
xmlns:p="http://www.springframework.org/schema/p"
xsi:schemaLocation="http://www.springframework.org/schema/beans
http://www.springframework.org/schema/beans/spring-beans-3.0.xsd
http://www.springframework.org/schema/context
http://www.springframework.org/schema/context/spring-context-3.0.xsd
http://www.springframework.org/schema/tx
http://www.springframework.org/schema/tx/spring-tx.xsd
http://www.springframework.org/schema/aop
http://www.springframework.org/schema/aop/spring-aop-3.2.xsd
http://www.springframework.org/schema/mvc
http://www.springframework.org/schema/mvc/spring-mvc-3.0.xsd">
<context:component-scan base-package="com.prosay"/>
<bean class="org.springframework.web.servlet.view.InternalResourceViewResolver" p:prefix="/" p:suffix=".jsp">
</bean>
</beans>
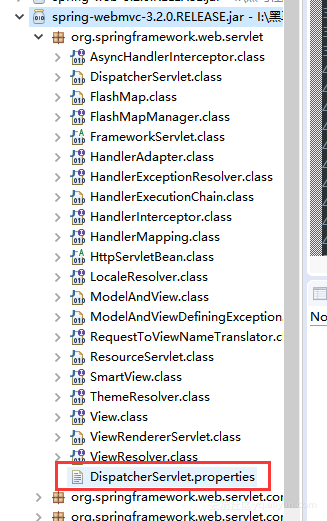
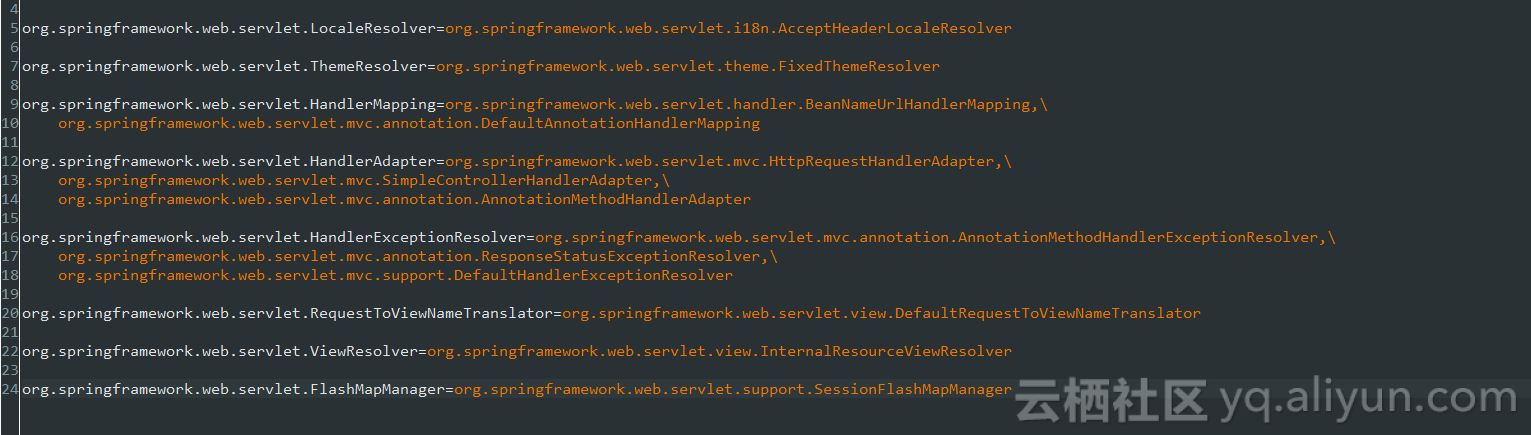
前端控制器从上边的文件中加载处理映射器,适配器,视图解析器等组件,如果不在springmvc.xml中配置,使用默认加载的默认的配置在下图:
![bc681565cca5ab9b9531995c776ea0cd901a4b17]()
![6918e40e6c1481f5a0da1734830b20ddf1bf836b]()
2,简单使用;
package com.prosay;

import org.springframework.stereotype.Controller;
import org.springframework.web.bind.annotation.RequestMapping;
import org.springframework.web.servlet.ModelAndView;
@Controller
public class LoginController {

    @RequestMapping("/login")
    public ModelAndView login(){
        System.out.println("login");
        ModelAndView  mv = new ModelAndView("main");
        return mv;
    }

    @RequestMapping("/logout")
    public ModelAndView logout(){
        System.out.println("logout");
        ModelAndView  mv = new ModelAndView("login");
        return mv;
    }
}
3,响应页面:
<%@ page language="java" contentType="text/html; charset=UTF-8"
    pageEncoding="UTF-8"%>
<!DOCTYPE html PUBLIC "-//W3C//DTD HTML 4.01 Transitional//EN" "http://www.w3.org/TR/html4/loose.dtd">
<html>
<head>
<meta http-equiv="Content-Type" content="text/html; charset=UTF-8">
<title>Insert title here</title>
</head>
<body>
 <form action="login" method="post">
    <input type="text" id="name" name="name" value="" /><br/>
    <input type="password" id="pwd" name="pwd" value="" /><br/>
    <input type="submit" value="提交" />
 </form>
</body>
</html>
<%@ page language="java" contentType="text/html; charset=UTF-8"
    pageEncoding="UTF-8"%>
<!DOCTYPE html PUBLIC "-//W3C//DTD HTML 4.01 Transitional//EN" "http://www.w3.org/TR/html4/loose.dtd">
<html>
<head>
<meta http-equiv="Content-Type" content="text/html; charset=UTF-8">
<title>Insert title here</title>
</head>
<body>
 main
</body>
</html>
![这里写图片描述]()
好了,一个最简单的springMVC demo就完成了。
非注解开发
注意:此例子和上面其他例子不是相同项目真正的项目开发中不会用到这种方法,但是这里演示这种方法主要是能帮助大家理解用SpringMVC的请求处理过程
.web.xml配置与上面相同就不演示了,springmvc.xml配置:
<beans xmlns="http://www.springframework.org/schema/beans"
xmlns:xsi="http://www.w3.org/2001/XMLSchema-instance" xmlns:mvc="http://www.springframework.org/schema/mvc"
xmlns:context="http://www.springframework.org/schema/context"
xmlns:aop="http://www.springframework.org/schema/aop" xmlns:tx="http://www.springframework.org/schema/tx"
xsi:schemaLocation="http://www.springframework.org/schema/beans
http://www.springframework.org/schema/beans/spring-beans-3.2.xsd
http://www.springframework.org/schema/mvc
http://www.springframework.org/schema/mvc/spring-mvc-3.2.xsd
http://www.springframework.org/schema/context
http://www.springframework.org/schema/context/spring-context-3.2.xsd
http://www.springframework.org/schema/aop
http://www.springframework.org/schema/aop/spring-aop-3.2.xsd
http://www.springframework.org/schema/tx
http://www.springframework.org/schema/tx/spring-tx-3.2.xsd ">
<bean id="itemsController1" name="/queryItems_test.action" class="cn.itcast.ssm.controller.ItemsController1" />
<bean id="itemsController2" class="cn.itcast.ssm.controller.ItemsController2" />
<bean
class="org.springframework.web.servlet.handler.BeanNameUrlHandlerMapping" />
<bean class="org.springframework.web.servlet.handler.SimpleUrlHandlerMapping">
<property name="mappings">
<props>
<prop key="/queryItems1.action">itemsController1</prop>
<prop key="/queryItems2.action">itemsController1</prop>
<prop key="/queryItems3.action">itemsController2</prop>
</props>
</property>
</bean>
<bean
class="org.springframework.web.servlet.view.InternalResourceViewResolver">
<property name="prefix" value="/WEB-INF/jsp/"/>
<property name="suffix" value=".jsp"/>
</bean>
</beans>
非注解处理程序必须实现控制器接口才能适配器执行。
package cn.itcast.ssm.controller;
import javax.servlet.http.HttpServletRequest;
import javax.servlet.http.HttpServletResponse;
import org.springframework.web.servlet.ModelAndView;
import org.springframework.web.servlet.mvc.Controller;
public class ItemsController1 implements Controller {
@Override
public ModelAndView handleRequest(HttpServletRequest request,
HttpServletResponse response) throws Exception {
ModelAndView modelAndView = new ModelAndView();
modelAndView.addObject("data", 123);
modelAndView.setViewName("/WEB-INF/jsp/index.jsp");
return modelAndView;
}
}
前端界面就不写了。
非注解和注解这两种开发方式可以混用的,如果混用那么两中方式的配置就都要配置好,当然一般开发中是不会用非注解这种方式的。
五,关于拦截器
过滤器:依赖于Servlet的的容器,是的JavaEE的标准在实现上基于函数回调,可以对几乎所有的请求进行过滤使用过滤器的目的是用来做一些过滤操作,获取我们想要的数据,比如。 :在过滤器中修改字符编码;在过滤器中修改的HttpServletRequest的的一些参数,包括过滤低俗文字,危险字符等。
拦截器:拦截器不依赖于Servlet容器,依赖于web框架,在SpringMVC中就是依赖于SpringMVC框架。在实现上基于Java的反射机制,属于面向切面编程的一种运用。一个拦截器实例在一个controller生命周期之内可以多次调用,但是只能对controller请求进行拦截,对其他的一些静态资源的请求无法拦截处理。
区别:
1、拦截器是基于java的反射机制的,而过滤器是基于函数回调;
2、拦截器不依赖与servlet容器,过滤器依赖与servlet容器;
3、拦截器只能对action请求起作用,而过滤器则可以对几乎所有的请求起作用;
4、拦截器可以访问Spring上下文中的对象,而过滤器不能访问。
拦截器的开发
配置springmvc.xml文件
<?xml version="1.0" encoding="UTF-8"?>
<beans xmlns="http://www.springframework.org/schema/beans"
    xmlns:xsi="http://www.w3.org/2001/XMLSchema-instance"
    xmlns:context="http://www.springframework.org/schema/context"
    xmlns:tx="http://www.springframework.org/schema/tx"
    xmlns:aop="http://www.springframework.org/schema/aop"
    xmlns:mvc="http://www.springframework.org/schema/mvc"
    xmlns:p="http://www.springframework.org/schema/p"
    xsi:schemaLocation="http://www.springframework.org/schema/beans
    http://www.springframework.org/schema/beans/spring-beans-3.0.xsd
    http://www.springframework.org/schema/context
    http://www.springframework.org/schema/context/spring-context-3.0.xsd
    http://www.springframework.org/schema/tx
    http://www.springframework.org/schema/tx/spring-tx.xsd
    http://www.springframework.org/schema/aop
    http://www.springframework.org/schema/aop/spring-aop-3.2.xsd
    http://www.springframework.org/schema/mvc
    http://www.springframework.org/schema/mvc/spring-mvc-3.0.xsd">

    <context:component-scan base-package="com.prosay"/>


    <bean class="org.springframework.web.servlet.view.InternalResourceViewResolver"
    >
     <property name="prefix" value="/"></property>
     <property name="suffix" value=".jsp"></property>
    </bean>

    <mvc:interceptors>
        <mvc:interceptor>
            <mvc:mapping path="/**/*"/>
            <bean class="com.prosay.MyInterceptor"></bean>
        </mvc:interceptor>
    </mvc:interceptors>
</beans>
新建类MyInterceptor继承自HandlerInterceptor ,实现拦截并可以进行响应的操作。
package com.prosay;
import javax.servlet.http.HttpServletRequest;
import javax.servlet.http.HttpServletResponse;
import org.springframework.beans.factory.annotation.Autowired;
import org.springframework.web.servlet.HandlerInterceptor;
import org.springframework.web.servlet.ModelAndView;
public class MyInterceptor implements HandlerInterceptor {
@Autowired
private Person person;
@Override
public boolean preHandle(HttpServletRequest request, HttpServletResponse response, Object handler)
throws Exception {
System.out.println("--MyInterceptor preHandler"+person.getName());
return true;
}
@Override
public void postHandle(HttpServletRequest request, HttpServletResponse response, Object handler,
ModelAndView modelAndView) throws Exception {
System.out.println("--MyInterceptor postHandler");
modelAndView.addObject("postName", "Interceptor-"+request.getParameter("name"));
}
@Override
public void afterCompletion(HttpServletRequest request, HttpServletResponse response, Object handler, Exception ex)
throws Exception {
System.out.println("--MyInterceptor afterCompletion");
if(ex != null){
request.getRequestDispatcher("error").forward(request, response);
}
}
}
六、@RequestMapping注解的用法
@RequestMapping是一个用来处理请求地址映射的注解,可用于类或方法上。用于类上,表示类中的所有响应请求的方法都是以该地址作为父路径。例:@RequestMapping(value=“/hello”)
RequestMapping注解有六个属性:
① value:指定请求的实际地址;
② method:指定请求的method类型, GET、POST、PUT、DELETE等;那么URL既可以处理GET 也可以处理POST 等其他类型的请求。如果请求的类型不同,表现形式为405的症状。
③ consumes:指定处理请求的提交内容类型(Content-Type),例如application/json, text/html。
④ produces:指定返回的内容类型,仅当request请求头中的(Accept)类型中包含该指定类型才返回。
⑤ params:指定request中必须包含某些参数值是,才让该方法处理。如果没有对应的参数值,表现形式为404的症状。
⑥ headers:指定request中必须包含某些指定的header值,才能让该方法处理请求。如果请求头中不包含相应的内容,表现形式为404的症状。
注解属性用法:设置注解属性的时候,都是在注解的括号里面进行的,例如:
映射注解 :@RequestMapping(value="/mget", method=RequestMethod.GET, params="age=19", headers="Host=localhost:8080")
参数注解:@RequestParam(value = "date", required = false) String date
通过指定参数和指定参数值,这种方法的参数必须传,而且必须是指定的值,否则会报错
@RequestMapping(value="/mget", method=RequestMethod.GET, params="age=19", headers="Host=localhost:8080")
public String mget(){
System.out.println("接收了一个GET请求");
return "index";
}
@RequestMapping(value="/mpost", method=RequestMethod.POST, params="age=19")
public String mpost(){
System.out.println("接收了一个POST请求");
return "index";
}
补充:
当我们使用方法形参获取URL请求的参数,而且请求的参数个数不足的时候, 会表现为400的症状。
SpringMVC接收参数时,参数类型不匹配,会表现为400的症状。
七、请求参数的传递和数据绑定
后台获取请求的方法有很多中,映射方法的参数也很灵活,两者结合使用,总结如下:
1、通过HttpServletRequest获取
映射方法参数直接是HttpServletRequest request,在方法里通过request.getParameter("参数名"); 直接获取参数。
@RequestMapping(value="/mgetRequest", method=RequestMethod.GET)
public String mgetRequest(HttpServletRequest request){
String name = request.getParameter("name");
System.out.println("HttpServletReqeust获取GET请求的参数,name:"+name);
return "index";
}
@RequestMapping(value="/mpostRequest", method=RequestMethod.POST)
public String mpostRequest(HttpServletRequest request){
String name = request.getParameter("name");
System.out.println("HttpServletReqeust获取POST请求的参数,name:"+name);
return "index";
}
无论通过什么方式,只要能获取到HttpServletRequest 就都可以通过request.getParameter("参数名"); 获取参数。其他方式不再举例。
2、方法形参
映射方法参数直接就是参数名称,并且指定了类型,可以直接用,当参数的数据类型不一致的时候会报错400,参数是必传的,不传会报500
@RequestMapping(value="/mgetArgs", method=RequestMethod.GET)
public String mgetArgs(String name, int age){
System.out.println("方法形参方式获取GET请求的参数【name:"+name+", age:"+age+"】");
return "index";
}
@RequestMapping(value="/mpostArgs", method=RequestMethod.POST)
public String mpostArgs(String name, int age){
System.out.println("方法形参方式获取POST请求的参数【name:"+name+", age:"+age+"】");
return "index";
}
3、通过一个Bean来接收
映射方法参数是一个bean对象,这种情况会直接把参数赋值给对象相应名称的属性,映射方法的参数对象的属性就存储了参数的值。参数中如果有bean没有的属性,可以再加一些基本数据类型作为参数。这种方法请求参数不必包含bean对象的全部属性,但是方法指定的基本数据类型还是必传的。
@RequestMapping(value="/mgetBean", method=RequestMethod.GET)
public String mgetBean(Person person,int num){
System.out.println("bean对象的方式获取GET请求的参数【name:"+person.getName()+", age:"+person.getAge()+", sex:"+person.getSex()+"】"+num);
return "index";
}
@RequestMapping(value="/mpostBean", method=RequestMethod.POST)
public String mpostBean(Person person,int num){
System.out.println("bean对象的方式获取POST请求的参数【name:"+person.getName()+", age:"+person.getAge()+", sex:"+person.getSex()+"】"+num);
return "index";
}
4、通过@RequestParam绑定请求参数
@RequestParam注解默认参数必传,如果设置注解属性required = false则参数可传可不传。例如:@RequestParam(value = "date", required = false) String date
@RequestMapping(value="/mgetRp", method=RequestMethod.GET)
public String mgetRp(@RequestParam("namex") String name, @RequestParam("agex") int age){
System.out.println("@RequestParam方式获取GET请求的参数【name:"+name+", age:"+age+"】");
return "index";
}
@RequestMapping(value="/mpostRp", method=RequestMethod.POST)
public String mpostRp(@RequestParam("namex") String name, @RequestParam("agex") int age){
System.out.println("@RequestParam方式获取POST请求的参数【name:"+name+", age:"+age+"】");
return "index";
}
5、通过@PathVariable获取参数
这个注解能够识别URL里面的一个模板,我们看下面的一个URL
http://localhost:8080/springmvc/hello/101?param1=10¶m2=20
@RequestMapping("/hello/{id}")
    public String getDetails(@PathVariable(value="id") String id,
    @RequestParam(value="param1", required=true) String param1,
    @RequestParam(value="param2", required=false) String param2){
.......
}
这种方式用@PathVariable注解的参数必须在@RequestMapping的value属性中接在映射路径后面,以“/”隔开,用“{}”包起参数名,而请求URL带的参数是直接在路径后以“/”隔开,直接加参数的值,这种方式可以和其他方式混用。
@RequestMapping(value="/mgetPv/{name}/{age}", method=RequestMethod.GET)
public String mgetPv(@PathVariable("name") String name, @PathVariable("age") int age){
System.out.println("@PathVariable方式获取GET请求的参数【name:"+name+", age:"+age+"】");
return "index";
}
补充: @RequestParam,@PathParam等注解区别
@RequestParam 和 @PathVariable 注解是用于从request中接收请求的,两个都可以接收参数,关键点不同的是@RequestParam 是从request里面拿取值,而 @PathVariable 是从一个URI模板里面来填充
@RequestParam
http://localhost:8080/springmvc/hello/101?param1=10¶m2=20
根据上面的这个URL,你可以用这样的方式来进行获取
public String getDetails(
    @RequestParam(value="param1", required=true) String param1,
        @RequestParam(value="param2", required=false) String param2){
...
}
@RequestParam 支持下面四种参数
@RequestMapping("/hello/{id}")
    public String getDetails(@PathVariable(value="id") String id,
    @RequestParam(value="param1", required=true) String param1,
    @RequestParam(value="param2", required=false) String param2){
.......
}
@ResponseBody
responseBody表示服务器返回的时候以一种什么样的方式进行返回, 将内容或对象作为 HTTP 响应正文返回,值有很多,一般设定为json
@RequestBody
一般是post请求的时候才会使用这个请求,把参数丢在requestbody里面
八、返回页面带参数的方式:
1、通过ModelAndView对象的addObject()方法
@RequestMapping(value="/responseMaV", method=RequestMethod.GET)
public ModelAndView responseMaV(HttpServletRequest request){
String name = request.getParameter("name");
System.out.println("Controller通过ModelAndView 返回参数,name:"+name);
ModelAndView mv = new ModelAndView("index");
mv.addObject("name", name);
return mv;
}
2、通过HttpServletRequest的setAttribute()方法
@RequestMapping(value="/responseRq", method=RequestMethod.GET)
public String responseRq(HttpServletRequest request){
String name = request.getParameter("name");
System.out.println("Controller通过HttpServletRequest 返回参数,name:"+name);
request.setAttribute("name", name);
int i=1/0;
return "index";
}
3、通过Model、ModelMap、Map方法形参返回数据
把Model、ModelMap、Map等封装返回数据的对象放在映射方法的参数里,在方法里把要返回的数据直接put进集合里即可。
@RequestMapping(value="/responseModel", method=RequestMethod.GET)
public String responseModel(HttpServletRequest request, Model model){
String name = request.getParameter("name");
System.out.println("Controller通过Model 返回参数,name:"+name);
model.addAttribute("name", name);
return "index";
}
@RequestMapping(value="/responseModelMap", method=RequestMethod.GET)
public String responseModelMap(HttpServletRequest request, ModelMap model){
String name = request.getParameter("name");
System.out.println("Controller通过ModelMap 返回参数,name:"+name);
model.addAttribute("name", name);
return "index";
}
@RequestMapping(value="/responseMap", method=RequestMethod.GET, produces="application/json;charset=utf-8")
public String responseMap(HttpServletRequest request, Map map){
String name = request.getParameter("name");
System.out.println("Controller通过Map 返回参数,name:"+name);
map.put("name", name);
return "index";
}
前端页面获取参数:
<%@ page language="java" contentType="text/html; charset=UTF-8"
    pageEncoding="UTF-8"%>
<!DOCTYPE html PUBLIC "-//W3C//DTD HTML 4.01 Transitional//EN" "http://www.w3.org/TR/html4/loose.dtd">
<html>
<head>
<meta http-equiv="Content-Type" content="text/html; charset=UTF-8">
<title>Insert title here</title>
</head>
<body>
 HELLO SPRING MVC
   name: ${requestScope.name }
   postName: ${requestScope.postName }
</body>
</html>
![这里写图片描述]()
九,文件上传
配置文件添加豆:
<?xml version="1.0" encoding="UTF-8"?>
<beans xmlns="http://www.springframework.org/schema/beans"
xmlns:xsi="http://www.w3.org/2001/XMLSchema-instance"
xmlns:context="http://www.springframework.org/schema/context"
xmlns:tx="http://www.springframework.org/schema/tx"
xmlns:aop="http://www.springframework.org/schema/aop"
xmlns:mvc="http://www.springframework.org/schema/mvc"
xmlns:p="http://www.springframework.org/schema/p"
xsi:schemaLocation="http://www.springframework.org/schema/beans
http://www.springframework.org/schema/beans/spring-beans-3.0.xsd
http://www.springframework.org/schema/context
http://www.springframework.org/schema/context/spring-context-3.0.xsd
http://www.springframework.org/schema/tx
http://www.springframework.org/schema/tx/spring-tx.xsd
http://www.springframework.org/schema/aop
http://www.springframework.org/schema/aop/spring-aop-3.2.xsd
http://www.springframework.org/schema/mvc
http://www.springframework.org/schema/mvc/spring-mvc-3.0.xsd">
<context:component-scan base-package="com.prosay"/>
<bean class="org.springframework.web.servlet.view.InternalResourceViewResolver"
>
<property name="prefix" value="/"></property>
<property name="suffix" value=".jsp"></property>
</bean>
<mvc:interceptors>
<mvc:interceptor>
<mvc:mapping path="/**/*"/>
<bean class="com.prosay.MyInterceptor"></bean>
</mvc:interceptor>
</mvc:interceptors>
<bean id="multipartResolver"class="org.springframework.web.multipart.commons.CommonsMultipartResolver">
<properties name= "maxUploadSize" value= "10485760"/>
<properties name= "defaultEncoding" value= "UTF-8"/>
<properties name= "maxInMemorySize" value= "1024"/>
<properties name= "uploadTempDir" value= "/upload"/>
</bean>
</beans>
控制方法:
@RequestMapping(value="/uploadFileMethod")
public String uploadFileMethod(@RequestParam("myFile") CommonsMultipartFile file){
System.out.println(file.getOriginalFilename());
try {
File myfile = new File("E://"+file.getOriginalFilename());
file.transferTo(myfile);
} catch (Exception e) {
e.printStackTrace();
}
return "index";
}
前端上传文件控件:
<%@ page language="java" contentType="text/html; charset=UTF-8"
    pageEncoding="UTF-8"%>
<!DOCTYPE html PUBLIC "-//W3C//DTD HTML 4.01 Transitional//EN" "http://www.w3.org/TR/html4/loose.dtd">
<html>
<head>
<meta http-equiv="Content-Type" content="text/html; charset=UTF-8">
<title>Insert title here</title>
</head>
<body>
URL映射测试<br/>
<a href="mapping/mget?age=19">GET请求</a>
<br/><br/>
<form action="mapping/mpost" method="post">
    <input type="hidden" name="age" value="19"/>
    <input type="submit" value="提交"/>
</form>

<hr style="border: 1px solid red" />
SpringMVC文件上传<br/>
<form action="mapping/uploadFileMethod" method="post" enctype="multipart/form-data">
    <input type="file" name="myFile" value="" />
    <input type="submit" value="提交"/>
</form>

</body>
</html>
![这里写图片描述]()