基于注解的配置
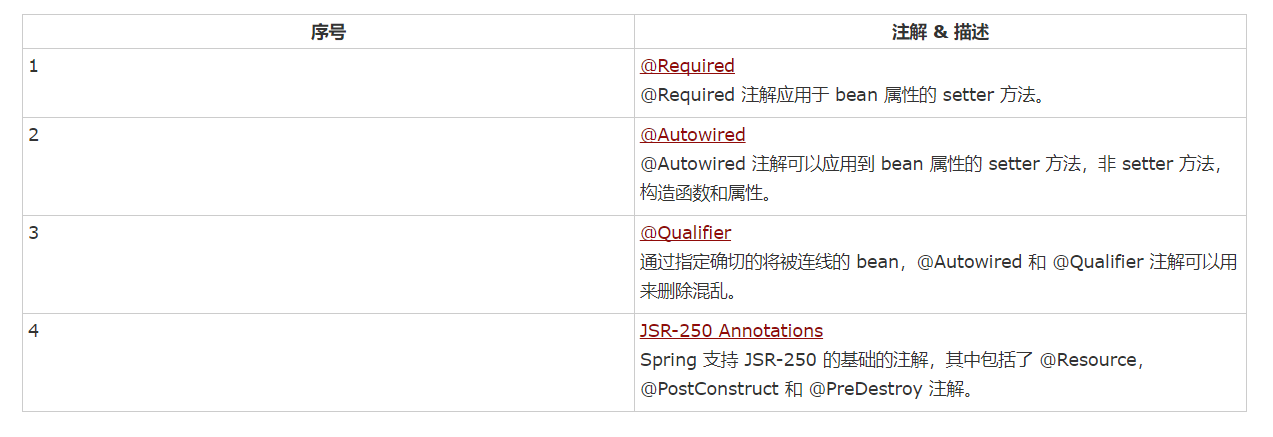
从 Spring 2.5 开始就可以使用注解来配置依赖注入。而不是采用 XML 来描述一个 bean 连线,你可以使用相关类,方法或字段声明的注解,将 bean 配置移动到组件类本身。
在 XML 注入之前进行注解注入,因此后者的配置将通过两种方式的属性连线被前者重写。
![]()
一、@Required注解
@Required 注解应用于 bean 属性的 setter 方法,它表明受影响的 bean 属性在配置时必须放在 XML 配置文件中,否则容器就会抛出一个 BeanInitializationException 异常。下面显示的是一个使用 @Required 注解的示例。
(1)编写Student.java
package com.tutorialspoint;
import org.springframework.beans.factory.annotation.Required;
public class Student {
   private Integer age;
   private String name;
   @Required
   public void setAge(Integer age) {
      this.age = age;
   }
   public Integer getAge() {
      return age;
   }
   @Required
   public void setName(String name) {
      this.name = name;
   }
   public String getName() {
      return name;
   }
}
(2)编写MainApp.java
package com.tutorialspoint;

import org.springframework.context.ApplicationContext;
import org.springframework.context.support.ClassPathXmlApplicationContext;

public class MainApp {
    public static void main(String[] args) {
          ApplicationContext context = new ClassPathXmlApplicationContext("Beans.xml");
          Student student = (Student) context.getBean("student");
          System.out.println("Name : " + student.getName() );
          System.out.println("Age : " + student.getAge() );
       }}
(3)编写Beans.xml
<?xml version = "1.0" encoding = "UTF-8"?>

<beans xmlns="http://www.springframework.org/schema/beans"
    xmlns:xsi="http://www.w3.org/2001/XMLSchema-instance"
    xmlns:context="http://www.springframework.org/schema/context"
    xsi:schemaLocation="http://www.springframework.org/schema/beans
    http://www.springframework.org/schema/beans/spring-beans-4.0.xsd
    http://www.springframework.org/schema/context
    http://www.springframework.org/schema/context/spring-context-4.0.xsd">


  <context:annotation-config/>

   <!-- Definition for student bean -->
   <bean id="student" class="com.tutorialspoint.Student">
      <property name="name"  value="Zara" />

      <!-- try without passing age and check the result -->
      <property name="age"  value="11"/>
   </bean>

</beans>
(4)运行MainApp.java中的main方法
如图:
![]()
这是正常流程
异常流程只需将Beans.xml改成如下,再运行main方法:
<?xml version = "1.0" encoding = "UTF-8"?>

<beans xmlns="http://www.springframework.org/schema/beans"
    xmlns:xsi="http://www.w3.org/2001/XMLSchema-instance"
    xmlns:context="http://www.springframework.org/schema/context"
    xsi:schemaLocation="http://www.springframework.org/schema/beans
    http://www.springframework.org/schema/beans/spring-beans-4.0.xsd
    http://www.springframework.org/schema/context
    http://www.springframework.org/schema/context/spring-context-4.0.xsd">


 <context:annotation-config/>

   <!-- Definition for student bean -->
   <bean id="student" class="com.tutorialspoint.Student">
      <property name="name"  value="Zara" />

      <!-- try without passing age and check the result -->
      <!--<property name="age"  value="11"/>-->
   </bean>

</beans>
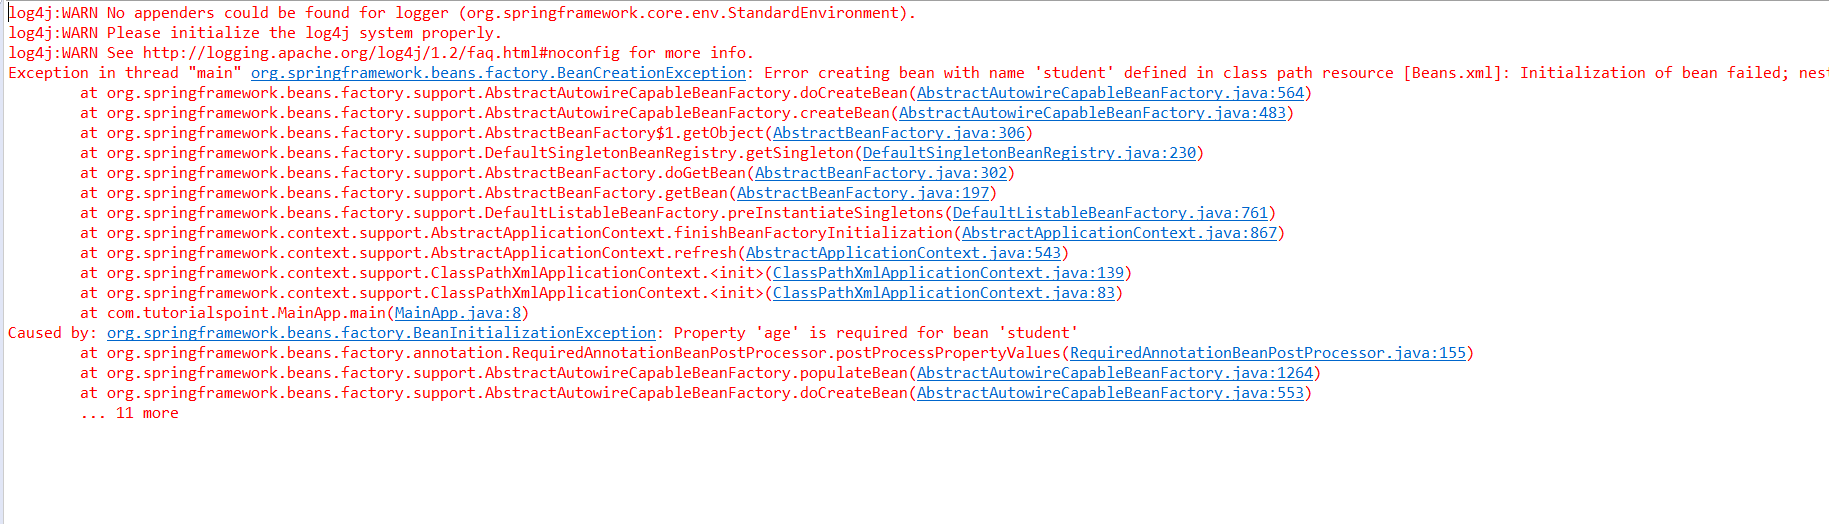
控制台最后的结果如下:
![]()
我想大家应该明白了,@Required注解的作用,其实这个注解与input中的required属性倒有其相同点,必填不能为空。
二、AutoWired注解
@Autowired 注释对在哪里和如何完成自动连接提供了更多的细微的控制。
@Autowired 注释可以在 setter 方法中被用于自动连接 bean,就像 @Autowired 注释,容器,一个属性或者任意命名的可能带有多个参数的方法。
演示示例:
1.编写TextEditor.java
package com.tutorialspoint;
import org.springframework.beans.factory.annotation.Autowired;
public class TextEditor {
   private SpellChecker spellChecker;
   @Autowired
   public void setSpellChecker( SpellChecker spellChecker ){
      this.spellChecker = spellChecker;
   }
   public SpellChecker getSpellChecker( ) {
      return spellChecker;
   }
   public void spellCheck() {
      spellChecker.checkSpelling();
   }
}
2.编写SpellChecker.java
package com.tutorialspoint;
public class SpellChecker {
   public SpellChecker(){
      System.out.println("Inside SpellChecker constructor." );
   }
   public void checkSpelling(){
      System.out.println("Inside checkSpelling." );
   }
}
3.编写Beans.xml
<?xml version = "1.0" encoding = "UTF-8"?>

<beans xmlns="http://www.springframework.org/schema/beans"
    xmlns:xsi="http://www.w3.org/2001/XMLSchema-instance"
    xmlns:context="http://www.springframework.org/schema/context"
    xsi:schemaLocation="http://www.springframework.org/schema/beans
    http://www.springframework.org/schema/beans/spring-beans-4.0.xsd
    http://www.springframework.org/schema/context
    http://www.springframework.org/schema/context/spring-context-4.0.xsd">


   <context:annotation-config/>

   <!-- Definition for textEditor bean without constructor-arg  -->
   <bean id="textEditor" class="com.tutorialspoint.TextEditor">
   </bean>

   <!-- Definition for spellChecker bean -->
   <bean id="spellChecker" class="com.tutorialspoint.SpellChecker">
   </bean>


</beans>
4.编写MainApp.java
package com.tutorialspoint;
import org.springframework.context.ApplicationContext;
import org.springframework.context.support.ClassPathXmlApplicationContext;
public class MainApp {
   public static void main(String[] args) {
      ApplicationContext context = new ClassPathXmlApplicationContext("Beans.xml");
      TextEditor te = (TextEditor) context.getBean("textEditor");
      te.spellCheck();
   }
}
5.运行MainApp.java中的main方法
结果如下:
![]()
@AutoWired 自动装配 它的一个属性叫required,属性值是boolean类型,默认为true,必须,也可以修改为false,非必须。
三、Qualifier注解
可能会有这样一种情况,当你创建多个具有相同类型的 bean 时,并且想要用一个属性只为它们其中的一个进行装配,在这种情况下,你可以使用 @Qualifier 注释和 @Autowired 注释通过指定哪一个真正的 bean 将会被装配来消除混乱。下面显示的是使用 @Qualifier 注释的一个示例。
(1)编写Student.java
package com.tutorialspoint;
public class Student {
   private Integer age;
   private String name;
   public void setAge(Integer age) {
      this.age = age;
   }
   public Integer getAge() {
      return age;
   }
   public void setName(String name) {
      this.name = name;
   }
   public String getName() {
      return name;
   }
}
(2)编写Profile.java
package com.tutorialspoint;

import org.springframework.beans.factory.annotation.Autowired;
import org.springframework.beans.factory.annotation.Qualifier;

public class Profile {
       @Autowired
       @Qualifier("student1")
       private Student student;
       public Profile(){
          System.out.println("Inside Profile constructor." );
       }
       public void printAge() {
          System.out.println("Age : " + student.getAge() );
       }
       public void printName() {
          System.out.println("Name : " + student.getName() );
       }
}
(3)编写MainApp.java
package com.tutorialspoint;
import org.springframework.context.ApplicationContext;
import org.springframework.context.support.ClassPathXmlApplicationContext;
public class MainApp {
     public static void main(String[] args) {
          ApplicationContext context = new ClassPathXmlApplicationContext("Beans.xml");
          Profile profile = (Profile) context.getBean("profile");
          profile.printAge();
          profile.printName();
       }
}
(4)编写Beans.xml
<?xml version = "1.0" encoding = "UTF-8"?>

<beans xmlns="http://www.springframework.org/schema/beans"
    xmlns:xsi="http://www.w3.org/2001/XMLSchema-instance"
    xmlns:context="http://www.springframework.org/schema/context"
    xsi:schemaLocation="http://www.springframework.org/schema/beans
    http://www.springframework.org/schema/beans/spring-beans-4.0.xsd
    http://www.springframework.org/schema/context
    http://www.springframework.org/schema/context/spring-context-4.0.xsd">


   <context:annotation-config/>

   <!-- Definition for profile bean -->
   <bean id="profile" class="com.tutorialspoint.Profile">
   </bean>

   <!-- Definition for student1 bean -->
   <bean id="student1" class="com.tutorialspoint.Student">
      <property name="name"  value="Zara" />
      <property name="age"  value="11"/>
   </bean>

   <!-- Definition for student2 bean -->
   <bean id="student2" class="com.tutorialspoint.Student">
      <property name="name"  value="Nuha" />
      <property name="age"  value="2"/>
   </bean>


</beans>
(5)运行MainApp.java对应的main方法
![]()
四、Spring JSR-250 注释
Spring还使用基于 JSR-250 注释,它包括 @PostConstruct, @PreDestroy 和 @Resource 注释。因为你已经有了其他的选择,尽管这些注释并不是真正所需要的,但是关于它们仍然让我给出一个简短的介绍。
@PostConstruct 和 @PreDestroy 注释:
为了定义一个 bean 的安装和卸载,我们使用 init-method 和/或 destroy-method 参数简单的声明一下 。init-method 属性指定了一个方法,该方法在 bean 的实例化阶段会立即被调用。同样地,destroy-method 指定了一个方法,该方法只在一个 bean 从容器中删除之前被调用。
你可以使用 @PostConstruct 注释作为初始化回调函数的一个替代,@PreDestroy 注释作为销毁回调函数的一个替代,其解释如下示例所示。
演示示例:
(1)编写HelloWorld.java
package com.tutorialspoint;
import javax.annotation.*;
public class HelloWorld {
   private String message;
   public void setMessage(String message){
      this.message  = message;
   }
   public String getMessage(){
      System.out.println("Your Message : " + message);
      return message;
   }
   @PostConstruct
   public void init(){
      System.out.println("Bean is going through init.");
   }
   @PreDestroy
   public void destroy(){
      System.out.println("Bean will destroy now.");
   }
}
(2)编写Beans.xml
<?xml version = "1.0" encoding = "UTF-8"?>

<beans xmlns="http://www.springframework.org/schema/beans"
    xmlns:xsi="http://www.w3.org/2001/XMLSchema-instance"
    xmlns:context="http://www.springframework.org/schema/context"
    xsi:schemaLocation="http://www.springframework.org/schema/beans
    http://www.springframework.org/schema/beans/spring-beans-4.0.xsd
    http://www.springframework.org/schema/context
    http://www.springframework.org/schema/context/spring-context-4.0.xsd">


   <context:annotation-config/>

   <bean id="helloWorld"
       class="com.tutorialspoint.HelloWorld"
       init-method="init" destroy-method="destroy">
       <property name="message" value="Hello World!"/>
   </bean>


</beans>
(3)编写MainApp.java并运行对应的main方法
package com.tutorialspoint;
import org.springframework.context.support.AbstractApplicationContext;
import org.springframework.context.support.ClassPathXmlApplicationContext;

public class MainApp {
     public static void main(String[] args) {
          AbstractApplicationContext context =
                              new ClassPathXmlApplicationContext("Beans.xml");
          HelloWorld obj = (HelloWorld) context.getBean("helloWorld");
          obj.getMessage();
          context.registerShutdownHook();
       }
}
结果如图:
![]()