概述
为文档添加必要的批注可以给文档使用者提供重要的提示信息,下面的示例中,将介绍通过C#编程语言来给Excel表格中的指定单元格内容添加批注,此外,对于已有的批注,如果需要修改,我们也可以进行编辑或者删除批注。示例内容将包含以下主要内容:
1.插入批注
1.1 插入文本
1.2 插入图片
2.编辑批注
2.1 修改批注内容
2.1 设置批注可见性
3.删除批注
工具
提示:在进行代码操作之前,需下载安装Spire.Xls,并添加引用dll文件,添加如下using指令
using System;

using Spire.Xls;

using System.Drawing;
代码示例(供参考)
1.插入Excel批注
【C#】
步骤1:实例化一个Workbook类实例并加载Excel文档
Workbook workbook = new Workbook();
workbook.LoadFromFile("test.xlsx");
步骤2:获取第一个工作表
Worksheet sheet = workbook.Worksheets[0];
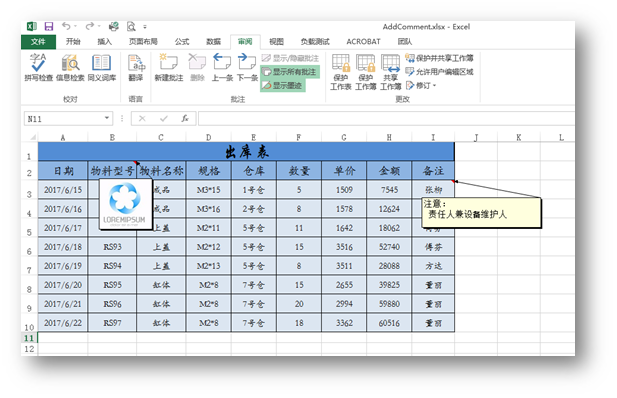
步骤3:插入文本批注
string comment = "注意:\n 责任人兼设备维护人";//设置批注文本
ExcelFont font = workbook.CreateFont();//设置批注字体格式
font.FontName = "Calibri";
font.Color = Color.Black;
font.IsBold = true;
CellRange range = sheet.Range["I3"];//添加批注到指定单元格
range.Comment.RichText.Text = comment;
range.Comment.Width = 200;
range.Comment.Height = 50;
range.Comment.RichText.SetFont(10, 10, font);
步骤4:插入图片批注
//加载图片,将图片插入到指定单元格的批注
Image image = Image.FromFile("logo.png");
sheet.Range["B2"].Comment.Fill.CustomPicture(image, "logo.png");
sheet.Range["B2"].Comment.Height = image.Height;
sheet.Range["B2"].Comment.Width = image.Width;
步骤5:保存文档
workbook.SaveToFile("AddComment.xlsx", ExcelVersion.Version2013);
System.Diagnostics.Process.Start("AddComment.xlsx");
批注插入效果(如下图):
![]()
全部代码:
![]()
![]()
using System;
using Spire.Xls;
using System.Drawing;

namespace ModifyComment_XLS
{
    class Program
    {
        static void Main(string[] args)
        {
            //实例化一个Workbook类实例并加载Excel文档
            Workbook workbook = new Workbook();
            workbook.LoadFromFile("test.xlsx");

            //获取第一个工作表
            Worksheet sheet = workbook.Worksheets[0];

            //设置批注文本
            string comment = "注意:\n 责任人兼设备维护人";

            //设置批注字体
            ExcelFont font = workbook.CreateFont();
            font.FontName = "Calibri";
            font.Color = Color.Black;
            font.IsBold = true;

            //添加批注到指定单元格
            CellRange range = sheet.Range["I3"];
            range.Comment.RichText.Text = comment;
            range.Comment.Width = 200;
            range.Comment.Height = 50;
            range.Comment.RichText.SetFont(10, 10, font);

            //加载图片,将图片插入到指定单元格的批注
            Image image = Image.FromFile("logo.png");
            sheet.Range["B2"].Comment.Fill.CustomPicture(image, "logo.png");
            sheet.Range["B2"].Comment.Height = image.Height;
            sheet.Range["B2"].Comment.Width = image.Width;

            //保存并打开文档
            workbook.SaveToFile("AddComment.xlsx", ExcelVersion.Version2013);
            System.Diagnostics.Process.Start("AddComment.xlsx");
        }
    }
}
View Code
2. 修改、隐藏Excel批注
【C#】
步骤1:创建一个Workbook类对象,并加载Excel文档
Workbook workbook = new Workbook();
workbook.LoadFromFile("AddComment.xlsx");
步骤2:获取第一个工作表
Worksheet sheet = workbook.Worksheets[0];
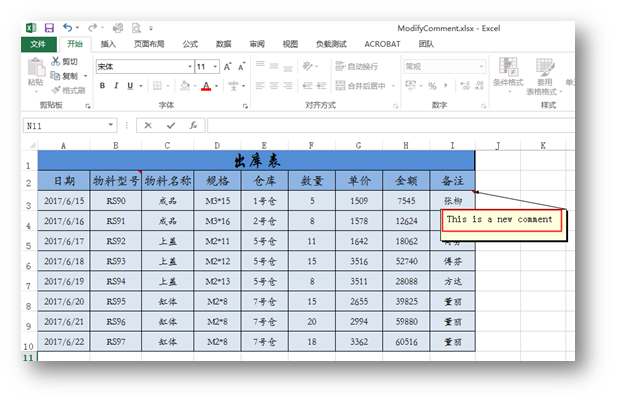
步骤3:修改工作表中的第一个批注
ExcelComment comment0 = workbook.Worksheets[0].Comments[0];
sheet.Comments[0].Text = "This is a new comment";
步骤4:设置批注可见性(隐藏、显示)
//设置指定批注可见(显示)
sheet.Comments[0].IsVisible = true;
//设置指定批注不可见(隐藏)
sheet.Comments[1].IsVisible = false;
步骤5:保存文档
workbook.SaveToFile("ModifyComment.xlsx", ExcelVersion.Version2013);
System.Diagnostics.Process.Start("ModifyComment.xlsx");
效果图:
![]()
全部代码:
![]()
![]()
using System;
using Spire.Xls;
using System.Drawing;

namespace ModifyComment_XLS
{
    class Program
    {
        static void Main(string[] args)
        {
            //创建一个Workbook类对象,并加载Excel文档
            Workbook workbook = new Workbook();
            workbook.LoadFromFile("AddComment.xlsx");

            //获取第一个工作表
            Worksheet sheet = workbook.Worksheets[0];

            //修改工作表中的第一个批注
            ExcelComment comment0 = workbook.Worksheets[0].Comments[0];
            sheet.Comments[0].Text = "This is a new comment";

            //设置指定批注不可见(隐藏)
            sheet.Comments[0].IsVisible = true;
            //设置指定批注可见(显示)
            sheet.Comments[1].IsVisible = false;

            //保存并打开文档
            workbook.SaveToFile("ModifyComment.xlsx", ExcelVersion.Version2013);
            System.Diagnostics.Process.Start("ModifyComment.xlsx");
        }
    }
}
View Code
3.删除Excel批注
【C#】
//实例化Wordbook类实例并加载Excel文档
Workbook workbook = new Workbook();
workbook.LoadFromFile("Comments.xlsx");

//获取第一个工作表
Worksheet sheet = workbook.Worksheets[0];

//删除工作表中的第2个批注
sheet.Comments[1].Remove();

//保存并打开文档
workbook.SaveToFile("RemoveComment.xlsx", ExcelVersion.Version2013);
System.Diagnostics.Process.Start("RemoveComment.xlsx");
以上全部为本篇文章的全部内容。
如需转载请注明出处。
<本文完>