一,导包
1)官网下载:http://www.quartz-scheduler.org/downloads/
2)Maven
        <dependency>
            <groupId>org.quartz-scheduler</groupId>
            <artifactId>quartz</artifactId>
            <version>2.2.1</version>
        </dependency>
二,实例
1.先定义一个作业任务类,写我们的执行代码
package cn.zyzpp.quartz.demo;
import java.text.SimpleDateFormat;
import java.util.Date;
import org.quartz.Job;
import org.quartz.JobDataMap;
import org.quartz.JobDetail;
import org.quartz.JobExecutionContext;
import org.quartz.JobExecutionException;
import org.quartz.JobKey;
import org.quartz.Trigger;
/**
* Created by yster@foxmail.com
* 2018年4月9日 下午11:00:52
*/
public class HelloJob implements Job {
private String setKey;
public void execute(JobExecutionContext context) throws JobExecutionException {
String now = new SimpleDateFormat("yyyy-mm-dd hh:mm:ss").format(new Date());
JobDetail detail = context.getJobDetail();
String group = detail.getKey().getGroup();
String value = detail.getJobDataMap().getString("key");
Trigger trigger = context.getTrigger();
value= trigger.getJobDataMap().getString("key");
JobDataMap data = context.getMergedJobDataMap();
value = data.getString("key");
JobKey jobKey = trigger.getJobKey();
String name = jobKey.getName();
group = jobKey.getGroup();
try {
Thread.sleep(5000l);
} catch (InterruptedException e) {
e.printStackTrace();
}
System.out.println(now + ":" + name + " " +group);
}
public String getSetKey() {
return setKey;
}
public void setSetKey(String setKey) {
this.setKey = setKey;
}
}
2.
package cn.zyzpp.quartz.demo
import java.text.SimpleDateFormat
import java.util.Date
import org.quartz.CronScheduleBuilder
import org.quartz.CronTrigger
import org.quartz.JobBuilder
import org.quartz.SimpleScheduleBuilder
import org.quartz.SimpleTrigger
import org.quartz.TriggerBuilder
import org.quartz.JobDetail
import org.quartz.Scheduler
import org.quartz.Trigger
import org.quartz.impl.StdSchedulerFactory
public class QuartzTest {
public static void main(String[] args) {
SimpleDateFormat sf =new SimpleDateFormat("yyyy-mm-dd hh:mm:ss")
try {
// Quartz 作业:定义一个JobDetail:为Job类设置属性
JobDetail jobDetail = JobBuilder.newJob(HelloJob.class) // 定义Job类为HelloQuartz类,这是真正的执行逻辑所在
.withIdentity("job1", "group1") // 定义name/group
.usingJobData("key", "job-value") // 自定义参数
.usingJobData("setKey", "setValue").build()
// System.out.println(jobDetail.getKey().getName())
// System.out.println(jobDetail.getKey().getGroup())
// System.out.println(jobDetail.getJobClass())
// 定义任务开始时间以及结束时间
Date startDate = new Date()
System.out.println("scheduler开始:" + sf.format(new Date()))
startDate.setTime(new Date().getTime() + 2000)
Date endDate = new Date()
endDate.setTime(startDate.getTime() + 4000)
// Quartz触发器:定义一个Trigger
Trigger trigger = TriggerBuilder.newTrigger()
.withIdentity("trigger1", "group1") // 定义name/group
// .startNow()//一旦加入scheduler,立即生效
.startAt(startDate)
.endAt(endDate)
.withSchedule(SimpleScheduleBuilder.simpleSchedule()
.withIntervalInSeconds(1) // 每隔一秒执行一次
.repeatForever()) // 一直执行,奔腾到老不停歇
.usingJobData("key", "trigger-value")
.build()
//SimpleTrigger 在一个指定时间段内执行一次作业任务 或者在指定时间间隔内多次执行作业任务
SimpleTrigger simpleTrigger = (SimpleTrigger) TriggerBuilder
.newTrigger()
.withIdentity("trigger1", "group1") // 定义name/group
.startAt(startDate)
.withSchedule(SimpleScheduleBuilder.simpleSchedule()
.withIntervalInSeconds(2)
.withRepeatCount(3)) //执行第1次后再执行3次(SimpleTrigger.REPEAT_INDEFINITELY)
.build()
//CronTrigger 基于 cron 表达式,更常用
CronTrigger cronTrigger = (CronTrigger) TriggerBuilder
.newTrigger()
.withIdentity("trigger1", "group1") // 定义name/group
.startAt(startDate)
.withSchedule(
//Cron表达式:[秒][分][时][日][月][周][年] (周日1-周六7,年可不写) *每 ?不关心 -至 #第 /递增 ,和 L最后 W最近工作日
CronScheduleBuilder.cronSchedule("0/2 * * * * ? * ")
)
.build()
// 调度类链接“工作”和“触发器”到一起,并执行它
// 创建scheduler
StdSchedulerFactory sfact = new StdSchedulerFactory()
Scheduler scheduler = sfact.getScheduler()
// 加入这个调度 返回第一次执行时间
scheduler.scheduleJob(jobDetail, cronTrigger)
//System.out.println("调度器:" + sf.format(scheduler.scheduleJob(jobDetail, cronTrigger)))
// 启动之
scheduler.start()
// 运行一段时间后暂停 可再次start 当前主线程不终止
Thread.sleep(10000l)
// scheduler.standby()
// System.out.println("暂停:三秒后再次开启")
// Thread.sleep(3000l)
// scheduler.start()
// Thread.sleep(5000l)
scheduler.shutdown(true)
System.out.println("scheduler终止" + sf.format(new Date()))
} catch (Exception e) {
e.printStackTrace()
}
}
}
三,干货
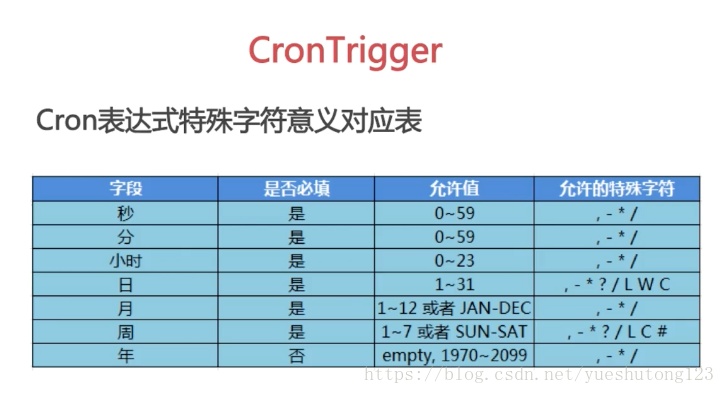
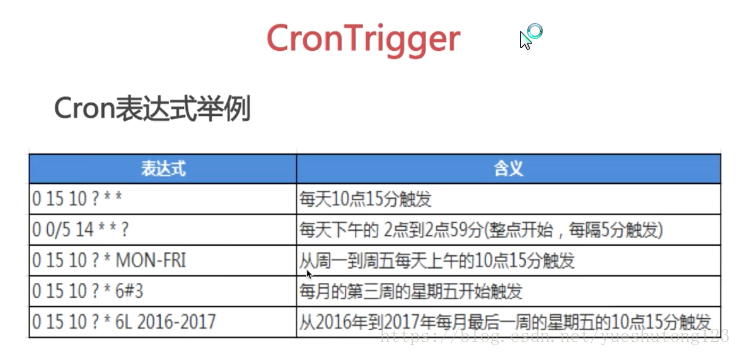
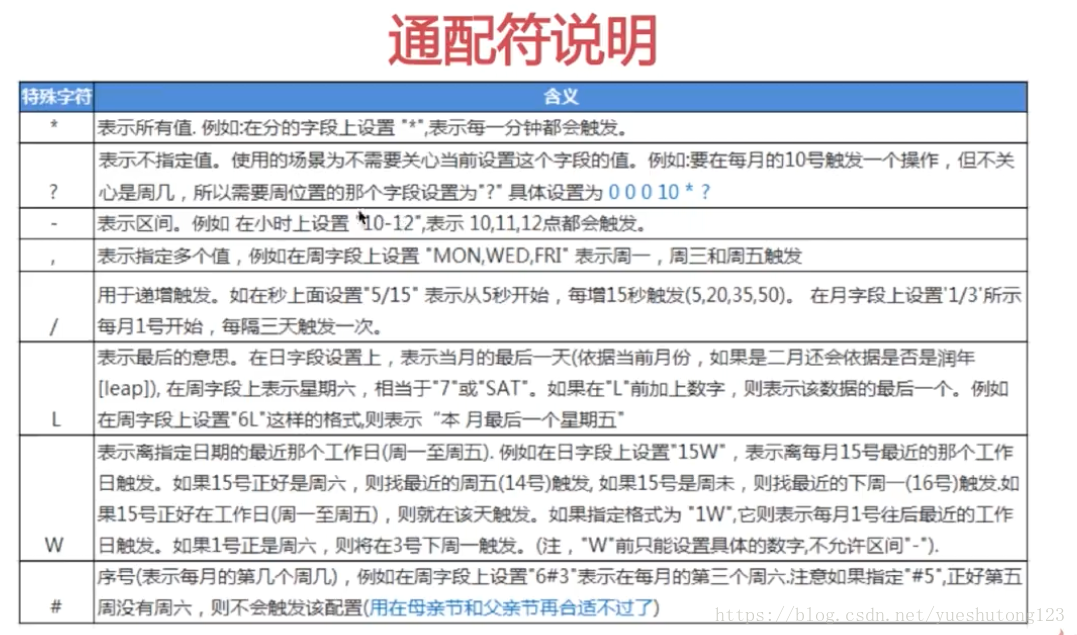
1)Cron表达式
![这里写图片描述]()
![这里写图片描述]()
![这里写图片描述]()
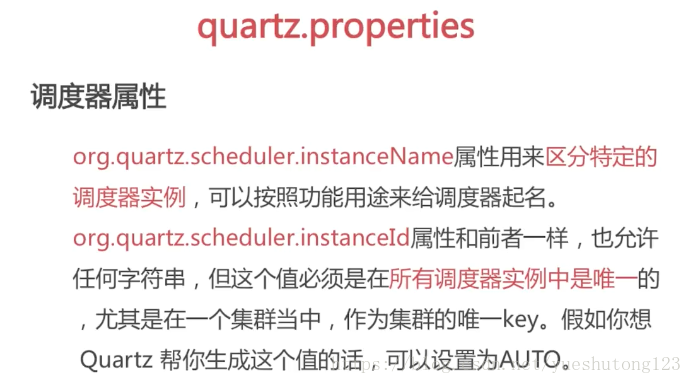
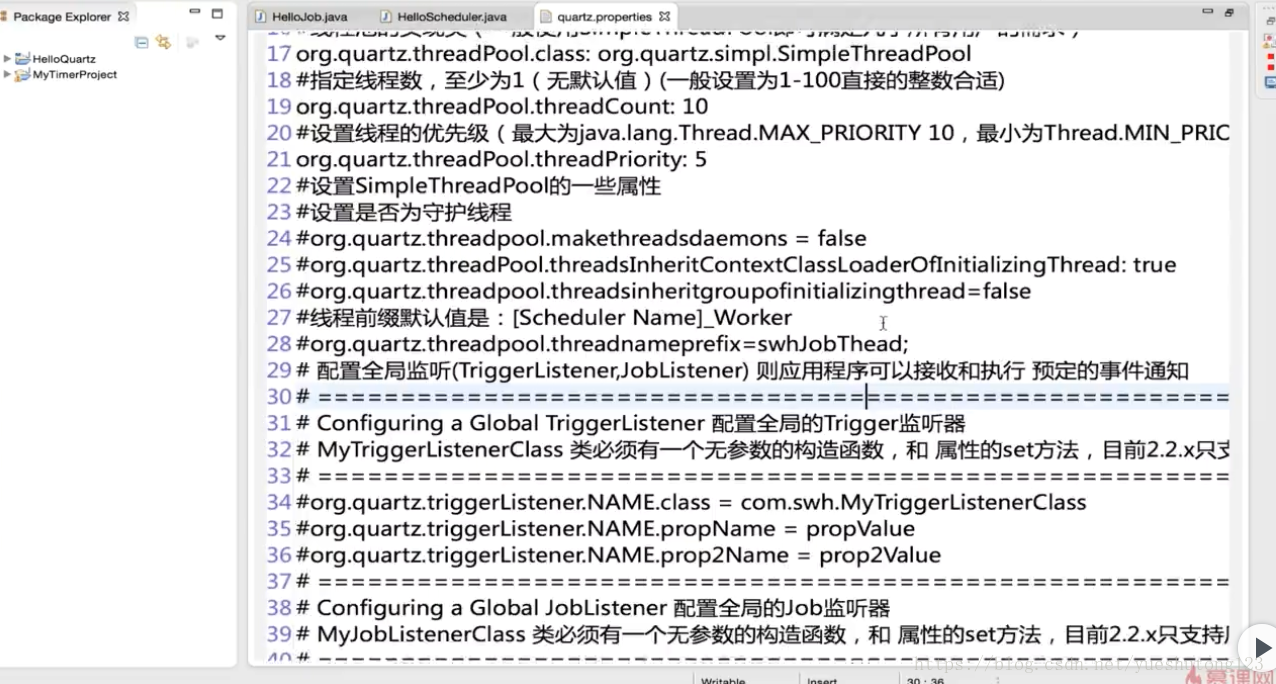
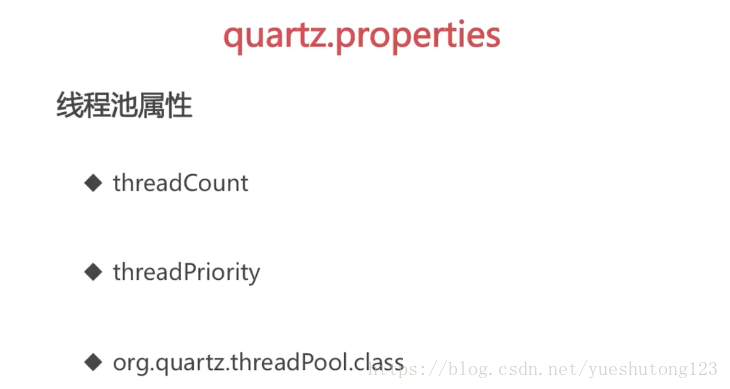
2)/org/quartz/quartz.properties
![这里写图片描述]()
![这里写图片描述]()
![这里写图片描述]()
![这里写图片描述]()
3)集成Spring
<bean id="simpleJobDetail"
class="org.springframework.scheduling.quartz.MethodInvokingJobDetailFactoryBean">
<property name="targetObject" ref="myBean" />
<property name="targetMethod" value="printMessage" />
</bean>
<bean id="firstComplexJobDetail"
class="org.springframework.scheduling.quartz.JobDetailFactoryBean">
<property name="jobClass"
value="com.imooc.springquartz.quartz.FirstScheduledJob" />
<property name="jobDataMap">
<map>
<entry key="anotherBean" value-ref="anotherBean" />
</map>
</property>
<property name="durability" value="true"/>
</bean>
<bean id="mySimpleTrigger" class="org.springframework.scheduling.quartz.SimpleTriggerFactoryBean">
<property name="jobDetail" ref="simpleJobDetail"/>
<property name="startDelay" value="1000"/>
<property name="repeatInterval" value="2000"/>
</bean>
<bean id="myCronTrigger" class="org.springframework.scheduling.quartz.CronTriggerFactoryBean">
<property name="jobDetail" ref="firstComplexJobDetail"/>
<property name="cronExpression" value="0/5 * * ? * *"/>
</bean>
<bean class="org.springframework.scheduling.quartz.SchedulerFactoryBean">
<property name="jobDetails">
<list>
<ref bean="simpleJobDetail"/>
<ref bean="firstComplexJobDetail"/>
</list>
</property>
<property name="triggers">
<list>
<ref bean="mySimpleTrigger"/>
<ref bean="myCronTrigger"/>
</list>
</property>
</bean>
1.MyBean.java
import java.text.SimpleDateFormat;
import java.util.Date;
import org.springframework.stereotype.Component;
@Component("myBean")
public class MyBean {
public void printMessage() {
Date date = new Date();
SimpleDateFormat sf = new SimpleDateFormat("yyyy-MM-dd HH:mm:ss");
System.out.println("MyBean Executes!" + sf.format(date));
}
}
2.AnotherBean.java
import org.springframework.stereotype.Component;

@Component("anotherBean")
public class AnotherBean {
    public void printAnotherMessage() {
        System.out.println("AnotherMessage");
    }
}
3.FirstScheduledJob.java
import java.text.SimpleDateFormat;
import java.util.Date;

import org.quartz.JobExecutionContext;
import org.quartz.JobExecutionException;
import org.springframework.scheduling.quartz.QuartzJobBean;

public class FirstScheduledJob extends QuartzJobBean{
     private AnotherBean anotherBean;

     public void setAnotherBean(AnotherBean anotherBean){
         this.anotherBean = anotherBean;
     }

    @Override
    protected void executeInternal(JobExecutionContext arg0)
            throws JobExecutionException {
        Date date = new Date();
        SimpleDateFormat sf = new SimpleDateFormat("yyyy-MM-dd HH:mm:ss");
        System.out.println("FirstScheduledJob Executes!" + sf.format(date));
        this.anotherBean.printAnotherMessage();
    }
}