Augmentor 使用介绍
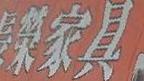
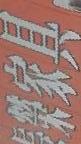
原图
![img_83d69d3f1a669eb9cba2e39d3ddba67b.jpe]()
1.random_distortion(probability, grid_height, grid_width, magnitude)
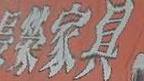
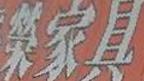
最终选择参数为
p.random_distortion(probability=0.8, grid_height=3, grid_width=3, magnitude=6)
![img_596b9163bca3ea16152bf6a5f70613ee.jpe]()
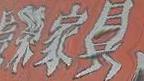
其他参数效果:
magnitude和grid_width,grid_height越大,扭曲程度越大
p.random_distortion(probability=0.6, grid_height=6, grid_width=6, magnitude=5)
![img_4a5307d71f15faf389a6e3b4d6ec9cf1.jpe]()
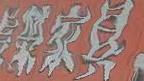
p.random_distortion(probability=0.6, grid_height=6, grid_width=6, magnitude=9)
![img_5a7222e8abddaa3fc29f2420e8281f24.jpe]()
p.random_distortion(probability=0.6, grid_height=10, grid_width=10, magnitude=5)
![img_4b4cf7cf54ac0f1419789098ad6438b3.jpe]()
2.random_erasing(probability, rectangle_area)
rectangle_area表示覆盖区域的比例,值越大比例越大。但是设置为1的时候并不是全覆盖,不知道为什么,反正也没必要弄清楚
![img_83558d5b1f59e112b5b8b799b1d79dbb.jpe]()
3.zoom_random(probability, percentage_area)
放大图片,然后按照percenta_area的比例对图片进行crop。
p.zoom_random(probability=1, percentage_area=0.2)
![img_d7f7d535d0aece245ac8d863930e4125.jpe]()
p.zoom_random(probability=1, percentage_area=0.8)
![img_4389b3c0c39bb39143674f61f35e7331.jpe]()
4.zoom(probability, min_factor, max_factor)
p.zoom(probability=1, min_factor=1.1, max_factor=1.5)
![img_69653447e64aca555afcc6f2527c6e00.jpe]()
p.zoom(probability=1, min_factor=2, max_factor=2)
![img_5d8feaca493447ecbe8e5fb6d4f2a767.jpe]()
组合操作
p.rotate_random_90(probability=0.8)
p.random_distortion(probability=0.8, grid_height=3, grid_width=3, magnitude=6)
p.random_erasing(0.3, 0.2)
p.zoom(probability=0.4, min_factor=1.1, max_factor=1.5)
p.sample(6)
![img_626018fc86eefdf9aa0eb51c14ed606f.jpe]()
![img_1ccd05bd85cdb07b78c6559a76c02dfa.jpe]()
![img_610983527476cbe17716332ffc98319d.jpe]()
![img_e813eef6c68ee55b885809cb19bda96e.jpe]()
![img_6cf9b3f00de9ae5d961abea49b9e28f0.jpe]()
![img_e830ddf55a24a8006a746dc520cf6050.jpe]()
MARSGGBO原创
2018-4-1