近日,@opentiny/unplugin-tiny-vue 发布了其重要的1.0.0版本更新,此次更新带来了全新的单组件包引入模式,显著提升了开发者的本地编译效率以及整个项目的构建速度。
在之前的版本中,开发者需要一次性加载整个TinyVue 库,这个不仅增加了初始时间,也使得项目构建过程变得相对缓慢。然而,随着新版本的发布,这一问题得到了有效的解决。通过引入单组件包模式,开发者现在可以根据实际需求选择性地加载所需的组件,从而极大地减少了不必要的资源消耗,提高了应用的响应速度和整体性能。
具体来说,当开发者使用 @opentiny/unplugin-tiny-vue 的新功能时,他们可以指定仅加载那些在当前项目中真正被使用的组件。这意味着,对于大型项目而言,这种按需加载的方式能够大幅度减少构建时间和内存占用,进而为开发者提供了更加流畅的工作体验。
接下来我们一起来看看如何使用~
安装配置
安装
npm i @opentiny/unplugin-tiny-vue -D
配置
单组件按需引入(推荐用法,可以加快编译和构建速度)
例如:TinyVueSingleResolver('TinyModal') => import TinyModal from '@opentiny/vue-modal'
Vite
// vite.config.js
import { defineConfig } from 'vite'
import Components from 'unplugin-vue-components/vite'
import AutoImport from'unplugin-auto-import/vite'
import { TinyVueSingleResolver } from '@opentiny/unplugin-tiny-vue'

exportdefault defineConfig({
plugins: [
    Components({
      resolvers: [TinyVueSingleResolver]
    }),
    AutoImport({
      resolvers: [TinyVueSingleResolver]
    })
  ]
})
Webpack
// webpack.config.js
const Components = require('unplugin-vue-components/webpack')
const AutoImport = require('unplugin-auto-import/webpack')
const { TinyVueSingleResolver } = require('@opentiny/unplugin-tiny-vue')

module.exports = {
plugins: [
    Components({
      resolvers: [TinyVueSingleResolver]
    }),
    AutoImport({
      resolvers: [TinyVueSingleResolver]
    })
  ]
}
温馨提示
因为 pnpm 工程的特点之一是:项目中显示引入的依赖需要提前在 package.json 中声明(防止幽灵依赖),所以在 pnpm 工程使用该插件时需要在 package.json 中声明项目用到的每一个 TinyVue 组件依赖(TinyVue 每个组件都是一个 npm 包)。依赖声明可以参考以下配置:
{
  "dependencies": {
    "@opentiny/vue-button": "~3.x.x",
    "@opentiny/vue-alert": "~3.x.x",
    "@opentiny/vue-input": "~3.x.x",
    ...
  }
}
如何使用
完成第一步配置后,开发者就可以在自己工程的页面模板使用 TinyVue 组件了(无需导入),具体的示例工程可以参考:https://github.com/opentiny/unplugin-tiny-vue/tree/main/example
示例代码如下:
<template>
  <div>
    <h2>函数式调用</h2>
    <div class="content">
      <span>弹窗模式:</span>
      <tiny-button @click="baseClick"> 基本提示框 </tiny-button>
      <tiny-button @click="successClick"> 成功提示框 </tiny-button>
      <tiny-button @click="confirmClick"> 确认提示框 </tiny-button>
    </div>

    <h2>标签式调用</h2>
    <div class="content">
      <tiny-modal v-model="show1" title="基本提示框" message="窗口内容1" show-footer></tiny-modal>
      <tiny-modal v-model="show2" title="基本提示框" message="窗口内容2" status="success" show-footer></tiny-modal>
      <tiny-button @click="show1 = true"> 打开弹窗1 </tiny-button>
      <tiny-button @click="show2 = true"> 打开弹窗2 </tiny-button>
    </div>
  </div>
</template>

<script setup>
import { ref } from 'vue'

const show1 = ref(false)
const show2 = ref(false)

function baseClick() {
const modal = TinyModal.alert('基本提示框', '标题')
setTimeout(() => modal.vm.close(), 3000)
}

function successClick() {
TinyModal.alert({ message: '成功提示框', status: 'success' })
}

function confirmClick() {
TinyModal.confirm('您确定要删除吗?').then((res) => {
  })
}
</script>
关于 ts 类型声明
使用此插件可以自动生成两个 ts 类型声明文件:auto-imports.d.ts、components.d.ts
只需要工程的 tsconfig.json 增加如下配置即可正常使用组件的类型声明:
"include": ["auto-imports.d.ts","components.d.ts","src/**/*.ts", "src/**/*.d.ts", "src/**/*.tsx", "src/**/*.vue"],
新旧版本对比说明
此次升级为开发者带来哪些提升呢?
接下来比较一下之前使用 TinyVueResolver 和新版本使用 TinyVueSingleResolver 的差别(只使用 TinyButton 和 TinyModal 组件):
TinyVueResolver
本地编译:
- 222个请求
- 14.7MB项资源
- 完成用时:2.34秒
![]()
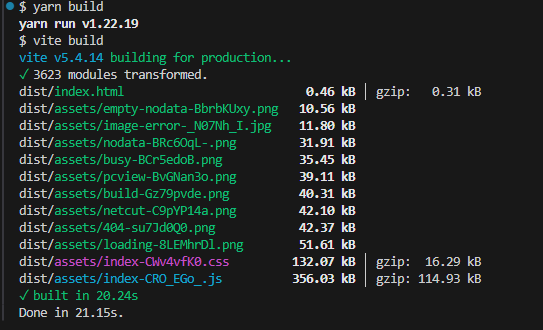
构建生产包:
![]()
TinyVueSingleResolver
本地编译:
- 31个请求
- 1.5MB 项资源
- 完成用时:340毫秒
![]()
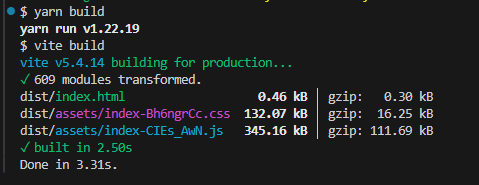
构建生产包:
![]()
关于OpenTiny
欢迎加入 OpenTiny 开源社区。添加微信小助手:opentiny-official 一起参与交流前端技术~
OpenTiny 官网:https://opentiny.design
OpenTiny 代码仓库:https://github.com/opentiny
TinyVue 源码:https://github.com/opentiny/tiny-vue
TinyEngine 源码: https://github.com/opentiny/tiny-engine
欢迎进入代码仓库 Star🌟TinyEngine、TinyVue、TinyNG、TinyCLI~ 如果你也想要共建,可以进入代码仓库,找到 good first issue标签,一起参与开源贡献~