![]()
本文包含以下内容:
建立新的配置类
建立新的测试方法
通过@Value 进行赋值
通过@PropertySource 加载配置文件,并进行注入
拓展@Value 、@PropertySource
1.建立新的配置类
建立新的配置类, @Configuration指定为配置类 ,@Bean加载Person类,为测试做准备,代码如下:
@Configurationpublic class MainConfigOfPropertyValues {      @Bean   public Person person(){      return new Person();   }
}
2.建立新的测试方法
public class IOCTest_PropertyValue {   AnnotationConfigApplicationContext applicationContext = new AnnotationConfigApplicationContext(MainConfigOfPropertyValues.class);   @Test   public void test01(){      printBeans(applicationContext);      System.out.println("=============");            Person person = (Person) applicationContext.getBean("person");      System.out.println(person);         }      private void printBeans(AnnotationConfigApplicationContext applicationContext){      String[] definitionNames = applicationContext.getBeanDefinitionNames();      for (String name : definitionNames) {         System.out.println(name);      }   }
}
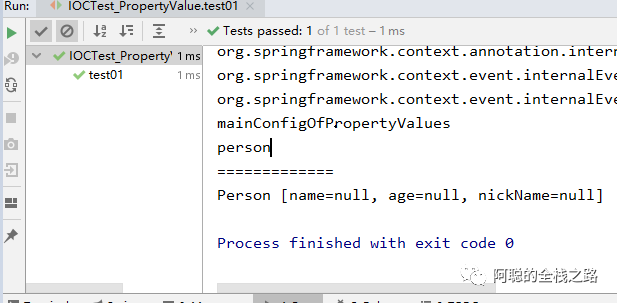
测试类运行结果如下,可以看到默认情况下person 这个Bean 所有的字段都为空。下面将进行赋值
![]()
3.通过@Value 进行赋值
在xml配置文件可以通过bean 标签中包含 property进行属性赋值
<bean id="person" class="com.atguigu.bean.Person" scope="prototype" > <property name="age" value="18"></property> <property name="name" value="zhangsan"></property> </bean>
在注解开发中可以使用@Value 对属性进行赋值。
@Value("张三")private String name;
2.可以写SpEL;#{} ,即sping 的表达式
@Value("#{20-2}")private Integer age;
3.可以写${};取出配置文件【properties】中的值(在运行环境变量里面的值)
@Value("${person.nickName}")private String nickName;
![]()
4.通过@PropertySource 加载配置文件,并进行注入
在xml 配置文件时,可以通过 context :property-placeholder标签,引入配置文件。
<context:property-placeholder location="classpath:person.properties"/>
1.在注解开发中,可使用 @PropertySource 加载外部配置文件
@PropertySource(value={"classpath:/person.properties"})
2.创建属性文件 person.properties
即可通过@Value + ${}获取到配置的文件的值,或使用容器的 getEnvironment()方法进行调用 getProperty( "person.nickName" );获取配置文件中的内容。
ConfigurableEnvironment environment = applicationContext.getEnvironment();String property = environment.getProperty("person.nickName");System.out.println(property);
![]()
5.拓展@Value 、@PropertySource
@Value 静态变量赋值
在处理静态变量时候,使用上面的@Value的用法是无法获取到配置文件中的数据的,只能获取到null,所以要进行如下更改。
@PropertySource注解的地址可以是以下两种:
classpath路径:"classpath:/com/myco/app.properties"
文件对应路径:"file:/path/to/file"
-END-
![]()
可以关注我的公众号,免费获取价值1980元学习资料