首页 文章 精选 留言 我的

精选列表

搜索[Android],共10000篇文章
优秀的个人博客,低调大师

Android -- DiskLruCache

DiskLruCache 创建一个磁盘缓存对象: public static DiskLruCache open(File directory, int appVersion, int valueCount, long maxSize); open()方法接收四个参数,第一个参数是数据的缓存文件地址,第二个参数是当前应用程序的版本号,第三个参数是同一个key可以对应多少个缓存文件,一般都是传1,第四个参数是最多可以缓存多少字节的数据。 //创建磁盘缓存文件,首选sdcard,如果sdcard没有挂载或者没有sdcard则获取应用默认的cache目录 public static File getDiskCacheDir(Context context, String uniqueName) { // Check if media is mounted or storage is built-in, if so, try and use external cache dir // otherwise use internal cache dir final String cachePath = Environment.MEDIA_MOUNTED.equals(Environment.getExternalStorageState()) || !isExternalStorageRemovable() ? getExternalCacheDir(context).getPath() : context.getCacheDir().getPath(); return new File(cachePath + File.separator + uniqueName); } 获取软件版本号 public int getAppVersion(Context context) { try { PackageInfo packageInfo = context.getPackageManager().getPackageInfo(context.getPackageName(), 0); return packageInfo.versionCode; } catch (NameNotFoundException e) { e.printStackTrace(); } return 1; } Java DiskLruCache mDiskLruCache = null; try { File cacheDir = getDiskCacheDir(context, "thumbnails"); if (!cacheDir.exists()) { cacheDir.mkdirs(); } mDiskLruCache = DiskLruCache.open(cacheDir, getAppVersion(context), 1, 10 * 1024 * 1024); } catch (IOException e) { e.printStackTrace(); } 磁盘缓存 //添加缓存 public void addBitmapToCache(String key, Bitmap bitmap) { // Add to memory cache as before,把缓存放到内存缓存中 if (getBitmapFromMemCache(key) == null) { mMemoryCache.put(key, bitmap); } // Also add to disk cache,把缓存放入磁盘缓存 synchronized (mDiskCacheLock) { if (mDiskLruCache != null && mDiskLruCache.get(key) == null) { mDiskLruCache.put(key, bitmap); } } } //获取缓存 public Bitmap getBitmapFromDiskCache(String key) { synchronized (mDiskCacheLock) { // Wait while disk cache is started from background thread while (mDiskCacheStarting) { try { mDiskCacheLock.wait(); } catch (InterruptedException e) {} } if (mDiskLruCache != null) { return mDiskLruCache.get(key); } } return null; } 总结 以上是磁盘缓存的创建和使用方法。在实际操作中内存缓存和磁盘缓存是配合起来使用的,一般先从内存缓存中读取数据,如果没有再从磁盘缓存中读取。 本文转自我爱物联网博客园博客,原文链接:http://www.cnblogs.com/yydcdut/p/4660669.html,如需转载请自行联系原作者

优秀的个人博客,低调大师

Android -- AudioPlayer

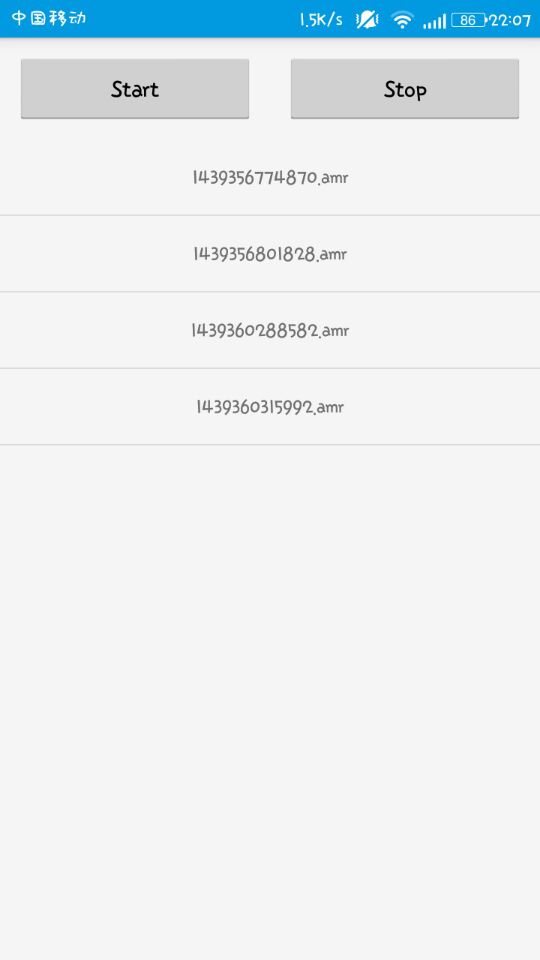
AudioPlayer 主要是实现边录边播(AudioRecord+AudioTrack)以及对音频的实时处理(如会说话的汤姆猫、语音) 优点:语音的实时处理,可以用代码实现各种音频的封装 缺点:输出是PCM语音数据,如果保存成音频文件,是不能够被播放器播放的,所以必须先写代码实现数据编码以及压缩 示例: 使用AudioRecord类录音,并实现WAV格式封装。录音20s,输出的音频文件大概为3.5M左右(已写测试代码) Demo public class SoundActivity extends Activity implements AdapterView.OnItemClickListener , MediaPlayer.OnCompletionListener { public static final String DIR = Environment.getExternalStorageDirectory().getAbsolutePath() + File.separator + "1122" + File.separator; private ListView mListView; private SoundAdapter mAdapter; private MediaPlayer mMediaPlayer; @Override protected void onCreate(Bundle savedInstanceState) { super.onCreate(savedInstanceState); setContentView(R.layout.activity_sound); mListView = (ListView) findViewById(R.id.lv_sound); mListView.setOnItemClickListener(this); initListView(); initMediaPlayer(); } private void initMediaPlayer() { mMediaPlayer = new MediaPlayer(); mMediaPlayer.setOnCompletionListener(this); } private void initListView() { mAdapter = new SoundAdapter(SoundActivity.this, DIR); mListView.setAdapter(mAdapter); } @Override public void onItemClick(AdapterView<?> parent, View view, int position, long id) { String fileName = (String) mAdapter.getItem(position); String file = DIR + fileName; try { if (mMediaPlayer.isPlaying()) { mMediaPlayer.stop(); } try { Thread.sleep(500); } catch (InterruptedException e) { e.printStackTrace(); } mMediaPlayer.reset(); mMediaPlayer.setDataSource(file); mMediaPlayer.prepare(); mMediaPlayer.start(); } catch (IOException e) { e.printStackTrace(); } } @Override public void onCompletion(MediaPlayer mp) { mMediaPlayer.reset(); } @Override protected void onDestroy() { super.onDestroy(); mMediaPlayer.release(); } public class SoundAdapter extends BaseAdapter { private Context mContext; private File mDir; private int mTotalNumber = 0; private List<String> mFileNameList; public SoundAdapter(Context context, String dirPath) { mContext = context; mDir = new File(dirPath); mTotalNumber = mDir.list().length; mFileNameList = Arrays.asList(mDir.list()); } @Override public int getCount() { return mTotalNumber; } @Override public Object getItem(int position) { return mFileNameList.get(position); } @Override public long getItemId(int position) { return position; } @Override public View getView(int position, View convertView, ViewGroup parent) { ViewHolder vh; if (convertView == null) { vh = new ViewHolder(); convertView = LayoutInflater.from(mContext).inflate(R.layout.item, null); vh.textView = (TextView) convertView.findViewById(R.id.text_view); convertView.setTag(vh); } else { vh = (ViewHolder) convertView.getTag(); } vh.textView.setText(mFileNameList.get(position)); return convertView; } class ViewHolder { TextView textView; } @Override public void notifyDataSetChanged() { mTotalNumber = mDir.list().length; mFileNameList = Arrays.asList(mDir.list()); super.notifyDataSetChanged(); } } 截图 本文转自我爱物联网博客园博客,原文链接:http://www.cnblogs.com/yydcdut/p/4725728.html,如需转载请自行联系原作者

优秀的个人博客,低调大师

Android -- Annotation

Override Annotation @Override public void onCreate(Bundle savedInstanceState){}; 概念 An annotation is a form of metadata, that can be added to Java source code. Classes, methods, variables, parameters and packages may be annotated. Annotations have no direct effect on the operation of the code they annotate. 分类 标准 Annotation Override, Deprecated, SuppressWarnings 元 Annotation @Retention, @Target, @Inherited, @Documented 自定义 Annotation 自定义 Annotation 表示自己根据需要定义的 Annotation,定义时需要用到上面的元 Annotation。 自定义 调用 @DBTableY(name = "YYD__DB") public class DB { @DBColumnY(name = "column11xx") public String column1; @DBColumnY(name = "column22xx") public String column2; } 定义 @Retention(RetentionPolicy.RUNTIME) @Target(ElementType.TYPE) public @interface DBTableY { String name() default "YUYIDONG11"; } @Retention(RetentionPolicy.RUNTIME) @Target({ElementType.FIELD}) public @interface DBColumnY { String name() default "YUYIDONG"; } 通过 @interface 定义,注解名即为自定义注解名 注解配置参数名为注解类的方法名,且: a. 所有方法没有方法体,没有参数没有修饰符,实际只允许 public & abstract 修饰符,默认为 public ,不允许抛异常 b. 方法返回值只能是基本类型,String, Class, annotation, enumeration 或者是他们的一维数组 c. 若只有一个默认属性,可直接用 value() 函数。一个属性都没有表示该 Annotation 为 Mark Annotation 可以加 default 表示默认值 元 Annotation @Documented 是否会保存到 Javadoc 文档中 @Retention 保留时间,可选值 SOURCE(源码时),CLASS(编译时),RUNTIME(运行时),默认为 CLASS,SOURCE 大都为 Mark Annotation,这类 Annotation 大都用来校验,比如 Override, SuppressWarnings 作用:表示需要在什么级别保存该注释信息,用于描述注解的生命周期(即:被描述的注解在什么范围内有效) 取值(RetentionPoicy)有: 1.SOURCE:在源文件中有效(即源文件保留) 2.CLASS:在class文件中有效(即class保留) 3.RUNTIME:在运行时有效(即运行时保留) ​ @Target 可以用来修饰哪些程序元素,如 TYPE, METHOD, CONSTRUCTOR, FIELD, PARAMETER 等,未标注则表示可修饰所有。 作用:用于描述注解的使用范围(即:被描述的注解可以用在什么地方) 取值(ElementType)有: 1.CONSTRUCTOR:用于描述构造器 2.FIELD:用于描述域 3.LOCAL_VARIABLE:用于描述局部变量 4.METHOD:用于描述方法 5.PACKAGE:用于描述包 6.PARAMETER:用于描述参数 7.TYPE:用于描述类、接口(包括注解类型) 或enum声明 ​ @Inherited 是否可以被继承,默认为 false 当 @Inherited annotation类型标注的annotation的Retention是RetentionPolicy.RUNTIME,则反射API增强了这种继承性。如果我们使用java.lang.reflect去查询一个 @Inherited annotation类型的annotation时,反射代码检查将展开工作:检查class和其父类,直到发现指定的annotation类型被发现,或者到达类继承结构的顶层。 注解 使用 @interface自定义注解时,自动继承了java.lang.annotation.Annotation接口,由编译程序自动完成其他细节。在定义注解时,不能继承其他的注解或接口。 @interface用来声明一个注解,其中的每一个方法实际上是声明了一个配置参数。方法的名称就是参数的名称,返回值类型就是参数的类型(返回值类型只能是基本类型、Class、String、enum)。可以通过default来声明参数的默认值。 public @interface 注解名 {定义体} 注解参数的可支持数据类型: 1.所有基本数据类型(int,float,boolean,byte,double,char,long,short) 2.String类型 3.Class类型 4.enum类型 5.Annotation类型 6.以上所有类型的数组 解析 运行时 Annotation 解析 运行时 Annotation 指 @Retention 为 RUNTIME 的 Annotation method.getAnnotation(AnnotationName.class); method.getAnnotations(); method.isAnnotationPresent(AnnotationName.class); getAnnotation(AnnotationName.class) 表示得到该 Target 某个 Annotation 的信息,因为一个 Target 可以被多个 Annotation 修饰 getAnnotations() 则表示得到该 Target 所有 Annotation isAnnotationPresent(AnnotationName.class) 表示该 Target 是否被某个 Annotation 修饰 Class clazz = DB.class; if (clazz.isAnnotationPresent(DBTableY.class)) { DBTableY dbTableY = (DBTableY) clazz.getAnnotation(DBTableY.class); Log.i("yyd", "dbTableY.name()--->" + dbTableY.name()); Field[] fields = clazz.getFields(); for (Field field : fields) { DBColumnY dbColumnY = field.getAnnotation(DBColumnY.class); Log.i("yyd", "dbColumnY.name()--->" + dbColumnY.name()); Log.i("yyd", "field.getName()--->" + field.getName()); } } 编译时 Annotation 解析 编译时 Annotation 指 @Retention 为 CLASS 的 Annotation,甴编译器自动解析。需要做的 自定义类集成自 AbstractProcessor 重写其中的 process 函数 编译器在编译时自动查找所有继承自 AbstractProcessor 的类,然后调用他们的 process 方法去处理。 SupportedAnnotationTypes({ "com.yydcdut.test.annotation.DBColumnY" }) public class DBColumnProcessor extends AbstractProcessor { @Override public boolean process(Set<? extends TypeElement> annotations, RoundEnvironment env) { for (TypeElement te : annotations) { for (Element element : env.getElementsAnnotatedWith(te)) { DBColumnY dbColumnY = element.getAnnotation(DBColumnY.class); Log.i("yyd",element.getEnclosingElement().toString()); } } return false; } } SupportedAnnotationTypes 表示这个 Processor 要处理的 Annotation 名字。 process 函数中参数 annotations 表示待处理的 Annotations,参数 env 表示当前或是之前的运行环境。 process 函数返回值表示这组 annotations 是否被这个 Processor 接受,如果接受后续子的 rocessor 不会再对这个 Annotations 进行处理。 我是天王盖地虎的分割线 本文转自我爱物联网博客园博客,原文链接:http://www.cnblogs.com/yydcdut/p/4646454.html如需转载请自行联系原作者

优秀的个人博客,低调大师

Android -- onAttachedToWindow()

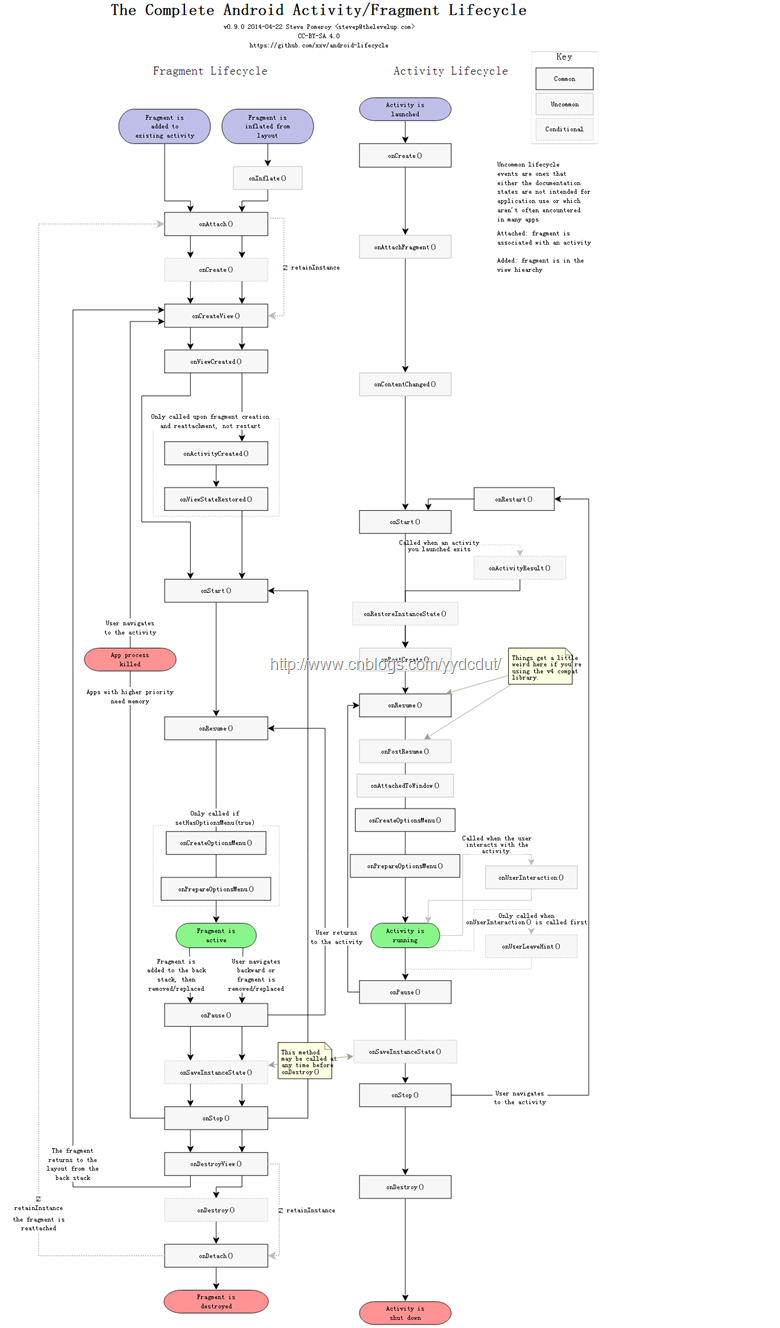
onAttachedToWindow在Activity生命周期中的位置 放大招: onAttachedToWindow不能在onCreate中哟~ View view = getWindow().getDecorView(); WindowManager.LayoutParams lp = (WindowManager.LayoutParams)view.getLayoutParams(); lp.gravity = Gravity.CENTER; lp.width = (dm.widthPixels * 4) / 5; lp.height = (dm.widthPixels * 4) / 5; getWindowManager().updateViewLayout(view,lp); 放到onCreate中进行测试,结果在lp.gravity = Gravity.CENTER;这行报了空指针异常,所以view.getLayoutParams()获取的LayoutParams是空。 public final class ActivityThread { ...... final void handleResumeActivity(IBinder token, boolean clearHide, boolean isForward) { ...... ActivityClientRecord r = performResumeActivity(token, clearHide); if (r != null) { final Activity a = r.activity; ...... // If the window hasn't yet been added to the window manager, // and this guy didn't finish itself or start another activity, // then go ahead and add the window. boolean willBeVisible = !a.mStartedActivity; if (!willBeVisible) { try { willBeVisible = ActivityManagerNative.getDefault().willActivityBeVisible( a.getActivityToken()); } catch (RemoteException e) { } } if (r.window == null && !a.mFinished && willBeVisible) { r.window = r.activity.getWindow(); View decor = r.window.getDecorView(); decor.setVisibility(View.INVISIBLE); ViewManager wm = a.getWindowManager(); WindowManager.LayoutParams l = r.window.getAttributes(); a.mDecor = decor; l.type = WindowManager.LayoutParams.TYPE_BASE_APPLICATION; ...... if (a.mVisibleFromClient) { a.mWindowAdded = true; wm.addView(decor, l); } } ...... } ...... } ...... } 原来在ActivityThread执行handleResumeActivity时就会为PhoneWindow(r.activity.getWindow)中的DecorView设置LayoutParam,并且通过源码发现handleResumeActivity函数首先会执行performResumeActivity,此时会调用Activity的onResume()生命周期函数,这时问题就比较清晰了,看来只要在Activity的onResume生命周期后就能获取DecorView的LayoutParam,进而可以设置高度和宽度了。根据上面贴出的生命周期图,onResume()后面是onAttachedToWindow(),并且onAttachedToWindow只会调用一次,不会受用户操作行为影响。所以在onAttachedToWindow中进行窗口尺寸的修改再合适不过了。 干货 onAttachedToWindow运行在onResume之后; DecorView的LayoutParams是在ActivityThread的handleResumeActivity中设置的,并且该函数会调用Activity的onResume生命周期,所以在onResume之后可以设置窗体尺寸; 我是天王盖地虎的分割线 本文转自我爱物联网博客园博客,原文链接:http://www.cnblogs.com/yydcdut/p/4471984.html,如需转载请自行联系原作者

优秀的个人博客,低调大师

Android -- isInEditMode

解释 Indicates whether this View is currently in edit mode. A View is usually in edit mode when displayed within a developer tool. For instance, if this View is being drawn by a visual user interface builder, this method should return true. Subclasses should check the return value of this method to provide different behaviors if their normal behavior might interfere with the host environment. For instance: the class spawns a thread in its constructor, the drawing code relies on device-specific features, etc. This method is usually checked in the drawing code of custom widgets. 如果在自定义控件的构造函数或者其他绘制相关地方使用系统依赖的代码,会导致可视化编辑器无法报错并提示:Use View.isInEditMode() in your custom views to skip code when shown inEclipse code public class LockRelativeLayout extends RelativeLayout { private Handler mainHandler = null; //与主Activity通信的Handler对象 public LockRelativeLayout(Context context, AttributeSet attrs) { super(context, attrs, 0); mContext = context; if (isInEditMode()) { return; } mainHandler = ((MainActivity)mContext).getMHandler(); } } 如果不加上if (isInEditMode()) { return; },标红处代码会导致可视化编辑报错 我是天王盖地虎的分割线 本文转自我爱物联网博客园博客,原文链接:http://www.cnblogs.com/yydcdut/p/4456722.html,如需转载请自行联系原作者

资源下载

更多资源
Mario

Mario

马里奥是站在游戏界顶峰的超人气多面角色。马里奥靠吃蘑菇成长,特征是大鼻子、头戴帽子、身穿背带裤,还留着胡子。与他的双胞胎兄弟路易基一起,长年担任任天堂的招牌角色。

腾讯云软件源

腾讯云软件源

为解决软件依赖安装时官方源访问速度慢的问题,腾讯云为一些软件搭建了缓存服务。您可以通过使用腾讯云软件源站来提升依赖包的安装速度。为了方便用户自由搭建服务架构,目前腾讯云软件源站支持公网访问和内网访问。

Nacos

Nacos

Nacos /nɑ:kəʊs/ 是 Dynamic Naming and Configuration Service 的首字母简称,一个易于构建 AI Agent 应用的动态服务发现、配置管理和AI智能体管理平台。Nacos 致力于帮助您发现、配置和管理微服务及AI智能体应用。Nacos 提供了一组简单易用的特性集,帮助您快速实现动态服务发现、服务配置、服务元数据、流量管理。Nacos 帮助您更敏捷和容易地构建、交付和管理微服务平台。

WebStorm

WebStorm

WebStorm 是jetbrains公司旗下一款JavaScript 开发工具。目前已经被广大中国JS开发者誉为“Web前端开发神器”、“最强大的HTML5编辑器”、“最智能的JavaScript IDE”等。与IntelliJ IDEA同源,继承了IntelliJ IDEA强大的JS部分的功能。

用户登录
用户注册