首页 文章 精选 留言 我的

精选列表

搜索[网站开发],共10000篇文章
优秀的个人博客,低调大师

DLNA&UPnP开发笔记(2)

1. UPnP协议组成 UPnP协议中,定义了两个主要的组件,一个是设备(Device),一个是控制点(Control Point)。这就是为什么很多UPnP协议栈的SDK的接口代码一般都主要由Device和Control Point构成。设备是在网络中可见的对象,而控制点在网络中不可见。 一个UPnP的设备(Device)是不能直接访问和控制另一个UPnP的设备(Device)的,对设备的访问和控制都必须通过控制点(Control Point)来代为完成。而控制点对设备的控制则主要是由设备定义的“服务”(Service)来实现。 设备(Device)需要向网络中广播自己的信息,并提供设备描述和服务(Service)描述,并发送设备事件消息. 控制点(Control Point)则是搜索设备,并使用其提供的服务(Service)访问和控制设备,同时监听设备事件消息。 2. 典型的UPnP AV应用架构 如图所示是一种典型的UPnP AV应用架构,它来自《UPnP-av-AVArchitecture》。在一个典型的UPnP应用中,有三个主体,一个服务器(MediaServer),一个播放器(MediaRender),以及一个控制点(Control Point)。 服务器(MediaServer)主要负责提供多媒体文件的浏览和控制。 播放器(MediaRender)主要负责提供播放和渲染。 控制点(Control Point)则控制整个播放过程。 它们三个在物理上可以是同一个设备,当然,也可以在不同的设备上。 对应到UPnP协议组件的话,“MediaServer”和“MediaRnederer”都属于UPnP的Device。 “ContentDirectory”、“ConnectionManager”、“AVTransport”、“RenderingControl”这些都属于UPnP设备所提供的服务(Service),通过这些服务描述,Control Point就知道该如何访问和控制设备了。 3. UPnP的设备描述和服务描述 UPnP的设备(Device)是通过广播包来通知局域网中的控制点自己的设备信息和服务的,而这些设备信息和服务都必须根据UPnP协议规定的XML文档格式来编写,UPnP提供了标准的模板可以参考,具体的文档地址: http://upnp.org/sdcps-and-certification/standards/sdcps/ 由这些文档我们可以看到,UPnP官网为我们定义了12种设备,在每种设备的文档中详细地定义了设备描述XML如何编写,定义了每种设备需要实现哪些服务,每种服务的XML文档如何编写。 到这里,我们其实可以看到,实现一个上述的UPnP AV应用也并没有那么可怕,一切都是有章可循的,我们需要做的就是熟读协议所定义了一系列文档。 本文转自 Jhuster 51CTO博客,原文链接:http://blog.51cto.com/ticktick/1637727,如需转载请自行联系原作者

优秀的个人博客,低调大师

Android开发实践:利用ProGuard进行代码混淆

由于Android的代码大都是Java代码,所以挺容易被反编译的,好在Android ADT为我们集成了混淆代码的工具,一来可以混淆我们的代码,让程序被反编译后基本看不懂,另外还能起到代码优化的作用。发布项目前,建议打开Android的代码混淆功能。 Android ADT主要通过ProGuard工具来提供代码混淆,网上也有挺多博客文章讲这个的,但感觉很多都介绍得太过于复杂,这里我就以问答的方式来更加简洁地介绍下ProGuard吧。 1. ProGuard是什么 ProGuard是一个工具,用来混淆和优化Java代码。 工作方式:移除无效的代码,将代码中的类名、函数名替换为晦涩难懂的名字。 注意,它只能混淆Java代码,Android工程中Native代码,资源文件(图片、xml),它是无法混淆的。 2. 如何开启ProGuard 修改Android工程根目录下的project.properties文件,把proguard.config=....这一行前面的注释“#”去掉。 这一行指定了系统默认的proguard配置文件,位于Android SDK/tools/proguard目录下。 当然,你也可以自己编写配置文件,但不建议这样做,因此系统默认的配置已经涵盖了许多通用的细节,如果你还有额外的配置,可以添加在 proguard-project.txt 文件中。 注意: 只有在生成release版本的apk时,混淆配置才会起作用,debug版本的apk不会进行混淆。 3. 哪些内容需要手动配置 系统默认的配置已经涵盖了大部分的内容,但是如果你的工程中有如下内容,则需要手动添加配置到proguard-project.txt文件中。 (1) 只在 AndroidManifest.xml 引用的类 (2) 通过JNI回调方式被调用的函数 (3) 运行时动态调用的函数或者成员变量 (4) 当然,如果你不确定哪些需要手动配置,可以以默认的配置生成程序,当运行中发现ClassNotFoundException异常时,即可找到哪个类不该被混淆。 4. 手动配置的规则 手动添加的配置,一般以“-keep”开头,常用的配置命令分别示例如下: 假设Android工程中有一个接口和一个类: 1 2 3 4 5 6 7 8 9 10 11 12 13 14 15 16 17 18 19 20 21 22 23 24 25 26 27 28 29 package com.ticktick.example; public interface TestInterface{ public void test(); } public class Test{ private StringmTestString; private final int mMinValue; private final int mMaxValue; public Test( int min, int max){ mMinValue=min; mMaxValue=max; } public int getMinValue(){ return mMinValue; } public int getMaxValue(){ return mMaxValue; } public void setTestString(StringtestStr){ mTestString=testStr; } } (1) 不混淆某个类的构造函数 例如:不混淆Test类的构造函数: 1 2 3 4 -keepclassmembers class com.ticktick.example.Test{ public <init>( int , int ); } (2) 不混淆某个包所有的类或指定的类 例如,不混淆package com.ticktick.example下的所有类/接口 1 -keep class com.ticktick.example.**{*;} 例如,不混淆com.ticktick.example.Test类: 1 -keep class com.ticktick.example.Test{*;} 如果希望不混淆某个接口,则把上述命令中的class替换为interface即可。 (3) 不混淆某个类的特定的函数 例如:不混淆com.ticktick.example.Test类的setTestString函数: 1 2 3 4 -keepclassmembers class com.ticktick.example.Test{ public void setTestString(java.lang.String); } (4) 不混淆某个类的子类,某个接口的实现 例如:不混淆com.ticktick.example.Test类的子类 1 -keep public class * extends com.ticktick.example.Test 例如:不混淆com.ticktick.example.TestInterface的实现 1 2 3 -keep class *implementscom.ticktick.example.TestInterface{ public static final com.ticktick.example.TestInterface$Creator*; } (5) 添加第三方依赖包 例如:添加android-support-v4.jar依赖包 1 2 3 4 5 6 -libraryjars libs/android-support-v4.jar -dontwarn android.support.v4.**{*;} -keep class android.support.v4.**{*;} -keep interface android.support.v4.**{*;} 注意: 需要添加dontwarn,因为默认情况下proguard会检查每一个引用是否正确,但是第三方库里往往有些不会用到的类,没有正确引用,所以如果不配置的话,系统会报错。 5. 混淆后的调试信息解析 当代码混淆之后,输出的Log信息也会带有混淆内容,比如函数名和类名会被替换为晦涩难懂的名字,而与代码中的不一致。 因此,ProGuard工具还提供了恢复混淆内容的工具和文件。 当你开启了ProGuard混淆后,每次生成release版的apk时,Andriod工程的根目录下会对应生成一个proguard文件夹,该文件夹下的mapping.txt文件记录了混淆后的名字与混淆前的名字的对应关系,通过该文件,我们反向得到恢复后的Log信息。 假设Log文件名为log.txt,则恢复混淆的命令为: 1 $retrace.sh-verbosemapping.txtlog.txt 注1:retrace.sh命令位于 <sdk_root>/tools/proguard/目录下 注2:你需要保存每一个release版本的mapping.txt,因为每一次release的混淆结果和映射关系都不一样。 本文转自 Jhuster 51CTO博客,原文链接:http://blog.51cto.com/ticktick/1413066,如需转载请自行联系原作者

优秀的个人博客,低调大师

Android开发实践:为什么要继承onMeasure()

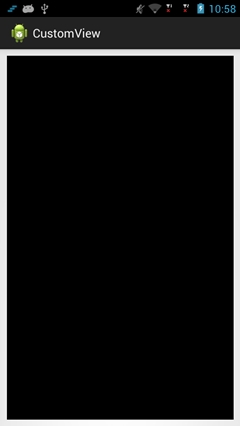
首先,我们写一个自定义View,直接调用系统默认的onMeasure函数,看看会是怎样的现象: 1 2 3 4 5 6 7 8 9 10 11 12 13 14 15 16 17 18 19 20 21 22 package com.titcktick.customview; import android.content.Context; import android.util.AttributeSet; import android.view.View; public class CustomView extends View{ public CustomView(Contextcontext){ super (context); } public CustomView(Contextcontext,AttributeSetattrs){ super (context,attrs); } @Override protected void onMeasure( int widthMeasureSpec, int heightMeasureSpec){ super .onMeasure(widthMeasureSpec,heightMeasureSpec); } } 1. 父控件使用match_parent,CustomView使用match_parent 1 2 3 4 5 6 7 8 9 10 11 12 13 <LinearLayoutxmlns:android= "http://schemas.android.com/apk/res/android" xmlns:tools= "http://schemas.android.com/tools" android:layout_width= "match_parent" android:layout_height= "match_parent" android:orientation= "vertical" > <com.titcktick.customview.CustomView android:layout_width= "match_parent" android:layout_height= "match_parent" android:layout_margin= "10dp" android:background= "@android:color/black" /> </LinearLayout> 这里加了10dp的margin并且把View的背景设置为了黑色,是为了方便辨别我们的CustomView,效果如下: 我们可以看到,默认情况下,如果父控件和CustomView都使用match_parent,则CustomView会充满父控件。 2. 父控件使用match_parent,CustomView使用wrap_content 把layout文件中,CustomView的layout_width/layout_height替换为wrap_content,你会发现,结果依然是充满父控件。 3. 父控件使用match_parent,CustomView使用固定的值 把layout文件中,CustomView的layout_width/layout_height替换为50dp,你会发现,CustomView的显示结果为50dpx50dp,如图所示: 4. 父控件使用固定的值,CustomView使用match_parent或者wrap_content 那么,如果把父控件的layout_width/layout_height替换为50dp,CustomView设置为match_parent或者wrap_content,你会发现,CustomView的显示结果也是为50dpx50 dp。 5 结论 如果自定义的CustomView采用默认的onMeasure函数,行为如下: (1) CustomView设置为 match_parent 或者 wrap_content 没有任何区别,其显示大小由父控件决定,它会填充满整个父控件的空间。 (2) CustomView设置为固定的值,则其显示大小为该设定的值。 如果你的自定义控件的大小计算就是跟系统默认的行为一致的话,那么你就不需要重写onMeasure函数了。 6. 怎样编写onMeasure函数 系统默认的onMeasure函数的行为就讨论到这,下面也说说怎样重写onMeasure函数,以及onMeasure函数的基本原理,关键部分在代码中以注释的形式给出了,仅供参考: 1 2 3 4 5 6 7 8 9 10 11 12 13 14 15 16 17 18 19 20 21 22 23 24 25 26 27 28 29 30 31 32 33 34 35 36 37 38 39 40 41 42 43 44 45 46 47 48 49 50 51 52 53 54 package com.titcktick.customview; import android.content.Context; import android.util.AttributeSet; import android.view.View; public class CustomView extends View{ private static final int DEFAULT_VIEW_WIDTH= 100 ; private static final int DEFAULT_VIEW_HEIGHT= 100 ; public CustomView(Contextcontext){ super (context); } public CustomView(Contextcontext,AttributeSetattrs){ super (context,attrs); } @Override protected void onMeasure( int widthMeasureSpec, int heightMeasureSpec){ int width=measureDimension(DEFAULT_VIEW_WIDTH,widthMeasureSpec); int height=measureDimension(DEFAULT_VIEW_HEIGHT,heightMeasureSpec); setMeasuredDimension(width,height); } protected int measureDimension( int defaultSize, int measureSpec){ int result=defaultSize; int specMode=MeasureSpec.getMode(measureSpec); int specSize=MeasureSpec.getSize(measureSpec); //1.layout给出了确定的值,比如:100dp //2.layout使用的是match_parent,但父控件的size已经可以确定了,比如设置的是具体的值或者match_parent if (specMode==MeasureSpec.EXACTLY){ result=specSize; //建议:result直接使用确定值 } //1.layout使用的是wrap_content //2.layout使用的是match_parent,但父控件使用的是确定的值或者wrap_content else if (specMode==MeasureSpec.AT_MOST){ result=Math.min(defaultSize,specSize); //建议:result不能大于specSize } //UNSPECIFIED,没有任何限制,所以可以设置任何大小 //多半出现在自定义的父控件的情况下,期望由自控件自行决定大小 else { result=defaultSize; } return result; } } 这样重载了onMeasure函数之后,你会发现,当CustomView使用match_parent的时候,它会占满整个父控件,而当CustomView使用wrap_content的时候,它的大小则是代码中定义的默认大小100x100像素。当然,你也可以根据自己的需求改写measureDimension()的实现。 本文转自 Jhuster 51CTO博客,原文链接:http://blog.51cto.com/ticktick/1540134,如需转载请自行联系原作者

优秀的个人博客,低调大师

iOS开发-UIWebView加载本地和网络数据

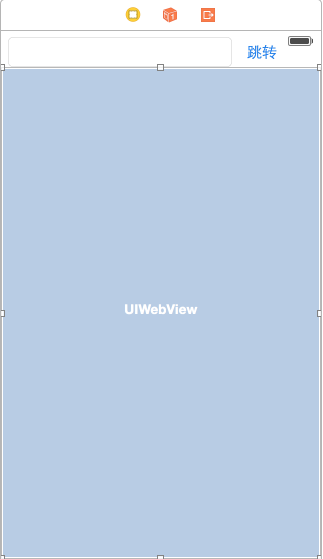
UIWebView是内置的浏览器控件,可以用它来浏览网页、打开文档,关于浏览网页榜样可以参考UC,手机必备浏览器,至于文档浏览的手机很多图书阅读软件,UIWebView是一个混合体,具体的功能控件内置的,实现一些基本的功能。UIWebView可以查看Html网页,pdf文件,docx文件,txt文件文件,系统自带的Safari就是UIWebView实现的。 基础布局 页面布局很简单就是一个文本框,一个按钮,一个UIWebView,页面布局如下: 如果想简单一点的话,其实用UIWebView也行,不过需要先准备一些文本数据,具体如下: 数据加载 ①直接拼接Html,用UIWebView显示,viewDidLoad中添加代码: 1 2 3 //直接加载Html字符串 NSString *htmlStr=@ "<html><head><title>Html加载</title></head><body>HtmlDemo-FlyElephant</body></html>" ; [ self .webView loadHTMLString:htmlStr baseURL: nil ]; ②加载本地的Html网页,Book.html中代码: 1 2 3 4 5 6 7 8 9 10 <!DOCTYPE html> <html> <head> <meta charset= "UTF-8" > <title>书籍</title> </head> <body> 少年维特之烦恼-歌德 </body> </html> viewDidLoad代码: 1 2 3 NSString *filePath = [[ NSBundle mainBundle]pathForResource:@ "Book" ofType:@ "html" ]; NSString *htmlString = [ NSString stringWithContentsOfFile:filePath encoding: NSUTF8StringEncoding error: nil ]; [ self .webView loadHTMLString:htmlString baseURL:[ NSURL URLWithString:filePath]]; ③加载本地的pdf文件,viewDidLoad代码: 1 2 3 4 5 NSURL *url = [[ NSBundle mainBundle]URLForResource:@ "Book.pdf" withExtension: nil ]; NSURLRequest *request = [ NSURLRequest requestWithURL:url]; [ self .webView loadRequest:request]; 加载pdf的第二种方式: 1 2 3 4 5 6 NSString *path = [[ NSBundle mainBundle]pathForResource:@ "Book.pdf" ofType: nil ]; //以二进制的形式加载数据 NSData *data = [ NSData dataWithContentsOfFile:path]; [ self .webView loadData:data MIMEType:@ "application/pdf" textEncodingName:@ "UTF-8" baseURL: nil ]; ④加载本地txt文件,viewDidLoad代码如下: 1 2 3 4 //加载txt NSURL *url = [[ NSBundle mainBundle]URLForResource:@ "Book.txt" withExtension: nil ]; //设置Url [ self .webView loadRequest:[ NSURLRequest requestWithURL:url]]; ⑤加载Word,viewDidLoad代码如下: 1 2 3 4 //加载Word NSURL *url = [[ NSBundle mainBundle]URLForResource:@ "Book.docx" withExtension: nil ]; //设置加载Url [ self .webView loadRequest:[ NSURLRequest requestWithURL:url]]; ⑥加载网络数据,跳转按钮事件中实现如下: 1 2 NSURLRequest *request =[ NSURLRequest requestWithURL:[ NSURL URLWithString: self .urlText.text]]; [ self .webView loadRequest:request]; ⑦设置委托,在不同的阶段处理数据,实现UIWebViewDelegate,设置自己本身为委托对象; 1 [ self .webView setDelegate: self ]; 常用的三个方法: 1 2 3 4 5 6 7 8 9 10 11 12 //加载开始 - ( void )webViewDidStartLoad:(UIWebView *)webView{ NSLog (@ "加载开始的时候的方法调用" ); } //加载完成 -( void )webViewDidFinishLoad:(UIWebView *)webView{ NSLog (@ "加载完成的时候电脑方法调用" ); } //加载出错 - ( void )webView:(UIWebView *)webView didFailLoadWithError:( NSError *)error{ NSLog (@ "加载出错的时候的调用" ); } 本文转自Fly_Elephant博客园博客,原文链接:http://www.cnblogs.com/xiaofeixiang/p/4307573.html,如需转载请自行联系原作者

优秀的个人博客,低调大师

Android开发学习笔记:Spinner和AutoCompleteTextView浅析

一.Spinner的简介与创建 1.Spinner的简介 Spinner(下拉列表)是一个每次只能选择所有项中一项的控件,相当于Html中的下拉列表框。它的继承关系如下: java.lang.Object ↳ android.view.View ↳ android.view.ViewGroup ↳ android.widget.AdapterView<T extends android.widget.Adapter> ↳ android.widget.AbsSpinner ↳ android.widget.Spinner Spinner常用的XML属性: 属性名称 描述 android:prompt 该提示在下拉列表对话框显示时显示。(译者注:对话框的标题: 2.创建使用Spinner的步骤如下: ①需要在布局中定时Spinner组件,然后向Spinner添加需要选择的数据 ②设置事件监听器setOnItemSelectedListener( )并实现onItemSelected( ) 3.Spinner添加数据的两种方法: ①在Java代码中载入列表数据 具体的例子如下: MainActivity.java packagecom.android.spinner; importandroid.app.Activity; importandroid.os.Bundle; importandroid.view.View; importandroid.widget.AdapterView; importandroid.widget.ArrayAdapter; importandroid.widget.Spinner; importandroid.widget.TextView; publicclassMainActivityextendsActivity{ privatestaticfinalString[]province={"广东","广西","湖南","河南","福建"}; privateTextViewtext; privateSpinnerspinner; privateArrayAdapter<String>adapter; @Override publicvoidonCreate(BundlesavedInstanceState){ super.onCreate(savedInstanceState); setContentView(R.layout.main); text=(TextView)findViewById(R.id.text); spinner=(Spinner)findViewById(R.id.spinner); //将Spinner里面的可选择内容通过ArrayAdapter连接起来 adapter=newArrayAdapter<String>(this,android.R.layout.simple_spinner_item,province); //设置Spinner的样式 adapter.setDropDownViewResource(android.R.layout.simple_spinner_dropdown_item); //为对话框设置标题 //也可在XMl文件中通过“android:prompt”设置 spinner.setPrompt("你来自哪个省"); //为Spinner设置适配器 spinner.setAdapter(adapter); //添加Spinner事件监听 spinner.setOnItemSelectedListener(newSpinner.OnItemSelectedListener(){ @Override publicvoidonItemSelected(AdapterView<?>arg0,Viewarg1, intarg2,longarg3){ //TODOAuto-generatedmethodstub text.setText("你所在的城市是:"+province[arg2]); //设置显示当前选择的项 arg0.setVisibility(View.VISIBLE); } @Override publicvoidonNothingSelected(AdapterView<?>arg0){ //TODOAuto-generatedmethodstub } }); } } main.xml <?xmlversion="1.0"encoding="utf-8"?> <LinearLayoutxmlns:android="http://schemas.android.com/apk/res/android" android:orientation="vertical" android:padding="10dip" android:layout_width="fill_parent" android:layout_height="wrap_content" > <TextView android:id="@+id/text" android:layout_width="fill_parent" android:layout_height="wrap_content" android:layout_marginTop="10dip" android:text="@string/planet_prompt" /> <Spinner android:id="@+id/spinner" android:layout_width="fill_parent" android:layout_height="wrap_content" /> </LinearLayout> strings.xml <?xmlversion="1.0"encoding="utf-8"?> <resources> <stringname="planet_prompt">你来自的省份是:</string> <stringname="app_name">测试Spinner</string> </resources> 效果图: ②在XML文件中定义列表的数据 具体的例子如下: MainActivity.java packagecom.android.spinner; importandroid.app.Activity; importandroid.os.Bundle; importandroid.view.View; importandroid.widget.AdapterView; importandroid.widget.AdapterView.OnItemSelectedListener; importandroid.widget.ArrayAdapter; importandroid.widget.Spinner; importandroid.widget.Toast; publicclassMainActivityextendsActivity{ @Override publicvoidonCreate(BundlesavedInstanceState){ super.onCreate(savedInstanceState); setContentView(R.layout.main); Spinnerspinner=(Spinner)findViewById(R.id.spinner); ArrayAdapter<CharSequence>adapter=ArrayAdapter.createFromResource( this,R.array.province, android.R.layout.simple_spinner_item); //调用setDropDownViewResource方法,以XML的方式定义下拉菜单要显示的样式 adapter.setDropDownViewResource(android.R.layout.simple_spinner_dropdown_item); //为spinner设置适配器 spinner.setAdapter(adapter); spinner.setOnItemSelectedListener(newMyOnItemSelectedListener()); } publicclassMyOnItemSelectedListenerimplementsOnItemSelectedListener{ publicvoidonItemSelected(AdapterView<?>parent,Viewview,intpos,longid){ Toast.makeText(parent.getContext(),"你来自的省份是:"+ parent.getItemAtPosition(pos).toString(),Toast.LENGTH_LONG).show(); } publicvoidonNothingSelected(AdapterView<?>parent){ //TODOAuto-generatedmethodstub } } } main.xml <?xmlversion="1.0"encoding="utf-8"?> <LinearLayoutxmlns:android="http://schemas.android.com/apk/res/android" android:orientation="vertical" android:padding="10dip" android:layout_width="fill_parent" android:layout_height="wrap_content" > <TextView android:id="@+id/text" android:layout_width="fill_parent" android:layout_height="wrap_content" android:layout_marginTop="10dip" android:text="@string/planet_prompt" /> <Spinner android:id="@+id/spinner" android:layout_width="fill_parent" android:layout_height="wrap_content" android:prompt="@string/planet_prompt" /> </LinearLayout> strings.xml <?xmlversion="1.0"encoding="utf-8"?> <resources> <stringname="planet_prompt">你来自的省份是</string> <stringname="app_name">测试Spinner</string> <string-arrayname="province"> <item>广东</item> <item>广西</item> <item>湖南</item> <item>河南</item> <item>福建</item> </string-array> </resources> 效果图: 二.AutoCompleteTextView简介 我们平常上网的时候经常会用到Google或百度,在输入框中输入类似”51CTO“,和51CTO相关的信息就会被列出来,供用户选择,非常方便。这种效果在Android中是用AutoCompleteTextView实现的。在AutoCompleteTextView中,主要是设置想显示资源的适配器(Adapter)。 AutoCompleteTextView有三个重要的方法clearListSelection():清除选中的列表项、dismissDropDown():如果存在关闭下拉菜单、getAdapter():获取适配器。 具体的例子如下: MainActivity.java packagecom.android.autocomplete; importandroid.app.Activity; importandroid.os.Bundle; importandroid.widget.ArrayAdapter; importandroid.widget.AutoCompleteTextView; publicclassMainActivityextendsActivity{ privateAutoCompleteTextViewatv; //创建字符串数组 privatestaticfinalString[]strs={"an","and","android","abc","abcdef"}; @Override publicvoidonCreate(BundlesavedInstanceState){ super.onCreate(savedInstanceState); setContentView(R.layout.main); atv=(AutoCompleteTextView)findViewById(R.id.AutoCompleteTextView1); //创建适配器 ArrayAdapter<String>adapter=newArrayAdapter<String>(this, android.R.layout.simple_dropdown_item_1line,strs); //为AutoCompleteTextView设置适配器 atv.setAdapter(adapter); } } main.xml <?xmlversion="1.0"encoding="utf-8"?> <LinearLayoutxmlns:android="http://schemas.android.com/apk/res/android" android:orientation="vertical" android:layout_width="fill_parent" android:layout_height="fill_parent" > <TextView android:layout_width="wrap_content" android:layout_height="wrap_content" android:text="自动完成文本框" /> <AutoCompleteTextView android:id="@+id/AutoCompleteTextView1" android:layout_width="fill_parent" android:layout_height="wrap_content" /> </LinearLayout> 效果图: 本文转自 lingdududu 51CTO博客,原文链接:http://blog.51cto.com/liangruijun/652801

优秀的个人博客,低调大师

Android开发学习笔记:手机震动控制浅析

Android系统中Vibrator对象负责对手机震动的处理,具体的实现方法: 1.获取振动器Vibrator的实例: Vibratorvibrator=(Vibrator)getSystemService(VIBRATOR_SERVICE); getSystemService(VIBRATOR_SERVICE):获得一个震动的服务 2.调用vibrate方法来产生震动: 只向vibrate()传递一个参数,这个参数用来指定振动的毫秒数 //震动5秒 vibrator.vibrate(5000); 向vibrate()方法传递多个参数 //等待1秒,震动2秒,等待1秒,震动3秒 long[]pattern={1000,2000,1000,3000}; //-1表示不重复,如果不是-1,比如改成1,表示从前面这个long数组的下标为1的元素开始重复. vibrator.vibrate(pattern,-1); 3.取消震动 vibrator.cancel(); 4.在AndroidManifest.xml文件添加权限 <uses-permissionandroid:name="android.permission.VIBRATE"/> 下面的实例包含了产生震动的两个方法 VibratorDemoActivity.java packagecom.lingdududu.test; importandroid.app.Activity; importandroid.os.Bundle; importandroid.os.Vibrator; importandroid.view.MotionEvent; /* *@authorlingdududu *当程序开始运行结束时,手机等待1秒就开始震动2秒,再等待1秒,开始震动3秒 *当我们点击手机屏幕,触发onTouchEvent事件,手机就开始震动1秒 */ publicclassVibratorDemoActivityextendsActivity{ @Override publicvoidonCreate(BundlesavedInstanceState){ super.onCreate(savedInstanceState); setContentView(R.layout.main); Vibratorvibrator=(Vibrator)getSystemService(VIBRATOR_SERVICE); long[]pattern={1000,2000,1000,3000};//OFF/ON/OFF/ON...... vibrator.vibrate(pattern,-1); } @Override publicbooleanonTouchEvent(MotionEventevent){ if(event.getAction()==MotionEvent.ACTION_MOVE){ Vibratorvibrator=(Vibrator)getSystemService(VIBRATOR_SERVICE); vibrator.vibrate(1000); } returnsuper.onTouchEvent(event); } } 注:记得在AndroidManifest.xml文件添加权限,还有程序要在真机上运行才能有震动的效果,模拟器上不支持震动的。 PS:我正在参加IT博客大赛,欢迎大家来投我一票的 http://blog.51cto.com/contest2011/3061169 本文转自 lingdududu 51CTO博客,原文链接:http://blog.51cto.com/liangruijun/724042

优秀的个人博客,低调大师

Android开发学习笔记:Notification和NotificationManager浅析

NotificationManager 获取NotificationManager String service = Context.NOTIFICATION_SERVICE; NotificationManager mNotificationManager =(NotificationManager)getSystemService(service); Notification //实例化Notification Notificationnotification=newNotification(); 3.设置Notification的属性 //设置显示图标,该图标会在状态栏显示 inticon=notification.icon=R.drawable.happy; //设置显示提示信息,该信息也在状态栏显示 StringtickerText="测试Notification"; //显示时间 longwhen=System.currentTimeMillis();notification.icon=icon; notification.tickerText=tickerText; notification.when=when; //也可以这样设置 Notificationnotification_2=newNotification(icon,tickerText,when) 调用setLatestEventInfo()方法在视图中设置图标和时间。 //实例化Intent Intentintent=newIntent(MainActivity.this,MainActivity.class); //获得PendingIntent PendingIntentpIntent=PendingIntent.getActivity(MainActivity.this,0,intent,0); //设置事件信息 notification.setLatestEventInfo(MainActivity.this,"Title","Content",pIntent); 4.发出通知 //Notification标示ID privatestaticfinalintID=1; //发出通知 mNotificationManager.notify(ID,n); 下面是具体的例子,在这个例子里定义了一个MainActivity发出广播通知,定义一个MyReceiver类继承Broadcasts接受通知,当接收完通知之后,启动一个SecondActivity,在SecondActivity类中通过Notification和NotificationManager来可视化显示广播通知。具体的步骤如下: MainActivity.java packagecom.android.notification; importandroid.app.Activity; importandroid.content.Intent; importandroid.os.Bundle; importandroid.view.View; importandroid.view.View.OnClickListener; importandroid.widget.Button; publicclassMainActivityextendsActivity{ //声明Button privateButtonbtn; //定义BroadcastReceiveraction privatestaticfinalStringMY_ACTION="com.android.notification.MY_ACTION"; @Override publicvoidonCreate(BundlesavedInstanceState){ super.onCreate(savedInstanceState); //设置当前布局视图 setContentView(R.layout.main); //实例化Button btn=(Button)findViewById(R.id.Button1); //添加事件监听器 btn.setOnClickListener(listener); } //创建事件监听器 privateOnClickListenerlistener=newOnClickListener(){ @Override publicvoidonClick(Viewv){ //实例化Intent Intentintent=newIntent(); //设置Intentaction属性 intent.setAction(MY_ACTION); //发起广播 sendBroadcast(intent); } }; } MyReceiver.java packagecom.android.notification; importandroid.content.BroadcastReceiver; importandroid.content.Context; importandroid.content.Intent; publicclassMyReceiverextendsBroadcastReceiver{ @Override publicvoidonReceive(Contextcontext,Intentintent){ //实例化Intent Intenti=newIntent(); //在新的任务中启动Activity i.setFlags(Intent.FLAG_ACTIVITY_NEW_TASK); //设置Intent启动的组件名称 i.setClass(context,SecondActivity.class); //启动Activity显示通知 context.startActivity(i); } } SecondActivity.java packagecom.android.notification; importandroid.app.Activity; importandroid.app.Notification; importandroid.app.NotificationManager; importandroid.app.PendingIntent; importandroid.content.Intent; importandroid.os.Bundle; importandroid.view.View; importandroid.view.View.OnClickListener; importandroid.widget.Button; publicclassSecondActivityextendsActivity{ //声明按钮 privateButtoncancelBtn; //声明Notification privateNotificationnotification; //声明NotificationManager privateNotificationManagermNotification; //Notification标示ID privatestaticfinalintID=1; @Override publicvoidonCreate(BundlesavedInstanceState){ super.onCreate(savedInstanceState); setContentView(R.layout.second); //实例化按钮 cancelBtn=(Button)findViewById(R.id.cancelButton2); //获得NotificationManager实例 Stringservice=NOTIFICATION_SERVICE; mNotification=(NotificationManager)getSystemService(service); //实例化Notification notification=newNotification(); //设置显示图标,该图标会在状态栏显示 inticon=notification.icon=android.R.drawable.stat_notify_chat; //设置显示提示信息,该信息也会在状态栏显示 StringtickerText="TestNotification"; //显示时间 longwhen=System.currentTimeMillis(); notification.icon=icon; notification.tickerText=tickerText; notification.when=when; //实例化Intent Intentintent=newIntent(this,MainActivity.class); //获得PendingIntent PendingIntentpi=PendingIntent.getActivity(this,0,intent,0); //设置事件信息 notification.setLatestEventInfo(this,"消息","HelloAndroid",pi); //发出通知 mNotification.notify(ID,notification); //为按钮添加监听器 cancelBtn.setOnClickListener(cancelListener); } //取消通知监听器 privateOnClickListenercancelListener=newOnClickListener(){ @Override publicvoidonClick(Viewv){ //取消通知 mNotification.cancel(ID); } }; } main.xml <?xmlversion="1.0"encoding="utf-8"?> <LinearLayoutxmlns:android="http://schemas.android.com/apk/res/android" android:orientation="vertical" android:layout_width="fill_parent" android:layout_height="fill_parent" > <Button android:text="发出广播通知" android:id="@+id/Button1" android:layout_width="wrap_content" android:layout_height="wrap_content" /> </LinearLayout> second.xml <?xmlversion="1.0"encoding="utf-8"?> <LinearLayoutxmlns:android="http://schemas.android.com/apk/res/android" android:orientation="vertical" android:layout_width="fill_parent" android:layout_height="fill_parent" > <TextView android:text="显示通知界面" android:id="@+id/TextView1" android:layout_width="wrap_content" android:layout_height="wrap_content" /> <Button android:text="取消通知" android:id="@+id/cancelButton2" android:layout_width="wrap_content" android:layout_height="wrap_content" /> </LinearLayout> 在AndroidManifest.xml文件中16~21加入对receiver,SecondActivity的声明 <?xmlversion="1.0"encoding="utf-8"?> <manifestxmlns:android="http://schemas.android.com/apk/res/android" package="com.android.notification" android:versionCode="1" android:versionName="1.0"> <uses-sdkandroid:minSdkVersion="10"/> <applicationandroid:icon="@drawable/icon"android:label="@string/app_name"> <activityandroid:name=".MainActivity" android:label="@string/app_name"> <intent-filter> <actionandroid:name="android.intent.action.MAIN"/> <categoryandroid:name="android.intent.category.LAUNCHER"/> </intent-filter> </activity> <receiverandroid:name="MyReceiver"> <intent-filter> <actionandroid:name="com.android.notification.MY_ACTION"/> </intent-filter> </receiver> <activityandroid:name="SecondActivity"/> </application> </manifest> 效果图: Notification丰富的提示方式: 声音提醒 ·使用默认声音 notification.defaults |= Notification.DEFAULT_SOUND; ·使用自定义声音 notification.sound = Uri.parse("file:///sdcard/notification/ringer.mp3"); ·注:如果定义了默认声音,那么自定义声音将被覆盖 振动提醒 ·使用默认振动 notification.defaults |= Notification.DEFAULT_VIBRATE; ·使用自定义振动 long[] vibrate = {0,100,200,300};notification.vibrate = vibrate; ·注:如果定义了默认振动,那么自定义振动将被覆盖 灯光闪烁提醒 ·使用默认闪烁 notification.defaults |= Notification.DEFAULT_LIGHTS; ·使用自定义闪烁 notification.ledARGB = 0xff00ff00;// LED灯的颜色,绿灯notification.ledOnMS = 300;// LED灯显示的毫秒数,300毫秒notification.ledOffMS = 1000;// LED灯关闭的毫秒数,1000毫秒notification.flags |= Notification.FLAG_SHOW_LIGHTS; // 必须加上这个标志 更多特性 可以通过 Notification 的相关字段或标志(flags)为提醒设置更多的特性。 ·FLAG_AUTO_CANCEL标志:当提醒被用户点击之后会自动被取消(cancel); ·FLAG_INSISTENT标志:在用户响应之前会一直重复提醒音; ·FLAG_ONGOING_EVENT标志:Add this to theflagsfield to group the notification under the "Ongoing" title in the Notifications window. ·FLAG_NO_CLEAR标志:当在提醒栏中点击“清除提醒”按钮时,该提醒将不会被清除; ·number字段:This value indicates the current number of events represented by the notification. The appropriate number is overlaid on top of the status bar icon. If you intend to use this field, then you must start with "1" when the Notification is first created. (If you change the value from zero to anything greater during an update, the number is not shown.) ·iconLevel字段:This value indicates the current level of aLevelListDrawablethat isused for the notification icon. You can animate the icon in the status bar by changingthis value to correlate with the drawable's defined in a LevelListDrawable. ·contentView字段:To define your own layout for the expanded message, instantiate a RemoteViews object and pass it to thecontentViewfield of your Notification. Pass the PendingIntent to thecontentIntentfield. 本文转自 lingdududu 51CTO博客,原文链接: http://blog.51cto.com/liangruijun/657502


资源下载

更多资源
Mario

Mario

马里奥是站在游戏界顶峰的超人气多面角色。马里奥靠吃蘑菇成长,特征是大鼻子、头戴帽子、身穿背带裤,还留着胡子。与他的双胞胎兄弟路易基一起,长年担任任天堂的招牌角色。

Spring

Spring

Spring框架(Spring Framework)是由Rod Johnson于2002年提出的开源Java企业级应用框架,旨在通过使用JavaBean替代传统EJB实现方式降低企业级编程开发的复杂性。该框架基于简单性、可测试性和松耦合性设计理念,提供核心容器、应用上下文、数据访问集成等模块,支持整合Hibernate、Struts等第三方框架,其适用范围不仅限于服务器端开发,绝大多数Java应用均可从中受益。

Sublime Text

Sublime Text

Sublime Text具有漂亮的用户界面和强大的功能,例如代码缩略图,Python的插件,代码段等。还可自定义键绑定,菜单和工具栏。Sublime Text 的主要功能包括:拼写检查,书签,完整的 Python API , Goto 功能,即时项目切换,多选择,多窗口等等。Sublime Text 是一个跨平台的编辑器,同时支持Windows、Linux、Mac OS X等操作系统。

WebStorm

WebStorm

WebStorm 是jetbrains公司旗下一款JavaScript 开发工具。目前已经被广大中国JS开发者誉为“Web前端开发神器”、“最强大的HTML5编辑器”、“最智能的JavaScript IDE”等。与IntelliJ IDEA同源,继承了IntelliJ IDEA强大的JS部分的功能。

用户登录
用户注册