深入理解线程通信
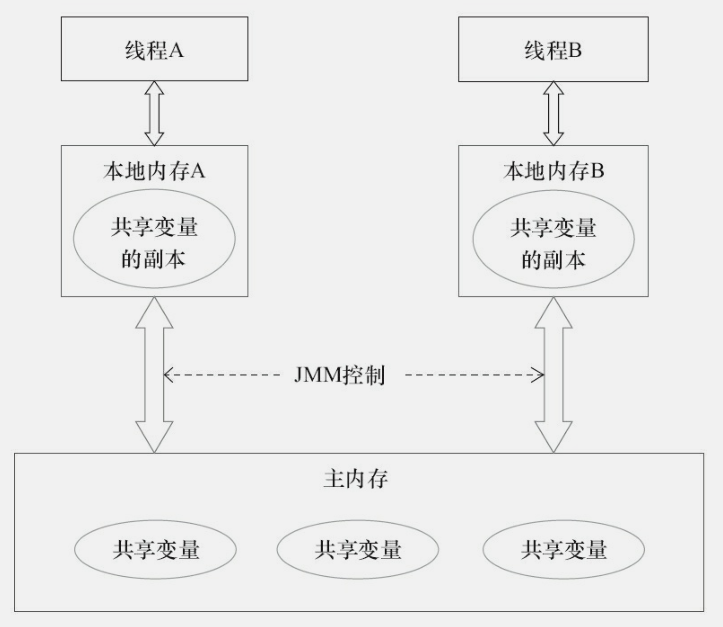
前言 开发中不免会遇到需要所有子线程执行完毕通知主线程处理某些逻辑的场景。 或者是线程 A 在执行到某个条件通知线程 B 执行某个操作。 可以通过以下几种方式实现: 等待通知机制 等待通知模式是 Java 中比较经典的线程通信方式。 两个线程通过对同一对象调用等待 wait() 和通知 notify() 方法来进行通讯。 如两个线程交替打印奇偶数: publicclassTwoThreadWaitNotify{ privateintstart=1; privatebooleanflag=false; publicstaticvoidmain(String[]args){ TwoThreadWaitNotifytwoThread=newTwoThreadWaitNotify(); Threadt1=newThread(newOuNum(twoThread)); t1.setName("A"); Threadt2=newThread(newJiNum(twoThread)); t2.setName("B"); t1.start(); t2.start(); } /** *偶数线程 */ publicstaticclassOuNumimplementsRunnable{ privateTwoThreadWaitNotifynumber; publicOuNum(TwoThreadWaitNotifynumber){ this.number=number; } @Override publicvoidrun(){ while(number.start<=100){ synchronized(TwoThreadWaitNotify.class){ System.out.println("偶数线程抢到锁了"); if(number.flag){ System.out.println(Thread.currentThread().getName()+"+-+偶数"+number.start); number.start++; number.flag=false; TwoThreadWaitNotify.class.notify(); }else{ try{ TwoThreadWaitNotify.class.wait(); }catch(InterruptedExceptione){ e.printStackTrace(); } } } } } } /** *奇数线程 */ publicstaticclassJiNumimplementsRunnable{ privateTwoThreadWaitNotifynumber; publicJiNum(TwoThreadWaitNotifynumber){ this.number=number; } @Override publicvoidrun(){ while(number.start<=100){ synchronized(TwoThreadWaitNotify.class){ System.out.println("奇数线程抢到锁了"); if(!number.flag){ System.out.println(Thread.currentThread().getName()+"+-+奇数"+number.start); number.start++; number.flag=true; TwoThreadWaitNotify.class.notify(); }else{ try{ TwoThreadWaitNotify.class.wait(); }catch(InterruptedExceptione){ e.printStackTrace(); } } } } } } } 输出结果: t2+-+奇数93 t1+-+偶数94 t2+-+奇数95 t1+-+偶数96 t2+-+奇数97 t1+-+偶数98 t2+-+奇数99 t1+-+偶数100 这里的线程 A 和线程 B 都对同一个对象 TwoThreadWaitNotify.class 获取锁,A 线程调用了同步对象的 wait() 方法释放了锁并进入 WAITING 状态。 B 线程调用了 notify() 方法,这样 A 线程收到通知之后就可以从 wait() 方法中返回。 这里利用了 TwoThreadWaitNotify.class 对象完成了通信。 有一些需要注意: wait() 、nofify() 、nofityAll() 调用的前提都是获得了对象的锁(也可称为对象监视器)。 调用 wait() 方法后线程会释放锁,进入 WAITING 状态,该线程也会被移动到等待队列中。 调用 notify() 方法会将等待队列中的线程移动到同步队列中,线程状态也会更新为 BLOCKED 从 wait() 方法返回的前提是调用 notify() 方法的线程释放锁,wait() 方法的线程获得锁。 等待通知有着一个经典范式: 线程 A 作为消费者: 获取对象的锁。 进入 while(判断条件),并调用 wait() 方法。 当条件满足跳出循环执行具体处理逻辑。 线程 B 作为生产者: 获取对象锁。 更改与线程 A 共用的判断条件。 调用 notify() 方法。 伪代码如下: //ThreadA synchronized(Object){ while(条件){ Object.wait(); } //dosomething } //ThreadB synchronized(Object){ 条件=false;//改变条件 Object.notify(); } join() 方法 privatestaticvoidjoin()throwsInterruptedException{ Threadt1=newThread(newRunnable(){ @Override publicvoidrun(){ LOGGER.info("running"); try{ Thread.sleep(3000); }catch(InterruptedExceptione){ e.printStackTrace(); } } }); Threadt2=newThread(newRunnable(){ @Override publicvoidrun(){ LOGGER.info("running2"); try{ Thread.sleep(4000); }catch(InterruptedExceptione){ e.printStackTrace(); } } }); t1.start(); t2.start(); //等待线程1终止 t1.join(); //等待线程2终止 t2.join(); LOGGER.info("mainover"); } 输出结果: 2018-03-1620:21:30.967[Thread-1]INFOc.c.actual.ThreadCommunication-running2 2018-03-1620:21:30.967[Thread-0]INFOc.c.actual.ThreadCommunication-running 2018-03-1620:21:34.972[main]INFOc.c.actual.ThreadCommunication-mainover 在 t1.join() 时会一直阻塞到 t1 执行完毕,所以最终主线程会等待 t1 和 t2 线程执行完毕。 其实从源码可以看出,join() 也是利用的等待通知机制: 核心逻辑: while(isAlive()){ wait(0); } 在 join 线程完成后会调用 notifyAll() 方法,是在 JVM 实现中调用,所以这里看不出来。 volatile 共享内存 因为 Java 是采用共享内存的方式进行线程通信的,所以可以采用以下方式用主线程关闭 A 线程: publicclassVolatileimplementsRunnable{ privatestaticvolatilebooleanflag=true; @Override publicvoidrun(){ while(flag){ System.out.println(Thread.currentThread().getName()+"正在运行。。。"); } System.out.println(Thread.currentThread().getName()+"执行完毕"); } publicstaticvoidmain(String[]args)throwsInterruptedException{ VolatileaVolatile=newVolatile(); newThread(aVolatile,"threadA").start(); System.out.println("main线程正在运行"); TimeUnit.MILLISECONDS.sleep(100); aVolatile.stopThread(); } privatevoidstopThread(){ flag=false; } } 输出结果: threadA正在运行。。。 threadA正在运行。。。 threadA正在运行。。。 threadA正在运行。。。 threadA执行完毕 这里的 flag 存放于主内存中,所以主线程和线程 A 都可以看到。 flag 采用 volatile 修饰主要是为了内存可见性,更多内容可以查看这里。 CountDownLatch 并发工具 CountDownLatch 可以实现 join 相同的功能,但是更加的灵活。 privatestaticvoidcountDownLatch()throwsException{ intthread=3; longstart=System.currentTimeMillis(); finalCountDownLatchcountDown=newCountDownLatch(thread); for(inti=0;i<thread;i++){ newThread(newRunnable(){ @Override publicvoidrun(){ LOGGER.info("threadrun"); try{ Thread.sleep(2000); countDown.countDown(); LOGGER.info("threadend"); }catch(InterruptedExceptione){ e.printStackTrace(); } } }).start(); } countDown.await(); longstop=System.currentTimeMillis(); LOGGER.info("mainovertotaltime={}",stop-start); } 输出结果: 2018-03-1620:19:44.126[Thread-0]INFOc.c.actual.ThreadCommunication-threadrun 2018-03-1620:19:44.126[Thread-2]INFOc.c.actual.ThreadCommunication-threadrun 2018-03-1620:19:44.126[Thread-1]INFOc.c.actual.ThreadCommunication-threadrun 2018-03-1620:19:46.136[Thread-2]INFOc.c.actual.ThreadCommunication-threadend 2018-03-1620:19:46.136[Thread-1]INFOc.c.actual.ThreadCommunication-threadend 2018-03-1620:19:46.136[Thread-0]INFOc.c.actual.ThreadCommunication-threadend 2018-03-1620:19:46.136[main]INFOc.c.actual.ThreadCommunication-mainovertotaltime=2012 CountDownLatch 也是基于 AQS(AbstractQueuedSynchronizer) 实现的,更多实现参考 ReentrantLock 实现原理 初始化一个 CountDownLatch 时告诉并发的线程,然后在每个线程处理完毕之后调用 countDown() 方法。 该方法会将 AQS 内置的一个 state 状态 -1 。 最终在主线程调用 await() 方法,它会阻塞直到 state == 0 的时候返回。 CyclicBarrier 并发工具 privatestaticvoidcyclicBarrier()throwsException{ CyclicBarriercyclicBarrier=newCyclicBarrier(3); newThread(newRunnable(){ @Override publicvoidrun(){ LOGGER.info("threadrun"); try{ cyclicBarrier.await(); }catch(Exceptione){ e.printStackTrace(); } LOGGER.info("threadenddosomething"); } }).start(); newThread(newRunnable(){ @Override publicvoidrun(){ LOGGER.info("threadrun"); try{ cyclicBarrier.await(); }catch(Exceptione){ e.printStackTrace(); } LOGGER.info("threadenddosomething"); } }).start(); newThread(newRunnable(){ @Override publicvoidrun(){ LOGGER.info("threadrun"); try{ Thread.sleep(5000); cyclicBarrier.await(); }catch(Exceptione){ e.printStackTrace(); } LOGGER.info("threadenddosomething"); } }).start(); LOGGER.info("mainthread"); } CyclicBarrier 中文名叫做屏障或者是栅栏,也可以用于线程间通信。 它可以等待 N 个线程都达到某个状态后继续运行的效果。 首先初始化线程参与者。 调用 await() 将会在所有参与者线程都调用之前等待。 直到所有参与者都调用了 await() 后,所有线程从 await() 返回继续后续逻辑。 运行结果: 2018-03-1822:40:00.731[Thread-0]INFOc.c.actual.ThreadCommunication-threadrun 2018-03-1822:40:00.731[Thread-1]INFOc.c.actual.ThreadCommunication-threadrun 2018-03-1822:40:00.731[Thread-2]INFOc.c.actual.ThreadCommunication-threadrun 2018-03-1822:40:00.731[main]INFOc.c.actual.ThreadCommunication-mainthread 2018-03-1822:40:05.741[Thread-0]INFOc.c.actual.ThreadCommunication-threadenddosomething 2018-03-1822:40:05.741[Thread-1]INFOc.c.actual.ThreadCommunication-threadenddosomething 2018-03-1822:40:05.741[Thread-2]INFOc.c.actual.ThreadCommunication-threadenddosomething 可以看出由于其中一个线程休眠了五秒,所有其余所有的线程都得等待这个线程调用 await() 。 该工具可以实现 CountDownLatch 同样的功能,但是要更加灵活。甚至可以调用 reset() 方法重置 CyclicBarrier (需要自行捕获 BrokenBarrierException 处理) 然后重新执行。 线程响应中断 publicclassStopThreadimplementsRunnable{ @Override publicvoidrun(){ while(!Thread.currentThread().isInterrupted()){ //线程执行具体逻辑 System.out.println(Thread.currentThread().getName()+"运行中。。"); } System.out.println(Thread.currentThread().getName()+"退出。。"); } publicstaticvoidmain(String[]args)throwsInterruptedException{ Threadthread=newThread(newStopThread(),"threadA"); thread.start(); System.out.println("main线程正在运行"); TimeUnit.MILLISECONDS.sleep(10); thread.interrupt(); } } 输出结果: threadA运行中。。 threadA运行中。。 threadA退出。。 可以采用中断线程的方式来通信,调用了 thread.interrupt() 方法其实就是将 thread 中的一个标志属性置为了 true。 并不是说调用了该方法就可以中断线程,如果不对这个标志进行响应其实是没有什么作用(这里对这个标志进行了判断)。 但是如果抛出了 InterruptedException 异常,该标志就会被 JVM 重置为 false。 线程池 awaitTermination() 方法 如果是用线程池来管理线程,可以使用以下方式来让主线程等待线程池中所有任务执行完毕: privatestaticvoidexecutorService()throwsException{ BlockingQueue<Runnable>queue=newLinkedBlockingQueue<>(10); ThreadPoolExecutorpoolExecutor=newThreadPoolExecutor(5,5,1,TimeUnit.MILLISECONDS,queue); poolExecutor.execute(newRunnable(){ @Override publicvoidrun(){ LOGGER.info("running"); try{ Thread.sleep(3000); }catch(InterruptedExceptione){ e.printStackTrace(); } } }); poolExecutor.execute(newRunnable(){ @Override publicvoidrun(){ LOGGER.info("running2"); try{ Thread.sleep(2000); }catch(InterruptedExceptione){ e.printStackTrace(); } } }); poolExecutor.shutdown(); while(!poolExecutor.awaitTermination(1,TimeUnit.SECONDS)){ LOGGER.info("线程还在执行。。。"); } LOGGER.info("mainover"); } 输出结果: 2018-03-1620:18:01.273[pool-1-thread-2]INFOc.c.actual.ThreadCommunication-running2 2018-03-1620:18:01.273[pool-1-thread-1]INFOc.c.actual.ThreadCommunication-running 2018-03-1620:18:02.273[main]INFOc.c.actual.ThreadCommunication-线程还在执行。。。 2018-03-1620:18:03.278[main]INFOc.c.actual.ThreadCommunication-线程还在执行。。。 2018-03-1620:18:04.278[main]INFOc.c.actual.ThreadCommunication-mainover 使用这个 awaitTermination() 方法的前提需要关闭线程池,如调用了 shutdown() 方法。 调用了 shutdown() 之后线程池会停止接受新任务,并且会平滑的关闭线程池中现有的任务。 管道通信 publicstaticvoidpiped()throwsIOException{//面向于字符PipedInputStream面向于字节 PipedWriterwriter=newPipedWriter(); PipedReaderreader=newPipedReader();//输入输出流建立连接 writer.connect(reader); Threadt1=newThread(newRunnable(){@Override publicvoidrun(){ LOGGER.info("running");try{for(inti=0;i<10;i++){ writer.write(i+""); Thread.sleep(10); } }catch(Exceptione){ }finally{try{ writer.close(); }catch(IOExceptione){ e.printStackTrace(); } } } }); Threadt2=newThread(newRunnable(){@Override publicvoidrun(){ LOGGER.info("running2");intmsg=0;try{while((msg=reader.read())!=-1){ LOGGER.info("msg={}",(char)msg); } }catch(Exceptione){ } } }); t1.start(); t2.start(); } 输出结果: 2018-03-1619:56:43.014[Thread-0]INFOc.c.actual.ThreadCommunication-running 2018-03-1619:56:43.014[Thread-1]INFOc.c.actual.ThreadCommunication-running2 2018-03-1619:56:43.130[Thread-1]INFOc.c.actual.ThreadCommunication-msg=0 2018-03-1619:56:43.132[Thread-1]INFOc.c.actual.ThreadCommunication-msg=1 2018-03-1619:56:43.132[Thread-1]INFOc.c.actual.ThreadCommunication-msg=2 2018-03-1619:56:43.133[Thread-1]INFOc.c.actual.ThreadCommunication-msg=3 2018-03-1619:56:43.133[Thread-1]INFOc.c.actual.ThreadCommunication-msg=4 2018-03-1619:56:43.133[Thread-1]INFOc.c.actual.ThreadCommunication-msg=5 2018-03-1619:56:43.133[Thread-1]INFOc.c.actual.ThreadCommunication-msg=6 2018-03-1619:56:43.134[Thread-1]INFOc.c.actual.ThreadCommunication-msg=7 2018-03-1619:56:43.134[Thread-1]INFOc.c.actual.ThreadCommunication-msg=8 2018-03-1619:56:43.134[Thread-1]INFOc.c.actual.ThreadCommunication-msg=9 Java 虽说是基于内存通信的,但也可以使用管道通信。 需要注意的是,输入流和输出流需要首先建立连接。这样线程 B 就可以收到线程 A 发出的消息了。 实际开发中可以灵活根据需求选择最适合的线程通信方式。 号外 最近在总结一些 Java 相关的知识点,感兴趣的朋友可以一起维护。 地址: https://github.com/crossoverJie/Java-Interview java线程与并发相关内容推荐阅读:http://www.roncoo.com/course/list.html?courseName=java