精选列表

搜索[SpringCloud],共1270篇文章
优秀的个人博客,低调大师

springCloud(6):Eureka的自我保护模式、多网卡下的IP选择、Eureka的健康检查

一、Eureka的自我保护模式 进入自我保护模式最直观的体现就是Eureka Server首页的警告,如下图: 默认情况下,如果Eureka Server在一定时间内没有接收到某个微服务实例的心跳,Eureka Server将会注销该实例(默认90秒)。但是当网络分区故障发生时,微服务与Eureka Server之间无法正常通信,这就可能变得非常危险了----因为微服务本身是健康的,此时本不应该注销这个微服务。 Eureka Server通过“自我保护模式”来解决这个问题----当Eureka Server节点在短时间内丢失过多客户端时(可能发生了网络分区故障),那么这个节点就会进入自我保护模式。一旦进入该模式,Eureka Server就会保护服务注册表中的信息,不再删除服务注册表中的数据(也就是不会注销任何微服务)。当网络故障恢复后,该Eureka Server节点会自动退出自我保护模式。 自我保护模式是一种对网络异常的安全保护措施。使用自我保护模式,而已让Eureka集群更加的健壮、稳定。 在Spring Cloud中,可以使用eureka.server.enable-self-preservation=false来禁用自我保护模式,当然也可以使用显示指定IP地址来解决: 1 eureka.instance.instance-id:${spring.cloud.client.ipAddress}:${server.port} 二、多网卡环境下的IP选择 2.1、简介 指定IP在某些场景下很有用,如某台服务器有eth0、eth1和eth2三块网卡,但是eth1可以被其它的服务器访问;如果Eureka Client将eth0或者eth2注册到Eureka Server上,其它微服务就无法通过这个IP调用该微服务的接口。 Spring Cloud提供了按需选择IP的能力,从而避免以上的问题。 2.2、操作 方案1、忽略指定名称的网卡 1 2 3 4 #忽略eth0,支持正则表达式 spring.cloud.inetutils.ignored-interfaces[0]=eth0 #注册时使用ip而不是主机名 eureka.instance.prefer-ip-address=true 方案2、只使用站点本地地址 1 2 3 4 #只使用站点本地地址 spring.cloud.inetutils. use -only-site- local -interfaces=true #注册时使用ip而不是主机名 eureka.instance.prefer-ip-address=true 方案3、手动指定IP地址 1 2 3 4 #手动指定IP地址 spring.cloud.inetutils. default -ip-address=127.0.0.1 #注册时使用ip而不是主机名 eureka.instance.prefer-ip-address=true 三、Eureka的健康检查 先看下图: 说明:在Status栏显示着UP,表示应用程序状态正常。其它取值DOWN、OUT_OF_SERVICE、UNKNOWN等,只有UP的微服务会被请求。 由于Eureka Server与Eureka Client之间使用心跳机制来确定Eureka Client的状态,默认情况下,服务器端与客户端的心跳保持正常,应用程序就会始终保持“UP”状态,所以微服务的UP并不能完全反应应用程序的状态。 Spring Boot Actuator提供了/health端点,该端点可展示应用程序的健康信息,只有将该端点中的健康状态传播到Eureka Server就可以了,实现这点很简单,只需为微服务配置如下内容: 1 2 #开启健康检查(需要spring-boot-starter-actuator依赖) eureka.client.healthcheck.enabled=true 如果需要更细粒度健康检查,可实现com.netflix.appinfo.HealthCheckHandler接口 本文转自我爱大金子博客51CTO博客,原文链接http://blog.51cto.com/1754966750/1941655如需转载请自行联系原作者 我爱大金子

优秀的个人博客,低调大师

springcloud 学习-eureka搭建

组件名:Netflix Eureka 作用:支撑微服务的自注册、自发现,提供负载均衡能力 开发环境使用IDEA,jdk1.8 一、搭建eureka服务 1.新建maven项目,配置pom.xml文件 1 2 3 4 5 6 7 8 9 10 11 12 13 14 15 <parent> <groupId>org.springframework.cloud</groupId> <artifactId>spring-cloud-starter-parent</artifactId> <version>Camden.SR7</version> </parent> <dependencies> <dependency> <groupId>org.springframework.cloud</groupId> <artifactId>spring-cloud-starter</artifactId> </dependency> <dependency> <groupId>org.springframework.cloud</groupId> <artifactId>spring-cloud-starter-eureka-server</artifactId> </dependency> </dependencies> 2.新建启动类 1 2 3 4 5 6 7 @SpringBootApplication @EnableEurekaServer public class Application{ public static void main(String[]args){ SpringApplication.run(Application. class ,args); } } 3.新建配置文件application.yml 1 2 3 4 5 6 7 8 9 10 11 server: port: 1000 eureka: instance: hostname:localhost client: register-with-eureka: false fetch-registry: false spring: application: name:eureka-server 4.启动(启动类) 5.访问 eureka:http://localhost:1000/ erueka服务器启动成功,目前还未有服务注册 二、搭建服务提供方 1.新建maven项目,配置pom.xml文件 1 2 3 4 5 6 7 8 9 10 11 12 13 14 15 <parent> <groupId>org.springframework.cloud</groupId> <artifactId>spring-cloud-starter-parent</artifactId> <version>Camden.SR7</version> </parent> <dependencies> <dependency> <groupId>org.springframework.cloud</groupId> <artifactId>spring-cloud-starter</artifactId> </dependency> <dependency> <groupId>org.springframework.cloud</groupId> <artifactId>spring-cloud-starter-eureka-server</artifactId> </dependency> </dependencies> 2.创建Application启动类,提供/hello服务 1 2 3 4 5 6 7 8 9 10 11 12 13 14 15 @Configuration @ComponentScan @EnableEurekaClient @EnableAutoConfiguration @RestController public class Application{ @RequestMapping (value= "hello" ,method=RequestMethod.GET) public Stringhello(){ return "你好,世界" ; } public static void main(String[]args){ new SpringApplicationBuilder(Application. class ).web( true ) .run(args); } } 3、新建application.yml配置文件 1 2 3 4 5 6 7 8 9 eureka: client: serviceUrl: defaultZone:http: //localhost:1000/eureka/ spring: application: name:feign-client-test- 001 server: port: 2000 查看路径id展示,需要添加配置 1 2 3 4 5 6 eureka: client: serviceUrl: defaultZone:http: //admin:admin123@localhost:1000/eureka instance: prefer-ip-address: true 4、运行,查看之前Erueka服务端的页面,FEIGN-CLIENT-TEST-001在注册中心变为了大写这个注意下 5、访问:http://127.0.0.1:2000/hello 三、搭建服务消费方 使用@FeignClient注解 Feignis a declarative web service client. It makes writing web service clients easier. 如上是Spring Cloud文档中对于Feign的定义,结合之前的两篇博文,在这里我们就可以吧Feign简单的理解为用户(前端)可以直接接触到的REST接口提供者。在Feign中,我们可以方便的访问和使用意已经在Erueka服务器中注册过的服务了。 1、建立maven工程,配置pom.xml文件 1 2 3 4 5 6 7 8 9 10 11 12 13 14 15 16 17 18 19 20 21 22 23 24 25 26 27 28 29 30 31 32 33 34 35 36 37 38 39 40 41 42 43 44 45 46 47 48 <parent> <groupId>org.springframework.boot</groupId> <artifactId>spring-boot-starter-parent</artifactId> <version> 1.5 . 2 .RELEASE</version> <relativePath/><!--lookupparentfromrepository--> </parent> <properties> <project.build.sourceEncoding>UTF- 8 </project.build.sourceEncoding> <project.reporting.outputEncoding>UTF- 8 </project.reporting.outputEncoding> <java.version> 1.8 </java.version> </properties> <dependencies> <dependency> <groupId>org.springframework.cloud</groupId> <artifactId>spring-cloud-starter-feign</artifactId> </dependency> <dependency> <groupId>org.springframework.cloud</groupId> <artifactId>spring-cloud-starter-eureka</artifactId> </dependency> <dependency> <groupId>org.springframework.boot</groupId> <artifactId>spring-boot-starter-test</artifactId> <scope>test</scope> </dependency> </dependencies> <dependencyManagement> <dependencies> <dependency> <groupId>org.springframework.cloud</groupId> <artifactId>spring-cloud-dependencies</artifactId> <version>Camden.SR6</version> <type>pom</type> <scope> import </scope> </dependency> </dependencies> </dependencyManagement> <build> <plugins> <plugin> <groupId>org.springframework.boot</groupId> <artifactId>spring-boot-maven-plugin</artifactId> </plugin> </plugins> </build> 2、建立包及启动类FeignApplication 1 2 3 4 5 6 7 8 9 10 11 12 13 14 /** *Createdbygaofengon2017/7/14. */ @Configuration @ComponentScan @EnableAutoConfiguration @EnableEurekaClient @EnableFeignClients @SpringBootApplication public class FeignApplication{ public static void main(String[]args){ SpringApplication.run(FeignApplication. class ,args); } } 3、建立接口类,用来调用上文中FEIGN-CLIENT-TEST-001服务的方法hello(),FEIGN-CLIENT-TEST-001是全大写的 1 2 3 4 5 @FeignClient ( "FEIGN-CLIENT-TEST-001" ) public interface IHello{ @RequestMapping (value= "/hello" ,method=RequestMethod.GET) Stringhello(); } 其中@FeignClient中指定需要调用的微服务的名称(全大写),@RequestMapping中指定访问微服务响应接口的路径,如之前微服务的hello方法是通过"/hello"路径访问,那么这里需要配置一致 4、新建Controller类,为前端提供REST接口 1 2 3 4 5 6 7 8 9 @RestController public class HelloController{ @Autowired private IHelloiHello; @RequestMapping (value= "gethello" ,method=RequestMethod.GET) public StringgetHello(){ return iHello.hello(); } } 5、配置Feign的配置文件,指定Eureka服务器注册地址和访问端口application.yml 1 2 3 4 5 6 7 8 9 server: port: 8081 eureka: client: serviceUrl: defaultZone:http: //localhost:1000/eureka/ spring: application: name:feign-client-test- 002 6、运行,查看之前Erueka服务端的页面 7、访问:http://127.0.0.1:8081/gethello 这里访问的就是feign-client-test-001的hello服务。 本文转自gaofeng36599 51CTO博客,原文链接:http://blog.51cto.com/786678398/1947471

优秀的个人博客,低调大师

springCloud(7):Ribbon实现客户端侧负载均衡-消费者整合Ribbon

一、简介 Ribbon是Netfix发布的负载均衡器,它有助于控制HTTP和TCP客户端的行为。为Ribbon配置服务提供者地址列表后,Ribbon就可基于某种负载均衡算法,自动地帮助服务消费者去请求。Ribbon默认为我们提供了很多的负载均衡算法,例如轮询、随机等,当然,也可以为Ribbon实现自定义的负载均衡算法。 在Spring Cloud中,当Ribbon与Eureka配合使用时,Ribbon可自动从Eureka Server获取服务提供者地址列表,并基于负载均衡算法,请求其中一个服务提供者实例。 二、为服务消费者整合Ribbon 2.1、引入ribbon依赖 1 2 3 4 < dependency > < groupId >org.springframework.cloud</ groupId > < artifactId >spring-cloud-starter-ribbon</ artifactId > </ dependency > 2.2、为RestTemplate添加@LoadBalanced注解(Application) 1 2 3 4 5 @Bean @LoadBalanced public RestTemplaterestTemplate(){ return new RestTemplate(); } 2.3、调用其它微服务 1 2 3 4 5 6 7 8 9 10 11 12 13 14 @GetMapping ( "/user/{id}" ) public UserfindById( @PathVariable Longid) throws Exception{ ServiceInstanceserviceInstance= this .loadBalancerClient.choose( "spring-ribbon-eureka-client2" ); //打印当前选择的是哪个节点 System.out.println( "serviceId:" +serviceInstance.getServiceId()); System.out.println( "hoost:" +serviceInstance.getHost()); System.out.println( "port:" +serviceInstance.getPort()); System.out.println( "============================================================" ); if ( null ==id){ return null ; } return this .restTemplate.getForObject( "http://spring-ribbon-eureka-client2/" +id,User. class ); } 说明: 1、spring-ribbon-eureka-client2是服务提供者注册到Eureka Server上的应用名称 2、本次测试开启了两个spring-ribbon-eureka-client2服务提供者,一个端口是8080,一个是8083 2.4、测试 访问:http://192.168.1.83:8082/user/1 效果: 本文转自我爱大金子博客51CTO博客,原文链接http://blog.51cto.com/1754966750/1947059如需转载请自行联系原作者 我爱大金子

优秀的个人博客,低调大师

springCloud(12):使用Hystrix实现微服务的容错处理-Hystrix的监控

一、简介 Hystrix提供了几乎实时的监控。HystrixCommand和HystrixObserv-ableCommand在执行时,会生成执行结果和运行指标,比如每秒执行的请求数、成功数等,这些监控数据对分析应用系统的状态很有用。 使用Hystrix的模块hystrix-metrics-event-stream,就可将这些监控的指标信息以text/event-stream的格式暴露给外部系统。spring-cloud-starter-hystrix已包含该模块,在此基础上,只须为项目添加spring-boot-starter-actuator,就可使用/hystrix.stream端点获得Hystrix的监控信息了。 我们以前的项目spring-hystrix-consumer中就已经包含了spring-cloud-starter-hystrix、spring-boot-starter-actuator,启动访问:http://localhost:8087/user/1后,再访问:http://localhost:8087/manage/hystrix.stream,会重复出现如下内容: 这是因为系统会不断地刷新以获取实时的监控数据.Hystrix的监控指标非常全面,例如HystrixCommand的名称、group名称、断路器状态、错误率、错误数等。 二、使用Hystrix Dashboard可视化监控数据 前面通过访问/hystrix.stream端点获得的数据很难一眼看出系统当前的运行状态,可是使用Hystrix Dashboard可以让监控数据图形化、可视化。 操作: 1、创建一个maven工程,加入Hystrix Dashboard依赖 1 2 3 4 <dependency> <groupId>org.springframework.cloud< / groupId> <artifactId>spring - cloud - starter - hystrix - dashboard< / artifactId> < / dependency> 2、编写启动类,添加@EnableHystrixDashboard注解 3、配置yml文件端口8086 测试: 1、访问http://localhost:8087/hystrix.stream,可看到Hystrix Dashbord的主页,如下: 2、随意设置一个title,并点击Monitor Stream,这里Title是:测试,URl是:http://localhost:8087/manage/hystrix.stream 注意:此处没有将Hystrix Dashboard注册到Eureka Server上,在生产环境中,为了更方便的管理Hystrix Dashboard,可将其注册到Eureka Server上。 三、使用Turbine聚合监控数据 前面使用的/hystrix.stream端点监控单个微服务。然而在使用微服务架构的应用系统一般会包含多个微服务,每个微服务通常都会部署多个实例。如果每次只能查看单个实例的监控数据,就必须在Hystrix Dashboard上切换想要监控的地址,这显然很不方便。 3.1、Turbine简介 Turbine是一个聚合Hystrix监控数据的工具,它可将所有相关/hystrix.stream端点的数据聚合到一个组合的/turbine.stream中,从而让集群的监控更加方便。 3.2、使用Turbine监控多个微服务 a、创建一个maven项目,添加turbine依赖: 1 2 3 4 5 <!--turbine--> < dependency > < groupId >org.springframework.cloud</ groupId > < artifactId >spring-cloud-starter-turbine</ artifactId > </ dependency > b、在启动类上添加@EnableTurbine注解 c、编写application.yml配置文件 1 2 3 4 5 6 7 8 9 10 11 12 13 14 15 16 17 18 19 20 21 spring: profiles: active: -dev application: name:hystrix-turbine eureka: client: service-url: defaultZone:http://liuy2:5010/eureka/ #设置与EurekaServer交互的地址,查询服务和注册服务都需要依赖这个地址,多个用逗号分隔 instance: prefer-ip-address:true turbine: app-config:hystrix-consumer-movie,ribbon-consumer-movie #参数指定了需要收集监控信息的服务名 cluster-name-expression: "'default'" #参数指定了集群名称为 --- spring: profiles: active:dev server: port:5014 说明:使用上面配置,Turbine会在Eureka Server中找到hystrix-consumer-movie和ribbon-consumer-movie这两个微服务,并聚合这两个微服务的监控数据。 d、测试 第一步:依次启动Eureka Server(4010)、provide-user(4011)、hystrix-consumer-movie(5012)、ribbon-consumer-movie(5011)、hystrix-turbine(5014)、hystrix-dashboard(5013) 第二步:访问http://localhost:5012/user/1,让hystrix-consumer-movie微服务产生监控数据 第三步:访问http://localhost:5011/user/1,让ribbon-consumer-movie微服务产生监控数据 第四步:打开Hystrix Dashboard首页http://localhost:5013/hystrix.stream,在URL栏填写http://localhost:5014/turbine.stream,随意填写title,点击Monitor Stream后出现如下图: 问题:在一些场景下,如微服务与Turbine网络不通,监控数据怎么处理? -- 使用消息中间件收集数据 3.3、使用rabbitmq收集监控数据 改造微服务:hystrix-consumer-movie a、添加以下依赖 1 2 3 4 5 6 7 8 < dependency > < groupId >org.springframework.cloud</ groupId > < artifactId >spring-cloud-netflix-hystrix-stream</ artifactId > </ dependency > < dependency > < groupId >org.springframework.cloud</ groupId > < artifactId >spring-cloud-starter-stream-rabbit</ artifactId > </ dependency > b、在application.yml中添加 1 2 3 4 5 6 spring: rabbitmq: host:192.168.175.13 port:5672 username:liuy password:123456 改造:hystrix-turbine a、添加以下依赖 1 2 3 4 5 6 7 8 9 < dependency > < groupId >org.springframework.cloud</ groupId > < artifactId >spring-cloud-starter-turbine-stream</ artifactId > </ dependency > <!--rabbit--> < dependency > < groupId >org.springframework.cloud</ groupId > < artifactId >spring-cloud-starter-stream-rabbit</ artifactId > </ dependency > 注意:此处删除spring-cloud-starter-turbine依赖 b、修改启动类,将@EnableTurbine改成@EnableTurbineStream c、修改application.yml 1 2 3 4 5 6 spring: rabbitmq: host:192.168.175.13 port:5672 username:liuy password:123456 同时删除:turbine 测试: 第一步:依次启动Eureka Server(4010)、provide-user(4011)、hystrix-dashboard(5013)、hystrix-consumer-movie-rabbitmq(5020)、hystrix-turbine-rabbitmq(5021) 第二步:访问http://localhost:5020/user/1,可正常获取结果 第三步:打开Hystrix Dashboard首页http://localhost:5013/hystrix.stream,在URL栏填写http://localhost:5021/,随意填写title,点击Monitor Stream后出现如下图: 本文转自我爱大金子博客51CTO博客,原文链接http://blog.51cto.com/1754966750/1949857如需转载请自行联系原作者 我爱大金子

优秀的个人博客,低调大师

springCloud(13):使用Zuul构建微服务网关-简介

一、为什么要使用微服务网关 不同的微服务一般会有不同的网络地址,而外部客户端可能需要调用多个服务的接口才能完成一个业务需求。如:一个电影购票的手机APP,可能会调用多个微服务,才能完成一次购票的业务流程。如果让客户端直接与各个微服务通信,会有以下的问题: 1、客户端会多次请求不同的微服务,增加了客户端的复杂性; 2、存在跨域请求,在一定场景下处理相对复杂; 3、认证复杂,每个服务都需要独立认证; 4、难以重构,随着项目的迭代,可能需要重新划分微服务,如果客户端直接与微服务通信,那么重构将会很难实施; 5、某些微服务可能使用了防火墙/浏览器不友好的协议,直接访问会有一定的困难。 以上问题可借助微服务网关解决,微服务网关是介于客户端和服务端之间的中间层,所有的外部请求都会先经过微服务网关,然后由微服务网关请求各个微服务。 微服务网关封装了应用程序的内部结构,客户端只须跟网关交互,而无须直接调用特定微服务的接口,这样,开发就可以得到简化。不仅如此,使用微服务网关还有以下优点: 1、易于监控。可在微服务网关收集监控数据并将其推送到外部系统进行分析; 2、易于认证。可在微服务网关上进行认证,然后再将请求转发到后端的微服务,而无须再每个微服务中进行认证; 3、减少了客户端与各个微服务之间的交互次数。 二、Zuul简介 Zuul是Netflix开源的微服务网关,它可以和Eureka、Ribbon、Hystrix等组件配合使用。 Zuul的核心是一系列的过滤器,这些过滤器可以完成以下功能: 1、身份认证与安全:识别每个资源的验证要求,并拒绝那些与要求不符的请求; 2、审查与监控:在边缘位置追踪有意义的数据和统计结果,从而带来精确的生产视图; 3、动态路由:动态地将请求路由到不同的后端集群; 4、压力测试:逐渐增加指向集群的流量,以了解性能; 5、负载分配:为每一种负载类型分配对应容量,并弃用超出限定值的请求; 6、静态响应处理:在边缘位置直接建立部分响应,从而避免其转发到内部集群; 7、多区域弹性:跨域AWS Region进行请求路由。 Spring Cloud对Zuul进行了整合与增强。目前,Zuul使用的默认HTTP客户端是Apache HTTP Client。 三、编写一个Zuul微服务网关 1、添加依赖 1 2 3 4 5 <!--zuul--> <dependency> <groupId>org.springframework.cloud</groupId> <artifactId>spring-cloud-starter-zuul</artifactId> </dependency> 2、在启动类上添加@EnableZuulProxy注解,声明一个Zuul代理,改代理使用Ribbon来定位注册在EurekaServer中的微服务;同时,改代理还整合了hystrix,所有经过Zuul的请求都会在Hystrix命令中执行。 3、编写application.yml 1 2 3 4 5 6 7 8 9 10 11 12 13 14 15 16 17 18 spring: profiles: active: -dev application: name:microservice-gateway-zuul eureka: client: service-url: defaultZone:http://liuy2:5010/eureka/ #设置与EurekaServer交互的地址,查询服务和注册服务都需要依赖这个地址,多个用逗号分隔 instance: prefer-ip-address:true --- spring: profiles: active:dev server: port:5016 这样,一个简单的微服务网关就编写完成了。这里仅是添加了Zuul的依赖,并将Zuul注册到Eureka Server上。 四、测试 4.1、测试路由规则 1、依次启动eureka-server(4010)、provide-user(4011)、hystrix-consumer-movie(5012)、microservice-gateway-zuul(5016) 2、访问http://localhost:5016/hystrix-consumer-movie/user/1,请求会被转发到http://localhost:5012/user/1 3、访问http://localhost:5016/provide-user/1,请求会被转发到http://localhost:4011/1 总结: 说明默认情况下,Zuul会代理所有注册到Eureka Server的微服务,并且Zuul的路由规则如下:http://ZUUL_HOST:ZUUL_PORT/微服务在Eureka上的serviceId/**会被转发到serviceId对应的微服务。 4.2、测试Hystrix容错与监控 1、依次启动eureka-server(4010)、provide-user(4011)、hystrix-consumer-movie(5012)、microservice-gateway-zuul(5016)、hystrix-dashboard(5013) 2、访问http://localhost:5016/hystrix-consumer-movie/user/1,可以获取正常用户数据 3、关闭provide-user微服务,再访问http://localhost:5016/hystrix-consumer-movie/user/1 4、访问http://localhost:5013/hystrix.stream进入Hystrix Dashboard页面,在URL栏输入http://localhost:5016/hystrix.stream,随意指定一个title,点击monitor Stream按钮。 总结:说明Zuul已经整合了Hystrix。 本文转自我爱大金子博客51CTO博客,原文链接http://blog.51cto.com/1754966750/1958373如需转载请自行联系原作者 我爱大金子

优秀的个人博客,低调大师

springCloud(15):使用Zuul构建微服务网关-Header与文件上传和过滤器

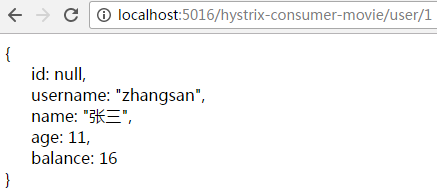
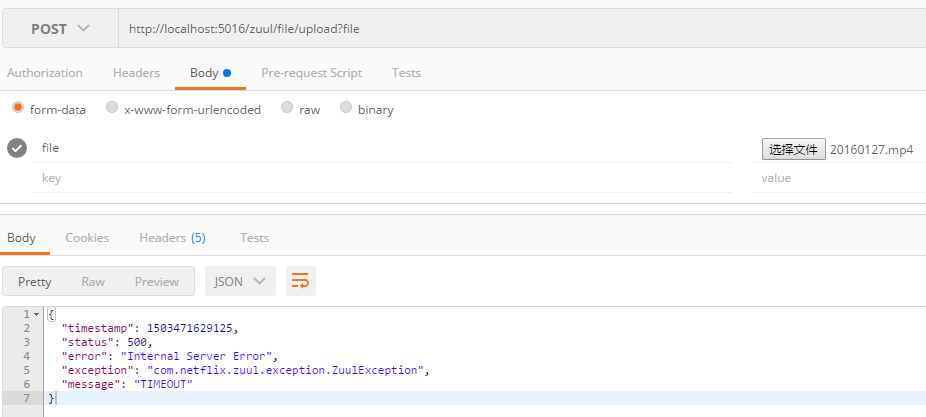
一、Header 1.1、敏感header的设置 一般来说,可在同一个系统中的服务之间共享Header,不过应尽量防止让一些敏感的Header外泄。 1 2 3 4 zuul: routes: provide-user: sensitive-headers:Cookie,Set-Cookie 说明:敏感的header不会传播到下游去,也就是说此处的Cookie,Set-Cookie不会传播的其它的微服务中去 1.2、忽略的Header 可以使用zuul.ignored-headers属性丢弃一些Header,如: 1 2 3 4 5 zuul: routes: provide-user: sensitive-headers:Cookie,Set-Cookie ignored-headers:Authorization 说明:忽略的header不会传播到下游去,也就是说此处的Authorization不会传播的其它的微服务中去,作用与上面敏感的Header差不多,事实上sensitive-headers会被添加到ignored-headers中。 注意: 1、默认情况下zuul.ignored-headers是空的 2、如果Spring Security在项目的classpath中,那么zuul.ignored-headers的默认值就是Pragma,Cache-Control,X-Frame-Options,X-Content-Type-Options,X-XSS-Protection,Expires,所以,当Spring Security在项目的classpath中,同时又需要使用下游微服务的Spring Security的Header时,可以将zuul.ignoreSecurity-Headers设置为false 二、使用Zuul上传文件 1、对于小文件(1M以内)上传,无须任何处理,即可正常上传。 2、对于大文件(10M以上)上传,需要为上传路径添加/zuul前缀。 注意:这里的上传路径添加/zuul前缀无须配置 zuul的配置: 1 2 3 zuul: routes: file-upload:/file/** 测试上传:上传文件200多M zuul端抛出超时异常: 1 Causedby:com.netflix.hystrix.exception.HystrixRuntimeException:file-uploadtimed-outand no fallbackavailable. 解决:在zuul的yml配置文件中加入如下配置: 1 2 3 4 hystrix.command. default .execution.isolation.thread.timeoutInMilliseconds:60000 ribbon: ConnectTimeout:3000 ReadTimeout:60000 再次测试上传:上传文件200多M 三、过滤器 3.1、过滤器类型与请求生命周期 Zuul大部分功能都是通过过滤器来实现的。Zuul中定义了4种标准过滤器类型,这些过滤器类型对应于请求的典型生命周期。 PRE 这种过滤器在请求被路由之前调用。可利用这种过滤实现身份验证、在集群中选择请求的微服务、记录调试信息等。 ROUTING 这种过滤器将请求路由到微服务。这种过滤器用于构建发送给微服务的请求,并使用Apache HttpClient或Netfilx Ribbon请求微服务。 POST 这种过滤器在路由到微服务以后执行。这种过滤器可用来为响应添加标准的HTTP Header、收集统计信息和指标、将响应从微服务发送给客户端等。 ERROR 在其它阶段发送错误时执行该过滤器。 Zuul请求的生命周期如图: 3.2、自定义过滤器 Zuul还允许创建自定义的过滤器类型。继承抽象类ZuulFilter即可。 自定义过滤器需要实现以下方法: a、filterType:返回过滤器的类型。有pre、route、post、error等,分别对应着上面的过滤器,详细可以参考com.netflix.zuul.ZuulFilter.filterType()中的注释。 b、filterOrder:返回一个int值来指定过滤器执行的顺序,不同的过滤器允许返回相同的顺序。 c、shouldFilter:返回一个boolean值来判断该过滤器是否要执行,true表示执行。 d、run:过滤器的具体逻辑。 这里编写一个记录请求日志的过滤器。 1、新建一个类LogFilter继承抽象类ZuulFilter 1 2 3 4 5 6 7 8 9 10 11 12 13 14 15 16 17 18 19 20 21 22 23 24 25 26 27 28 29 30 31 32 33 34 35 36 37 38 39 40 41 42 43 44 package com.liuy.filter; import javax.servlet.http.HttpServletRequest; import org.slf4j.Logger; import org.slf4j.LoggerFactory; import com.netflix.zuul.ZuulFilter; import com.netflix.zuul.context.RequestContext; /** *打印请求日志 *记录请求日志的过滤器 *@description记录请求日志的过滤器 *@authorluis *@version1.0 *@date:2017年8月23日下午3:58:55 */ public class LogFilter extends ZuulFilter{ private static final LoggerLOG=LoggerFactory.getLogger(LogFilter. class ); @Override public Objectrun(){ RequestContextctx=RequestContext.getCurrentContext(); HttpServletRequestrequest=ctx.getRequest(); LogFilter.LOG.info(String.format( "打印日志:send%srequestto%s" ,request.getMethod(),request.getRequestURL().toString())); return null ; } @Override public boolean shouldFilter(){ return true ; } @Override public int filterOrder(){ return 1 ; } @Override public StringfilterType(){ return "pre" ; } } 2、修改启动类 1 2 3 4 5 6 7 8 9 10 11 12 13 14 15 16 17 18 19 20 21 22 23 24 25 26 27 28 29 package com.liuy; import org.springframework.boot.SpringApplication; import org.springframework.boot.autoconfigure.SpringBootApplication; import org.springframework.cloud.netflix.zuul.EnableZuulProxy; import org.springframework.context.annotation.Bean; import com.liuy.filter.LogFilter; /** *Zuul微服务网关-过滤器 *@descriptionZuul微服务网关-过滤器 *@authorluis *@version1.0 *@date:2017年8月22日下午2:54:04 */ @SpringBootApplication @EnableZuulProxy public class Application{ public static void main(String[]args){ SpringApplication.run(Application. class ,args); } /**自定义过滤器*/ @Bean public LogFilterpreRequestLogFilter(){ return new LogFilter(); } } 3、测试 a、依次启动eureka-server(4010)、provide-user(4011)、hystrix-consumer-movie(5012)、microservice-gateway-zuul-filter(5017) b、访问http://localhost:5017/hystrix-consumer-movie/user/1 效果: 3.3、禁用过滤器 Spring Cloud默认为Zuul编写了一些过滤器,如DebugFilter、FormBodyWrap-perFilter等,这些过滤器都放在spring-cloud-netflix-core这个jar包的org.springframework.cloud.netflix.zuul.filters包中。在某些场景下,我们可能需要禁用某些过滤器。 禁用方法非常简单,只需设置zuul.<SimpleClassName>.<filterType>.disable=true即可禁用SimpleClassName对应的过滤器。 以org.springframework.cloud.netflix.zuul.filters.pre.DebugFilter为例,如: 1 zuul.DebugFilter.post.disable=true 以前面我们自定义的com.liuy.filter.LogFilter为例,如: 1 zuul.LogFilter.pre.disable=true 本文转自我爱大金子博客51CTO博客,原文链接http://blog.51cto.com/1754966750/1958684如需转载请自行联系原作者 我爱大金子

优秀的个人博客,低调大师

springCloud(14):使用Zuul构建微服务网关-路由端点与路由配置详解

一、Zuul的路由端点 当@EnableZuulProxy与SpringBoot Actuator配合使用时,Zuul会暴露一个路由管理端点/routes。借助这个端点,可以方便、直观地查看以及管理Zuul的路由。 /routes端点的使用非常简单,使用GET方法访问该端点,即可返回Zuul当前映射的路由列表;使用POST方法访问该端点就会强制刷新Zuul当前映射的路由列表(尽管路由会自动刷新,Spring Cloud依然提供了强制立即刷新的方式)。 由于spring-cloud-starter-zuul已经包含了spring-boot-starter-actuator,因此之前编写的microservice-gateway-zuul已具备路由管理的能力。 测试: 1、依次启动eureka-server(4010)、eureka-server-2(5010)、provide-user(4011)、hystrix-consumer-movie(5012)、microservice-gateway-zuul(5016) 2、访问http://localhost:5016/routes,结果报401 解决:配置management.security.enabled=false 从中可以直观地看出路径到微服务的映射。 二、路由配置详解 前面已经编写了一个简单的Zuul网关,并让该网关代理了所有注册到Eureka Server的微服务。但在现实中可能只想让Zuul代理部分微服务,又或者需要对URL进行更加精确的控制。 2.1、自定义指定微服务的访问路径 配置zuul.routes.指定微服务的serverId = 指定路径即可。例如: 1 2 3 zuul: routes: hystrix-consumer-movie:/movie/** 效果: 2.2、忽略指定微服务 使用zuul.ignored-services配置需要忽略的服务,多个用逗号分隔,例如: 1 2 zuul: ignored-services:provide-user 效果: 2.3、忽略所有微服务,只路由指定微服务 将zuul.ignored-services设为'*',routes配置指定的微服务,例如: 1 2 3 4 zuul: ignored-services: '*' routes: hystrix-consumer-movie:/movie/** 效果: 2.4、同时指定微服务的serviceId和对应的路径 1 2 3 4 5 zuul: routes: user-route: #user-route只是给路由一个名称,可以随便命名 service-id:hystrix-consumer-movie path:/movie/** #service-id对应的路径 效果与2.1一样。 2.5、同时指定path和URL 1 2 3 4 5 zuul: routes: user-route: #user-route只是给路由一个名称,可以随便命名 url:http://localhost:5200/ #指定URL path:/movie/** #URL对应的路径 说明:当访问http://localhost:5016/movie/user/1时,则会转发至http://localhost:5200/user/1 效果: 注意:使用这种方式配置的路由不会作为HystrixCommand执行,同时也不能使用Ribbon来负载均衡多个URL 2.6、同时指定path和URL,并且不破坏Hystrix、Ribbon特性 1 2 3 4 5 6 7 8 9 10 11 zuul: routes: user-route: path:/user/** service-id:provide-user ribbon: eureka: enabled:false #为Ribbon禁用Eureka provide-user: #这边是serviceId ribbon: listOfServers:http://localhost:4011,http://localhost:4012 2.7、使用正则表达式指定Zuul的路由匹配规则 借助PatternServiceRouteMapper,实现从微服务到映射路由的正则配置。 1 2 3 4 5 6 7 8 9 10 11 12 13 @SpringBootApplication @EnableZuulProxy public class Application{ public static void main(String[]args){ SpringApplication.run(Application. class ,args); } /*正则表达式指定Zuul的路由匹配规则**/ @Bean public PatternServiceRouteMapperserviceRouteMapper(){ return new PatternServiceRouteMapper( "(?<name>^.+)-(?<version>v.+$)" , "${version}/${name}" ); } } 说明:上面将如provide-user-v2这个微服务,映射到/v2/provide-user/**这个路径上 例:我们队微服务的serviceId命名为provide-user-v2,那么我们可以这么来访问http://localhost:5017/v2/provide-user/1 2.8、路由前缀 设置 zuul.prefix 可以为所有的匹配增加前缀, 例如 /api,代理前缀默认会从请求路径中移除(通过zuul.stripPrefix=false可以关闭这个功能),zuul.stripPrefix默认为true. 如:配置全局的,与prefix一起使用 1 2 3 zuul: prefix:/api strip-prefix:true 当strip-prefix=true的时候 (http://localhost:5016/api/provide-user/1 -> http://localhost:4011/1) 当strip-prefix=false的时候(http://localhost:5016/api/provide-user/1 -> http://localhost:4011/api/1) 说明上面为true的配置,当访问zuul的/api/provide-user/1路径,请求将会被转发到provide-user微服务的/1路径 如:配置局部的,与path一起使用 1 2 3 4 5 zuul: routes: provide-user: path:/user/** strip-prefix:false 当strip-prefix=true的时候 (http://localhost:5016/user/1->http://localhost:4011/1) 当strip-prefix=false的时候(http://localhost:5016/user/1->http://localhost:4011/user/1) 说明上面为true的配置,当访问zuul的/user/1路径,请求将会被转发到provide-user微服务的/1路径 2.9、忽略某些路径 2.2中有讲有忽略微服务,但是有时需要更细粒度的路由控制。如,想让Zuul代理某个微服务,同时又想保护该微服务的某些敏感路径。此时,可使用ignored-patterns指定忽略的正则,如: 1 2 zuul: ignored-patterns:/**/provide-user/** #忽略所有包含/provide-user/的路径 本文转自我爱大金子博客51CTO博客,原文链接http://blog.51cto.com/1754966750/1958422如需转载请自行联系原作者 我爱大金子

优秀的个人博客,低调大师

springCloud(1):微服务简介

一、什么是微服务 微服务架构风格是一种将一个单一应用程序开发为一组小型服务的方法,每个服务运行在自己的进程中,服务间通信采用轻量级通信机制(通常用HTTP资源API)。 二、微服务架构特性 1、每个微服务可独立运行在自己的进程里 2、一系列独立运行的微服务共同构建起整个系统 3、每个服务为独立的业务开发,一个微服务只关注某个特定的功能,如:订单管理 4、微服务之间通过一些轻量级的通信机制进行通信,例如:通过RESTful API进行调用 5、可以使用不同的语言与数据存储技术 6、全自动的部署机制 三、微服务的优点与挑战 3.1、优点 1、易于开发和维护 一个微服务只会关注一个特定的业务功能。 2、单个微服务启动较快 单个微服务代码量较少 3、局部修改容易部署 单体应用只要要修改就得重新部署整个应用,微服务解决了这一问题 4、技术栈不受限 语言不受限制 5、按需伸缩 可根据需要,实现细粒度的扩展 3.2、挑战 1、运维成本较高 更多的服务意味着更多的运维投入 2、分布式固有的复杂性 使用微服务构建的是分布式系统,对于一个分布式系统,系统容错、网络延迟、分布式事务等都会带来巨大的挑战 3、接口调整成本高 微服务之间通过接口进行通信,如果修改某一个微服务的API,可能所有使用了该接口的微服务都需要做调整 4、重复劳动 很多服务可能都会使用到相同的功能,而这个功能并没有达到分解为一个微服务的程度。 四、微服务设计原则 4.1、单一职责原则 指的是一个单元(类、方法或者服务等)只应关注整个系统功能中单独、有界限的一部分。(SOLID原则之一) 4.2、服务自治原则 指每个微服务应具备独立的业务能力 、依赖与运行环境。应该与其它服务高度解耦,每个微服务从开发、测试、构建、部署,都应当可以独立运行,而不应该依赖其它的服务 4.3、轻量级通信原则 轻量级的通信机制应具备两点: 1、体量较轻 2、跨语言 微服务架构中,常用的协议有REST、AMQP、STOMP、MQTT等 4.4、微服务粒度 微服务的粒度是难点,也常常是争论的焦点。应当使用合理的粒度划分微服务,而不是一味的把服务做小。 五、微服务架构的实现 不仅需要开发框架的支持,还需要一些自动化的部署工具,以及IaaS、PaaS或CaaS的支持。 开发框架的选择: 可以使用Spring Cloud作为微服务开发框架。当然也可以使用Dubbo等 本文转自我爱大金子博客51CTO博客,原文链接http://blog.51cto.com/1754966750/1941022如需转载请自行联系原作者 我爱大金子

优秀的个人博客,低调大师

springCloud(5):Eureka的元数据与Eureka Server的rest端点

一、Eureka的元数据 1.1、简介 Eureka的元数据有两种:标准元数据和自定义元数据。 标准元数据指的是主机名、IP地址、端口号、状态页和健康检查等信息,这些信息都会被发布在服务注册表中,用于服务之间的调用。 自定义元数据可以使用eureka.instance.metadata-map配置,这些元数据可以在远程客户端中访问,但一般不会改变客户端的行为,除非客户端知道该元数据的含义。 1.2、操作 如下图: 1.2.1、修改demo2的application.properties配置 1 2 3 4 5 6 7 8 server.port=9093 spring.application.name=demo2 eureka.client.service-url.defaultZone=http://liuy1:9090/eureka/ eureka.instance.prefer-ip-address=true #显示指定IP eureka.instance.instance-id:${spring.cloud.client.ipAddress}:${server.port} #元数据 eureka.instance.metadata- map . my -metada=zhangsan 1.2.2、在demo1中访问 1 2 3 4 5 6 7 8 9 10 11 12 13 /** *查询DEMO2服务的信息 *@description查询DEMO2服务的信息 *@return *@throwsException *@author我爱大金子 *@version1.0 *@date:2017年6月24日下午4:25:15 */ @GetMapping ( "/demo-instance" ) public List<ServiceInstance>showInfo() throws Exception{ return discoveryClient.getInstances( "demo2" ); } 1.2.3、测试 访问:http://localhost:9092/demo-instance 二、Eureka Server的rest端点 非JVM的微服务可使用REST端点操作Eu-reka,从而实现注册与发现。此处不举例说明,详情请参考http://projects.spring.io/spring-cloud/ 本文转自我爱大金子博客51CTO博客,原文链接http://blog.51cto.com/1754966750/1941647如需转载请自行联系原作者 我爱大金子

资源下载

更多资源
Mario,低调大师唯一一个Java游戏作品

Mario,低调大师唯一一个Java游戏作品

马里奥是站在游戏界顶峰的超人气多面角色。马里奥靠吃蘑菇成长,特征是大鼻子、头戴帽子、身穿背带裤,还留着胡子。与他的双胞胎兄弟路易基一起,长年担任任天堂的招牌角色。

Oracle Database,又名Oracle RDBMS

Oracle Database,又名Oracle RDBMS

Oracle Database,又名Oracle RDBMS,或简称Oracle。是甲骨文公司的一款关系数据库管理系统。它是在数据库领域一直处于领先地位的产品。可以说Oracle数据库系统是目前世界上流行的关系数据库管理系统,系统可移植性好、使用方便、功能强,适用于各类大、中、小、微机环境。它是一种高效率、可靠性好的、适应高吞吐量的数据库方案。

Apache Tomcat7、8、9(Java Web服务器)

Apache Tomcat7、8、9(Java Web服务器)

Tomcat是Apache 软件基金会(Apache Software Foundation)的Jakarta 项目中的一个核心项目,由Apache、Sun 和其他一些公司及个人共同开发而成。因为Tomcat 技术先进、性能稳定,而且免费,因而深受Java 爱好者的喜爱并得到了部分软件开发商的认可,成为目前比较流行的Web 应用服务器。

Sublime Text 一个代码编辑器

Sublime Text 一个代码编辑器

Sublime Text具有漂亮的用户界面和强大的功能,例如代码缩略图,Python的插件,代码段等。还可自定义键绑定,菜单和工具栏。Sublime Text 的主要功能包括:拼写检查,书签,完整的 Python API , Goto 功能,即时项目切换,多选择,多窗口等等。Sublime Text 是一个跨平台的编辑器,同时支持Windows、Linux、Mac OS X等操作系统。