首页 文章 精选 留言 我的

精选列表

搜索[部署],共10000篇文章
优秀的个人博客,低调大师

完整部署CentOS7.2+OpenStack+kvm 云平台环境(5)--问题解决

一、 [root@openstack-server ~]# nova listERROR (CommandError): You must provide a username or user id via --os-username, --os-user-id, env[OS_USERNAME] or env[OS_USER_ID]解决办法:source一下环境变量来获取 token [root@openstack-server src]# source admin-openrc.sh [root@openstack-server src]# nova list +--------------------------------------+--------------+--------+------------+-------------+--------------------+ | ID | Name | Status | Task State | Power State | Networks | +--------------------------------------+--------------+--------+------------+-------------+--------------------+ | 056c37a4-3e94-4280-96dd-5bc003469647 | kvmserver-01 | ACTIVE | - | Running | flat=192.168.1.121 | +--------------------------------------+--------------+--------+------------+-------------+--------------------+ 二、 在进行keystone认证的时候,出现下面的报错:Maximum lock attempts on _lockusertokens-0b75ff3ce97a40caa6bf6753c962c82b occurred. (Disable debug mode to suppress these details.) (HTTP 500) (Request-ID: req-bb1c465e-33bc-412a-8ac2-c0d0a7e168ad) 或者An unexpected error prevented the server from fulfilling your request. (HTTP 500) (Request-ID: req-bb1c465e-33bc-412a-8ac2-c0d0a7e168ad) 问题产生的可能原因及解决办法:1)admin_token用户环境变量错误引起的。 解决办法: [root@linux-node1 ~]# export OS_TOKEN=35d6e6f377a889571bcf [root@linux-node1 ~]# export OS_URL=http://192.168.1.17:35357/v3 [root@linux-node1 ~]# export OS_IDENTITY_API_VERSION=32)keystone数据同步失败,没有获取到正确的token值引起的。 解决办法: 删除mysql数据库中的keystone库,重新创建keystone库; 重新生成一个token,在keystone.conf中重新指定admin_token对应的新的token指; 然后初始化keystone数据,重启memcaced服务,重新进行keystone的认证;3)获取的token无效引起的。 解决办法:修改keystone.conf文件中的[token]区域。 之前的配置,将token存放在memcache缓存中[token]provider = uuid //或者是provider = keystone.token.providers.uuid.Providerdriver = memcache //或者是driver = keystone.token.persistence.backends.memcache.Token 修改后的配置,将token存放在sql数据库中[token]provider = uuiddriver = keystone.token.persistence.backends.sql.Token---------------------------------------------------------------------------------------------------------------------------------------------- 说明下: keystone默认使用SQL数据库存储token,token默认有效期为1天(24h)。 Openstack中每个组件执行的每次命令(请求)都需要token来验证,每次访问都会创建token,增长速度非常快,token表数据也会越来越多。 随着时间的推移,无效的记录越来越多,企业私有云几天的量就可以几万条、几十万条。这么多无效的token导致针对token表的SQL语句变慢,性能也会变差! 这就需要手动写个定时脚本来清理token表。 但是更好的方法当然是将token存放在memcache缓存中,利用memcached特性,自动删除不使用的缓存: [memcache] servers = localhost:11211 [token] provider = keystone.token.providers.uuid.Provider driver = keystone.token.persistence.backends.memcache.Token 默认的配置是: [token] provider = keystone.token.providers.uuid.Provider driver = keystone.token.persistence.backends.sql.Token-------------------------------------------------------------------------------------------------------------------------------------------- 三、No handlers could be found for logger "oslo_config.cfg"原因:日志文件的配置项错误解决办法: 在/etc/keystone/keystone.conf、/etc/nova/nova.conf配置文件里修改logdir为: log_dir=/var/log/keystone log_dir=/var/log/nova 四、 之前在openstack里创建的虚拟机,后面删除了。但是再创建虚拟机并设置和之前删除的虚拟机一样的ip的时候,就报错说这个ip已经被占用了! 但是之前创建的虚拟机已经删除了,这是为什么? 这是因为虚拟机虽然删除了,但是所删除虚拟机在neutron组网内的ip还没有被真正释放出来。 需要登陆openstack的web界面,到“网络”部分里面进行删除: 五、 在上传镜像或查看镜像的时候,报错: [root@linux-node1 ~]# glance image-list500 Internal Server Error: The server has either erred or is incapable of performing the requested operation. (HTTP 500) 测试登陆数据库,发现登陆失败! [root@linux-node1 ~]# mysql -u glance -h 192.168.1.17 -p Enter password: ERROR 1040 (08004): Too many connections 解决办法,这也是centos7下修改mysql连接数的做法:1)临时修改 MariaDB [(none)]> set GLOBAL max_connections=1000; Query OK, 0 rows affected (0.00 sec) MariaDB [(none)]> show variables like "max_connections"; +-----------------+-------+ | Variable_name | Value | +-----------------+-------+ | max_connections | 1000 | +-----------------+-------+ 1 row in set (0.00 sec) 2)永久修改: 配置/etc/my.cnf [mysqld]新添加一行如下参数: max_connections=1000 重启mariadb服务,再次查看mariadb数据库最大连接数,可以看到最大连接数是214,并非我们设置的1000。 MariaDB [(none)]> show variables like 'max_connections'; +-----------------+-------+ | Variable_name | Value | +-----------------+-------+ | max_connections | 214 | +-----------------+-------+ 这是由于mariadb有默认打开文件数限制。可以通过配置/usr/lib/systemd/system/mariadb.service来调大打开文件数目。 配置/usr/lib/systemd/system/mariadb.service [Service]新添加两行如下参数: LimitNOFILE=10000 LimitNPROC=10000 重新加载系统服务,并重启mariadb服务 systemctl --system daemon-reload systemctl restart mariadb.service 再次查看mariadb数据库最大连接数,可以看到最大连接数已经是1000 MariaDB [(none)]> show variables like 'max_connections'; +-----------------+-------+ | Variable_name | Value | +-----------------+-------+ | max_connections | 1000 | +-----------------+-------+ 六、 openstack创建虚拟机后,vnc进入vm后发现: ifconfig命令没有看到eth0信息 [root@localhost ~]# ifconfig lo Link encap:Local Loopback inet addr:127.0.0.1 Mask:255.0.0.0 inet6 addr: ::1/128 Scope:Host UP LOOPBACK RUNNING MTU:16436 Metric:1 RX packets:0 errors:0 dropped:0 overruns:0 frame:0 TX packets:0 errors:0 dropped:0 overruns:0 carrier:0 collisions:0 txqueuelen:0 RX bytes:0 (0.0 b) TX bytes:0 (0.0 b) 重启网卡又报下面错误。 [root@localhost ~]# service network restart Shutting down loopback insterface: [ OK ] Bringing up loopback insterface: [ OK ]Bringing up interface eth0: Device eth0 does not seem to be present,delaying initialization. [FAILED] 解决办法:首先,打开/etc/udev/rules.d/70-persistent-net.rules内容如下面例子所示: [root@localhost ~]# cat /etc/udev/rules.d/70-persistent-net.rules # This file was automatically generated by the /lib/udev/write_net_rules # program, run by the persistent-net-generator.rules rules file. # # You can modify it, as long as you keep each rule on a single # line, and change only the value of the NAME= key. # PCI device 0x1af4:0x1000 (virtio-pci) SUBSYSTEM=="net", ACTION=="add", DRIVERS=="?*", ATTR{address}=="52:54:00:f0:f9:1c", ATTR{type}=="1", KERNEL=="eth*", NAME="eth0" # PCI device 0x1af4:0x1000 (virtio-pci) SUBSYSTEM=="net", ACTION=="add", DRIVERS=="?*", ATTR{address}=="fa:16:3e:e9:ad:89", ATTR{type}=="1", KERNEL=="eth*", NAME="eth1" 记录下,eth1网卡的mac地址fa:16:3e:e9:ad:89接下来,打开/etc/sysconfig/network-scripts/ifcfg-eth0 [root@localhost ~]# cat /etc/sysconfig/network-scripts/ifcfg-eth0 DEVICE="eth0" BOOTPROTO="dhcp" HWADDR="52:54:00:F0:F9:1C" IPV6INIT="yes" NM_CONTROLLED="yes" ONBOOT="yes" TYPE="Ethernet" UUID="af2a1e56-a502-42e9-9359-5c7dd6b1e1e9" 将ifcfg-eth0文件下的DEVICE设备名称改为“eth1”将mac地址即HWADDR改为上面记录的eth1的地址:fa:16:3e:e9:ad:89即修改后: [root@localhost ~]# cat /etc/sysconfig/network-scripts/ifcfg-eth0 DEVICE="eth1" BOOTPROTO="dhcp" HWADDR="fa:16:3e:e9:ad:89" IPV6INIT="yes" NM_CONTROLLED="yes" ONBOOT="yes" TYPE="Ethernet" UUID="af2a1e56-a502-42e9-9359-5c7dd6b1e1e9" 最后,重启网卡 [root@localhost ~]# /etc/init.d/network restart Shutting down interface eth0: [ OK ] Shutting down loopback interface: [ OK ] Bringing up loopback interface: [ OK ] Bringing up interface eth0: Determining IP information for eth1... done. [ OK ] 然后查看,发现ifconfig后有ip信息了! [root@localhost ~]# ifconfig eth1 Link encap:Ethernet HWaddr FA:16:3E:E9:AD:89 inet addr:192.168.1.102 Bcast:192.168.1.255 Mask:255.255.255.0 inet6 addr: fe80::f816:3eff:fee9:ad89/64 Scope:Link UP BROADCAST RUNNING MULTICAST MTU:1500 Metric:1 RX packets:678 errors:0 dropped:0 overruns:0 frame:0 TX packets:183 errors:0 dropped:0 overruns:0 carrier:0 collisions:0 txqueuelen:1000 RX bytes:78238 (76.4 KiB) TX bytes:27488 (26.8 KiB) lo Link encap:Local Loopback inet addr:127.0.0.1 Mask:255.0.0.0 inet6 addr: ::1/128 Scope:Host UP LOOPBACK RUNNING MTU:16436 Metric:1 RX packets:0 errors:0 dropped:0 overruns:0 frame:0 TX packets:0 errors:0 dropped:0 overruns:0 carrier:0 collisions:0 txqueuelen:0 RX bytes:0 (0.0 b) TX bytes:0 (0.0 b) 七、 openstack上创建vm实例后,状态为ERROR问题解决 解决方法参考:http://www.cnblogs.com/kevingrace/p/6015732.html ***************当你发现自己的才华撑不起野心时,就请安静下来学习吧*************** 本文转自散尽浮华博客园博客,原文链接:http://www.cnblogs.com/kevingrace/p/5811167.html,如需转载请自行联系原作者

优秀的个人博客,低调大师

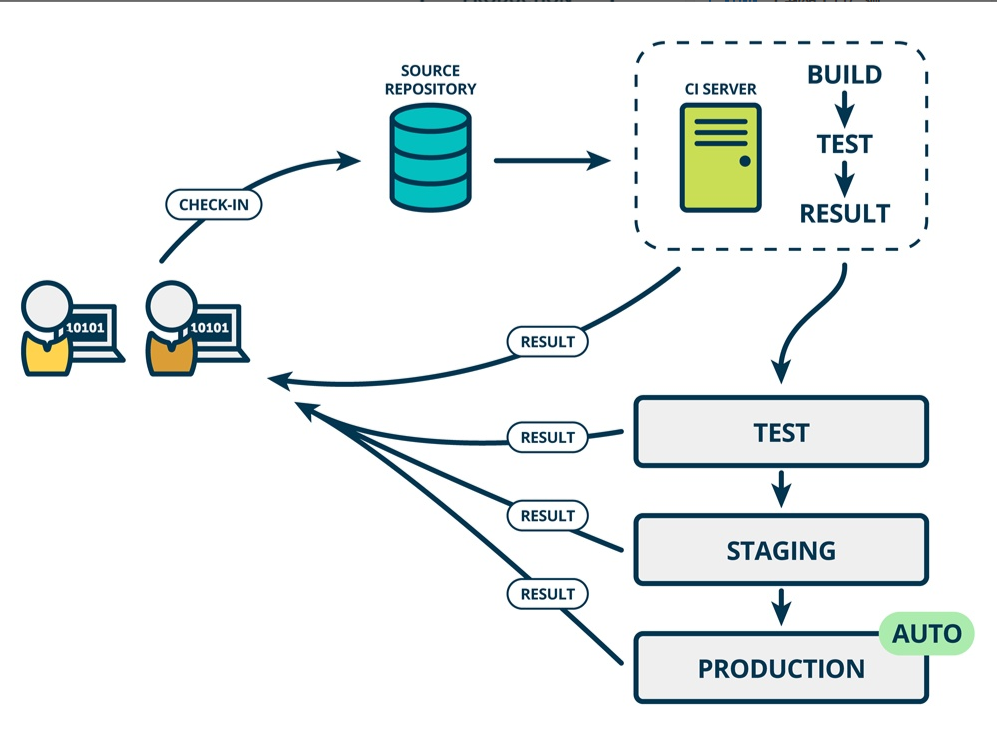
《微软-统一沟通-UC 2013》-1-部署-基础架构-1-install AD DS

《微软-统一沟通-UC 2013》 实验环境-产品: 1. Windows Server 2012 2. Sql Server 2012 3. Office Web Apps Server 2013 4. Exchange Server 2013 5. SharePoint Server 2013 6. Lync Server 2013 7. Forefront Threat Management Gateway 2010 *************** 只有你想不到的! 没有你做不到的! *************** Installing AD DS by using Server Manager AD DS can be installed in Windows Server 2012 by using the Add Roles Wizard in Server Manager, followed by the Active Directory Domain Services Configuration Wizard, which is new beginning in Windows Server 2012. The Active Directory Domain Services Installation Wizard (dcpromo.exe) is deprecated beginning in Windows Server 2012. The following sections explain how to create server pools in order to install and manage AD DS on multiple servers, and how to use the wizards to install AD DS. Creating server pools Server Manager can pool other servers on the network as long as they are accessible from the computer running Server Manager. Once pooled, you choose those servers for remote installation of AD DS or any other configuration options possible within Server Manager. The computer running Server Manager automatically pools itself. For more information about server pools, see Add Servers to Server Manager . Note In order to manage a domain-joined computer using Server Manager on a workgroup server, or vice-versa, additional configuration steps are needed. For more information, see “Add and manage servers in workgroups” in Add Servers to Server Manager . Installing AD DS Administrative credentials The credential requirements to install AD DS vary depending on which deployment configuration you choose. For more information, see Credential requirements to run Adprep.exe and install Active Directory Domain Services . Use the following procedures to install AD DS using the GUI method. The steps can be performed locally or remotely. For more detailed explanation of these steps, see the following topics: Deploying a Forest with Server Manager Install a Replica Windows Server 2012 Domain Controller in an Existing Domain (Level 200) Install a New Windows Server 2012 Active Directory Child or Tree Domain (Level 200) Install a Windows Server 2012 Active Directory Read-Only Domain Controller (RODC) (Level 200) To install AD DS by using Server Manager 1. In Server Manager, clickManageand clickAdd Roles and Featuresto start the Add Roles Wizard. 2. On theBefore you beginpage, clickNext. 3. On theSelect installation typepage, clickRole-based or feature-based installationand then clickNext. 4. On theSelect destination serverpage, clickSelect a server from the server pool, click the name of the server where you want to install AD DS and then clickNext. To select remote servers, first create a server pool and add the remote servers to it. For more information about creating server pools, see Add Servers to Server Manager . 5. On theSelect server rolespage, clickActive Directory Domain Services, then on theAdd Roles and Features Wizarddialog box, clickAdd Features, and then clickNext. 6. On theSelect featurespage, select any additional features you want to install and clickNext. 7. On theActive Directory Domain Servicespage, review the information and then clickNext. 8. On theConfirm installation selectionspage, clickInstall. 9. On theResultspage, verify that the installation succeeded, and clickPromote this server to a domain controllerto start the Active Directory Domain Services Configuration Wizard. Important If you close Add Roles Wizard at this point without starting the Active Directory Domain Services Configuration Wizard, you can restart it by clicking Tasks in Server Manager. 10. On theDeployment Configurationpage, choose one of the following options: o If you are installing an additional domain controller in an existing domain, clickAdd a domain controller to an existing domain, and type the name of the domain (for example, emea.corp.contoso.com) or clickSelect…to choose a domain, and credentials (for example, specify an account that is a member of the Domain Admins group) and then clickNext. Note The name of the domain and current user credentials are supplied by default only if the machine is domain-joined and you are performing a local installation. If you are installing AD DS on a remote server, you need to specify the credentials, by design. If current user credentials are not sufficient to perform the installation, clickChange…in order to specify different credentials. o For more information, see Install a Replica Windows Server 2012 Domain Controller in an Existing Domain (Level 200) . o If you are installing a new child domain, clickAdd a new domain to an existing forest, forSelect domain type, selectChild Domain, type or browse to the name of the parent domain DNS name (for example, corp.contoso.com), type the relative name of the new child domain (for example emea), type credentials to use to create the new domain, and then clickNext. For more information, see Install a New Windows Server 2012 Active Directory Child or Tree Domain (Level 200) . o If you are installing a new domain tree, clickAdd new domain to an existing forest, forSelect domain type, chooseTree Domain, type the name of the root domain (for example, corp.contoso.com), type the DNS name of the new domain (for example, fabrikam.com), type credentials to use to create the new domain, and then clickNext. For more information, see Install a New Windows Server 2012 Active Directory Child or Tree Domain (Level 200) . o If you are installing a new forest, clickAdd a new forestand then type the name of the root domain (for example, corp.contoso.com). For more information, see Install a New Windows Server 2012 Active Directory Forest (Level 200) . 11. On theDomain Controller Optionspage, choose one of the following options: o If you are creating a new forest or domain, select the domain and forest functional levels, clickDomain Name System (DNS) server, specify the DSRM password, and then clickNext. o If you are adding a domain controller to an existing domain, clickDomain Name System (DNS) server,Global Catalog (GC), orRead Only Domain Controller (RODC)as needed, choose the site name, and type the DSRM password and then clickNext. For more information about which options on this page are available or not available under different conditions, see Domain Controller Options . 12. On theDNS Optionspage (which appears only if you install a DNS server), clickUpdate DNS delegationas needed. 13. If you do, provide credentials that have permission to create DNS delegation records in the parent DNS zone. If a DNS server that hosts the parent zone cannot be contacted, theUpdate DNS Delegationoption is not available. For more information about whether you need to update the DNS delegation, see Understanding Zone Delegation . If you attempt to update the DNS delegation and encounter an error, see DNS Options . 14. On theRODC Optionspage (which appears only if you install an RODC), specify the name of a group or user who will manage the RODC, add accounts to or remove accounts from the Allowed or Denied password replication groups, and then clickNext. For more information, see Password Replication Policy . 15. On theAdditional Optionspage, choose one of the following options: o If you are creating a new domain, type a new NetBIOS name or verify the default NetBIOS name of the domain, and then clickNext. o If you are adding a domain controller to an existing domain, select the domain controller that you want to replicate the AD DS installation data from (or allow the wizard to select any domain controller). If you are installing from media, clickInstall from media pathtype and verify the path to the installation source files, and then clickNext. You cannot use install from media (IFM) to install the first domain controller in a domain. IFM does not work across different operating system versions. In other words, in order to install an additional domain controller that runs Windows Server 2012 by using IFM, you must create the backup media on a Windows Server 2012 domain controller. For more information about IFM, see Installing an Additional Domain Controller by Using IFM . 16. On thePathspage, type the locations for the Active Directory database, log files, and SYSVOL folder (or accept default locations), and clickNext. Important Do not store the Active Directory database, log files, or SYSVOL folder on a data volume formatted with Resilient File System (ReFS). 17. On thePreparation Optionspage, type credentials that are sufficient to run adprep. For more information, see Credential requirements to run Adprep.exe and install Active Directory Domain Services . 18. On theReview Optionspage, confirm your selections, clickView scriptif you want to export the settings to a Windows PowerShell script, and then clickNext. 19. On thePrerequisites Checkpage, confirm that prerequisite validation completed and then clickInstall. Automatically Restart OS 20. On theResultspage, verify that the server was successfully configured as a domain controller. The server will be restarted automatically to complete the AD DS installation. 本文转自 CTO_LiuJinFeng 51CTO博客,原文链接:http://blog.51cto.com/dynamic/1155585,如需转载请自行联系原作者

优秀的个人博客,低调大师

《微软-统一沟通-UC 2013》-1-部署-基础架构-2-Add a domain controller

《微软-统一沟通-UC 2013》 实验环境-产品: 1. Windows Server 2012 2. Sql Server 2012 3. Office Web Apps Server 2013 4. Exchange Server 2013 5. SharePoint Server 2013 6. Lync Server 2013 7. Forefront Threat Management Gateway 2010 ***************** 只有你想不到的! 没有你做不到的! ***************** Installing AD DS by using Server Manager AD DS can be installed in Windows Server 2012 by using the Add Roles Wizard in Server Manager, followed by the Active Directory Domain Services Configuration Wizard, which is new beginning in Windows Server 2012. The Active Directory Domain Services Installation Wizard (dcpromo.exe) is deprecated beginning in Windows Server 2012. The following sections explain how to create server pools in order to install and manage AD DS on multiple servers, and how to use the wizards to install AD DS. Creating server pools Server Manager can pool other servers on the network as long as they are accessible from the computer running Server Manager. Once pooled, you choose those servers for remote installation of AD DS or any other configuration options possible within Server Manager. The computer running Server Manager automatically pools itself. For more information about server pools, see Add Servers to Server Manager . Note In order to manage a domain-joined computer using Server Manager on a workgroup server, or vice-versa, additional configuration steps are needed. For more information, see “Add and manage servers in workgroups” in Add Servers to Server Manager . Installing AD DS Administrative credentials The credential requirements to install AD DS vary depending on which deployment configuration you choose. For more information, see Credential requirements to run Adprep.exe and install Active Directory Domain Services . Use the following procedures to install AD DS using the GUI method. The steps can be performed locally or remotely. For more detailed explanation of these steps, see the following topics: Deploying a Forest with Server Manager Install a Replica Windows Server 2012 Domain Controller in an Existing Domain (Level 200) Install a New Windows Server 2012 Active Directory Child or Tree Domain (Level 200) Install a Windows Server 2012 Active Directory Read-Only Domain Controller (RODC) (Level 200) To install AD DS by using Server Manager 1. In Server Manager, clickManageand clickAdd Roles and Featuresto start the Add Roles Wizard. 2. On theBefore you beginpage, clickNext. 3. On theSelect installation typepage, clickRole-based or feature-based installationand then clickNext. 4. On theSelect destination serverpage, clickSelect a server from the server pool, click the name of the server where you want to install AD DS and then clickNext. To select remote servers, first create a server pool and add the remote servers to it. For more information about creating server pools, see Add Servers to Server Manager . 5. On theSelect server rolespage, clickActive Directory Domain Services, then on theAdd Roles and Features Wizarddialog box, clickAdd Features, and then clickNext. 6. On theSelect featurespage, select any additional features you want to install and clickNext. 7. On theActive Directory Domain Servicespage, review the information and then clickNext. 8. On theConfirm installation selectionspage, clickInstall. 9. On theResultspage, verify that the installation succeeded, and clickPromote this server to a domain controllerto start the Active Directory Domain Services Configuration Wizard. Important If you close Add Roles Wizard at this point without starting the Active Directory Domain Services Configuration Wizard, you can restart it by clicking Tasks in Server Manager. 10. On theDeployment Configurationpage, choose one of the following options: o If you are installing an additional domain controller in an existing domain, clickAdd a domain controller to an existing domain, and type the name of the domain (for example, emea.corp.contoso.com) or clickSelect…to choose a domain, and credentials (for example, specify an account that is a member of the Domain Admins group) and then clickNext. Note The name of the domain and current user credentials are supplied by default only if the machine is domain-joined and you are performing a local installation. If you are installing AD DS on a remote server, you need to specify the credentials, by design. If current user credentials are not sufficient to perform the installation, clickChange…in order to specify different credentials. o For more information, see Install a Replica Windows Server 2012 Domain Controller in an Existing Domain (Level 200) . o If you are installing a new child domain, clickAdd a new domain to an existing forest, forSelect domain type, selectChild Domain, type or browse to the name of the parent domain DNS name (for example, corp.contoso.com), type the relative name of the new child domain (for example emea), type credentials to use to create the new domain, and then clickNext. For more information, see Install a New Windows Server 2012 Active Directory Child or Tree Domain (Level 200) . o If you are installing a new domain tree, clickAdd new domain to an existing forest, forSelect domain type, chooseTree Domain, type the name of the root domain (for example, corp.contoso.com), type the DNS name of the new domain (for example, fabrikam.com), type credentials to use to create the new domain, and then clickNext. For more information, see Install a New Windows Server 2012 Active Directory Child or Tree Domain (Level 200) . o If you are installing a new forest, clickAdd a new forestand then type the name of the root domain (for example, corp.contoso.com). For more information, see Install a New Windows Server 2012 Active Directory Forest (Level 200) . 11. On theDomain Controller Optionspage, choose one of the following options: o If you are creating a new forest or domain, select the domain and forest functional levels, clickDomain Name System (DNS) server, specify the DSRM password, and then clickNext. o If you are adding a domain controller to an existing domain, clickDomain Name System (DNS) server,Global Catalog (GC), orRead Only Domain Controller (RODC)as needed, choose the site name, and type the DSRM password and then clickNext. For more information about which options on this page are available or not available under different conditions, see Domain Controller Options . 12. On theDNS Optionspage (which appears only if you install a DNS server), clickUpdate DNS delegationas needed. 13. If you do, provide credentials that have permission to create DNS delegation records in the parent DNS zone. If a DNS server that hosts the parent zone cannot be contacted, theUpdate DNS Delegationoption is not available. For more information about whether you need to update the DNS delegation, see Understanding Zone Delegation . If you attempt to update the DNS delegation and encounter an error, see DNS Options . 14. On theRODC Optionspage (which appears only if you install an RODC), specify the name of a group or user who will manage the RODC, add accounts to or remove accounts from the Allowed or Denied password replication groups, and then clickNext. For more information, see Password Replication Policy . 15. On theAdditional Optionspage, choose one of the following options: o If you are creating a new domain, type a new NetBIOS name or verify the default NetBIOS name of the domain, and then clickNext. o If you are adding a domain controller to an existing domain, select the domain controller that you want to replicate the AD DS installation data from (or allow the wizard to select any domain controller). If you are installing from media, clickInstall from media pathtype and verify the path to the installation source files, and then clickNext. You cannot use install from media (IFM) to install the first domain controller in a domain. IFM does not work across different operating system versions. In other words, in order to install an additional domain controller that runs Windows Server 2012 by using IFM, you must create the backup media on a Windows Server 2012 domain controller. For more information about IFM, see Installing an Additional Domain Controller by Using IFM . 16. On thePathspage, type the locations for the Active Directory database, log files, and SYSVOL folder (or accept default locations), and clickNext. Important Do not store the Active Directory database, log files, or SYSVOL folder on a data volume formatted with Resilient File System (ReFS). 17. On thePreparation Optionspage, type credentials that are sufficient to run adprep. For more information, see Credential requirements to run Adprep.exe and install Active Directory Domain Services . 18. On theReview Optionspage, confirm your selections, clickView scriptif you want to export the settings to a Windows PowerShell script, and then clickNext. 19. On thePrerequisites Checkpage, confirm that prerequisite validation completed and then clickInstall. Automatically Restart OS 20. On theResultspage, verify that the server was successfully configured as a domain controller. The server will be restarted automatically to complete the AD DS installation. 本文转自 CTO_LiuJinFeng 51CTO博客,原文链接:http://blog.51cto.com/dynamic/1156186,如需转载请自行联系原作者

资源下载

更多资源
优质分享App

优质分享App

近一个月的开发和优化,本站点的第一个app全新上线。该app采用极致压缩,本体才4.36MB。系统里面做了大量数据访问、缓存优化。方便用户在手机上查看文章。后续会推出HarmonyOS的适配版本。

Spring

Spring

Spring框架(Spring Framework)是由Rod Johnson于2002年提出的开源Java企业级应用框架,旨在通过使用JavaBean替代传统EJB实现方式降低企业级编程开发的复杂性。该框架基于简单性、可测试性和松耦合性设计理念,提供核心容器、应用上下文、数据访问集成等模块,支持整合Hibernate、Struts等第三方框架,其适用范围不仅限于服务器端开发,绝大多数Java应用均可从中受益。

Rocky Linux

Rocky Linux

Rocky Linux(中文名:洛基)是由Gregory Kurtzer于2020年12月发起的企业级Linux发行版,作为CentOS稳定版停止维护后与RHEL(Red Hat Enterprise Linux)完全兼容的开源替代方案,由社区拥有并管理,支持x86_64、aarch64等架构。其通过重新编译RHEL源代码提供长期稳定性,采用模块化包装和SELinux安全架构,默认包含GNOME桌面环境及XFS文件系统,支持十年生命周期更新。

Sublime Text

Sublime Text

Sublime Text具有漂亮的用户界面和强大的功能,例如代码缩略图,Python的插件,代码段等。还可自定义键绑定,菜单和工具栏。Sublime Text 的主要功能包括:拼写检查,书签,完整的 Python API , Goto 功能,即时项目切换,多选择,多窗口等等。Sublime Text 是一个跨平台的编辑器,同时支持Windows、Linux、Mac OS X等操作系统。

用户登录
用户注册