文章首发于微信公众号《程序员果果》
地址:https://mp.weixin.qq.com/s/47TUd96NMz67_PCDyvyInQ
简介
Eureka是一种基于REST(Representational State Transfer)的服务,主要用于AWS云,用于定位服务,以实现中间层服务器的负载平衡和故障转移。我们将此服务称为Eureka Server。Eureka还附带了一个基于Java的客户端组件Eureka Client,它使与服务的交互变得更加容易。客户端还有一个内置的负载均衡器,可以进行基本的循环负载均衡。在Netflix,一个更复杂的负载均衡器包含Eureka基于流量,资源使用,错误条件等多种因素提供加权负载平衡,以提供卓越的弹性。
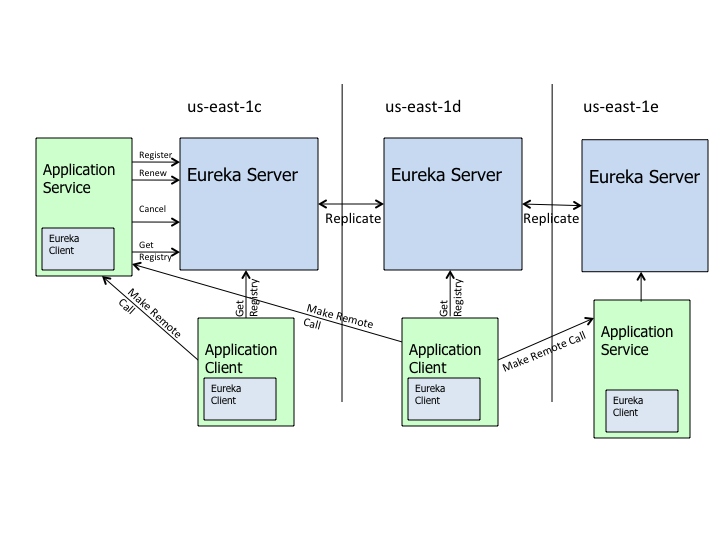
先看一张 github 上 Netflix Eureka 的一架构图,如下:
![]()
从图可以看出在这个体系中,有2个角色,即Eureka Server和Eureka Client。而Eureka Client又分为Applicaton Service和Application Client,即服务提供者何服务消费者。 每个区域有一个Eureka集群,并且每个区域至少有一个eureka服务器可以处理区域故障,以防服务器瘫痪。
Eureka Client 在 Eureka Server 注册,然后Eureka Client 每30秒向 Eureka Server 发送一次心跳来更新一次租约。如果 Eureka Client 无法续订租约几次,则会在大约90秒内 Eureka Server 将其从服务器注册表中删除。注册信息和续订将复制到群集中的所有 Eureka Server 节点。来自任何区域的客户端都可以查找注册表信息(每30秒发生一次)根据这些注册表信息,Application Client 可以远程调用 Applicaton Service 来消费服务。
源码分析
基于Spring Cloud的 eureka 的 client 端在启动类上加上 @EnableDiscoveryClient 注解,就可以 用 NetFlix 提供的 Eureka client。下面就以 @EnableDiscoveryClient 为入口,进行Eureka Client的源码分析。
@EnableDiscoveryClient,通过源码可以发现这是一个标记注解:
/**
 * Annotation to enable a DiscoveryClient implementation.
 * @author Spencer Gibb
 */
@Target(ElementType.TYPE)
@Retention(RetentionPolicy.RUNTIME)
@Documented
@Inherited
@Import(EnableDiscoveryClientImportSelector.class)
public @interface EnableDiscoveryClient {

    boolean autoRegister() default true;
}
通过注释可以知道 @EnableDiscoveryClient 注解是用来 启用 DiscoveryClient 的实现,DiscoveryClient接口代码如下:
public interface DiscoveryClient {

    String description();

    List<ServiceInstance> getInstances(String serviceId);

    List<String> getServices();

}
接口说明:
- description():实现描述。
- getInstances(String serviceId):获取与特定serviceId关联的所有ServiceInstance
- getServices():返回所有已知的服务ID
DiscoveryClient 接口的实现结构图:
![]()
- EurekaDiscoveryClient:Eureka 的 DiscoveryClient 实现类。
- CompositeDiscoveryClient:用于排序可用客户端的发现客户端的顺序。
- NoopDiscoveryClient:什么都不做的服务发现实现类,已经被废弃。
- SimpleDiscoveryClient:简单的服务发现实现类 SimpleDiscoveryClient,具体的服务实例从 SimpleDiscoveryProperties 配置中获取。
EurekaDiscoveryClient 是 Eureka 对 DiscoveryClient接口的实现,代码如下:
public class EurekaDiscoveryClient implements DiscoveryClient {

    public static final String DESCRIPTION = "Spring Cloud Eureka Discovery Client";

    private final EurekaInstanceConfig config;

    private final EurekaClient eurekaClient;

    public EurekaDiscoveryClient(EurekaInstanceConfig config, EurekaClient eurekaClient) {
        this.config = config;
        this.eurekaClient = eurekaClient;
    }

    @Override
    public String description() {
        return DESCRIPTION;
    }

    @Override
    public List<ServiceInstance> getInstances(String serviceId) {
        List<InstanceInfo> infos = this.eurekaClient.getInstancesByVipAddress(serviceId,
                false);
        List<ServiceInstance> instances = new ArrayList<>();
        for (InstanceInfo info : infos) {
            instances.add(new EurekaServiceInstance(info));
        }
        return instances;
    }

    @Override
    public List<String> getServices() {
        Applications applications = this.eurekaClient.getApplications();
        if (applications == null) {
            return Collections.emptyList();
        }
        List<Application> registered = applications.getRegisteredApplications();
        List<String> names = new ArrayList<>();
        for (Application app : registered) {
            if (app.getInstances().isEmpty()) {
                continue;
            }
            names.add(app.getName().toLowerCase());

        }
        return names;
    }

}
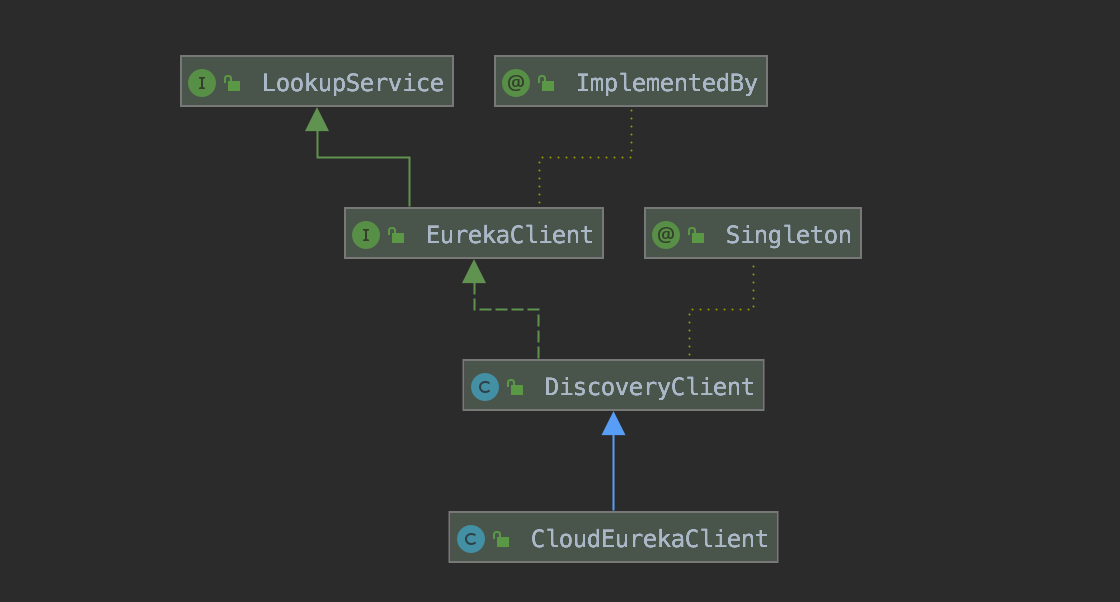
从代码可以看出 EurekaDiscoveryClient 实现了 DiscoveryClient 定义的规范接口,真正实现发现服务的是 EurekaClient,下面是 EurekaClient 依赖结构图:
![]()
EurekaClient 唯一实现类 DiscoveryClient,DiscoveryClient 的构造方法如下:
@Inject
DiscoveryClient(ApplicationInfoManager applicationInfoManager, EurekaClientConfig config, AbstractDiscoveryClientOptionalArgs args,
                Provider<BackupRegistry> backupRegistryProvider) {
    //省略...

    try {
        // default size of 2 - 1 each for heartbeat and cacheRefresh
        scheduler = Executors.newScheduledThreadPool(2,
                new ThreadFactoryBuilder()
                        .setNameFormat("DiscoveryClient-%d")
                        .setDaemon(true)
                        .build());

        heartbeatExecutor = new ThreadPoolExecutor(
                1, clientConfig.getHeartbeatExecutorThreadPoolSize(), 0, TimeUnit.SECONDS,
                new SynchronousQueue<Runnable>(),
                new ThreadFactoryBuilder()
                        .setNameFormat("DiscoveryClient-HeartbeatExecutor-%d")
                        .setDaemon(true)
                        .build()
        );  // use direct handoff

        cacheRefreshExecutor = new ThreadPoolExecutor(
                1, clientConfig.getCacheRefreshExecutorThreadPoolSize(), 0, TimeUnit.SECONDS,
                new SynchronousQueue<Runnable>(),
                new ThreadFactoryBuilder()
                        .setNameFormat("DiscoveryClient-CacheRefreshExecutor-%d")
                        .setDaemon(true)
                        .build()
        );  // use direct handoff
         //省略...
       initScheduledTasks();
    try {
        Monitors.registerObject(this);
    } catch (Throwable e) {
        logger.warn("Cannot register timers", e);
    }
    //省略...
}
可以看到这个构造方法里面,主要做了下面几件事:
- 创建了scheduler定时任务的线程池,heartbeatExecutor心跳检查线程池(服务续约),cacheRefreshExecutor(服务获取)
- 然后initScheduledTasks()开启上面三个线程池,往上面3个线程池分别添加相应任务。然后创建了一个instanceInfoReplicator(Runnable任务),然后调用InstanceInfoReplicator.start方法,把这个任务放进上面scheduler定时任务线程池(服务注册并更新)。
服务注册(Registry)
上面说了,initScheduledTasks()方法中调用了InstanceInfoReplicator.start()方法,InstanceInfoReplicator 的 run()方法代码如下:
public void run() {
    try {
        discoveryClient.refreshInstanceInfo();

        Long dirtyTimestamp = instanceInfo.isDirtyWithTime();
        if (dirtyTimestamp != null) {
            discoveryClient.register();
            instanceInfo.unsetIsDirty(dirtyTimestamp);
        }
    } catch (Throwable t) {
        logger.warn("There was a problem with the instance info replicator", t);
    } finally {
        Future next = scheduler.schedule(this, replicationIntervalSeconds, TimeUnit.SECONDS);
        scheduledPeriodicRef.set(next);
    }
}
发现 InstanceInfoReplicator的run方法,run方法中会调用DiscoveryClient的register方法。DiscoveryClient 的 register方法 代码如下:
/**
 * Register with the eureka service by making the appropriate REST call.
 */
boolean register() throws Throwable {
    logger.info(PREFIX + "{}: registering service...", appPathIdentifier);
    EurekaHttpResponse<Void> httpResponse;
    try {
        httpResponse = eurekaTransport.registrationClient.register(instanceInfo);
    } catch (Exception e) {
        logger.warn(PREFIX + "{} - registration failed {}", appPathIdentifier, e.getMessage(), e);
        throw e;
    }
    if (logger.isInfoEnabled()) {
        logger.info(PREFIX + "{} - registration status: {}", appPathIdentifier, httpResponse.getStatusCode());
    }
    return httpResponse.getStatusCode() == 204;
}
最终又经过一系列调用,最终会调用到AbstractJerseyEurekaHttpClient的register方法,代码如下:
public EurekaHttpResponse<Void> register(InstanceInfo info) {
    String urlPath = "apps/" + info.getAppName();
    ClientResponse response = null;
    try {
        Builder resourceBuilder = jerseyClient.resource(serviceUrl).path(urlPath).getRequestBuilder();
        addExtraHeaders(resourceBuilder);
        response = resourceBuilder
                .header("Accept-Encoding", "gzip")
                .type(MediaType.APPLICATION_JSON_TYPE)
                .accept(MediaType.APPLICATION_JSON)
                .post(ClientResponse.class, info);
        return anEurekaHttpResponse(response.getStatus()).headers(headersOf(response)).build();
    } finally {
        if (logger.isDebugEnabled()) {
            logger.debug("Jersey HTTP POST {}/{} with instance {}; statusCode={}", serviceUrl, urlPath, info.getId(),
                    response == null ? "N/A" : response.getStatus());
        }
        if (response != null) {
            response.close();
        }
    }
}
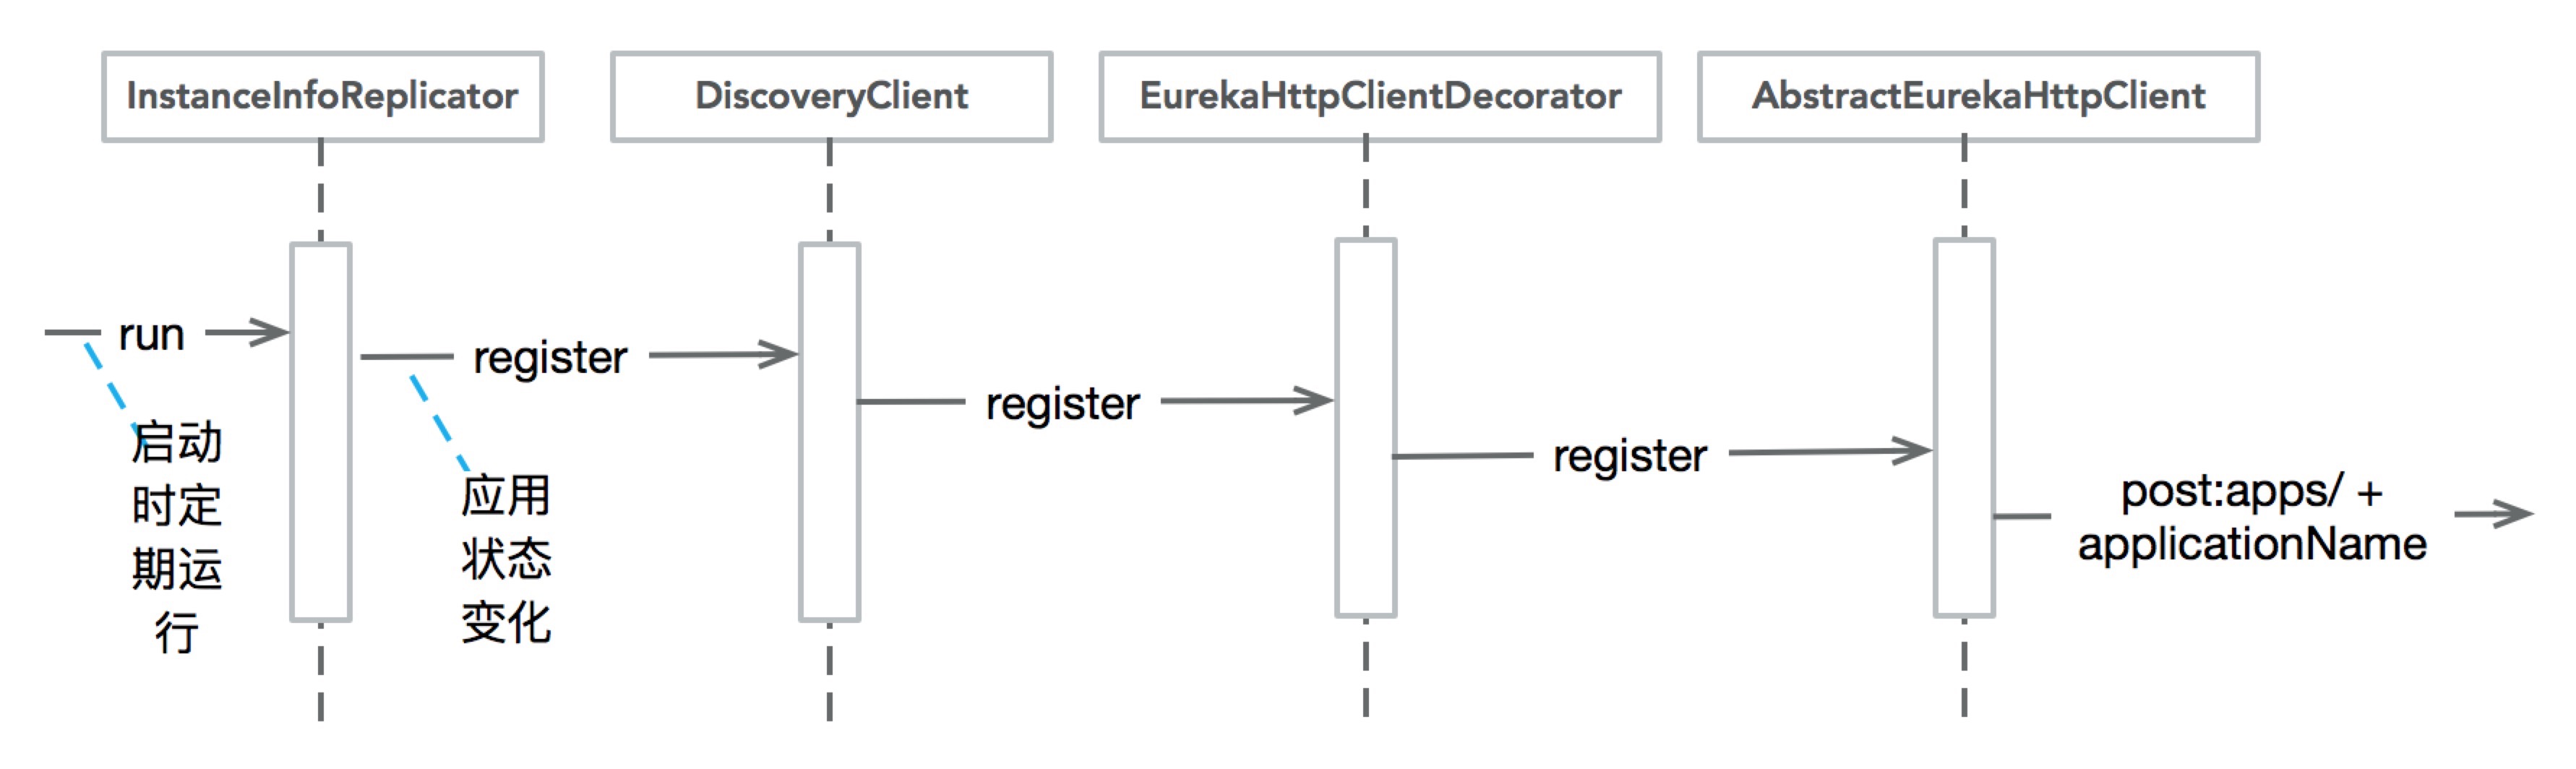
可以看到最终通过http rest请求eureka server端,把应用自身的InstanceInfo实例注册给server端,我们再来完整梳理一下服务注册流程:
![]()
Renew服务续约
服务续约和服务注册非常类似,HeartbeatThread 代码如下:
private class HeartbeatThread implements Runnable {

    public void run() {
        if (renew()) {
            //更新最后一次心跳的时间
            lastSuccessfulHeartbeatTimestamp = System.currentTimeMillis();
        }
    }
}
// 续约的主方法
boolean renew() {
    EurekaHttpResponse<InstanceInfo> httpResponse;
    try {
        httpResponse = eurekaTransport.registrationClient.sendHeartBeat(instanceInfo.getAppName(), instanceInfo.getId(), instanceInfo, null);
        logger.debug(PREFIX + "{} - Heartbeat status: {}", appPathIdentifier, httpResponse.getStatusCode());
        if (httpResponse.getStatusCode() == 404) {
            REREGISTER_COUNTER.increment();
            logger.info(PREFIX + "{} - Re-registering apps/{}", appPathIdentifier, instanceInfo.getAppName());
            long timestamp = instanceInfo.setIsDirtyWithTime();
            boolean success = register();
            if (success) {
                instanceInfo.unsetIsDirty(timestamp);
            }
            return success;
        }
        return httpResponse.getStatusCode() == 200;
    } catch (Throwable e) {
        logger.error(PREFIX + "{} - was unable to send heartbeat!", appPathIdentifier, e);
        return false;
    }
}
发送心跳 ,请求eureka server 端 ,如果接口返回值为404,就是说服务不存在,那么重新走注册流程。
如果接口返回值为404,就是说不存在,从来没有注册过,那么重新走注册流程。
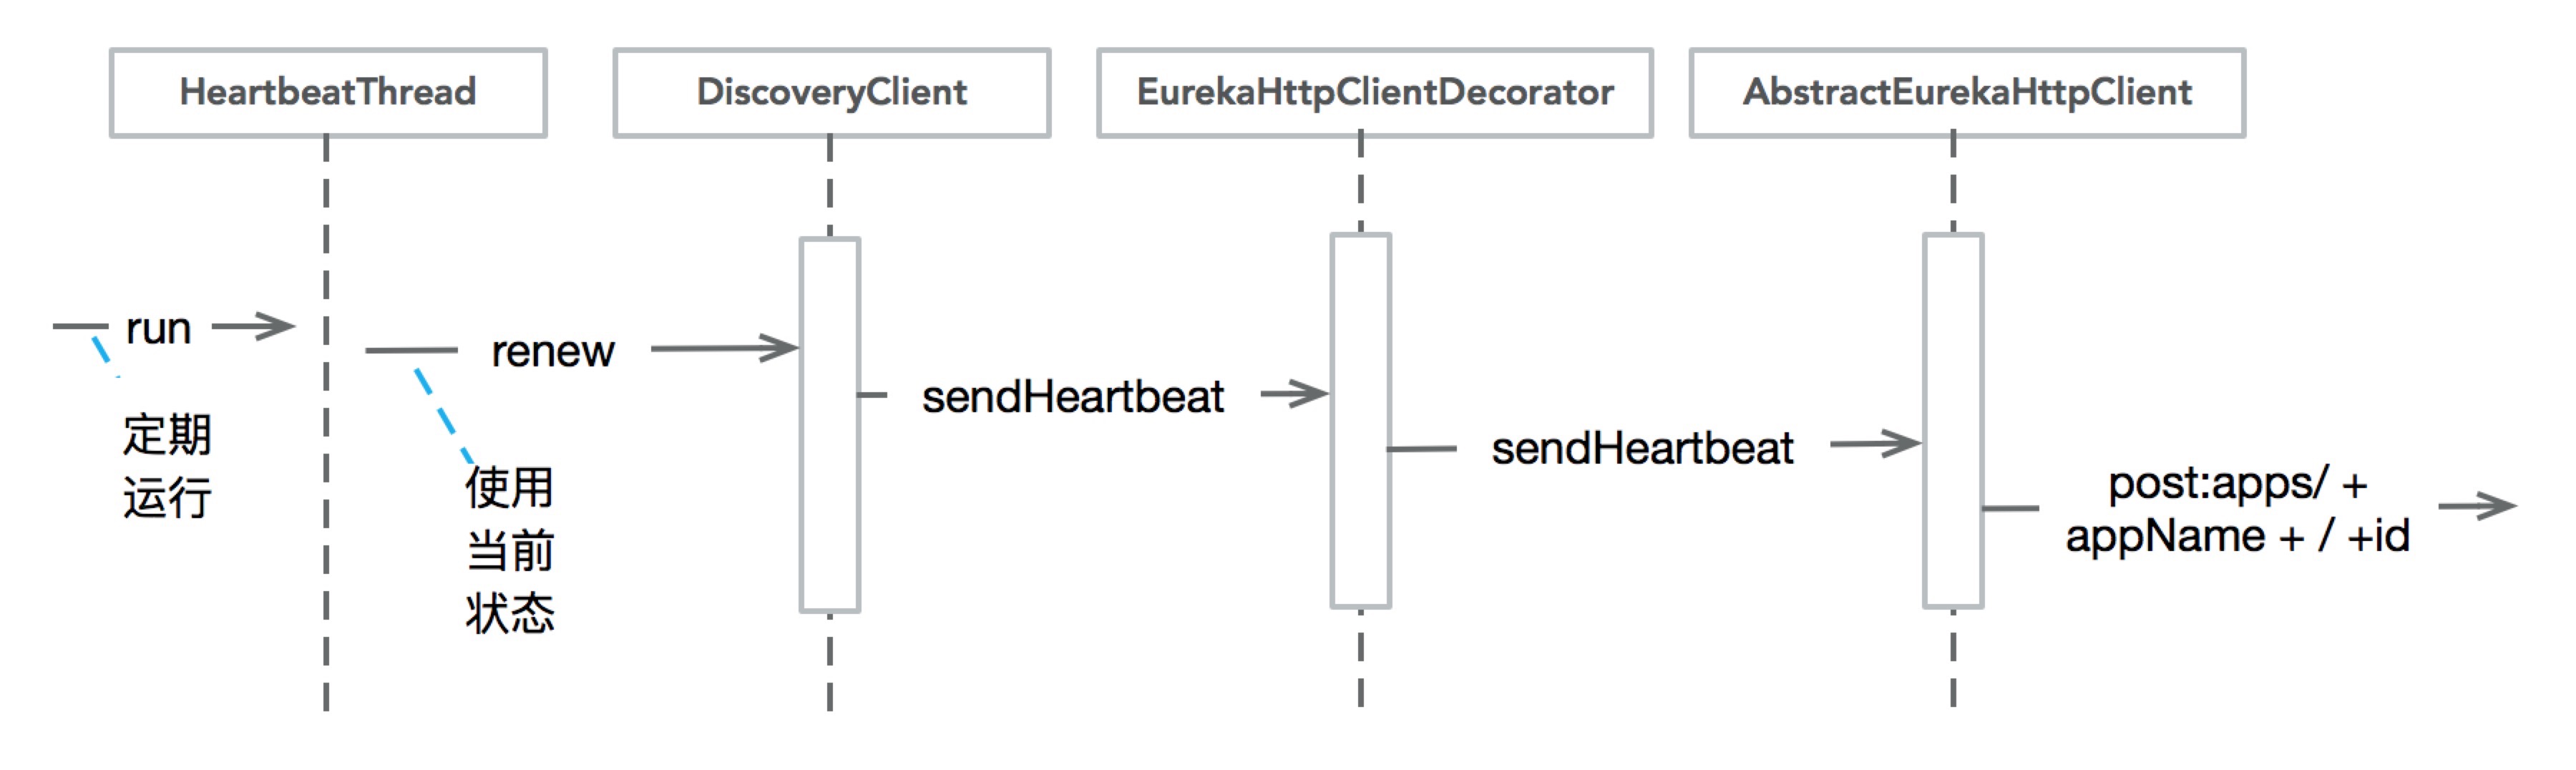
服务续约流程如下图:
![]()
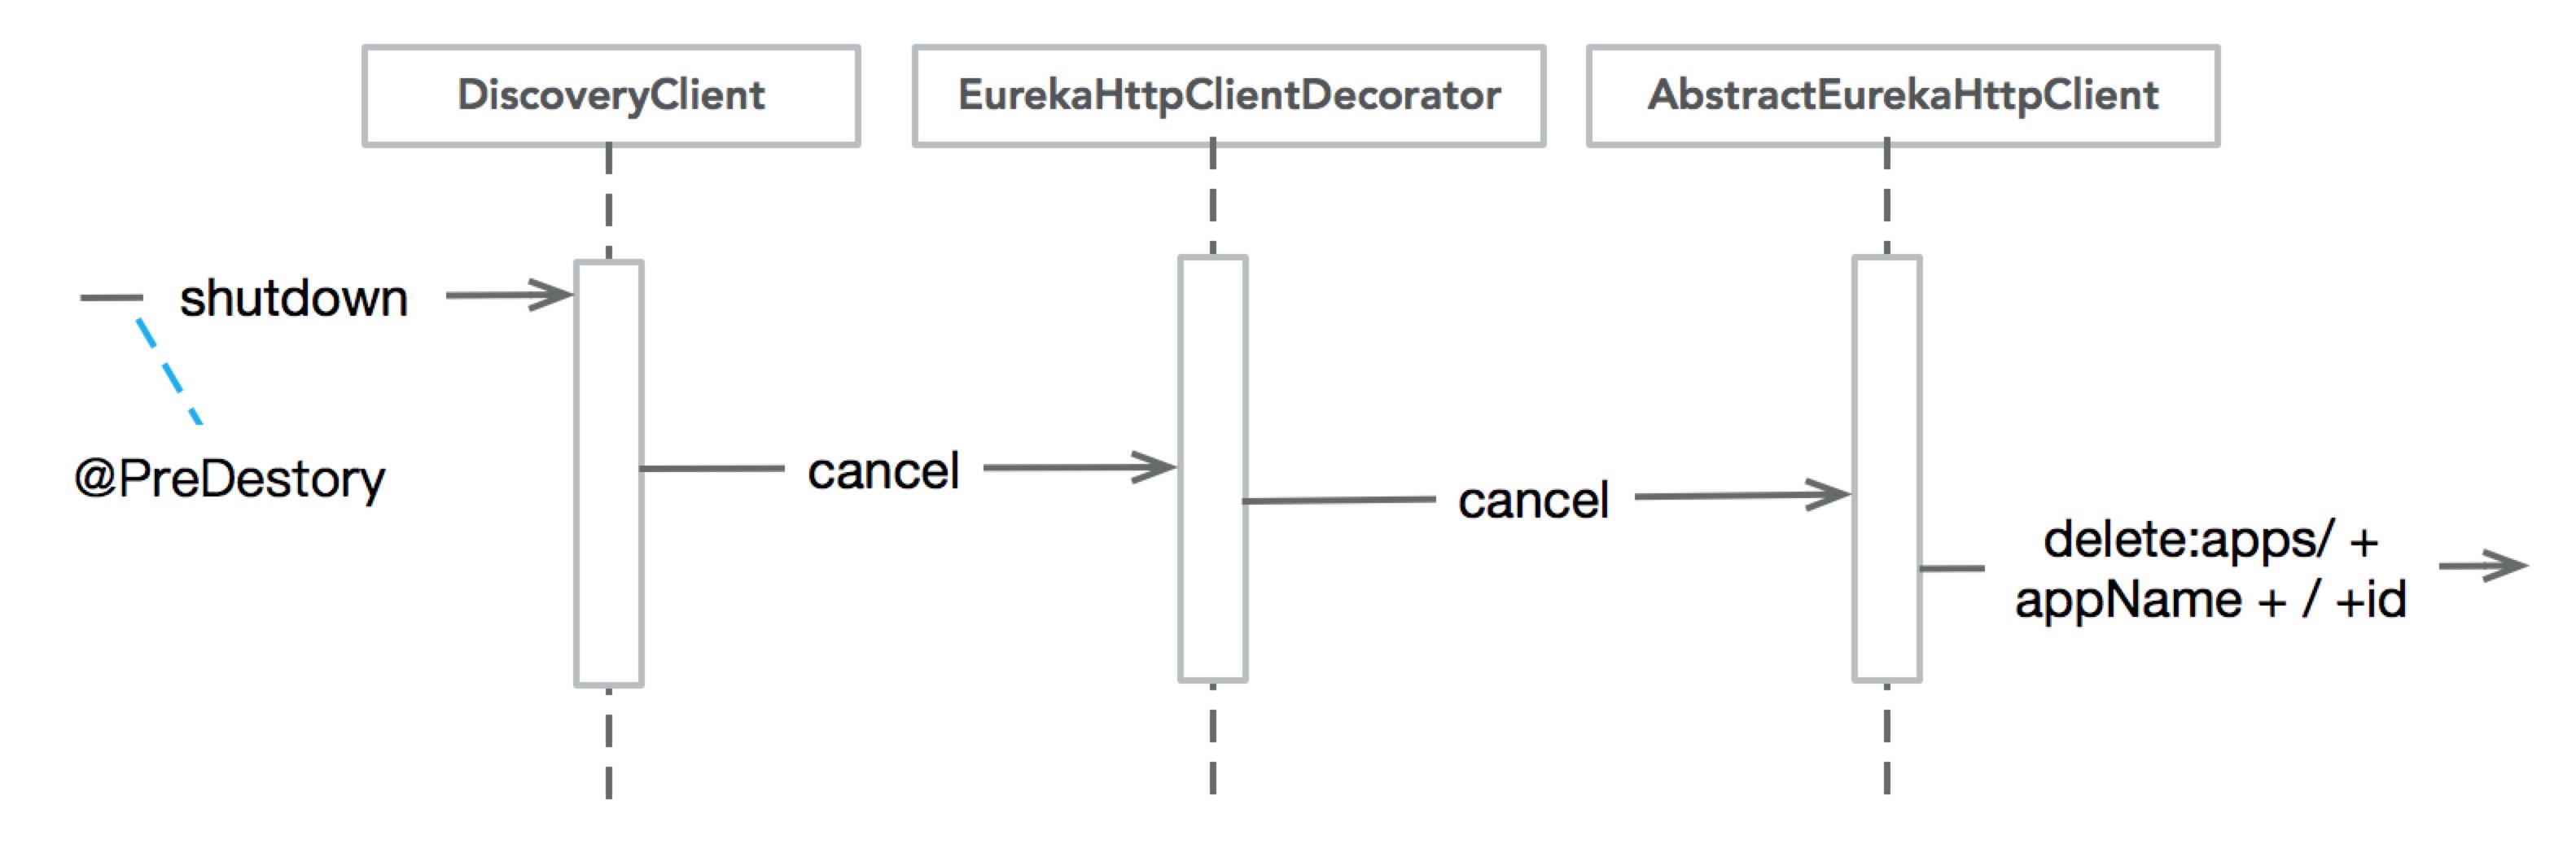
服务下线cancel
在服务shutdown的时候,需要及时通知服务端把自己剔除,以避免客户端调用已经下线的服务,shutdown()方法代码如下:
public synchronized void shutdown() {
    if (isShutdown.compareAndSet(false, true)) {
        logger.info("Shutting down DiscoveryClient ...");

        if (statusChangeListener != null && applicationInfoManager != null) {
            applicationInfoManager.unregisterStatusChangeListener(statusChangeListener.getId());
        }

        // 关闭各种定时任务
        // 关闭刷新实例信息/注册的定时任务
        // 关闭续约(心跳)的定时任务
        // 关闭获取注册信息的定时任务
        cancelScheduledTasks();

        // If APPINFO was registered
        if (applicationInfoManager != null
                && clientConfig.shouldRegisterWithEureka()
                && clientConfig.shouldUnregisterOnShutdown()) {
            // 更改实例状态,使实例不再接收流量
            applicationInfoManager.setInstanceStatus(InstanceStatus.DOWN);
            //向EurekaServer端发送下线请求
            unregister();
        }

        if (eurekaTransport != null) {
            eurekaTransport.shutdown();
        }

        heartbeatStalenessMonitor.shutdown();
        registryStalenessMonitor.shutdown();

        logger.info("Completed shut down of DiscoveryClient");
    }
}

private void cancelScheduledTasks() {
    if (instanceInfoReplicator != null) {
        instanceInfoReplicator.stop();
    }
    if (heartbeatExecutor != null) {
        heartbeatExecutor.shutdownNow();
    }
    if (cacheRefreshExecutor != null) {
        cacheRefreshExecutor.shutdownNow();
    }
    if (scheduler != null) {
        scheduler.shutdownNow();
    }
}

void unregister() {
    // It can be null if shouldRegisterWithEureka == false
    if(eurekaTransport != null && eurekaTransport.registrationClient != null) {
        try {
            logger.info("Unregistering ...");
            EurekaHttpResponse<Void> httpResponse = eurekaTransport.registrationClient.cancel(instanceInfo.getAppName(), instanceInfo.getId());
            logger.info(PREFIX + "{} - deregister  status: {}", appPathIdentifier, httpResponse.getStatusCode());
        } catch (Exception e) {
            logger.error(PREFIX + "{} - de-registration failed{}", appPathIdentifier, e.getMessage(), e);
        }
    }
}
先关闭各种定时任务,然后向eureka server 发送服务下线通知。服务下线流程如下图:
![]()
参考
https://github.com/Netflix/eureka/wiki
http://yeming.me/2016/12/01/eureka1/
http://blog.didispace.com/springcloud-sourcecode-eureka/
https://www.jianshu.com/p/71a8bdbf03f4