突然发现好久没写博客了,感觉变懒了,是要让自己养成经常写文章的习惯才行。既可以分享自己的所学,和所想,和大家一起讨论,发现自己的不足的问题。
大家可能经常会用到富文本编辑器,今天我要说的是UEditor的使用,这是一个简单易用的开源富文本编辑器。但是对于没有用过的同学而言还是需要稍微了解一下的。
可能有些人也知道,UEditor是百度的开源富文本编辑器,当然也有一些其他优秀的富文本编辑器,比如kindeditor,ckeditor之类的,大家可以对比一下使用,但是我今天主要是讲java版的UEditor。
大家可以通过 https://ueditor.baidu.com/website/download.html 选择自己想使用的版本下载。
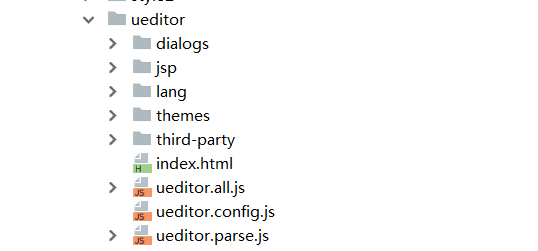
首先介绍一下它的目录层级:
![]()
- dialogs: 弹出对话框对应的资源和JS文件
- jsp或php或asp或net: 涉及到服务器端操作的后台文件
- lang: 编辑器国际化显示的文件
- themes: 样式图片和样式文件
- third-party: 第三方插件(包括代码高亮,源码编辑等组件)
- ueditor.all.js: 开发版代码合并的结果,目录下所有文件的打包文件
- ueditor.all.min.js: ueditor.all.js文件的压缩版,建议在正式部署时采用
- ueditor.config.js: 编辑器的配置文件,建议和编辑器实例化页面置于同一目录
- ueditor.parse.js: 编辑的内容显示页面引用,会自动加载表格、列表、代码高亮等样式
我们把UEditor拷贝到我们的项目路径下,与你的页面是在同一个目录下就可以了。
在需要用到UEditor的页面引入下面的文件即可,根据自己的实际路径引入:
    <script type="text/javascript" charset="utf-8" src="../../ueditor/ueditor.config.js"></script>
    <script type="text/javascript" charset="utf-8" src="../../ueditor/ueditor.all.min.js"></script>
    <script type="text/javascript" src="../../ueditor/lang/zh-cn/zh-cn.js"></script>
在页面需要展示富文本编辑器的位置这样引入:
 1           <!-- 加载编辑器的容器 -->
 2                 <div class="k-field" style="width:1024px;">
 3                     <script id="article_content" name="article_content" type="text/plain" style="width:1024px;height:400px;">
 4                         在这里输入您的内容......
 5                     </script>
 6                 </div>
 7                 <!-- 实例化编辑器 -->
 8                 <script type="text/javascript">
 9                     var ue = UE.getEditor('article_content',{ 10 <!-- 根据个人需要配置,不配置则按默认的 --> 11  maximumWords:50000, 12  enableAutoSave:true, 13  saveInterval:500 14  }); 15 </script>
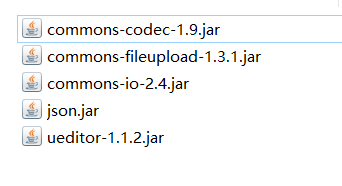
除此之外我们还要引入UEditor所需要的jar包 在 UEditor目录下的 jsp/lib 下有,如果你有引入这些包的话,则无需引入。
![]()
如果你的不是maven项目的话,直接把所有包拷贝到项目下面的lib目录下就可以自动引入了,但是如果是maven项目的话,maven库里没有ueditor的包,那就不能按照平常的方式引入了,可以把ueditor的包拷贝到项目的lib目录下之后,在pom.xml中这样引入:
1         <dependency>
2             <groupId>com.baidu.ueditor</groupId>
3             <artifactId>ueditor</artifactId>
4             <version>1.1.2</version>
5             <scope>system</scope>
6             <systemPath>${project.basedir}/src/main/webapp/WEB-INF/lib/ueditor-1.1.2.jar</systemPath>
7         </dependency>
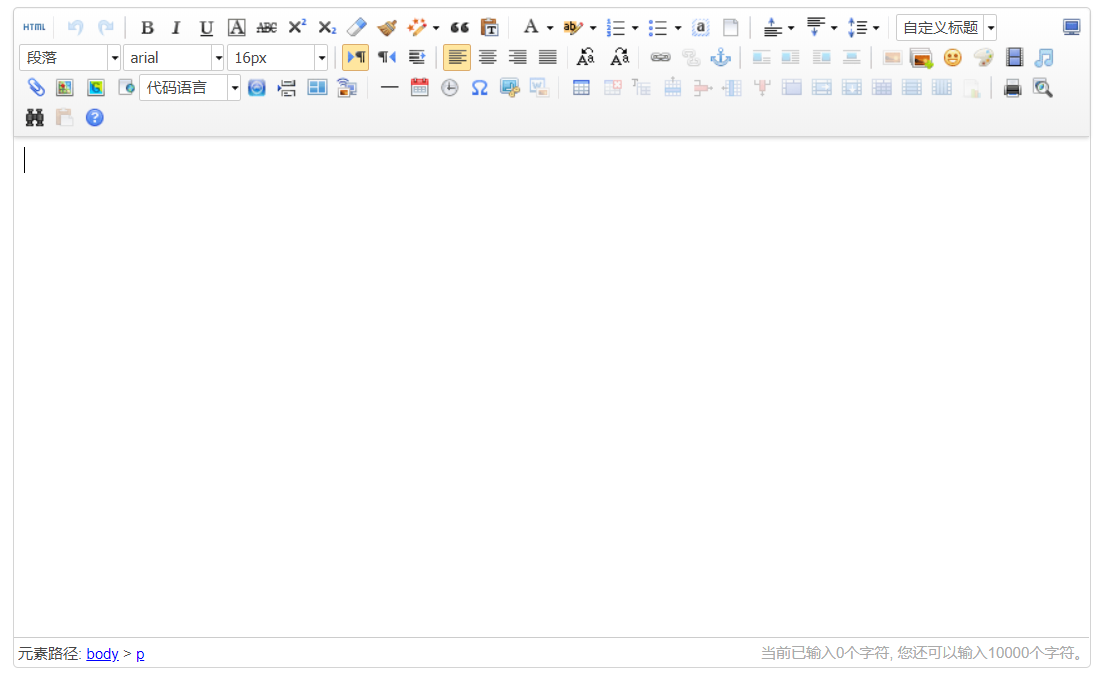
上面的步骤都完成之后就可以去对应的页面试一下效果如何。如果没有做任何改动的话就是下面的效果:
![]()
以上就完成了最简单的UEditor富文本编辑器引入方式,可以体验一下上传图片和文件,都可以正常上传。
但是当你重新部署项目之后会发现,怎么之前上传的文件和图片下载不了也看不到了呢。这就是因为UEditor原生上传文件和图片的方式是上传到项目路径下,那重新部署项目,那不就把原来上传的文件和图片覆盖了咯。
所以为了避免这样的情况发生,我们接下来稍微修改一下UEditor的代码。可能步骤有点多,但是耐心地跟着我的步骤一步步去理解,应该可以很快就知道怎么修改。
通过查看源码,下面我们一步步来追踪:
1. 上传图片或文件时最开始会进入“ueditor/jsp/controller.jsp”,我们查看其代码:
 1 <%@ page language="java" contentType="text/html; charset=UTF-8"
 2     import="com.baidu.ueditor.ActionEnter"
 3     pageEncoding="UTF-8"%>
 4 <%@ page trimDirectiveWhitespaces="true" %>
 5 <%
 6
 7     request.setCharacterEncoding( "utf-8" );
 8     response.setHeader("Content-Type" , "text/html");
 9     String rootPath = application.getRealPath( "/" );
10     out.write( new ActionEnter( request, rootPath ).exec() );
11
12 %>
第9行中的rootPath 是获取 项目的实际路径,并作为 ActionEnter 构造函数的参数之一实例化对象,在这个构造函数中(如下面的代码)会去初始化改类的成员变量以及通过“ConfigManager.getInstance”获取配置,
其实是获取 ueditor/jsp/config.json 的配置信息。大家可以去看一下里面配置了一些什么内容,里面也有注释,我这里粘贴图片的配置内容:
1     public ActionEnter(HttpServletRequest request, String rootPath) {
2         this.request = request;
3         this.rootPath = rootPath;
4         this.actionType = request.getParameter("action");
5         this.contextPath = request.getContextPath();
6         this.configManager = ConfigManager.getInstance(this.rootPath, this.contextPath, request.getRequestURI()); 7 }
 1     /* 上传图片配置项 */
 2     "imageActionName": "uploadimage", /* 执行上传图片的action名称 */
 3     "imageFieldName": "upfile", /* 提交的图片表单名称 */
 4     "imageMaxSize": 2048000, /* 上传大小限制,单位B */
 5     "imageAllowFiles": [".png", ".jpg", ".jpeg", ".gif", ".bmp"], /* 上传图片格式显示 */
 6     "imageCompressEnable": true, /* 是否压缩图片,默认是true */
 7     "imageCompressBorder": 1600, /* 图片压缩最长边限制 */
 8     "imageInsertAlign": "none", /* 插入的图片浮动方式 */
 9     "imageUrlPrefix": "", /* 图片访问路径前缀 */
10     "imagePathFormat": "/ueditor/jsp/upload/image/{yyyy}{mm}{dd}/{time}{rand:6}", /* 上传保存路径,可以自定义保存路径和文件名格式 */
11                                 /* {filename} 会替换成原文件名,配置这项需要注意中文乱码问题 */
12                                 /* {rand:6} 会替换成随机数,后面的数字是随机数的位数 */
13                                 /* {time} 会替换成时间戳 */
14                                 /* {yyyy} 会替换成四位年份 */
15                                 /* {yy} 会替换成两位年份 */
16                                 /* {mm} 会替换成两位月份 */
17                                 /* {dd} 会替换成两位日期 */
18                                 /* {hh} 会替换成两位小时 */
19                                 /* {ii} 会替换成两位分钟 */
20                                 /* {ss} 会替换成两位秒 */
21                                 /* 非法字符 \ : * ? " < > | */
22                                 /* 具请体看线上文档: fex.baidu.com/ueditor/#use-format_upload_filename */
2. 总共也就几行代码,发现会调用 ActionEnter 类的 exec() 方法,我进入该方法:
1     public String exec() {
2         String callbackName = this.request.getParameter("callback");
3         if (callbackName != null) {
4             return !this.validCallbackName(callbackName) ? (new BaseState(false, 401)).toJSONString() : callbackName + "(" + this.invoke() + ");";
5         } else {
6             return this.invoke(); 7  } 8 }
3. 发现这个方法会调用 该类的 invoke() 方法,我们继续看invoke() 方法:
 1     public String invoke() {
 2         if (this.actionType != null && ActionMap.mapping.containsKey(this.actionType)) {
 3             if (this.configManager != null && this.configManager.valid()) {
 4                 State state = null;
 5                 int actionCode = ActionMap.getType(this.actionType);
 6                 Map<String, Object> conf = null; 7 switch(actionCode) { 8 case 0: 9 return this.configManager.getAllConfig().toString(); 10 case 1: 11 case 2: 12 case 3: 13 case 4: 14 conf = this.configManager.getConfig(actionCode); 15 state = (new Uploader(this.request, conf)).doExec(); 16 break; 17 case 5: 18 conf = this.configManager.getConfig(actionCode); 19 String[] list = this.request.getParameterValues((String)conf.get("fieldName")); 20 state = (new ImageHunter(conf)).capture(list); 21 break; 22 case 6: 23 case 7: 24 conf = this.configManager.getConfig(actionCode); 25 int start = this.getStartIndex(); 26 state = (new FileManager(conf)).listFile(start); 27  } 28 29 return state.toJSONString(); 30 } else { 31 return (new BaseState(false, 102)).toJSONString(); 32  } 33 } else { 34 return (new BaseState(false, 101)).toJSONString(); 35  } 36 }
在上面的这个方法中我们发现,在第7行代码中有一个switch,根据 “actionCode” 的值的不同做一些不同的事情,我们看一下这个值从哪里来的,发现这个值是 通过调用这 个 方法 而得到 “ActionMap.getType(this.actionType)”,我们进去getType方法会发现 只是返回一个map的velue值,这个value值就是上的 mapping 里的值,我们通过第1步的配置文件可以知道上传图片的是“uploadimage”
所以返回的value值是 1,而文件“uploadfile”返回的是4。我们再看到上面的switch 可以知道执行this.configManager.getConfig 重新组装了配置信息并将配置信息作为参数实例化Uploader ,并调用该实例 的 doExec()方法。
 1 public final class ActionMap {
 2     public static final Map<String, Integer> mapping = new HashMap<String, Integer>() {
 3         {
 4             this.put("config", Integer.valueOf(0));
 5             this.put("uploadimage", Integer.valueOf(1));
 6             this.put("uploadscrawl", Integer.valueOf(2)); 7 this.put("uploadvideo", Integer.valueOf(3)); 8 this.put("uploadfile", Integer.valueOf(4)); 9 this.put("catchimage", Integer.valueOf(5)); 10 this.put("listfile", Integer.valueOf(6)); 11 this.put("listimage", Integer.valueOf(7)); 12  } 13  }; 14 public static final int CONFIG = 0; 15 public static final int UPLOAD_IMAGE = 1; 16 public static final int UPLOAD_SCRAWL = 2; 17 public static final int UPLOAD_VIDEO = 3; 18 public static final int UPLOAD_FILE = 4; 19 public static final int CATCH_IMAGE = 5; 20 public static final int LIST_FILE = 6; 21 public static final int LIST_IMAGE = 7; 22 23 public ActionMap() { 24  } 25 26 public static int getType(String key) { 27 return ((Integer)mapping.get(key)).intValue(); 28  } 29 }
4.我进入到 Uploader 类,上一步最后就是调用第10行的方法,因为配置里 不是base64 所以执行else里的内容,调用 BinaryUploader 的save方法
 1 public class Uploader {
 2     private HttpServletRequest request = null;
 3     private Map<String, Object> conf = null;
 4
 5     public Uploader(HttpServletRequest request, Map<String, Object> conf) {
 6         this.request = request;
 7         this.conf = conf; 8  } 9 10 public final State doExec() { 11 String filedName = (String)this.conf.get("fieldName"); 12 State state = null; 13 if ("true".equals(this.conf.get("isBase64"))) { 14 state = Base64Uploader.save(this.request.getParameter(filedName), this.conf); 15 } else { 16 state = BinaryUploader.save(this.request, this.conf); 17  } 18 19 return state; 20  } 21 }
5. 我们继续进入到BinaryUploader 的save方法 ,我们看到下面的代码的第33行,会去设定 “physicalPath ” 的值,并作为参数 调用 方法: StorageManager.saveFileByInputStream 进行保存,而“physicalPath ” 值是由 配置信息 参数 config 获取。所以我们需要通过修改配置 来 修改这个值就行了。
 1     public static final State save(HttpServletRequest request, Map<String, Object> conf) {
 2         FileItemStream fileStream = null;
 3         boolean isAjaxUpload = request.getHeader("X_Requested_With") != null;
 4         if (!ServletFileUpload.isMultipartContent(request)) {
 5             return new BaseState(false, 5);
 6         } else { 7 ServletFileUpload upload = new ServletFileUpload(new DiskFileItemFactory()); 8 if (isAjaxUpload) { 9 upload.setHeaderEncoding("UTF-8"); 10  } 11 12 try { 13 for(FileItemIterator iterator = upload.getItemIterator(request); iterator.hasNext(); fileStream = null) { 14 fileStream = iterator.next(); 15 if (!fileStream.isFormField()) { 16 break; 17  } 18  } 19 20 if (fileStream == null) { 21 return new BaseState(false, 7); 22 } else { 23 String savePath = (String)conf.get("savePath"); 24 String originFileName = fileStream.getName(); 25 String suffix = FileType.getSuffixByFilename(originFileName); 26 originFileName = originFileName.substring(0, originFileName.length() - suffix.length()); 27 savePath = savePath + suffix; 28 long maxSize = ((Long)conf.get("maxSize")).longValue(); 29 if (!validType(suffix, (String[])conf.get("allowFiles"))) { 30 return new BaseState(false, 8); 31 } else { 32 savePath = PathFormat.parse(savePath, originFileName); 33 String physicalPath = (String)conf.get("rootPath") + savePath; 34 InputStream is = fileStream.openStream(); 35 State storageState = StorageManager.saveFileByInputStream(is, physicalPath, maxSize); 36  is.close(); 37 if (storageState.isSuccess()) { 38 storageState.putInfo("url", PathFormat.format(savePath)); 39 storageState.putInfo("type", suffix); 40 storageState.putInfo("original", originFileName + suffix); 41  } 42 43 return storageState; 44  } 45  } 46 } catch (FileUploadException var14) { 47 return new BaseState(false, 6); 48 } catch (IOException var15) { 49 return new BaseState(false, 4); 50  } 51  } 52 }
6.上面都是在分析代码,下面就开始修改了,我们在配置文件“ueditor/jsp/config.json”里添加 saveRootPath ,这就是存储图片或文件的绝对根路径,修改 imageUrlPrefix 的值,这个链接是要指向 绝对根路径,用于访问图片或文件,大家可以搭一个nginx服务器,或者直接用Tomcat也可以,只要能访问都行。
  "saveRootPath": "/data/", /* 文件和图片上传绝对根路径*/
    /* 上传图片配置项 */
    "imageActionName": "uploadimage", /* 执行上传图片的action名称 */
    "imageFieldName": "upfile", /* 提交的图片表单名称 */
    "imageMaxSize": 2048000, /* 上传大小限制,单位B */
    "imageAllowFiles": [".png", ".jpg", ".jpeg", ".gif", ".bmp"], /* 上传图片格式显示 */
    "imageCompressEnable": true, /* 是否压缩图片,默认是true */
    "imageCompressBorder": 1600, /* 图片压缩最长边限制 */
    "imageInsertAlign": "none", /* 插入的图片浮动方式 */
    "imageUrlPrefix": "http://xxx", /* 指向saveRootPath的url,用于访问图片或文件*/
  "imagePathFormat": "/ueditor/jsp/upload/image/{yyyy}{mm}{dd}/{time}{rand:6}",
7. 我们在 第 3 步 的invoke() 方法 中调用的 this.configManager.getConfig(actionCode); 方法里 组装绝对根路径。就是在返回conf之前添加 下面代码中的红色内容。
1         conf.put("savePath", savePath);
2         conf.put("rootPath", this.rootPath);
3         conf.put("saveRootPath",this.jsonConfig.getString("saveRootPath"));
4         return conf;
8. 最后我们把 第5步 里的 save 方法里的 physicalPath 值修改一下 ,注释原来的内容,新增下面代码的红色内容。
1 //                      String physicalPath = (String)conf.get("rootPath") + savePath;
2                         String physicalPath = (String)conf.get("saveRootPath") + savePath;
这样 我们就把 原来的相对路径改成了我们想要的绝对路径了,大家可以尝试一下。
好了时间不早了,要休息了,大家如果有什么更好的方法,可以在评论去留言,大家一起讨论!如果有什么不妥之处也请大家多多指教!