提笔之际(附总体思路)
最近跟几个小伙伴在实践一个项目,考虑到界面效果,我们决定使用揭露动画作为Activity的转场动画。
这里主要是我负责这部分的实现。
话说之前是没接触过的,关于具体的实现跟大体的思路都不太清楚。于是最先啃官方API,有点难看懂,然后下载了官方的demo,直接看代码,还是有问题,毕竟它规模略大,集成了好多动画效果;
接着就找了很多博文,发现网上真的水文忒多了哎。。
最后找到了这三篇,算是解答了我的疑问:
https://www.jianshu.com/p/b75548e488df
这篇思路很好,写得也很走心,启发了我设计的思路跟注意到的一些问题,像揭露动画的逻辑放在哪里之类的;正当我要下载demo的时候发现他代码是kotlin来的,好吧,再继续找博文;
https://blog.csdn.net/shedoor/article/details/81251849#5
这篇就讲得更加详尽,这还看不懂那就有点说不过去了。一开始觉得揭露动画还是挺高大上的样子,结果此博文文首便说很简单,那就很简单吧,后来理解透了之后发觉确实也不难,毕竟只有一个静态方法而已;
https://github.com/OCNYang/Android-Animation-Set/tree/master/reveal-animation
这个点进去是他的GitHub,demo下下来,代码看一下,自己写个小demo(我是先在一个activity里面跑通揭露动画,再进一步将揭露动画实现成跳转动画),再加入自己的逻辑,一步一步来算是没有问题了。
到这里就跑通了一个活动中的Activity了;
- https://github.com/whyalwaysmea/AndroidDemos
接下来就进入本文主题了,使用揭露动画作为Activity的转场动画;
这篇文档跟代码算是帮上大忙了,有较大的参考价值;
不同的是作者的思路是在跳转的目标活动中,启动做揭露动画的收挽,收挽结束后再finish();
我这里根据情况修改为跳转的目标活动中按下返回键即finish(),完了之后原始活动中的onReStart()中做揭露动画的收挽;另外我在在跳转的目标活动中完成揭露动画展开的时候,添加了一个AlphaAnimation;
这边的起始活动用的是button的onClick触发的方式,以及这里对两个活动各自的控件的visible做了细节的把控;
引子
使用揭露动画做一个丝滑的Activity转场动画,
关于这个需求,可能不同的同学,会有不同的问题,
我这里把可能遇到的问题跟我在完成这个demo的过程中遇到的问题做一个总结,
然后附上总体的思路,大家可以交流一下~
什么是揭露动画?
Material-Animations; 官网有详细的介绍,
揭露动画具有相当丝滑的效果,
常常可以用与基于一个Activity的碎片切换或者View、控件的切换覆盖铺张,如本文第一个demo;
或者直接作为两个Activity之间的转场动画,如本文第二个demo;
揭露动画怎么用?
官方API封装好了,
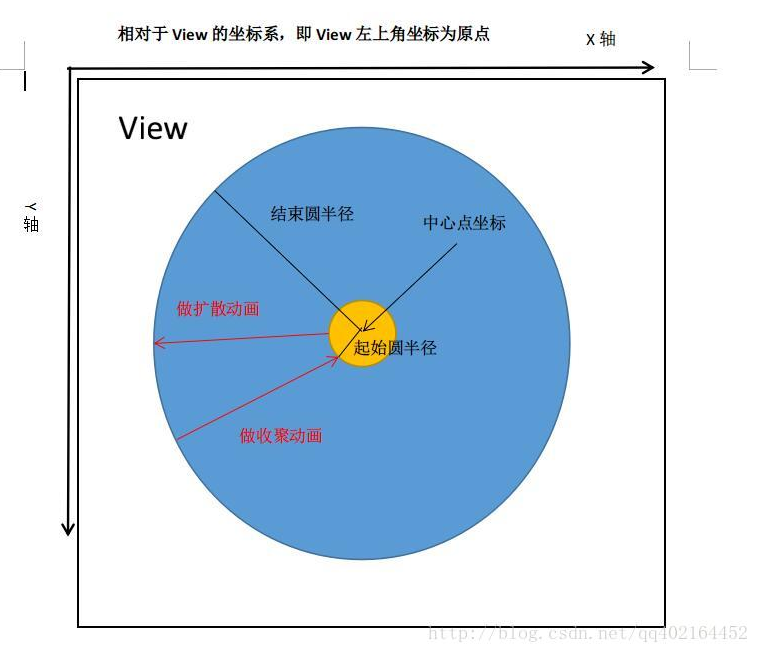
一个类一个静态方法——ViewAnimationUtils.createCircularReveal(),
传进五个参数,返回一个Animator对象。根据具体情况调用即可。
详细可见参考文档;
“丝滑”之解
这个转场动画要实现得丝滑,需要注意几个细节:
活动A跳转到活动B的情况下,
a.在A点击触发跳转时刻,揭露动画要放在哪个活动展开;
b.在B按下返回键之后,揭露动画又要放在哪个活动收挽;
c.揭露动画的展开和收挽,createCircularReveal()分别以谁为操作对象;
d.这里A通过FloatingActionButton出发,那揭露层View跟FloatingActionButton的visible跟invisible设置的顺序;
e.关闭android默认的activity转场动画(不然就相当不丝滑了hhh);
相关解答详解下方第二个demo的思路总结,请移步到正文中的第二个demo;
了解本文的两个demo之后,我相信以这个两个demo为模板,结合笔者之前关于Material Design做的诸多笔记,应该是可以做出不少很有趣的东西来的~
再附上在做本demo的过程中一些debugExperience:
正文
1.先在一个activity里面跑通揭露动画
首先新建一个空项目,接着走三步即可:
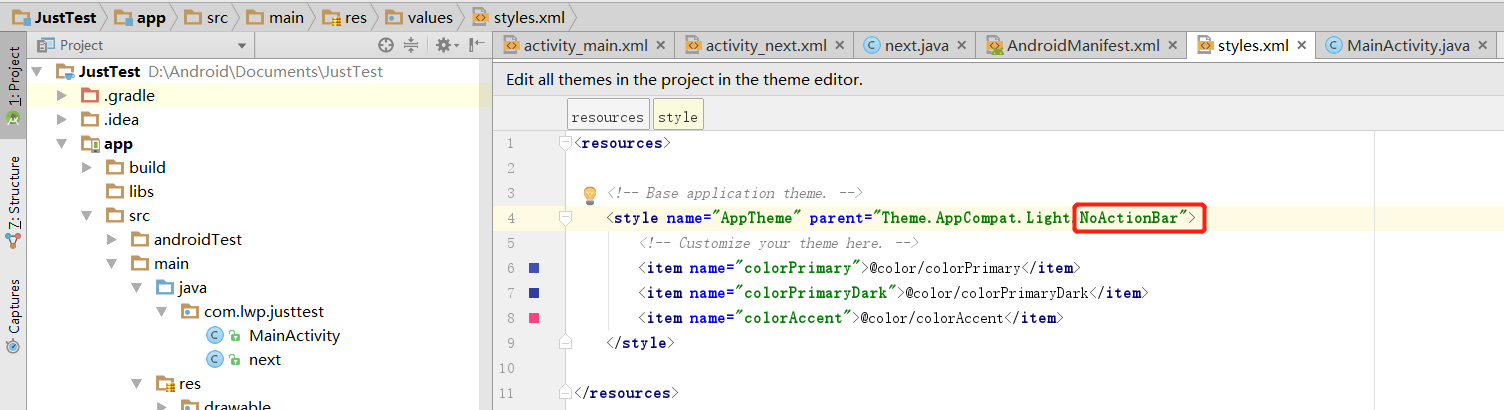
1)更改styles.xml,改成NoActionBar,去掉标题栏,待会儿调试可以观察:
2)书写activity_main.xml:
- 这里对子空间的布局范围要求并不多,直接简单用FrameLayout即可;
- 然后是Textview放在最前面,最先渲染,以为至底层;
- 接着我们这里使用一个View原生控件来作为揭露动画的操作对象,即通过对View控件的显示和隐藏以及动画操作来具体实现揭露动画;
- 最后放置一个悬浮按钮,用于启动点击事件,这里响应的事件是启动揭露动画:
另外说一下,关于FloatingActionButton,
android:backgroundTint可以设置其背景色,
android:src则给按钮设置图标,
这里用的图标资源来自于阿里的矢量图标库。
<?xml version="1.0" encoding="utf-8"?>
<FrameLayout xmlns:android="http://schemas.android.com/apk/res/android"
    xmlns:app="http://schemas.android.com/apk/res-auto"
    xmlns:tools="http://schemas.android.com/tools"
    android:layout_width="match_parent"
    android:layout_height="match_parent"
    tools:context="com.lwp.justtest.MainActivity">

    <TextView
        android:layout_width="wrap_content"
        android:layout_height="wrap_content"
        android:text="Hello World!"
        android:layout_gravity="center"
        app:layout_constraintBottom_toBottomOf="parent"
        app:layout_constraintLeft_toLeftOf="parent"
        app:layout_constraintRight_toRightOf="parent"
        app:layout_constraintTop_toTopOf="parent" />

    <View
        android:id="@+id/view_puppet"
        android:background="@color/colorPrimaryDark"
        android:layout_width="match_parent"
        android:layout_height="match_parent"
        android:visibility="gone"/>

    <android.support.design.widget.FloatingActionButton
        android:id="@+id/fab"
        android:layout_width="wrap_content"
        android:layout_height="wrap_content"
        android:layout_gravity="bottom|end"
        android:layout_margin="16dp"
        android:backgroundTint="@color/colorPrimary"
        android:src="@drawable/map"
        app:pressedTranslationZ="10dp" />

</FrameLayout>
3)书写MainActivity.java:
- 实例化各个组件之后,实现FloatingActionButton的onClick(),
- onClick()中我们调用一个自定义方法,在里面启动揭露动画;
- 这里通过变量flag实现点击按钮时揭露动画的交替开启显示以及关闭隐藏,效果图在下方代码之后;
- 关于揭露动画的逻辑以及具体实现的语法,
其实核心就是ViewAnimationUtils.createCircularReveal()这个方法以及其五个参数的意义,
详细地可以参考前面提到的参考文章链接:
package com.lwp.justtest;

import android.animation.Animator;
import android.animation.AnimatorListenerAdapter;
import android.support.design.widget.FloatingActionButton;
import android.support.v7.app.AppCompatActivity;
import android.os.Bundle;
import android.util.Log;
import android.view.View;
import android.view.ViewAnimationUtils;

public class MainActivity extends AppCompatActivity implements View.OnClickListener {

    boolean flag = false;
    FloatingActionButton fab;
    private View mPuppet;

    @Override
    protected void onCreate(Bundle savedInstanceState) {
        super.onCreate(savedInstanceState);
        setContentView(R.layout.activity_main);

        mPuppet = findViewById(R.id.view_puppet);
        fab = (FloatingActionButton)findViewById(R.id.fab);
        fab.setOnClickListener(this);
    }

    @Override
    public void onClick(View v) {
        doRevealAnimation();
    }

    private void doRevealAnimation() {
        int[] vLocation = new int[2];
        fab.getLocationInWindow(vLocation);
        int centerX = vLocation[0] + fab.getMeasuredWidth() / 2;
        int centerY = vLocation[1] + fab.getMeasuredHeight() / 2;

        int height = mPuppet.getHeight();
        int width = mPuppet.getWidth();
        int maxRradius = (int) Math.hypot(height, width);
        Log.e("hei", maxRradius + "");

        if (flag) {
            Animator animator = ViewAnimationUtils.createCircularReveal(mPuppet, centerX, centerY, maxRradius, 0);
            animator.setDuration(1000);
            animator.addListener(new AnimatorListenerAdapter() {
                @Override
                public void onAnimationEnd(Animator animation) {
                    super.onAnimationEnd(animation);
                    mPuppet.setVisibility(View.GONE);
                }
            });
            animator.start();
            flag = false;
        } else {
            Animator animator = ViewAnimationUtils.createCircularReveal(mPuppet, centerX, centerY, 0, maxRradius);
            animator.setDuration(1000);
            animator.addListener(new Animator.AnimatorListener() {
                @Override
                public void onAnimationStart(Animator animation) {
                    mPuppet.setVisibility(View.VISIBLE);
                }

                @Override
                public void onAnimationEnd(Animator animation) {
                }

                @Override
                public void onAnimationCancel(Animator animation) {

                }

                @Override
                public void onAnimationRepeat(Animator animation) {

                }
            });
            animator.start();
            flag = true;
        }
    }

}
上面三步走完,即可运行程序,揭露动画随即实现,效果如下:
接着后面就进入本文主题了;
2.使用揭露动画作为Activity的转场动画
思路总结:
1. MainActivity.java:
    1.1.   实例化、声明各种对象,注意:
            根布局对象(用来控制整个布局),
            揭露层对象指的是用于作揭露操作的纯色的match_parent的View控件;

    1.2.  onCreate():完成findViewById()以及intent的构建,FloatingActionButton的setOnClickListener;

    1.3.  onClick():计算fab的中心坐标,用于作为揭露动画的圆心;同时把这对坐标put进intent中,然后startActivity(intent);跳转到下一个活动,同时把坐标对传过去;

    1.4. createRevealAnimator():计算startRadius、endRadius,调用核心方法createCircularReveal()构建出animator并做相关配置后return之;
          注意:
            这里的createCircularReveal()操作对象用的是揭露层纯色View对象mPuppet0;
            以及配置中用了animator.addListener(animatorListener0);添加一个动画监听器;--->> 1.5.

    1.5.  Animator.AnimatorListener animatorListener0

 注意这里的思路:
          !!!
          onAnimationStart():收挽揭露动画开启时,揭露层setVisibility(View.VISIBLE);fab.setVisibility(View.INVISIBLE);
          onAnimationEnd():收挽版揭露动画结束时,mPuppet0.setVisibility(View.INVISIBLE);fab.setVisibility(View.VISIBLE);
          !!!

    1.6. onRestart():回调方法,计算fab的中心坐标,用于作为揭露动画的圆心;
         调用createRevealAnimator()创建并配置一个animator(--->> 1.4.),
         然后开启收挽版揭露动画,即animator.start();

2. next.java:
    2.1.   实例化、声明各种对象,注意:
            根布局对象(用来控制整个布局),
            揭露层对象指的是用于作揭露操作的纯色的match_parent的View控件;

    2.2.  onCreate():完成findViewById(),
        这里注意:
            动画需要依赖于某个视图才可启动,这里依赖于根布局对象并且开辟一个子线程,
            在子线程中get坐标对,调用createRevealAnimator()创建并配置一个animator;--->> 2.3.
            然后开启展开版揭露动画,即animator.start();
    2.3. createRevealAnimator():计算startRadius、endRadius,调用核心方法createCircularReveal()构建出animator并做相关配置后return之;

          注意这里的思路:

            !!!这里的createCircularReveal()操作对象用的是根布局对象content;

            !!!!!
            (即先加载好整个布局,再把整个布局作为揭露对象从0径到屏幕对角线径揭露展开,
              展开过程中揭露层纯色view在最顶层,所以感觉是View在做展开而已,
              而实际上并不是;展开完毕后,再把view层去掉,去掉之后下层的活动内容自然就显示出来了。)
            !!!!!

            以及配置中用了animator.addListener(animatorListener0);添加一个动画监听器;--->> 2.4.
    2.4. Animator.AnimatorListener animatorListener1

          注意这里的思路:
          !!!
          onAnimationEnd():展开版揭露动画结束时,
            mPuppet.startAnimation(createAlphaAnimation());//调用透明度动画,丝滑效果-->>2.5.
            mPuppet.setVisibility(View.INVISIBLE);//动画结束时,揭露动画设置为不可见
          !!!

    2.5. createAlphaAnimation():定义透明度动画,返回一个AlphaAnimation对象;

    3. 两个布局xml没什么特别需要说的地方,
        注意第一个xml的view要android:visibility="gone",以及按照渲染先后层次关系按序书写控件即是;

    4. styles.xml:android:windowAnimationStyle属性置为null,取消掉Android默认的转场动画
    <style name="noAnimTheme" parent="AppTheme">
        <item name="android:windowAnimationStyle">@null</item>
    </style>

    5. AndroidManifest.xml:为参与的活动添加刚刚设置好的主题;
      <activity
            android:name=".MainActivity"
            android:theme="@style/noAnimTheme">
            <intent-filter>
                <action android:name="android.intent.action.MAIN" />

                <category android:name="android.intent.category.LAUNCHER" />
            </intent-filter>
        </activity>
        <activity
            android:name=".next"
            android:theme="@style/noAnimTheme">
        </activity>
最后上代码了,不同的功能基本上都放在了不同的方法内实现,结合注释应该不难理解了~
MainActivity.java:
package com.lwp.justtest;

import ...

public class MainActivity extends AppCompatActivity implements View.OnClickListener {

    FloatingActionButton fab;
    Intent intent;
    private View content;//根布局对象(用来控制整个布局)
    private View mPuppet0;//揭露层对象
    private int centerX;
    private int centerY;

    @Override
    protected void onCreate(Bundle savedInstanceState) {
        super.onCreate(savedInstanceState);
        setContentView(R.layout.activity_main);

        content = findViewById(R.id.reveal_content0);
        mPuppet0 = findViewById(R.id.view_puppet);
        intent = new Intent(MainActivity.this, next.class);
        fab = (FloatingActionButton)findViewById(R.id.fab);
        fab.setOnClickListener(this);
    }

    @Override
    public void onClick(View v) {
        int[] vLocation = new int[2];
        fab.getLocationInWindow(vLocation);
        centerX = vLocation[0] + fab.getMeasuredWidth() / 2;
        centerY = vLocation[1] + fab.getMeasuredHeight() / 2;
        intent.putExtra("cx",centerX);
        intent.putExtra("cy",centerY);
        startActivity(intent);
    }

    private Animator createRevealAnimator(int x, int y) {
        float startRadius = (float) Math.hypot(content.getHeight(), content.getWidth());
        float endRadius = fab.getMeasuredWidth() / 2 ;

        //注意揭露动画开启时是用根布局作为操作对象,关闭时用揭露层作为操作对象
        Animator animator = ViewAnimationUtils.createCircularReveal(
                mPuppet0, x, y,
                startRadius,
                endRadius);
        animator.setDuration(500);
        animator.setInterpolator(new AccelerateDecelerateInterpolator());//设置插值器
        animator.addListener(animatorListener0);
        return animator;
    }

    //定义动画状态监听器_按下返回键版
    private Animator.AnimatorListener animatorListener0 = new Animator.AnimatorListener() {
        @Override
        public void onAnimationStart(Animator animation) {
            mPuppet0.setVisibility(View.VISIBLE);//按下返回键时,动画开启,揭露层设置为可见
            fab.setVisibility(View.INVISIBLE);
        }
        @Override
        public void onAnimationEnd(Animator animation) {
            mPuppet0.setVisibility(View.INVISIBLE);
            fab.setVisibility(View.VISIBLE);
        }
        @Override
        public void onAnimationCancel(Animator animation) {
        }
        @Override
        public void onAnimationRepeat(Animator animation) {
        }
    };

    //第二个活动退回来时,回调本方法
    @Override
    protected void onRestart() {
        super.onRestart();

        //动画需要依赖于某个视图才可启动,
        // 这里依赖于根布局对象,并且开辟一个子线程,充分利用资源
        content.post(new Runnable() {
            @Override
            public void run() {
                int[] vLocation = new int[2];
                fab.getLocationInWindow(vLocation);
                centerX = vLocation[0] + fab.getMeasuredWidth() / 2;
                centerY = vLocation[1] + fab.getMeasuredHeight() / 2;
                Animator animator = createRevealAnimator(centerX, centerY);
                animator.start();
            }
        });
    }
}
main.xml:
<?xml version="1.0" encoding="utf-8"?>
<FrameLayout xmlns:android="http://schemas.android.com/apk/res/android"
    xmlns:app="http://schemas.android.com/apk/res-auto"
    xmlns:tools="http://schemas.android.com/tools"
    android:id="@+id/reveal_content0"
    android:layout_width="match_parent"
    android:layout_height="match_parent"
    tools:context="com.lwp.justtest.MainActivity">

    <TextView
        android:layout_width="wrap_content"
        android:layout_height="wrap_content"
        android:text="Here is First Activity!"
        android:textColor="@color/colorPrimaryDark"
        android:textSize="30sp"
        android:layout_gravity="center"
        app:layout_constraintBottom_toBottomOf="parent"
        app:layout_constraintLeft_toLeftOf="parent"
        app:layout_constraintRight_toRightOf="parent"
        app:layout_constraintTop_toTopOf="parent" />

    <View
        android:id="@+id/view_puppet"
        android:background="@color/colorPrimaryDark"
        android:layout_width="match_parent"
        android:layout_height="match_parent"
        android:visibility="gone"/>

    <android.support.design.widget.FloatingActionButton
        android:id="@+id/fab"
        android:layout_width="wrap_content"
        android:layout_height="wrap_content"
        android:layout_gravity="bottom|end"
        android:layout_margin="16dp"
        android:backgroundTint="@color/colorPrimary"
        android:src="@drawable/map"
        app:pressedTranslationZ="10dp" />

</FrameLayout>
next.java:
package com.lwp.justtest;

import ...

public class next extends AppCompatActivity {

    private View content;//根布局对象(用来控制整个布局)
    private View mPuppet;//揭露层对象
    private int mX ;
    private int mY ;

    @Override
    protected void onCreate(Bundle savedInstanceState) {
        super.onCreate(savedInstanceState);
        setContentView(R.layout.activity_next);//先加载好整个布局,后面再用整个布局作为揭露动画的操作对象,揭露完毕后再去掉揭露层
        content = findViewById(R.id.reveal_content);
        mPuppet = findViewById(R.id.view_puppet);

        //动画需要依赖于某个视图才可启动,
        // 这里依赖于根布局对象,并且开辟一个子线程,充分利用资源
        content.post(new Runnable() {
            @Override
            public void run() {
                mX = getIntent().getIntExtra("cx", 0);
                mY = getIntent().getIntExtra("cy", 0);
                Animator animator = createRevealAnimator(mX, mY);
                animator.start();
            }
        });
    }

    private Animator createRevealAnimator(int x, int y) {
        float startRadius = 0;
        float endRadius = (float) Math.hypot(content.getHeight(), content.getWidth());

        Animator animator = ViewAnimationUtils.createCircularReveal(
                content, x, y,
                startRadius,
                endRadius);
        animator.setDuration(660);
        animator.setInterpolator(new AccelerateDecelerateInterpolator());
        //判断标志位reversed,true则为添加返回键版动画监听器,false则为跳转动画开启版
        // if (!reversed)
           animator.addListener(animatorListener1);
        return animator;
    }

    //定义动画状态监听器_跳转动画开启版
    private Animator.AnimatorListener animatorListener1 = new Animator.AnimatorListener() {
        @Override
        public void onAnimationStart(Animator animation) {
//            content.setVisibility(View.VISIBLE);//跳转进来时,(因为finish之前会将之设置为不可见,)
                                                 // 根布局要设置为可见,与finish部分的不可见相对应
//            mPuppet.setAlpha(1);
        }
        @Override
        public void onAnimationEnd(Animator animation) {
            mPuppet.startAnimation(createAlphaAnimation());
            mPuppet.setVisibility(View.INVISIBLE);//动画结束时,揭露动画设置为不可见
        }
        @Override
        public void onAnimationCancel(Animator animation) {
        }
        @Override
        public void onAnimationRepeat(Animator animation) {
        }
    };

    private AlphaAnimation createAlphaAnimation() {
        AlphaAnimation aa = new AlphaAnimation(1,0);
        aa.setDuration(400);
        aa.setInterpolator(new AccelerateDecelerateInterpolator());//设置插值器
        return aa;
    }
}
next.xml:
<?xml version="1.0" encoding="utf-8"?>
<FrameLayout xmlns:android="http://schemas.android.com/apk/res/android"
    xmlns:app="http://schemas.android.com/apk/res-auto"
    xmlns:tools="http://schemas.android.com/tools"
    android:id="@+id/reveal_content"
    android:layout_width="match_parent"
    android:layout_height="match_parent"
    tools:context="com.lwp.justtest.next">

    <TextView
        android:layout_width="wrap_content"
        android:layout_height="wrap_content"
        android:text="Here is Second Activity!"
        android:textColor="@color/colorPrimaryDark"
        android:textSize="30sp"
        android:layout_gravity="center"/>

    <View
        android:id="@+id/view_puppet"
        android:background="@color/colorPrimaryDark"
        android:layout_width="match_parent"
        android:layout_height="match_parent"/>


</FrameLayout>
res/values/styles.xml:
<resources>

    <!-- Base application theme. -->
    <style name="AppTheme" parent="Theme.AppCompat.Light.NoActionBar">
        <!-- Customize your theme here. -->
        <item name="colorPrimary">@color/colorPrimary</item>
        <item name="colorPrimaryDark">@color/colorPrimaryDark</item>
        <item name="colorAccent">@color/colorAccent</item>
    </style>

    <style name="noAnimTheme" parent="AppTheme">
        <item name="android:windowAnimationStyle">@null</item>
    </style>

</resources>
AndroidManifest.xml:
<application
        android:allowBackup="true"
        android:icon="@mipmap/ic_launcher"
        android:label="@string/app_name"
        android:roundIcon="@mipmap/ic_launcher_round"
        android:supportsRtl="true"
        android:theme="@style/AppTheme">
        <activity
            android:name=".MainActivity"
            android:theme="@style/noAnimTheme">
            <intent-filter>
                <action android:name="android.intent.action.MAIN" />

                <category android:name="android.intent.category.LAUNCHER" />
            </intent-filter>
        </activity>
        <activity
            android:name=".next"
            android:theme="@style/noAnimTheme">
        </activity>
    </application>
最终效果图:
本文的两个demo就到此为止了,我相信以这个两个demo为模板,结合笔者之前关于Material Design做的诸多笔记,应该是可以做出不少很有趣的东西来的~