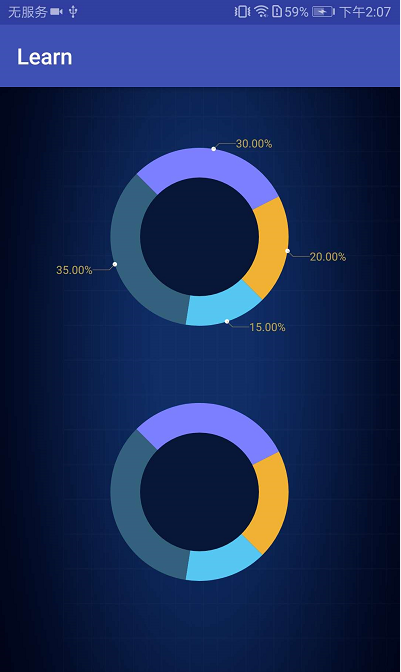
今天讲图表统计中比较常用的一个,像支付宝的月账单啥的,都是用圆饼图来做数据统计的,先看一下我最终实现的效果图:
该效果实际上是两个实心圆叠加后的效果。
《一》View实现思路分析:
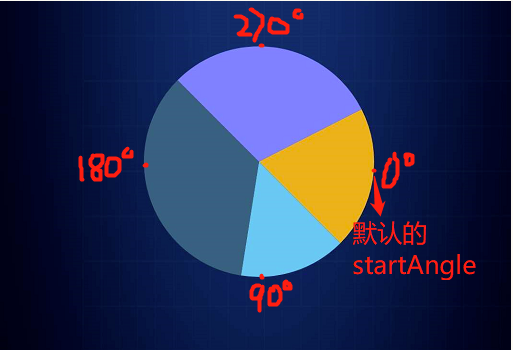
(1)根据占比集合数据,计算所需绘制的角度,动态设置画笔颜色,drawArc()绘制外圆弧
(2)drawCircle()绘制内圆
(3)确定每块圆饼的小白点的位置
(4)绘制白点的沿线和占比文字
《二》具体实现:
(1)绘制不同颜色的圆饼
   for (int i = 0; i < mRateList.size(); i++) {
            mPaint.setStyle(Paint.Style.FILL);
            mPaint.setColor(mColorList.get(i));
//            Log.e("TAG", "startAngle=" + startAngle + "--sweepAngle=" + ((int) (mRateList.get(i) * (360)) - offset));
            canvas.drawArc(rectF, startAngle, (int) (mRateList.get(i) * (360)) , true, mPaint);
            startAngle = startAngle + (int) (mRateList.get(i) * 360);
   }
(2)绘制内圆
  mPaint.setColor(ContextCompat.getColor(mContext, R.color.color_081638));
  canvas.drawCircle(radius + centerPointRadius + (xOffset + yOffset + textRect.width()), radius + centerPointRadius + (xOffset + yOffset + textRect.height()), radius / 1.5f, mPaint);
(3)确定每块圆饼的小白点的位置,通过每段圆饼的起始角度确定该段圆弧的中心点位置。
 private void dealPoint(RectF rectF, float startAngle, float endAngle, List<Point> pointList) {
        Path path = new Path();
        //通过Path类画一个90度(180—270)的内切圆弧路径
        path.addArc(rectF, startAngle, endAngle);

        PathMeasure measure = new PathMeasure(path, false);
//        Log.e("路径的测量长度:", "" + measure.getLength());

        float[] coords = new float[]{0f, 0f};
        //利用PathMeasure分别测量出各个点的坐标值coords
        int divisor = 1;
        measure.getPosTan(measure.getLength() / divisor, coords, null);
//        Log.e("coords:", "x轴:" + coords[0] + " -- y轴:" + coords[1]);
        float x = coords[0];
        float y = coords[1];
        Point point = new Point(Math.round(x), Math.round(y));
        pointList.add(point);
    }
(4)绘制以白点为起点的折线和占比文字。有个细节需要注意一下,绘制折线和比例文字时,每部分沿线和文字的绘制规则不一样,我是按下面的规则处理的:将圆分为四部分,每块区分显示。
  //折线横向长度
    private int xOffset;
    //折线偏Y方向长度
    private int yOffset;
    private void dealRateText(Canvas canvas, Point point, int position, List<Point> pointList) {
        if (position == 0) {
            lastPoint = pointList.get(0);
        } else {
            lastPoint = pointList.get(position - 1);
        }
        float[] floats = new float[8];
        floats[0] = point.x;
        floats[1] = point.y;
        //右半圆
        if (point.x >= radius + centerPointRadius + (xOffset + yOffset + textRect.width())) {
            mPaint.setTextAlign(Paint.Align.LEFT);
            floats[6] = point.x + xOffset;
            if (point.y <= radius + centerPointRadius + (xOffset + yOffset + textRect.height())) {
                //右上角
                floats[2] = point.x + yOffset;
                floats[3] = point.y - yOffset;
                floats[4] = point.x + yOffset;
                floats[5] = point.y - yOffset;
                floats[7] = point.y - yOffset;
            } else {
                //右下角
                floats[2] = point.x + yOffset;
                floats[3] = point.y + yOffset;
                floats[4] = point.x + yOffset;
                floats[5] = point.y + yOffset;
                floats[7] = point.y + yOffset;
            }
            //左半圆
        } else {
            mPaint.setTextAlign(Paint.Align.RIGHT);
            floats[6] = point.x - xOffset;
            //防止相邻的圆饼绘制的文字重叠显示
            if (point.y <= radius + centerPointRadius) {
                //左上角
                floats[2] = point.x - yOffset;
                floats[3] = point.y - yOffset;
                floats[4] = point.x - yOffset;
                floats[5] = point.y - yOffset;
                floats[7] = point.y - yOffset;
            } else {
                //左下角
                floats[2] = point.x - yOffset;
                floats[3] = point.y + yOffset;
                floats[4] = point.x - yOffset;
                floats[5] = point.y + yOffset;
                floats[7] = point.y + yOffset;
            }
        }
        //根据每块的颜色,绘制对应颜色的折线
//        mPaint.setColor(mRes.getColor(colorList.get(position)));
        mPaint.setColor(ContextCompat.getColor(mContext, R.color.color_b69b4f));
        //画圆饼图每块边上的折线
        canvas.drawLines(floats, mPaint);
        mPaint.setStyle(Paint.Style.STROKE);
        //绘制显示的文字,需要根据类型显示不同的文字
        if (mRateList.size() > 0) {
            //Y轴:+ textRect.height() / 2 ,相对沿线居中显示
            canvas.drawText(getFormatPercentRate(mRateList.get(position) * 100) + "%", floats[6], floats[7] + textRect.height() / 2, mPaint);
        }
    }
完整代码:
package com.example.jojo.learn.customview;
import android.content.Context;
import android.graphics.Canvas;
import android.graphics.Color;
import android.graphics.Paint;
import android.graphics.Path;
import android.graphics.PathMeasure;
import android.graphics.Point;
import android.graphics.Rect;
import android.graphics.RectF;
import android.support.annotation.Nullable;
import android.support.v4.content.ContextCompat;
import android.util.AttributeSet;
import android.view.View;

import com.example.jojo.learn.R;
import com.example.jojo.learn.utils.DP2PX;

import java.text.DecimalFormat;
import java.util.ArrayList;
import java.util.List;

/**
 * Created by JoJo on 2018/8/6.
 * wechat:18510829974
 * description: 饼状图
 */

public class PieView extends View {
    private Context mContext;
    private Paint mPaint;
    //每块占比的绘制的颜色
    private List<Integer> mColorList = new ArrayList<>();
    //圆弧占比的集合
    private List<Float> mRateList = new ArrayList<>();
    //是否展示文字
    private boolean isShowRateText;
    //圆弧半径
    private float radius;
    private int startAngle = 0;
    //不同色块之间是否需要空隙offset
    private int offset = 0;
    //圆弧中心点小圆点的圆心半径
    private int centerPointRadius;
    private float showRateSize;
    private Rect textRect;
    //折线横向长度
    private int xOffset;
    //折线偏Y方向长度
    private int yOffset;
    private float mChangeAngle;
    private boolean isAnimation;
    private int sign = 0;

    public PieView(Context context) {
        this(context, null);
    }

    public PieView(Context context, @Nullable AttributeSet attrs) {
        this(context, attrs, 0);
    }

    public PieView(Context context, @Nullable AttributeSet attrs, int defStyleAttr) {
        super(context, attrs, defStyleAttr);
        mContext = context;

        init();

        initData();
    }

    private void initData() {

        float[] rate = {30f, 40f, 15f, 15f};
        int[] colors = {Color.RED, Color.BLUE, Color.YELLOW, Color.GRAY};
        for (int i = 0; i < rate.length; i++) {
            mRateList.add(rate[i] / 100);
            mColorList.add(colors[i]);
        }

        textRect = new Rect();
        if (mRateList.size() > 0) {
            mPaint.getTextBounds((mRateList.get(0) + "%"), 0, (mRateList.get(0) + "%").length(), textRect);
        }
    }

    private void init() {
        radius = DP2PX.dip2px(mContext, 80);
        centerPointRadius = DP2PX.dip2px(mContext, 2);
        xOffset = DP2PX.dip2px(mContext, 20);
        yOffset = DP2PX.dip2px(mContext, 5);
        showRateSize = DP2PX.dip2px(mContext, 10);

        mPaint = new Paint(Paint.ANTI_ALIAS_FLAG);
        mPaint.setColor(Color.RED);
        mPaint.setAntiAlias(true);
        mPaint.setStyle(Paint.Style.FILL);
        mPaint.setTextSize(showRateSize);

        if (mRateList.size() > 0) {
            textRect = new Rect();
            mPaint.getTextBounds((mRateList.get(0) + "%"), 0, (mRateList.get(0) + "%").length(), textRect);
        }
    }

    @Override
    protected void onMeasure(int widthMeasureSpec, int heightMeasureSpec) {
        super.onMeasure(widthMeasureSpec, heightMeasureSpec);
        int widthMode = MeasureSpec.getMode(widthMeasureSpec);
        int heightMode = MeasureSpec.getMode(heightMeasureSpec);
        int widthSize = MeasureSpec.getSize(widthMeasureSpec);
        int heightSize = MeasureSpec.getSize(heightMeasureSpec);
        if (heightMode == MeasureSpec.AT_MOST) {
            //边沿线和文字所占的长度:(xOffset + yOffset + textRect.width())
            heightSize = (int) (radius * 2) + 2 * centerPointRadius + getPaddingLeft() + getPaddingRight() + (xOffset + yOffset + textRect.height()) * 2;
        }
        if (widthMode == MeasureSpec.AT_MOST) {

            widthSize = (int) (radius * 2) + 2 * centerPointRadius + getPaddingLeft() + getPaddingRight() + (xOffset + yOffset + textRect.width()) * 2;
        }
        //保存测量结果
        setMeasuredDimension(widthSize, heightSize);
    }

    private int paintPosition;

    @Override
    protected void onDraw(Canvas canvas) {
        super.onDraw(canvas);

        //(1)绘制圆饼
        RectF rectF = new RectF(0 + centerPointRadius + (xOffset + yOffset + textRect.width()), 0 + centerPointRadius + (xOffset + yOffset + textRect.height()), 2 * radius + centerPointRadius + (xOffset + yOffset + textRect.width()), 2 * radius + centerPointRadius + (xOffset + yOffset + textRect.height()));
        List<Point> mPointList = new ArrayList<>();

        for (int i = 0; i < mRateList.size(); i++) {
            mPaint.setStyle(Paint.Style.FILL);
            mPaint.setColor(mColorList.get(i));
//            Log.e("TAG", "startAngle=" + startAngle + "--sweepAngle=" + ((int) (mRateList.get(i) * (360)) - offset));
            canvas.drawArc(rectF, startAngle, (int) (mRateList.get(i) * (360)) - offset, true, mPaint);

            //(2)处理每块圆饼弧的中心点,绘制折线,显示对应的文字
            if (isShowRateText) {
                dealPoint(rectF, startAngle, (mRateList.get(i) * 360 - offset) / 2, mPointList);
                Point point = mPointList.get(i);
                mPaint.setColor(Color.WHITE);//点的绘制的颜色
                canvas.drawCircle(point.x, point.y, centerPointRadius, mPaint);
                dealRateText(canvas, point, i, mPointList);
            }
            startAngle = startAngle + (int) (mRateList.get(i) * 360);
        }
        //(3)绘制内部中空的圆
        mPaint.setColor(ContextCompat.getColor(mContext, R.color.color_081638));
        mPaint.setStyle(Paint.Style.FILL);
        canvas.drawCircle(radius + centerPointRadius + (xOffset + yOffset + textRect.width()), radius + centerPointRadius + (xOffset + yOffset + textRect.height()), radius / 1.5f, mPaint);

    }

    private Point lastPoint;

    private void dealRateText(Canvas canvas, Point point, int position, List<Point> pointList) {
        if (position == 0) {
            lastPoint = pointList.get(0);
        } else {
            lastPoint = pointList.get(position - 1);
        }
        float[] floats = new float[8];
        floats[0] = point.x;
        floats[1] = point.y;
        //右半圆
        if (point.x >= radius + centerPointRadius + (xOffset + yOffset + textRect.width())) {
            mPaint.setTextAlign(Paint.Align.LEFT);
            floats[6] = point.x + xOffset;
            //防止相邻的圆饼绘制的文字重叠显示
//            if (lastPoint != null) {
//                int absX = Math.abs(point.x - lastPoint.x);
//                int absY = Math.abs(point.y - lastPoint.y);
//                if (absX > 0 && absX < 20 && absY > 0 && absY < 20) {
//                    floats[6] = point.x + xOffset - textRect.width() / 2;
//                    Log.e("TAG", "右半圆");
//                } else {
//                    floats[6] = point.x + xOffset;
//                }
//            } else {
//                floats[6] = point.x + xOffset;
//            }
            if (point.y <= radius + centerPointRadius + (xOffset + yOffset + textRect.height())) {
                //右上角
                floats[2] = point.x + yOffset;
                floats[3] = point.y - yOffset;
                floats[4] = point.x + yOffset;
                floats[5] = point.y - yOffset;
                floats[7] = point.y - yOffset;
            } else {
                //右下角
                floats[2] = point.x + yOffset;
                floats[3] = point.y + yOffset;
                floats[4] = point.x + yOffset;
                floats[5] = point.y + yOffset;
                floats[7] = point.y + yOffset;
            }
            //左半圆
        } else {
            mPaint.setTextAlign(Paint.Align.RIGHT);
            floats[6] = point.x - xOffset;
            //防止相邻的圆饼绘制的文字重叠显示
//            if (lastPoint != null) {
//                int absX = Math.abs(point.x - lastPoint.x);
//                int absY = Math.abs(point.y - lastPoint.y);
//                if (absX > 0 && absX < 20 && absY > 0 && absY < 20) {
//                    floats[6] = point.x - xOffset - textRect.width() / 2;
//                    Log.e("TAG", "左半圆");
//                } else {
//                    floats[6] = point.x - xOffset;
//                }
//            } else {
//                floats[6] = point.x - xOffset;
//            }
            if (point.y <= radius + centerPointRadius) {
                //左上角
                floats[2] = point.x - yOffset;
                floats[3] = point.y - yOffset;
                floats[4] = point.x - yOffset;
                floats[5] = point.y - yOffset;
                floats[7] = point.y - yOffset;
            } else {
                //左下角
                floats[2] = point.x - yOffset;
                floats[3] = point.y + yOffset;
                floats[4] = point.x - yOffset;
                floats[5] = point.y + yOffset;
                floats[7] = point.y + yOffset;
            }
        }
        //根据每块的颜色,绘制对应颜色的折线
//        mPaint.setColor(mRes.getColor(colorList.get(position)));
        mPaint.setColor(ContextCompat.getColor(mContext, R.color.color_b69b4f));
        //画圆饼图每块边上的折线
        canvas.drawLines(floats, mPaint);
        mPaint.setStyle(Paint.Style.STROKE);
        //绘制显示的文字,需要根据类型显示不同的文字
        if (mRateList.size() > 0) {
            //Y轴:+ textRect.height() / 2 ,相对沿线居中显示
            canvas.drawText(getFormatPercentRate(mRateList.get(position) * 100) + "%", floats[6], floats[7] + textRect.height() / 2, mPaint);
        }
    }

    private void dealPoint(RectF rectF, float startAngle, float endAngle, List<Point> pointList) {
        Path path = new Path();
        //通过Path类画一个90度(180—270)的内切圆弧路径
        path.addArc(rectF, startAngle, endAngle);

        PathMeasure measure = new PathMeasure(path, false);
//        Log.e("路径的测量长度:", "" + measure.getLength());

        float[] coords = new float[]{0f, 0f};
        //利用PathMeasure分别测量出各个点的坐标值coords
        int divisor = 1;
        measure.getPosTan(measure.getLength() / divisor, coords, null);
//        Log.e("coords:", "x轴:" + coords[0] + " -- y轴:" + coords[1]);
        float x = coords[0];
        float y = coords[1];
        Point point = new Point(Math.round(x), Math.round(y));
        pointList.add(point);
    }

    public void updateDate(List<Float> rateList, List<Integer> colorList, boolean isShowRateText) {
        this.isShowRateText = isShowRateText;
        this.mRateList = rateList;
        this.mColorList = colorList;
        init();
        invalidate();
    }

    /**
     * 获取格式化的保留两位数的数
     */
    public String getFormatPercentRate(float dataValue) {
        DecimalFormat decimalFormat = new DecimalFormat(".00");//构造方法的字符格式这里如果小数不足2位,会以0补足.
        return decimalFormat.format(dataValue);
    }


}